
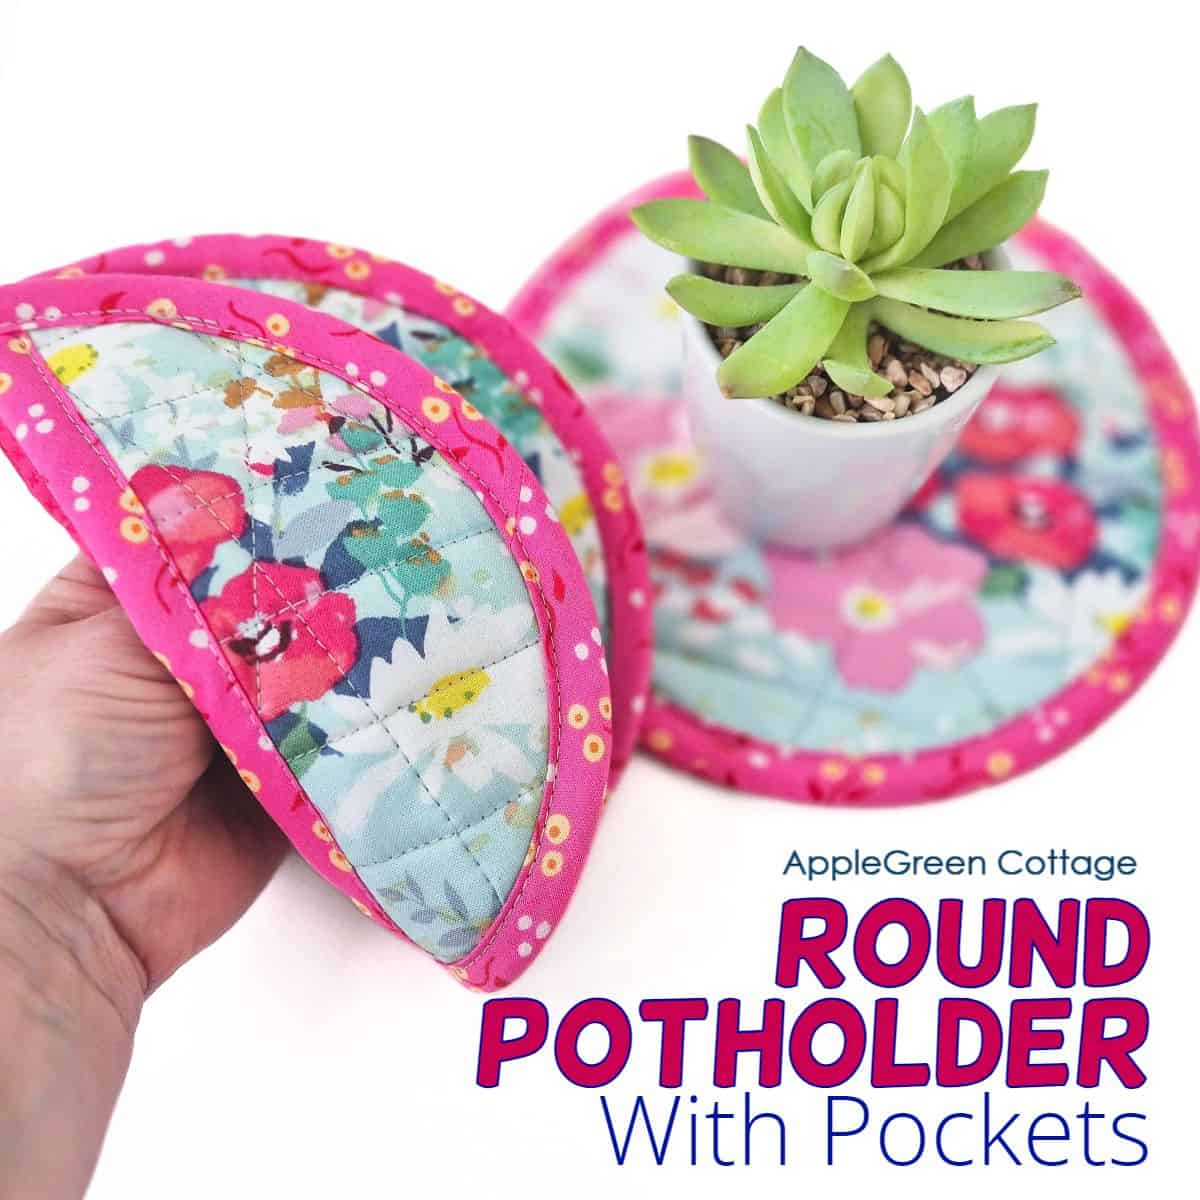
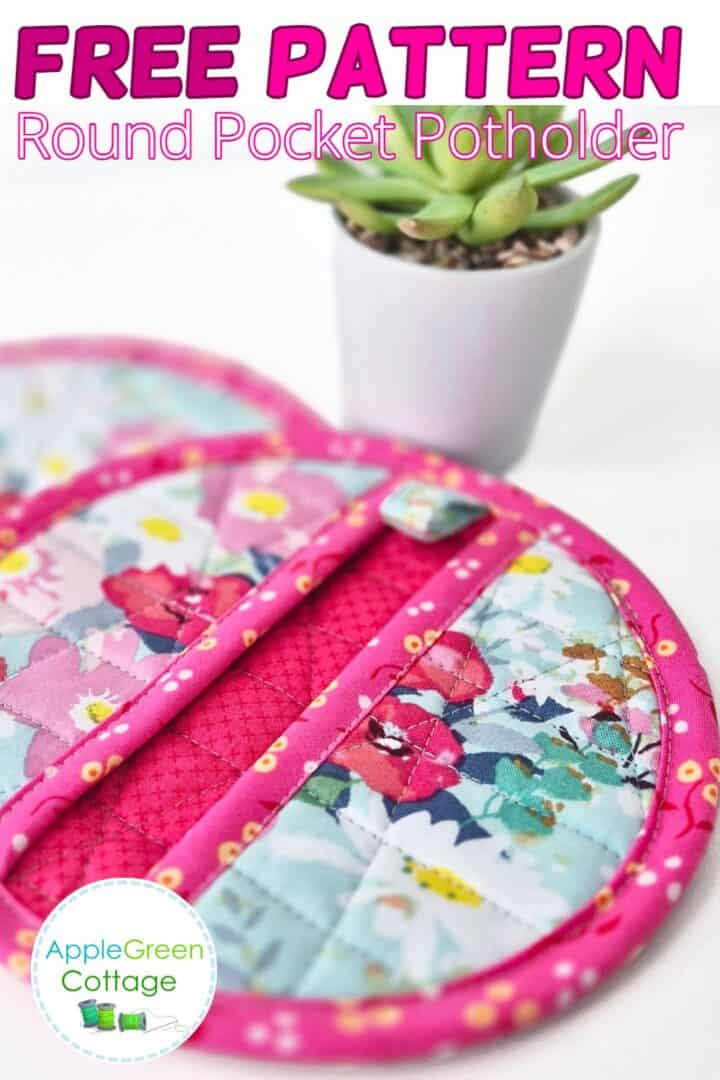
See how to sew a round potholder with our free round potholder sewing pattern in 2 sizes. It's got pockets!
If your kitchen needs a quick refresh, this double pocket potholder is quick and it keeps your kitchen looking neat. Plus, this easy sewing project is perfect for gift sewing! Get the free pattern and make a set - 2 sizes, 2 designs, and 2 tutorials below!
Want the printable PDF version without scrolling through the post? See the → optional PDF file in our shop.

This tutorial is also part of Printable Tutorials BUNDLE
100 PDF tutorials now, and growing!
Table Of Contents
- Why You'll Love This Round Potholder Pattern
- Sewing Video
- Supplies
- What size is this potholder pattern?
- TUTORIAL 1 - How to make a round potholder with pockets
- TUTORIAL 2 - How to make an easy round potholder
- Make a Matching Oven Mitt!
- Questions Answered
- Related Ideas
- Want a printable copy of the whole tutorial?
Why You'll Love This Round Potholder Pattern
Made to use, not just admire:
- 2 sizes - choose the one that fits your kitchen best
- Pocket or no-pocket - add pockets for extra grip, or keep it simple
- Quick - and scrap-friendly
- Giftable - great for kitchen sets and quick gifts
Plus, two designs, customize it to your space! Are you here to sew for home? Check out my best free home sewing projects.
Sewing Video
Here's my potholder video tutorial for the basic version of this pattern.
(Don't see the video? Disable your ad blocker.)
Supplies
Shop my personal favorite sewing supplies on Amazon HERE.
- two 9" x 18" pieces of quilting cotton (9" square for the no-pocket option)
- a 4" x 2"scrap of fabric
- same size piece of Insul-Bright*
- see bias tape tutorial to make a yard of ½" double-fold bias tape
- sewing machine
- needle, iron, pins or clips
- scissors or rotary cutter and a cutting mat
- free pattern in 2 sizes
*You can add another layer of Insul-Bright or batting for better heat protection.
What size is this potholder pattern?
This pattern includes 2 sizes - finished potholders measure about 7" and 8" across, so you can choose the size that fits your needs best.
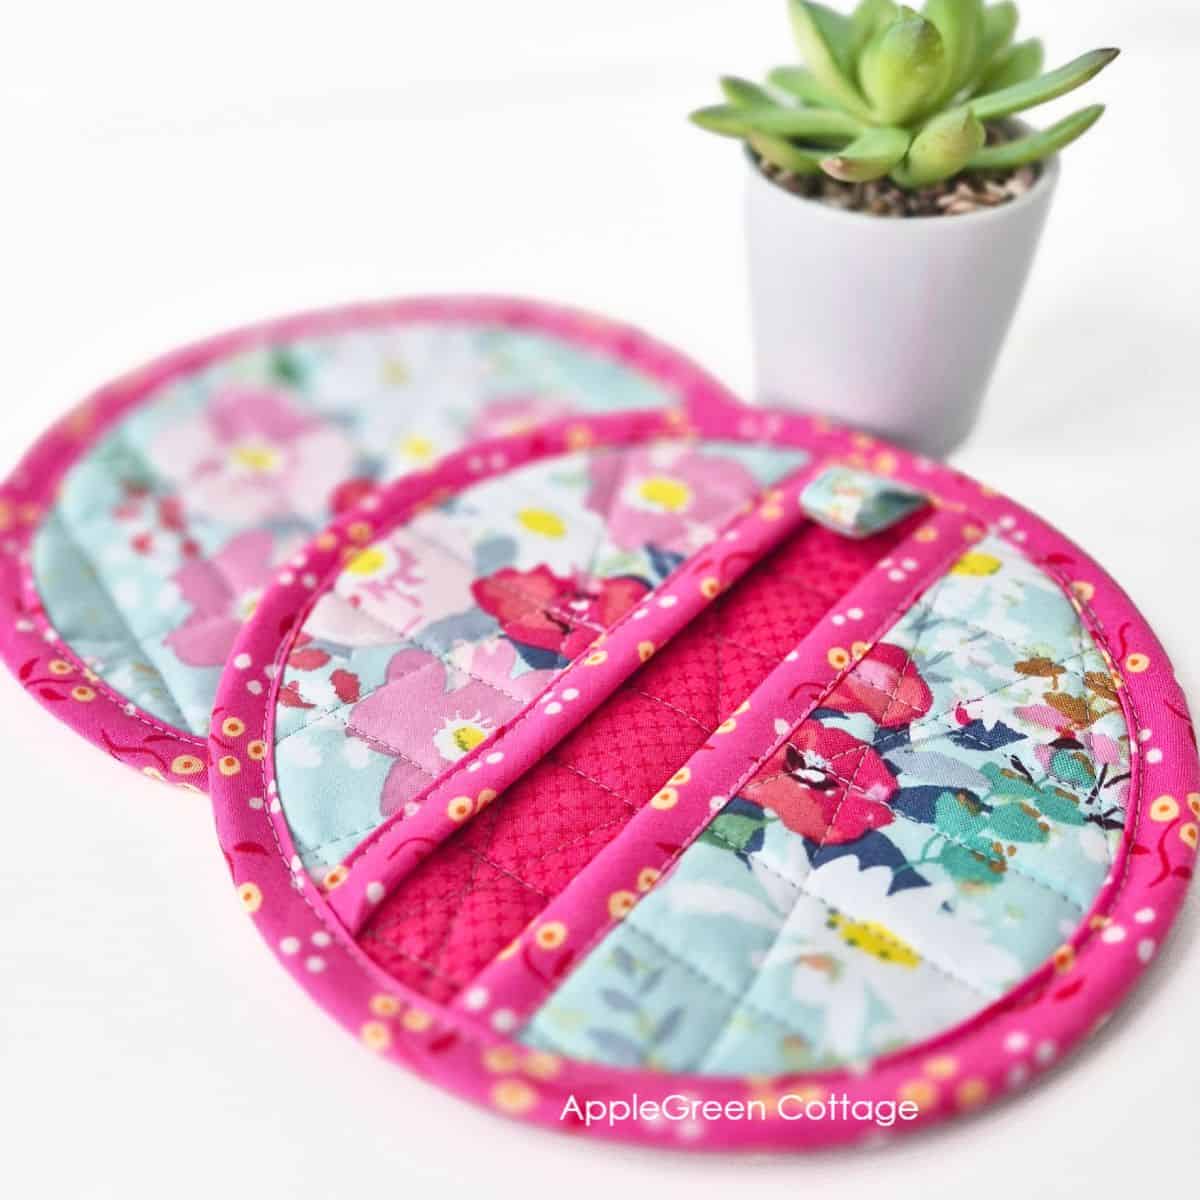
TUTORIAL 1 - How to make a round potholder with pockets
Step 1 - Get the free pattern
Join our mailing list and get the pattern emailed to you:
Prefer an ad-free printer-friendly option of the whole tutorial+pattern? See the → optional PDF file in our shop.
How To Print this PDF file
For best results, download the PDF to a desktop or laptop, open it in Adobe Reader, and print at 100% size. (I recommend not printing directly from a browser window or from mobile, it could cause issues.)
Step 2 - Choose And Cut Fabric
Select your fabric. Large-scale prints, small prints, toss- or gridded, blenders and solids work wonderfully. You can also use scraps or orphan quilt blocks.
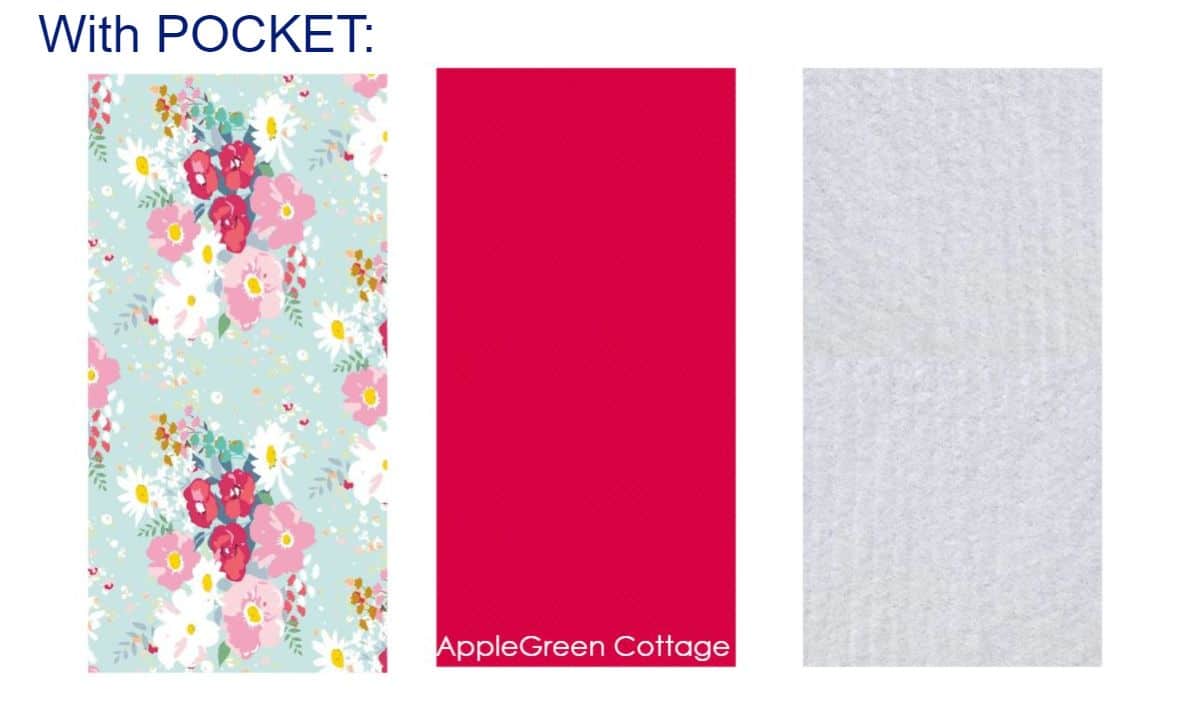
Cutting Directions for sewing a potholder with pockets:
- from quilting cotton, cut two 9" x 18" rectangles (8" x 16" for small size)
- from Insul-Bright, cut one rectangle same size
- see bias tape tutorial to make a yard of ½" double-fold bias tape (that is, strips cut into 2", folded twice).
- For the hanging loop, cut pattern piece No 2 from quilting cotton
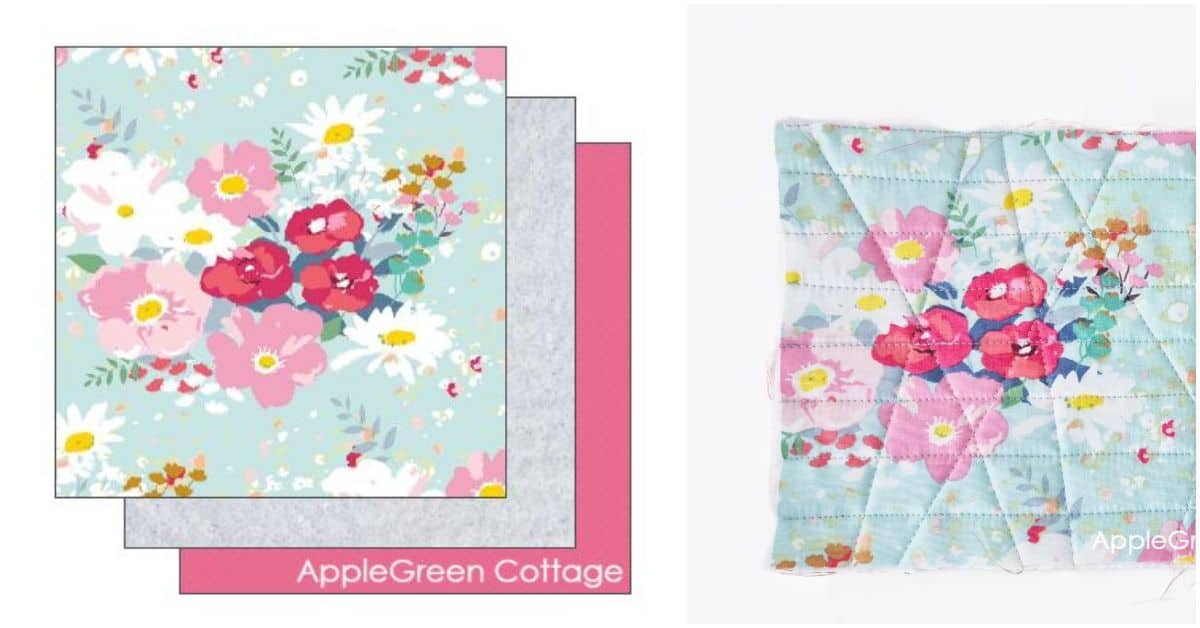
Step 3 - Quilt
Place your backing fabric with the right side facing down. Put Insul-Bright on top of it, and cover with the other fabric piece right side facing up.
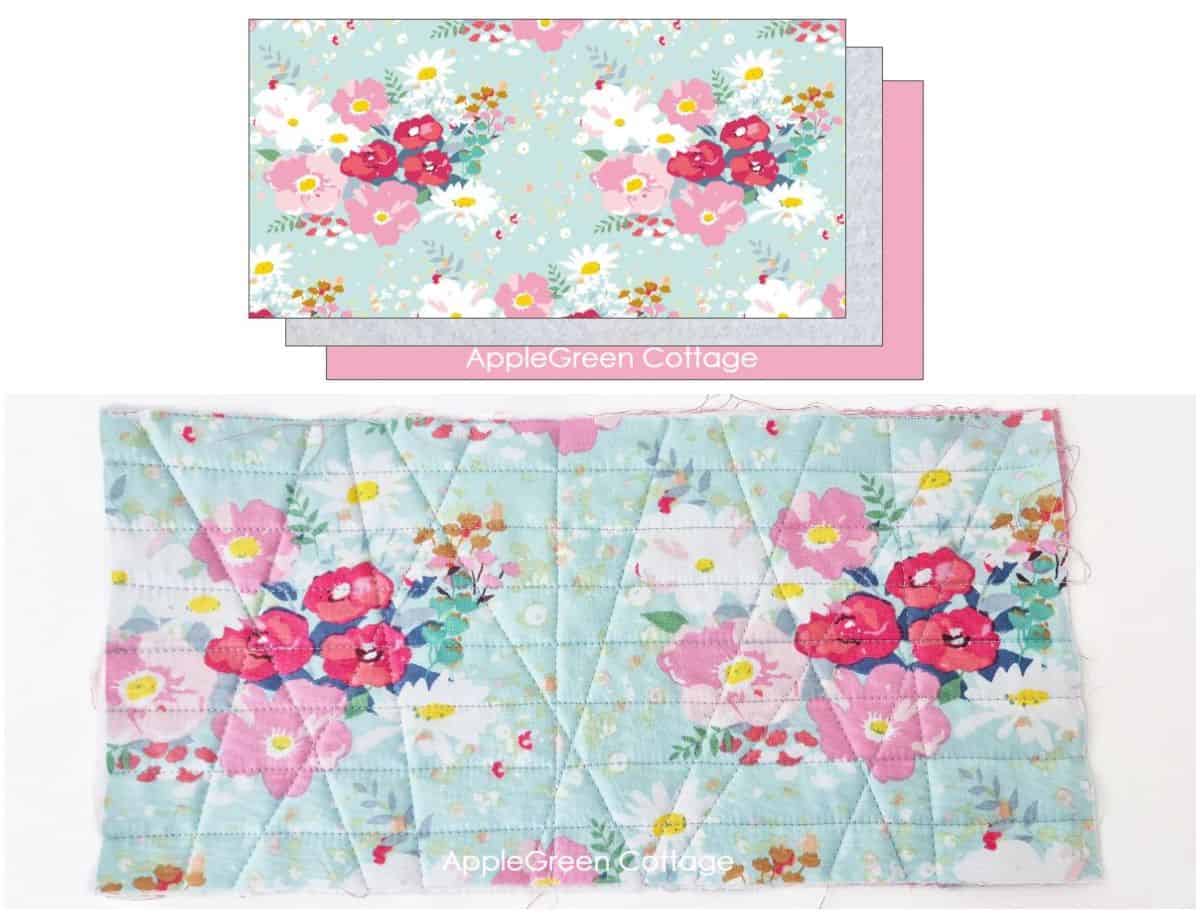
Pin or spray-baste layers to prevent the layers from sliding, and quilt. The easiest way is to stitch a few straight lines, here are my favorite straight line quilting designs.
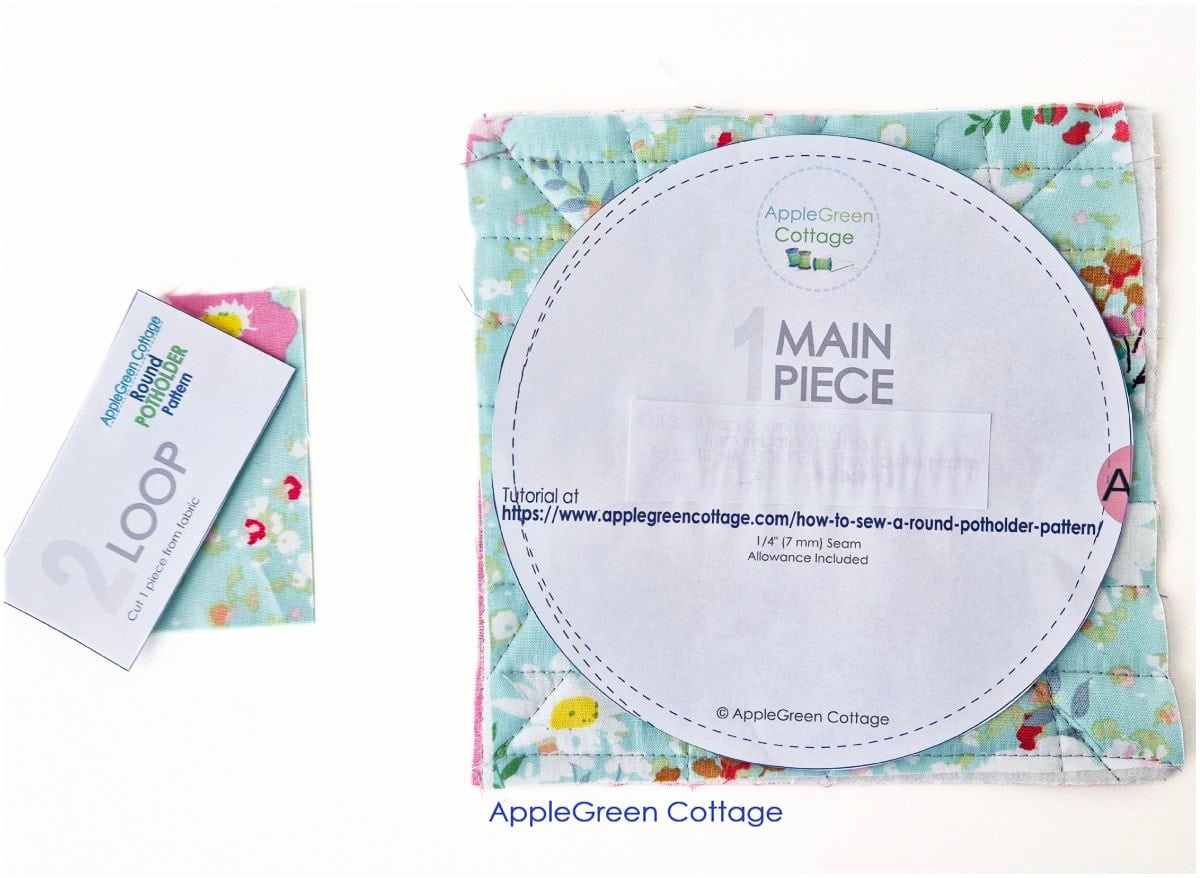
Step 4 - Cut pattern pieces
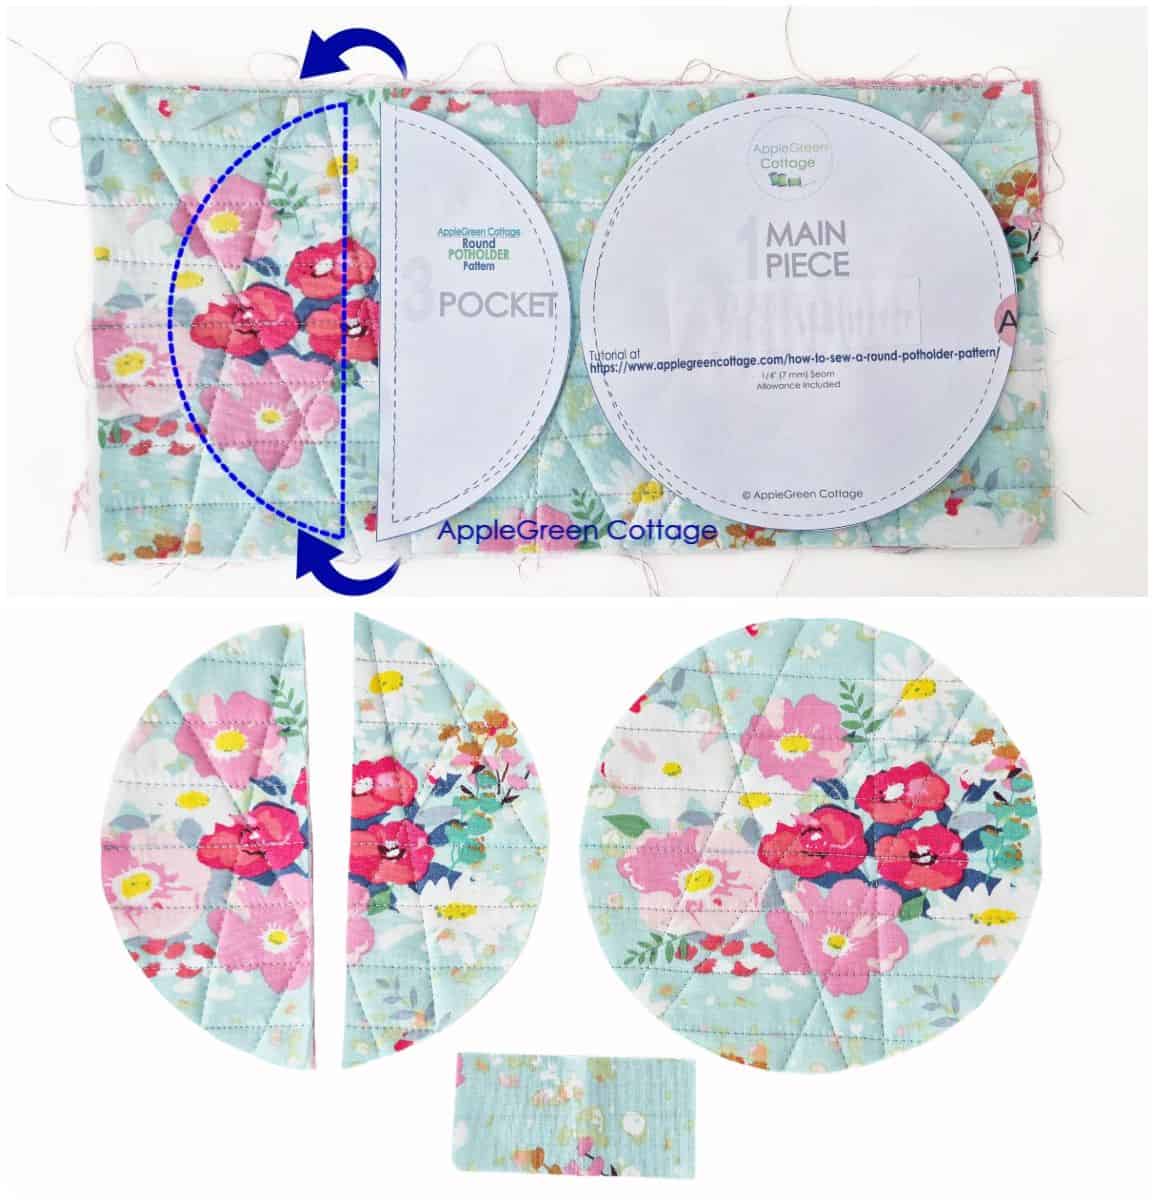
- From the quilt sandwich, cut one circle from pattern piece No 1.
- Cut two pocket pieces (pattern piece No 3) too. Cut the pieces mirrored if you have a directional print.
- For the hanging loop, cut pattern piece No 2 from quilting cotton.
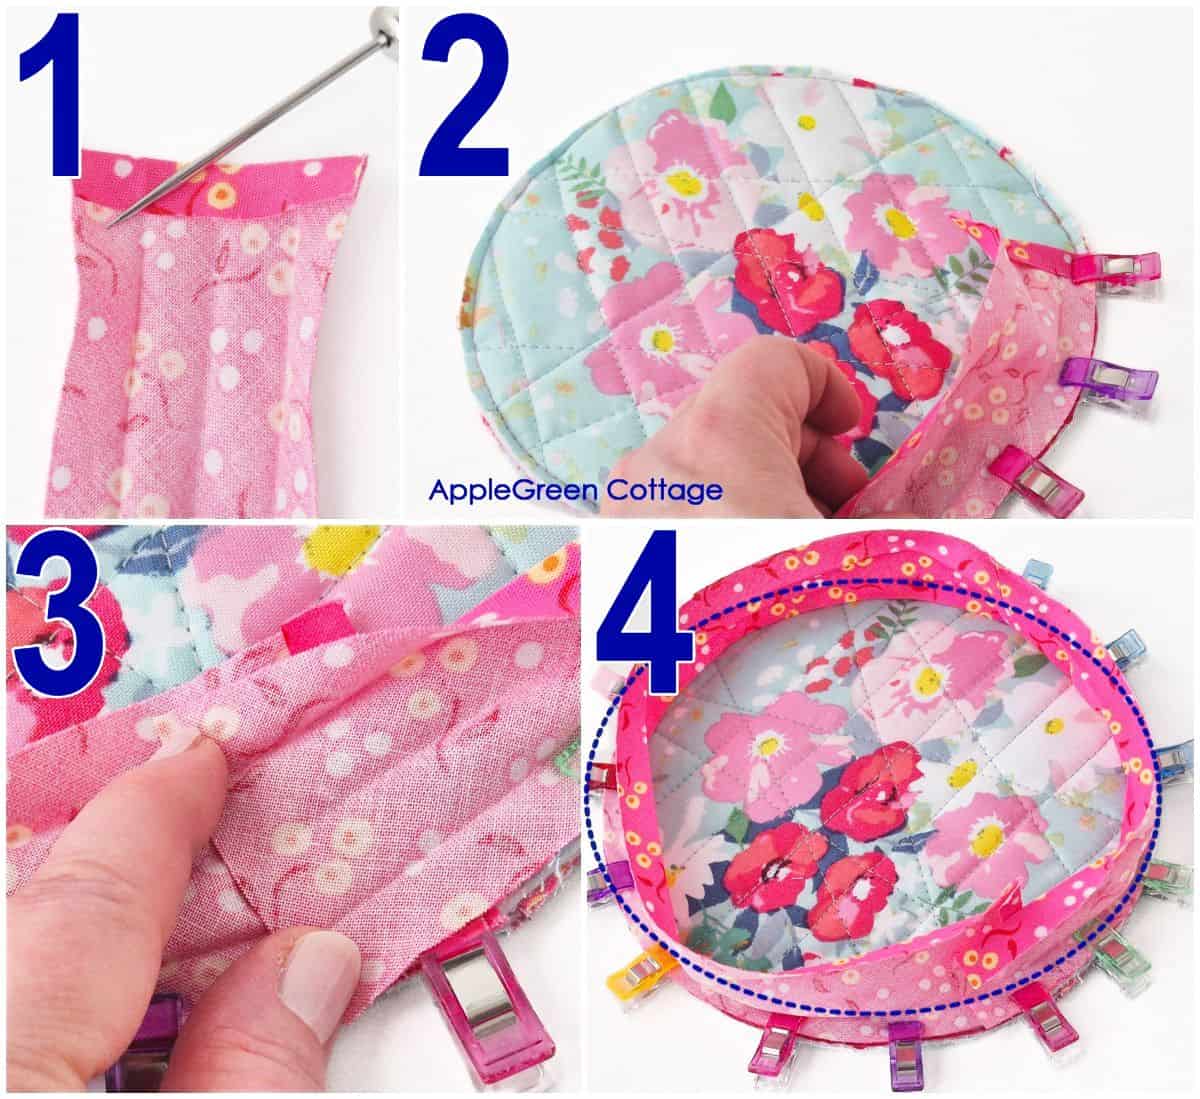
Step 5 - Create pockets
1 - Take the two pocket pieces and decide which will be the front side. My front is the floral. Cut two 8" or 9"-long pieces of bias tape.
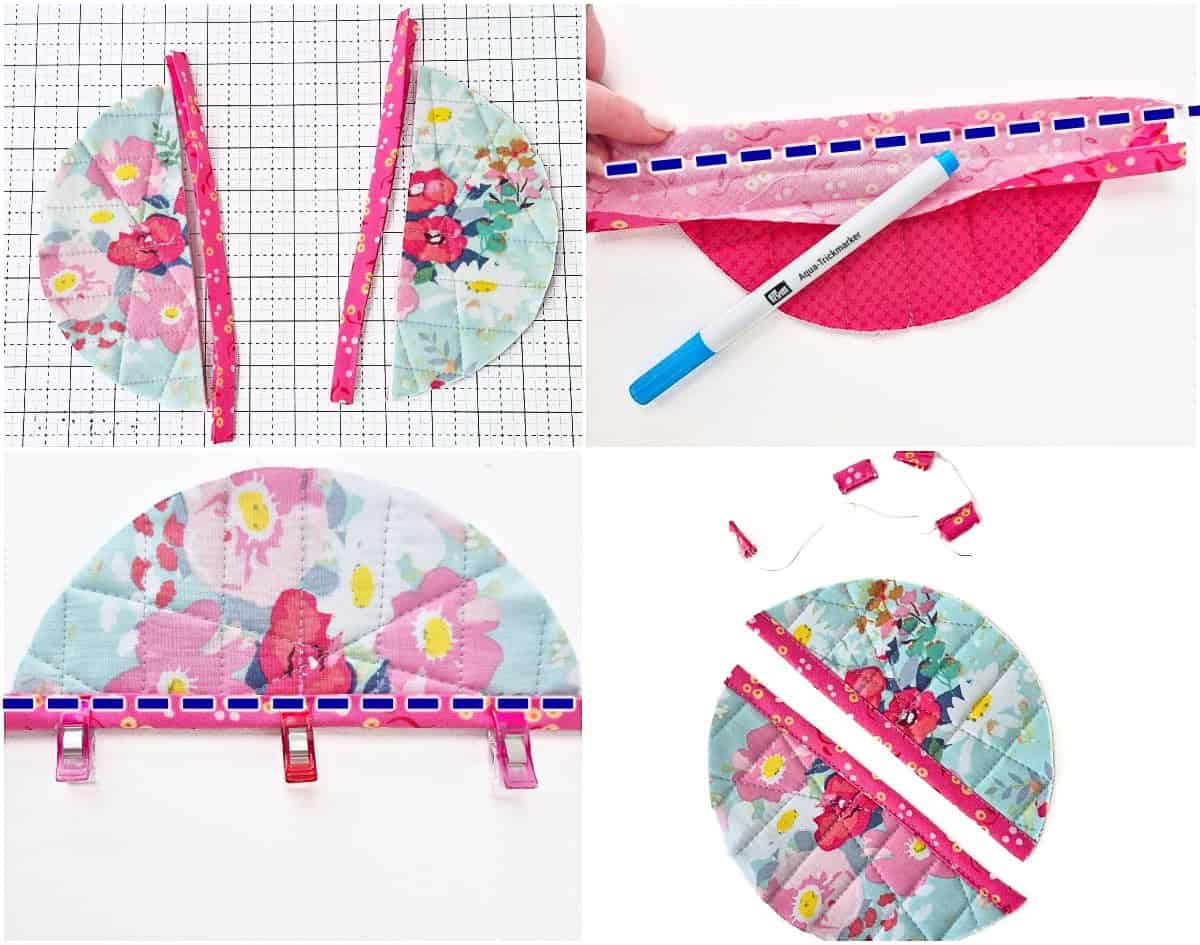
2 - Add bias tape (or straight-grain quilt binding if you prefer that) to the straight edges:
- Open the bias tape and place it along the straight edge, right sides together.
- Clip in place. Sew along the first fold line, keeping edges aligned.
- Fold the tape over the edge to the front and clip again.
- Topstitch close to the folded edge to finish neatly.
- Cut off any excess tape.
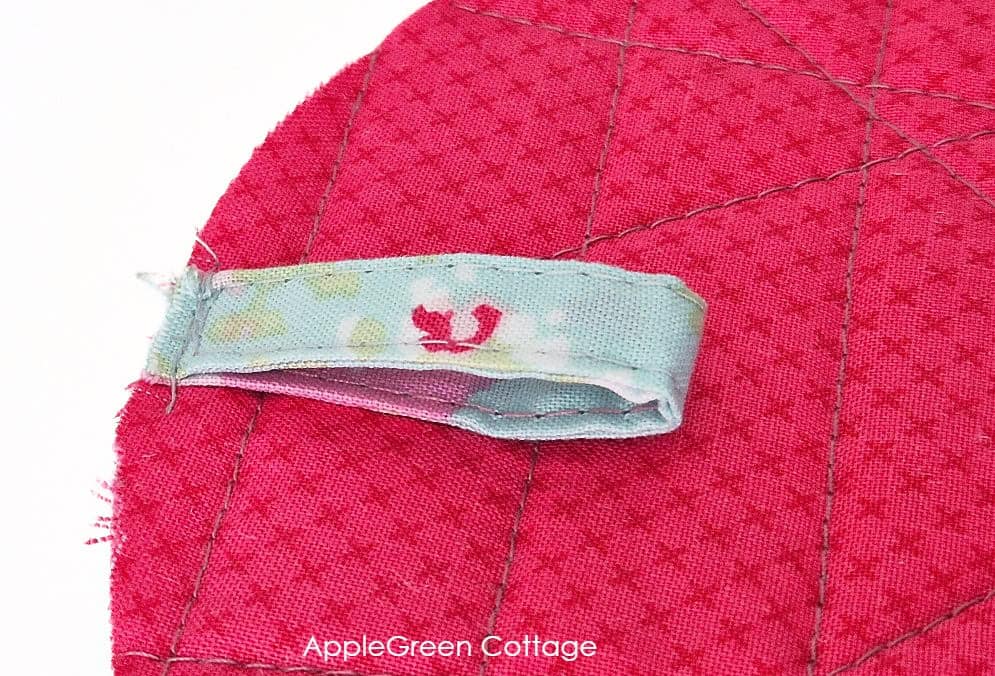
Step 6 - Create a hanging loop
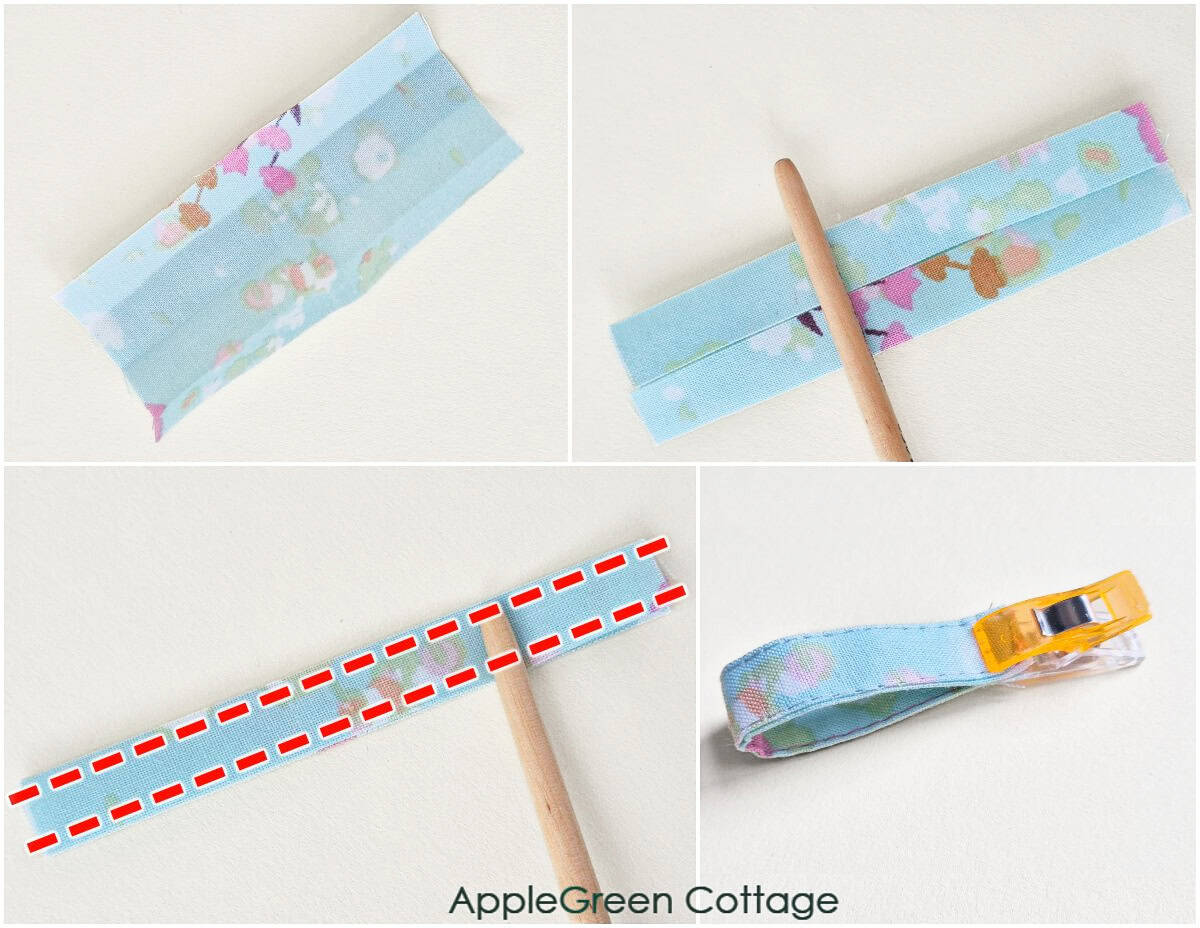
Using Pattern Piece No 2,
- fold the two long raw edges towards the center towards the wrong side, then
- fold along the center too. Press. You have 4 layers now.
- Edgestitch along both long edges.
- Fold in half and clip.
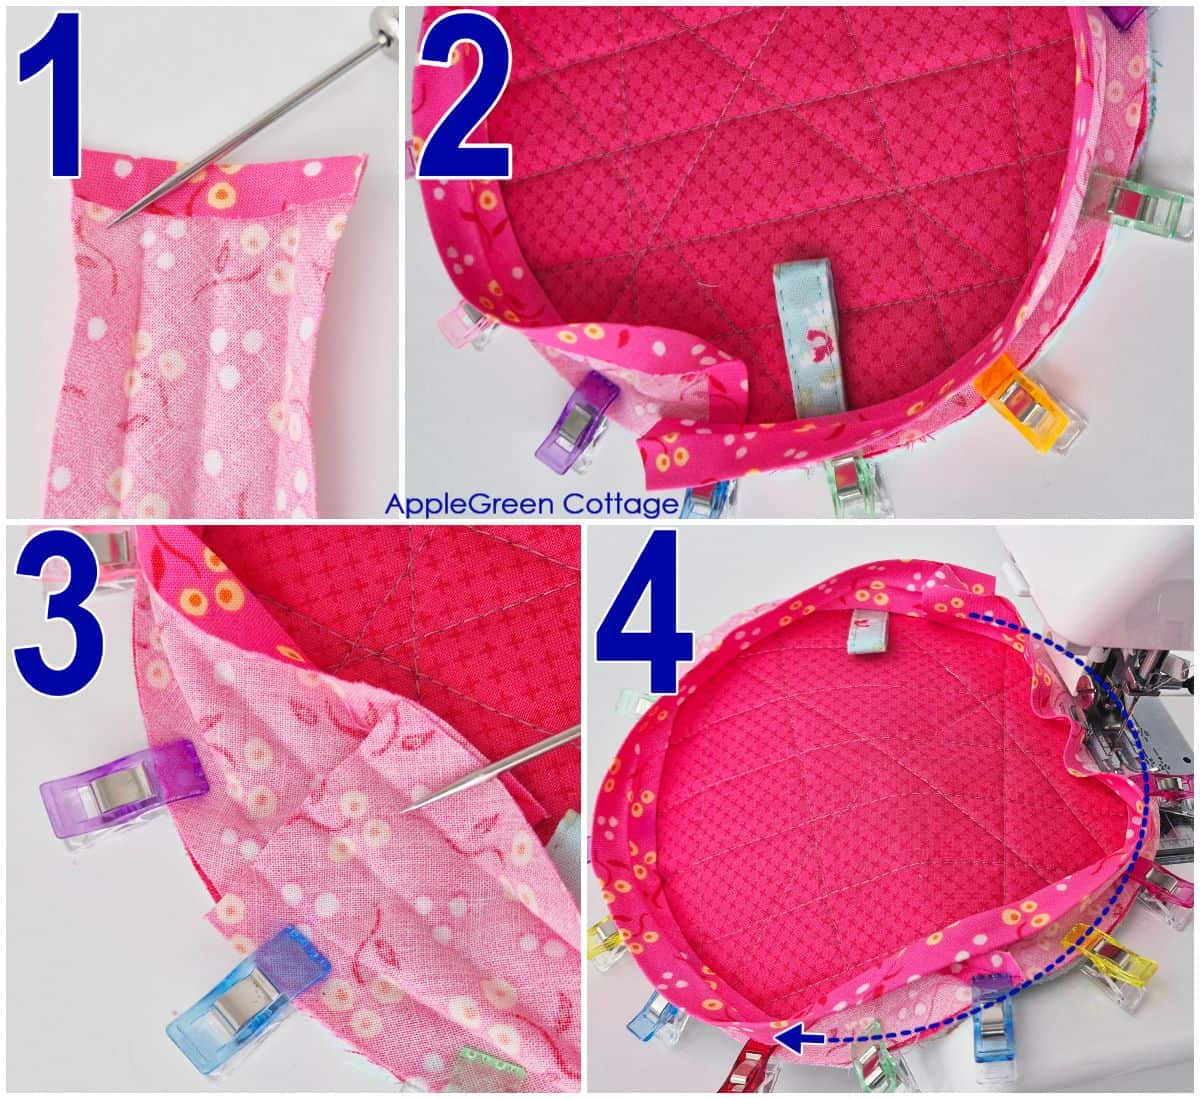
Step 7 - Assemble the pieces
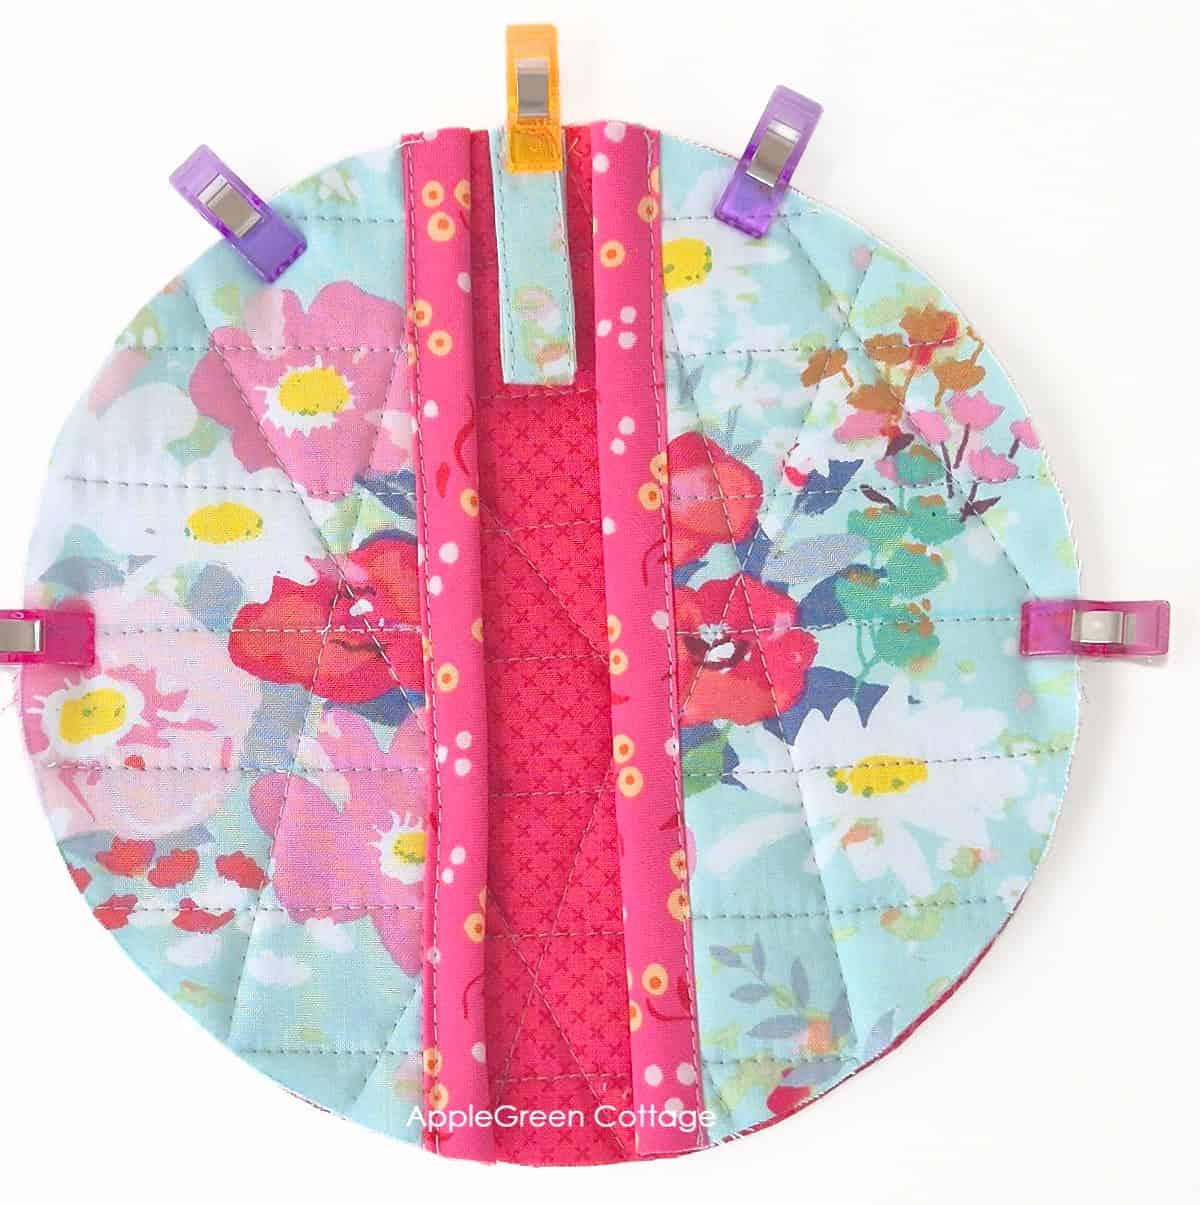
- Turn the main piece with the back side facing you (here: pink).
- Clip the two pockets to the sides of the main piece, with raw edges aligned.
- Clip the hanging loop to the top of your potholder, with the fold facing the center, and the raw edges on the outside.
- Baste around with a ⅛" seam allowance to fix the pieces.
- If you want to flatten the edge, you can sew around again, using a zigzag stitch.
NOTE: I added the hanging loop to the front, just between the pockets. If you prefer, you can attach it to the back.
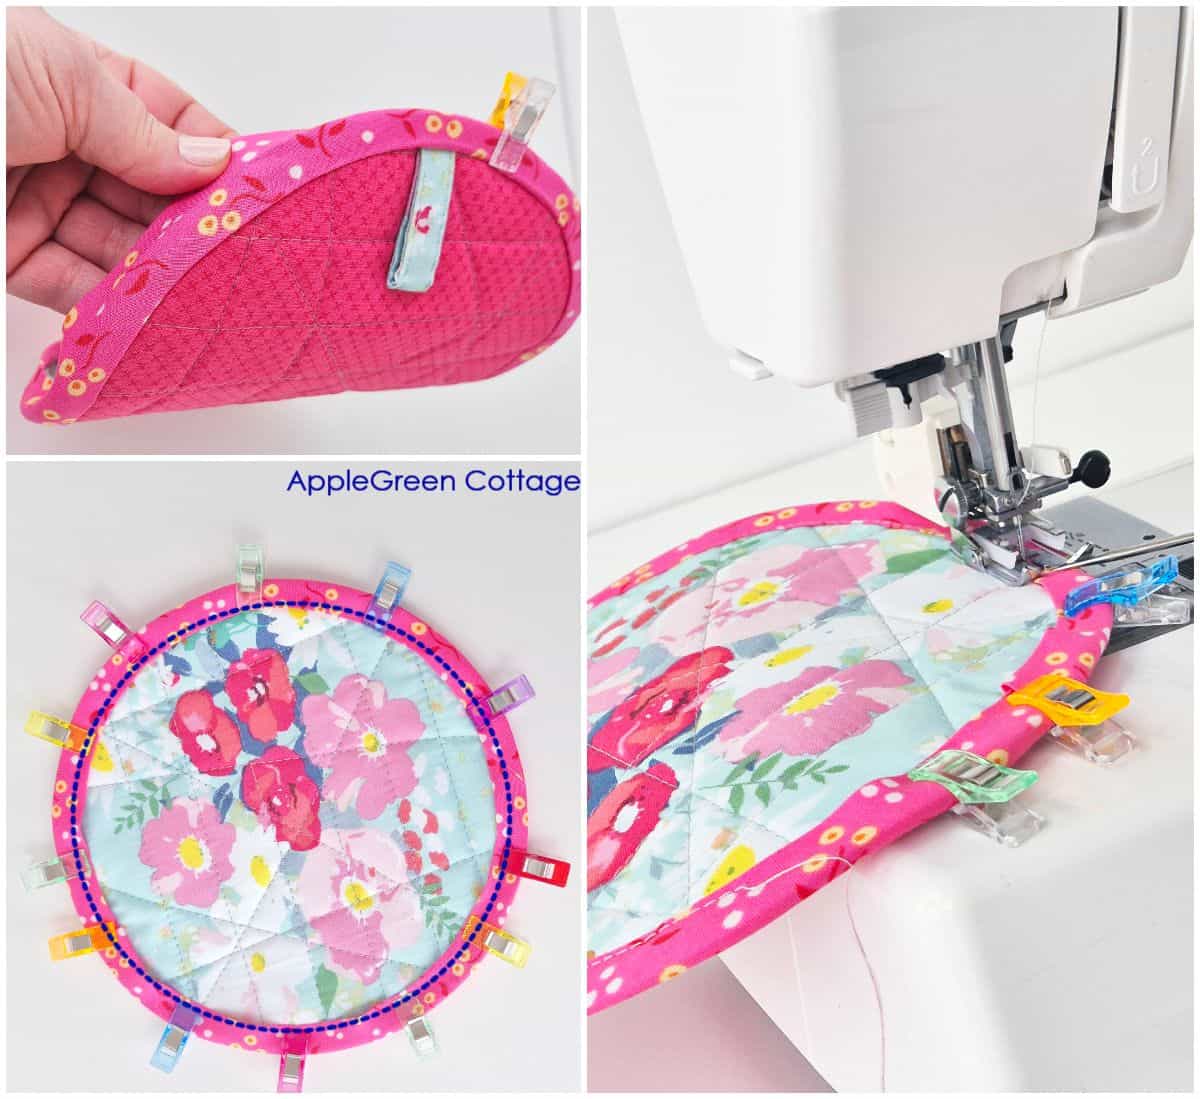
Step 8 - Add Bias Tape
New to sewing bias tape? Use this bias tape sewing tutorial for more helpful tips.
- Fold back ⅜" of the bias tape to the wrong side and press, then start attaching it to the BACK side of the potholder.
- Clip the bias tape all the way around, with the raw edges aligned.
- End with a 1" overlap at the starting point.
- Sew along the first fold line of the bias tape.
And now, the other side:
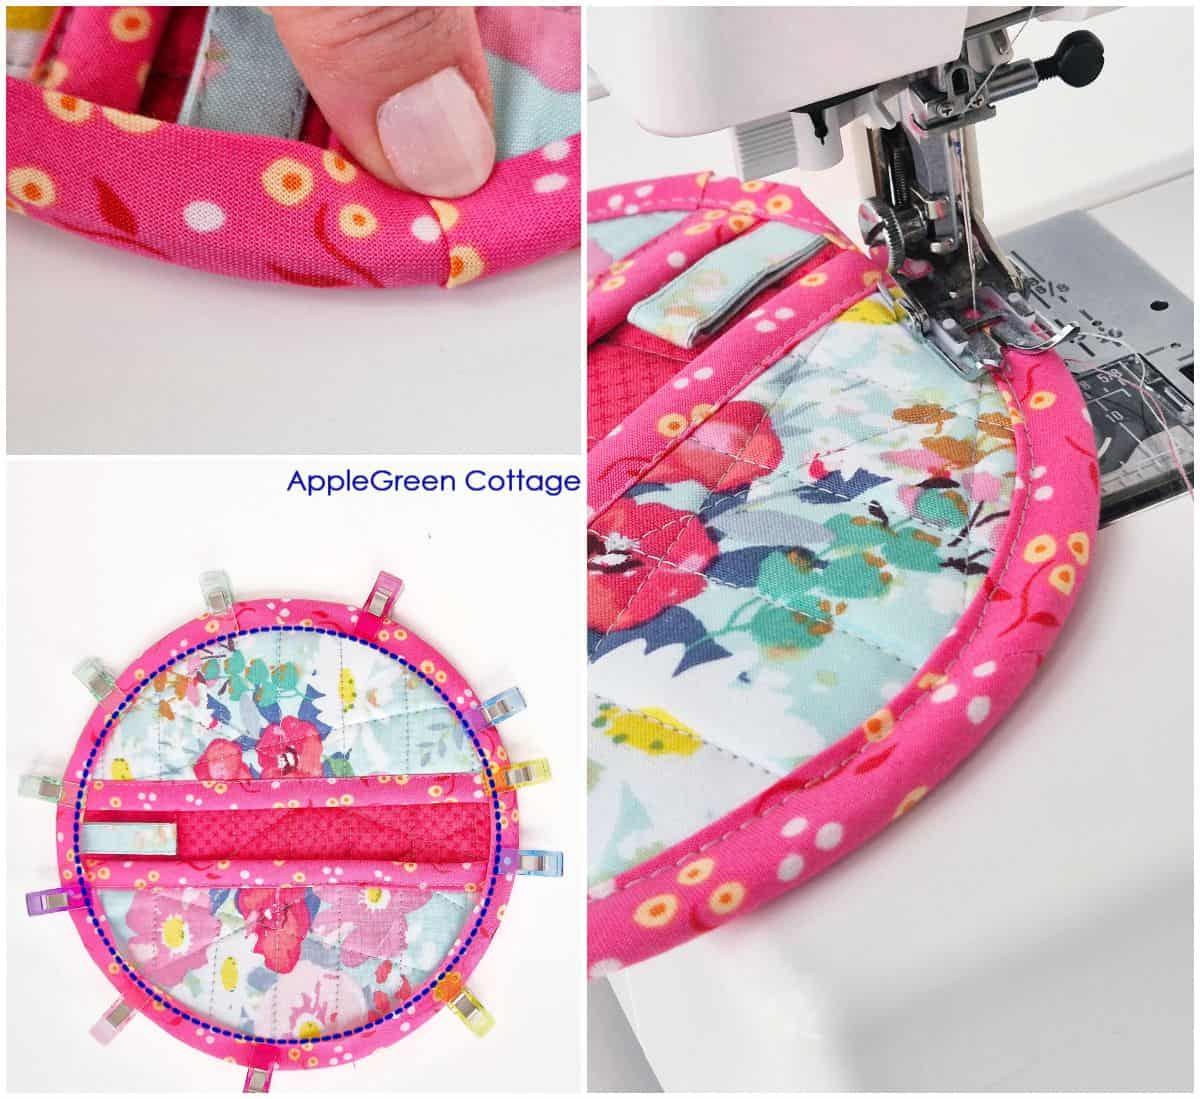
With the right side of the potholder facing you, bring the folded edge to lay just over the previous stitch line. Sew along the inner folded edge to secure it neatly, about ⅛″ from the edge.
Done, congrats! Now, how to make a basic circle potholder without pockets:
TUTORIAL 2 - How to make an easy round potholder
Step 1 - Download the free pattern
Join our mailing list and get the pattern emailed to you:
Prefer an ad-free printer-friendly option of the whole tutorial+pattern? See the → optional PDF file in our shop.
How To Print this PDF file
For best results, download the PDF to a desktop or laptop, open it in Adobe Reader, and print at 100% size. (I recommend not printing directly from a browser window or from mobile, it could cause issues.)
Step 2 - Choose And Cut Fabric
Select your fabric. Large-scale prints, small prints, toss- or gridded, blenders and solids work wonderfully. You can also use scraps or orphan quilt blocks.

Cutting Directions for sewing a potholder without pockets:
- from quilting cotton, cut two 9" squares (8" for small size)
- from Insul-Bright, cut one square same size
- see bias tape tutorial to make 30" of ½" double-fold bias tape (that is, strips cut into 2", folded twice).
- For the hanging loop, cut pattern piece No 2 from quilting cotton
Step 3 - Quilt
Place your backing fabric with the right side facing down. Put Insulbright on top of it, and cover with the other fabric piece right side facing up.
Pin or spray-baste layers to prevent the layers from sliding, and quilt. The easiest way is to stitch a few straight lines, here are my favorite straight line quilting designs.
TIP: If you're new to quilting, here's a tutorial on how to make a quilt sandwich and how to quilt it.
Step 4 - Cut pattern pieces
From the quilt sandwich, cut one circle from pattern piece No 1. For the hanging loop, cut pattern piece No 2 from quilting cotton.
Step 5 - Create a hanging loop
Using the Pattern Piece No 2,
- fold the two long raw edges towards the center with the wrong sides together, then
- fold along the center too, to get 4 layers. Press.
- Edgestitch along both long edges.
- Fold in half and clip.
Step 6 - Attach the loop
- Turn the main piece with the back side facing you (here: pink).
- Baste the hanging loop to the top of your potholder, with the fold facing the center, and the raw edges on the outside.
- To flatten the edge, you can baste around with a ⅛" seam allowance; you can also use a zigzag stitch.
Step 7 - Add Bias Tape
New to sewing bias tape? Use this bias tape sewing tutorial for more helpful tips.
Turn the main piece with the back side facing you (here: pink).
- Fold back ⅜" of the bias tape to the wrong side and press, then start attaching it to the BACK side of the potholder.
- Clip the bias tape all the way around, with the raw edges aligned.
- End with a 1" overlap at the starting point.
- Sew along the first fold line of the bias tape.
And now, the other side:
With the right side of the potholder facing you, bring the folded edge to lay just over the previous stitch line. Sew along the inner folded edge to secure it neatly, about ⅛″ from the edge.
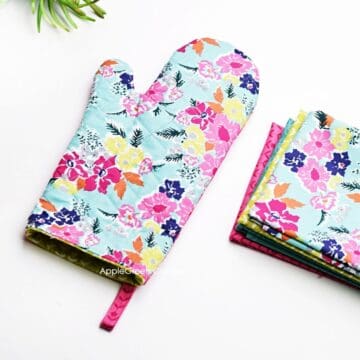
Make a Matching Oven Mitt!

+Free Oven Mitt Pattern!
Use matching fabric and create this cute oven mitt - 2 sizes, no binding!
Questions Answered
One layer is usually enough. For extra heat protection, you can add a second layer or combine with cotton batting. I used 2 layers in my square potholder pattern.
While on side of Insul-Bright will show a bit more of that insulating layer and appears a bit more shiny, both sides work the same. Just place it between your fabric layers and sew as usual.
Cotton batting or Insul-Bright are best. You can use both together for structure and heat resistance.
About 7"-9" works well for most hands. My free potholder pattern includes 2 sizes so you can pick what fits you best.
Related Ideas
Looking for more easy sewing projects like this one? Try these:


Conclusion
That's it - your round potholder is ready to use, hang, gift, or bundle with other kitchen sewing projects. If you loved this project, browse my other free home sewing patterns and kitchen tutorials for more quick, practical makes you'll actually use.
Sew This Handy Storage Tote!
Check out this pretty ALLina project tote pattern in our shop - for all your storage needs!
As always, I'd love to see if you've made a project using this tutorial. Please post a picture to Instagram and tag me @applegreencottage or #applegreencottage - so I can take a look!
Want a printable copy of the whole tutorial?
Prefer a full, ad-free and printer-optimized Printable Tutorial with both instructions AND pattern included? ↓↓
This tutorial is also part of Printable Tutorials BUNDLE
100 PDF tutorials now, and growing!

Join the FREE 7-part email course and make 6 beautiful items for your home! You'll love it!


Leave a Reply