
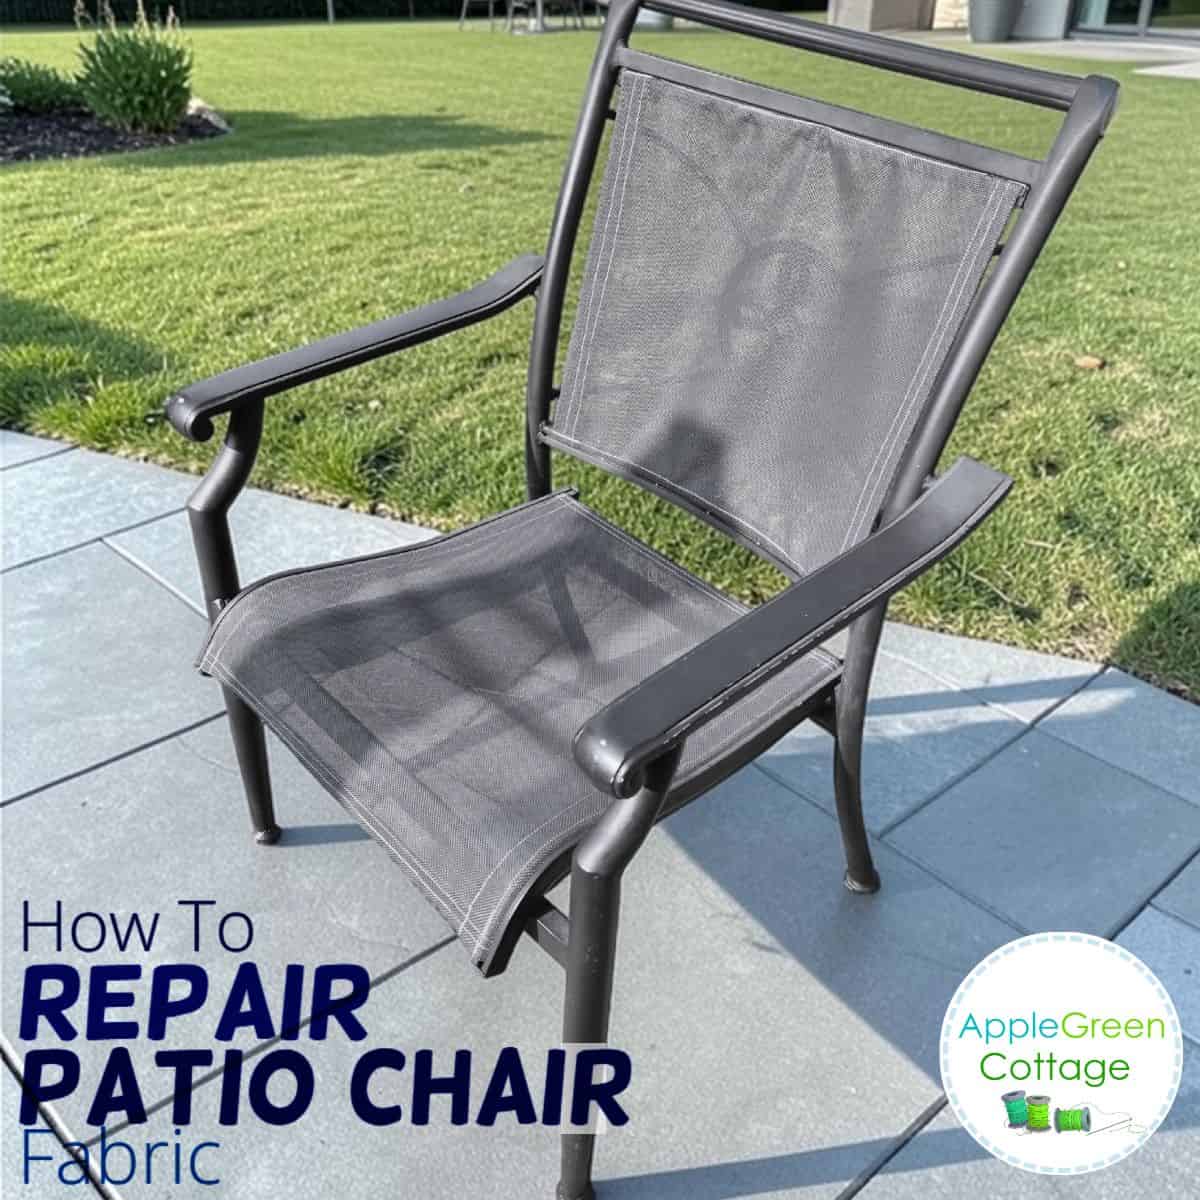
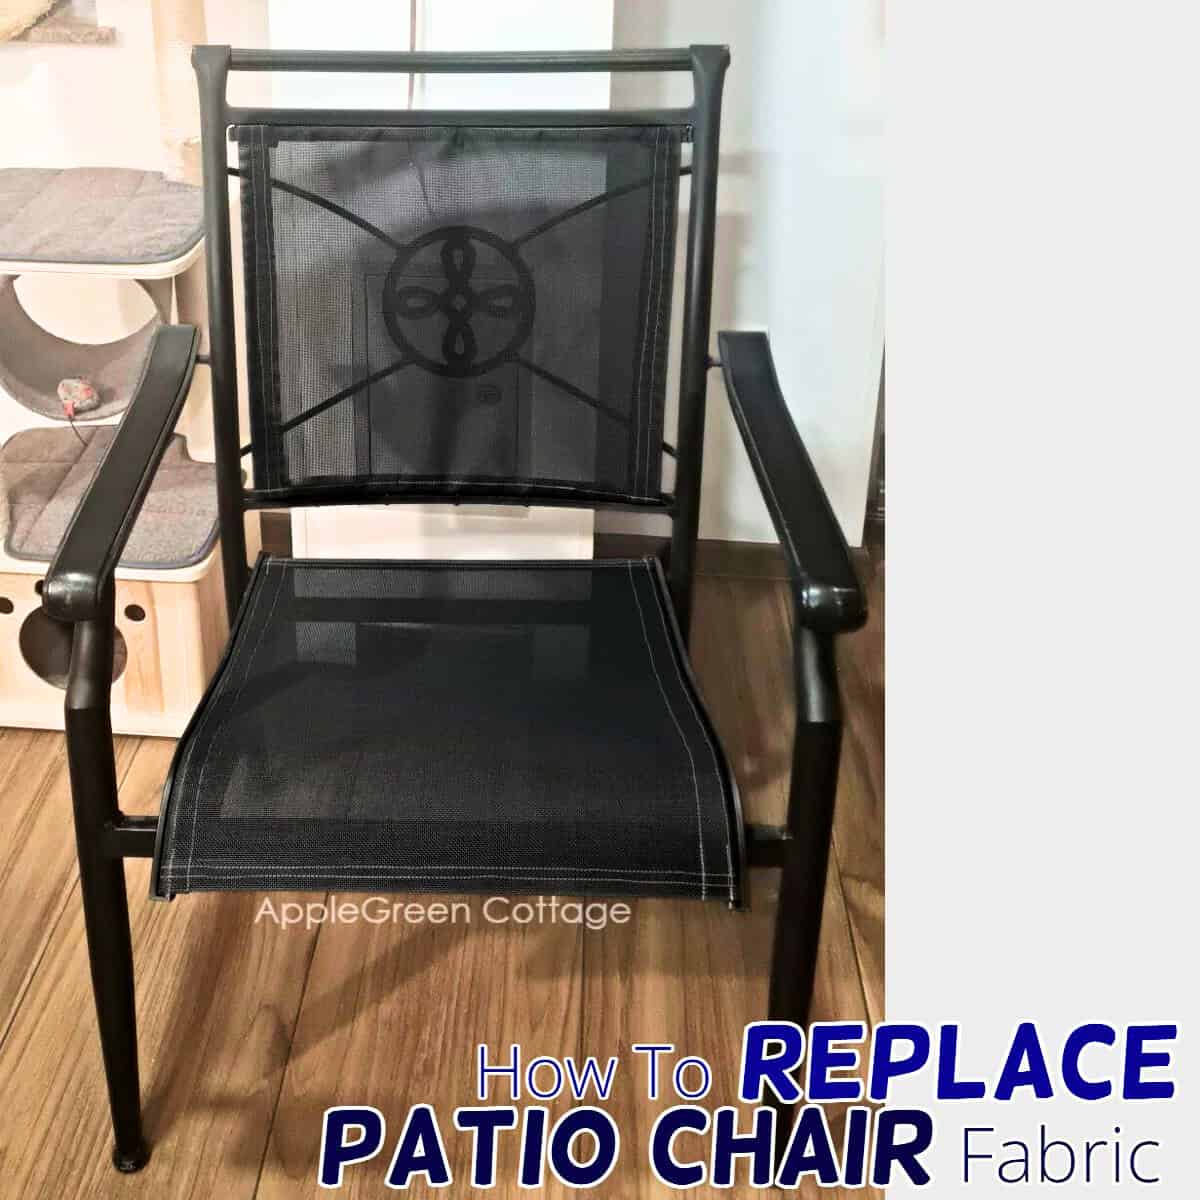
Is your favorite outdoor sling chair looking tired, sagging, or torn? Don't toss it! In this tutorial, I'll show you how to replace patio chair fabric with just a few supplies, your sewing machine, and thread.
This method works for most two-piece sling chairs and is much easier than it looks. Once you've done one, you'll know exactly how to repair a patio chair in under an afternoon.
Always looking for home improvement tips? Here's how to repair a shade sail - the easy way!
Table Of Contents
Why Replace Mesh On Patio Sling Chairs Instead of Buying A New Chair?
Outdoor chairs take a beating from the sun, rain, and everyday use. The mesh fabric is usually the first part to give out, but the frame itself can last for years.
That's why mesh patio chair replacement is so popular - it's budget-friendly, eco-friendly, and you keep enjoying the furniture you already love.
And if you've ever looked up patio chair fabric replacement kits, you'll know they can be expensive. Sewing your own with strong, UV-resistant fabric is cheaper, custom, and looks just as good.
Supplies
- Outdoor furniture mesh fabric (on Amazon)
- UV-resistant heavy polyester thread (I used 70 tex thread like this one)
- Sewing machine (domestic works fine with a denim/microtex needle, I use a heavy duty HLx5 needle on my Janome HD9, and Schmetz denim 100/16 on my domestic)
- Measuring tape
- Fabric scissors or rotary cutter
- Pins or clips
- Screwdriver or Allen wrench (for disassembling chair rails)
- sling chair spline cording - if the tubing in your sling chair is damaged or brittle (on Amazon)
Shop my personal favorite sewing supplies on Amazon HERE.
How Much Fabric to Reupholster Outdoor Chair
The first question I usually get is how much fabric you need to reupholster an outdoor chair. In total, I used ¾ yard of fabric, width is 54" and I did not use up all the fabric on one chair.
Step-by-Step Instructions
First, we'll measure and recreate the seat bottom (PART A), and then we'll measure and create the seat back (PART B)
Part A - Seat Bottom
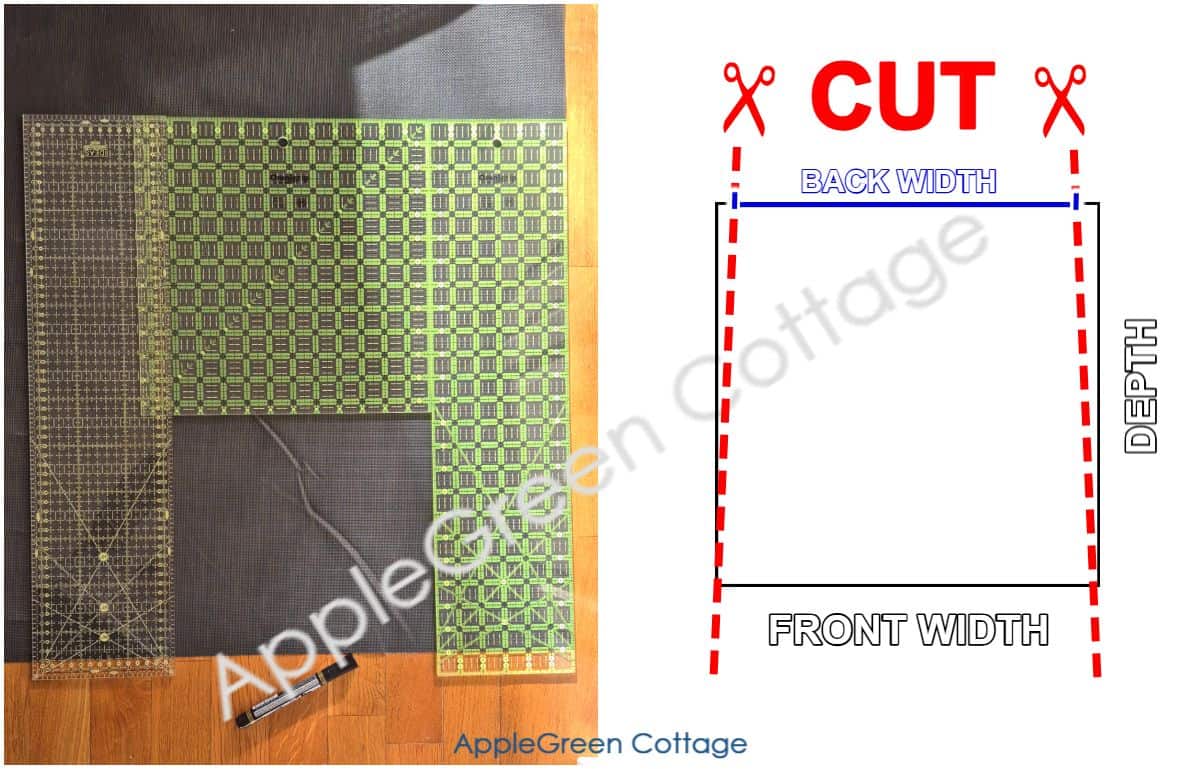
Step 1 - Measure the Seat Bottom, then remove it from frame
Chair Bottom - While still on the chair, measure the fabric area width and length, so you have the original measurements (old mesh usually does not fold very flat when removed from the frame, so it's better to measure it now)
Mine was: back rail-to-rail: 17 ½", front rail-to-rail: 19 ¼", and depth from back to front 21".
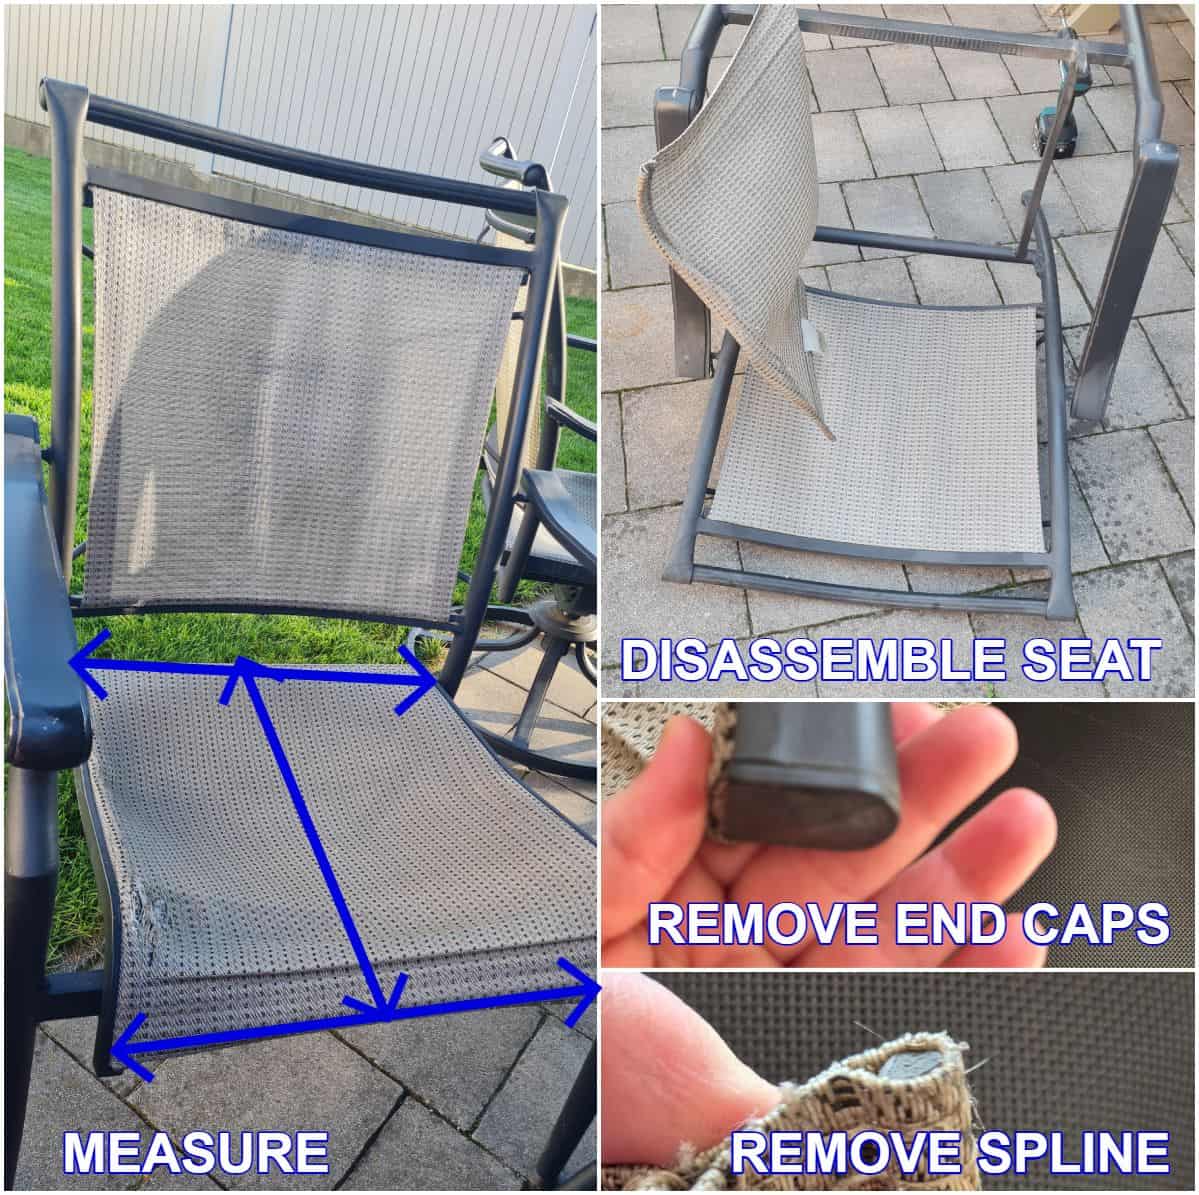
Once everything is measured and marked, disassemble seat from the frame. First, unscrew or loosen the side rails that hold the sling in place, then remove end caps and spline. I simply pushed a small-sized Allen wrench into the tunnel to get out the spline.
Slide the old fabric out. This will be your template for the next step.
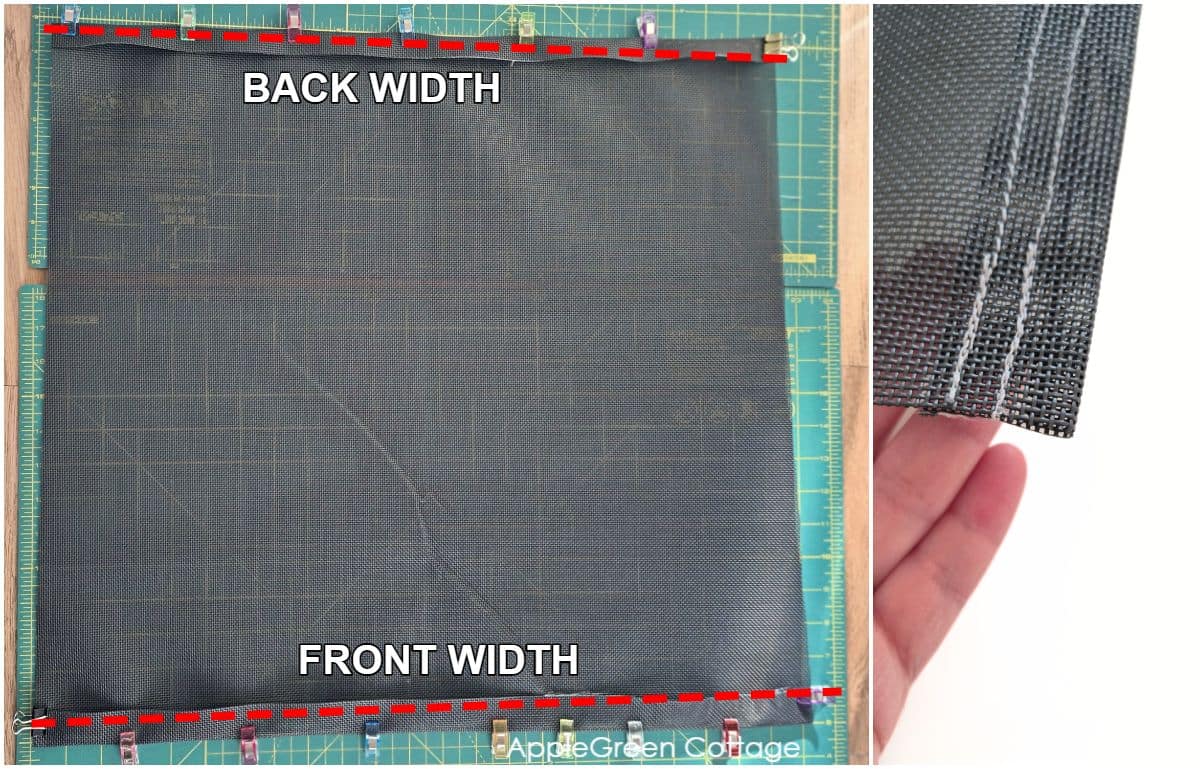
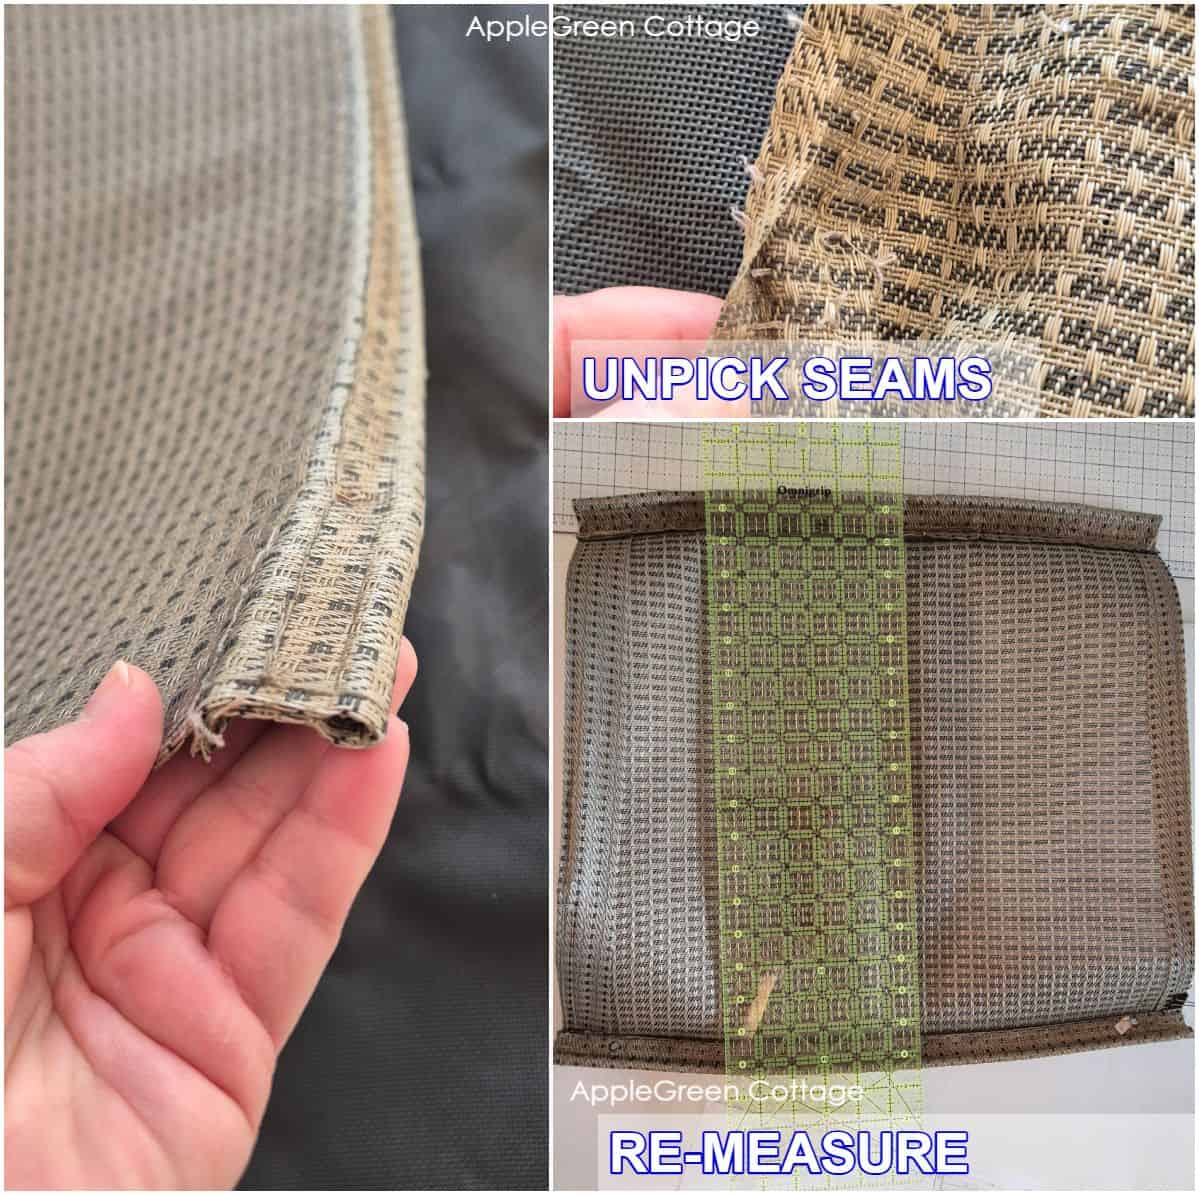
Step 2 - Unpick seams and measure again
Unpick all seams, unfold them and re-measure everything, including seam allowances. This will give you the sizes you need to cut.
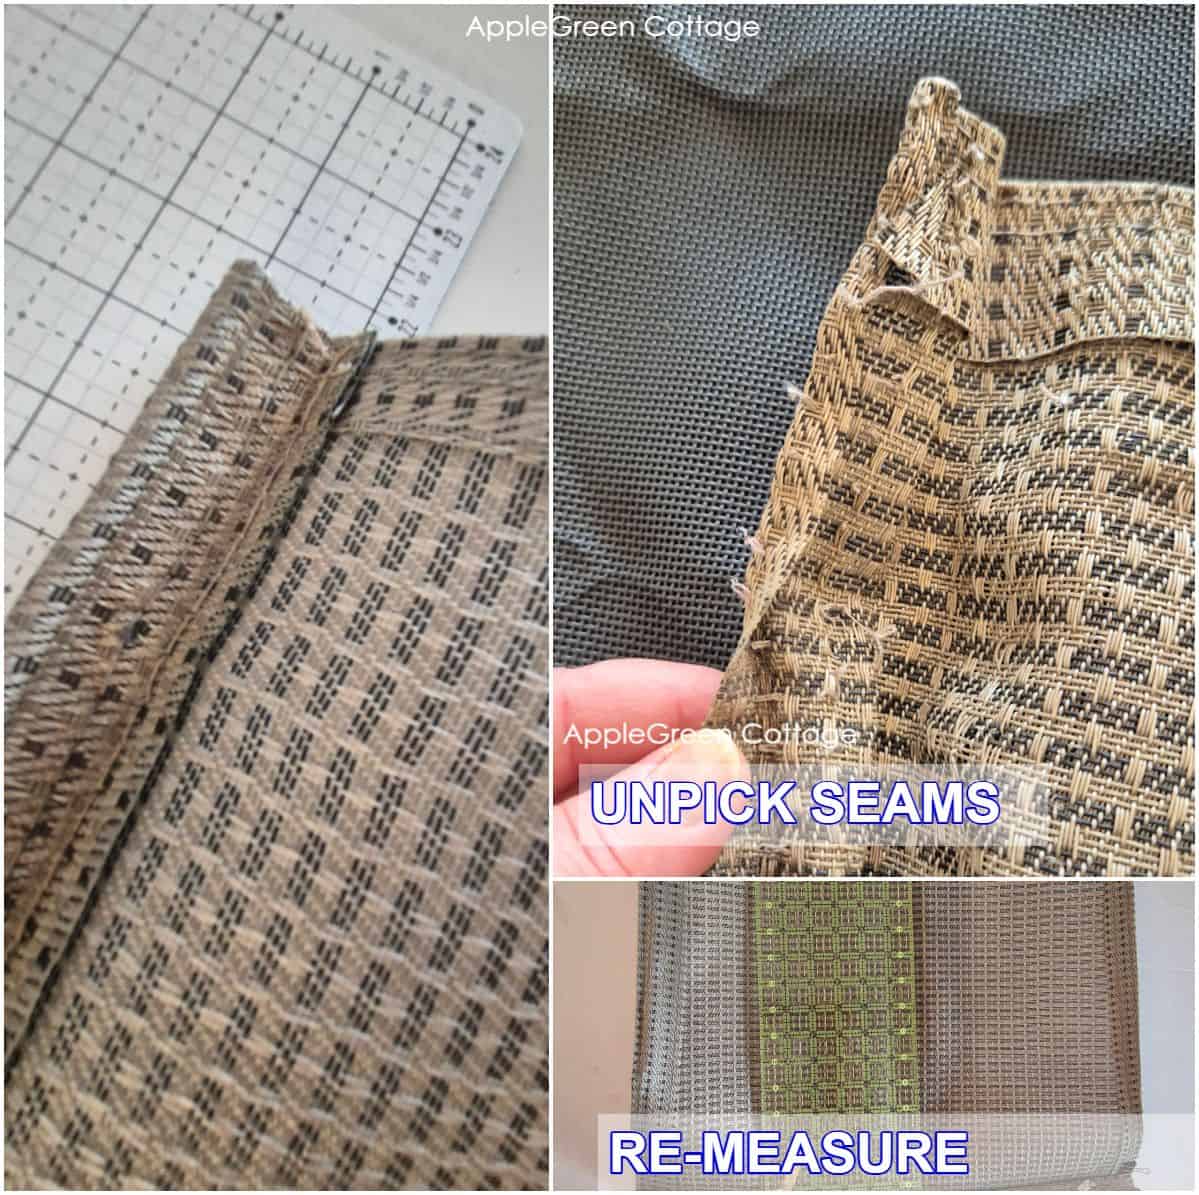
My measurements for the seat bottom:
- back width of the seat: 17 ½" visible mesh from rail to rail, visible part + plus adding on each side: ¼" mesh wrapped around the spline plus a 1 ¾" seam allowance
- front width of the seat: 19 ¼" visible mesh from rail to rail, visible part + plus adding on each side: ¼" mesh wrapped around the spline plus a 1 ¾" seam allowance
- seat depth: from front to back finished size 21" plus twice a single hem of 1"
NOTE: Since my new fabric does not fray, I will not use a double-fold hem. I will only do a single hem. If your fabric frays and want to hide the raw edges, see how to do a double-fold hem.
Fabric Cutting Directions
Cutting dimensions for my chair bottom:
- back width: 21 ½"
- front width: 23 ¼", and
- depth from back to front 23"
Step 3 - Cut the new chair bottom piece
First cut a rectangle using the largest width (23 ¼") and 23" depth, then cut the bottom back to size:
Step 4 - Hem the chair bottom front and back edge
Fold back the 1" SA on front and back, sew in place. Reinforce the seam at start and end by backstitching. I did two seams on each side, approximately ⅜" apart.
Step 5 - Sew the side sleeves on the Seat Bottom
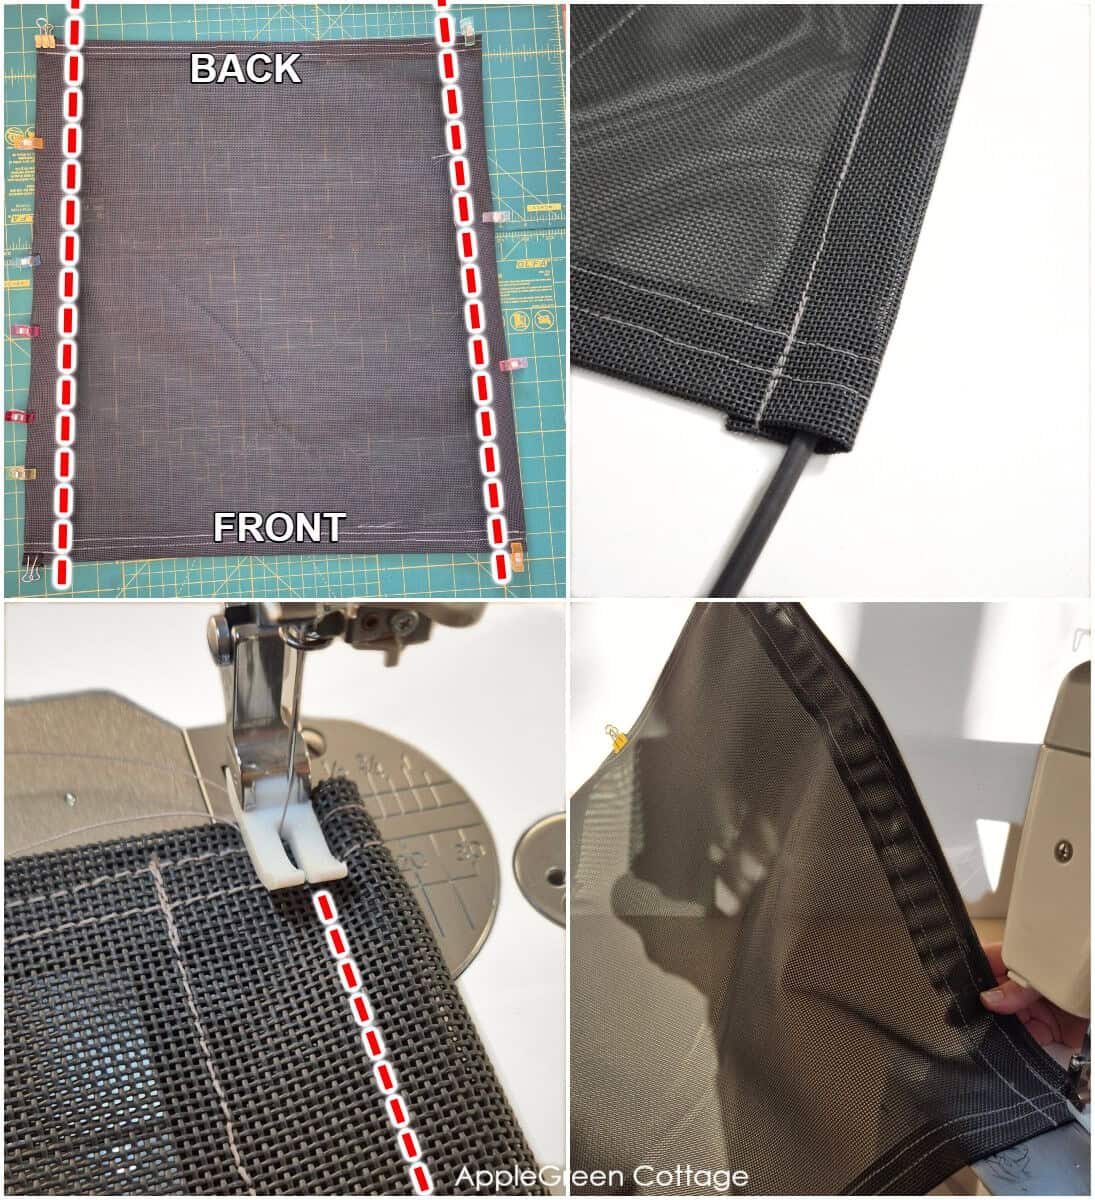
Fold back each side by 1 ¾". (TIP: if you do a double-fold hem, fold just ½" first, and then again just 1 ¼".)
Sew a straight seam down the fold to create a wide channel. This is where the spline (plastic rod) slides in to secure the fabric to the chair.
Insert the spline, then sew another seam along the original seam, this time as close as possible to the spline.
Repeat on the other side.
Step 6 - Attach the Rails

Seat bottom is done! Attach the rails, and onto the chair frame it goes!
PART B - Seat Back
Now to create the seat back.
Step 1 - Measure the Seat Back, then disassemble
Chair Back- While still on the chair, measure the fabric area width and length, so you have the original measurements of the visible portion of the fabric.
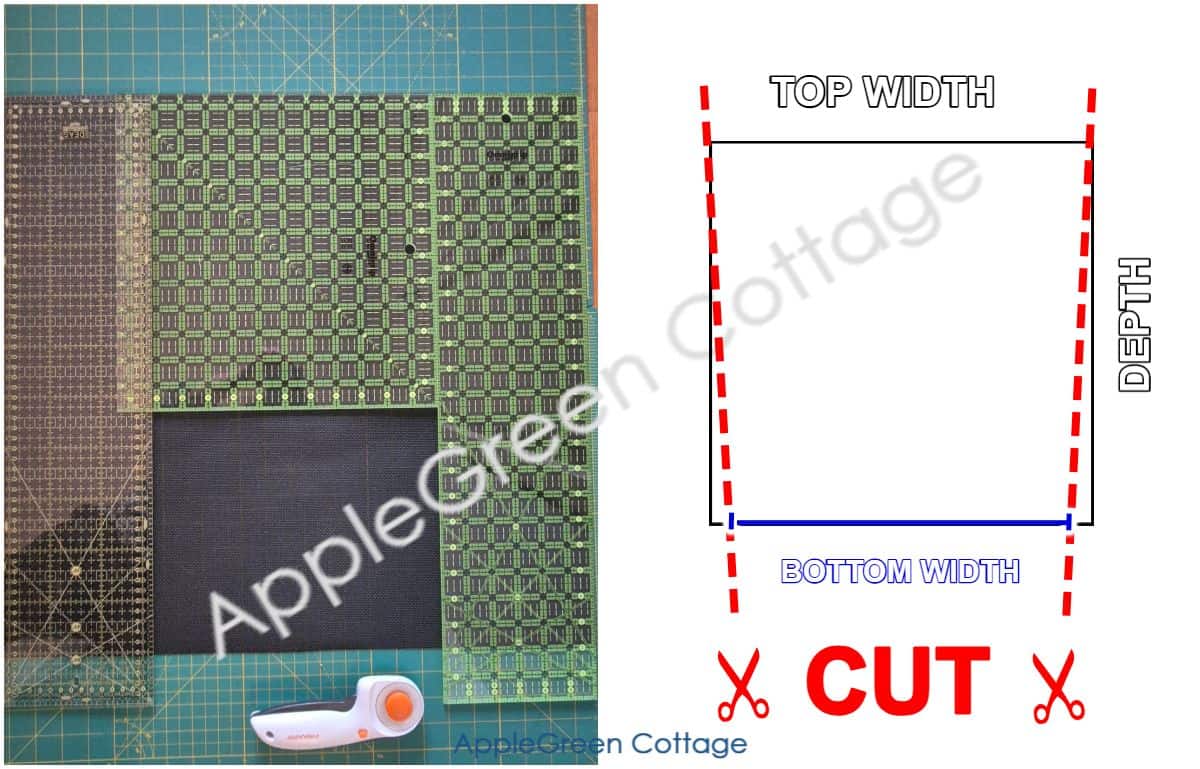
Mine was: top width 20 ¼", bottom width 18 ⅝", and height (same on edges and in the center!) 18 ½".
The back piece on my chair is slightly curved backwards but its equal height on all spots - meaning the top and bottom edges will still be parallel.

Once everything is measured and marked, disassemble the back from the frame. First, unscrew or loosen the top rail that holds the back in place and remove the rail. Then loosen the bottom screws, remove the spline and wiggle the fabric out.
This will be your template for the next step.
Tip: If the top and bottom of your chair back aren't parallel (mine were), it's better to draw the shape (pattern) instead of just measuring, to catch the curve better. See the 'Popular Questions' below if you need that info.
Step 2 - Unpick seams and measure again
Unpick all seams, unfold the fabric and re-measure everything, including seam allowances. This will give you the sizes you need to cut for the back.
My measurements for the seat back:
- top width of the seat back: 20 ¼" visible mesh from rail to rail, visible part + plus 1 ½" seam allowance (single hem) on each side
- bottom width of the seat back: 18 ⅝" visible mesh from rail to rail, visible part + plus 1 ½" seam allowance (single hem) on each side
- height: from front to back finished size 18 ½" plus twice a single hem of 1"
Fabric Cutting Directions
Cutting dimensions for my chair back:
- top width: 23 ¼"
- bottom width: 21 ⅝", and
- height: 22"
Step 3 - Cut the new chair back piece
Lay your old fabric flat and measure. First cut a rectangle using the largest width (23 ¼") and 22" height, then cut the back bottom width to size.
Step 4 - Hem the side edges
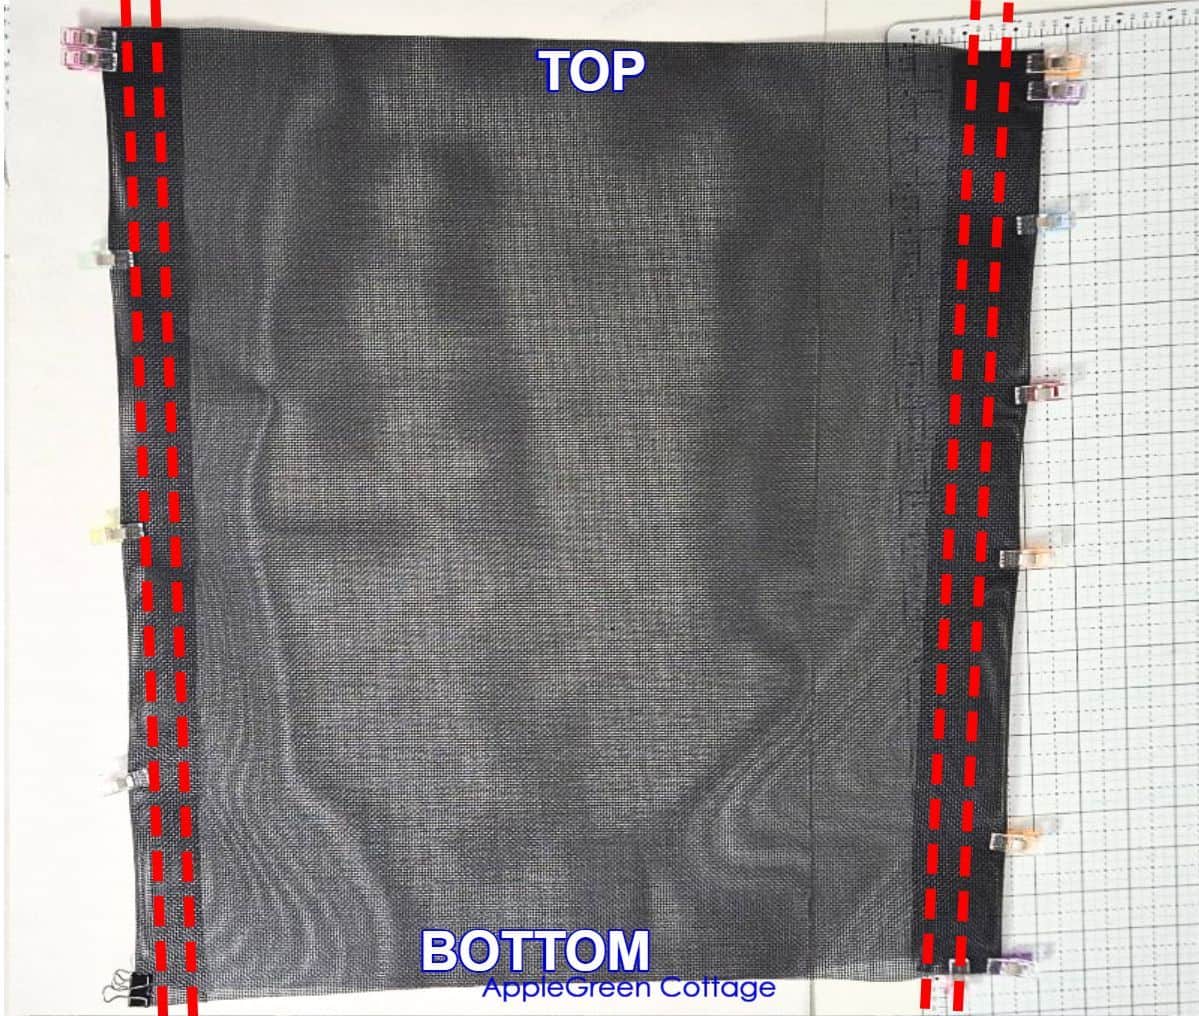
Fold back the 1 ½" seam allowance on both sides and sew the hem in place. Reinforce the seam at start and end by backstitching. Again, I did two seams on each side.
Step 5 - Sew the top and bottom sleeves
Fold the top and bottom back by 1 ½". (TIP: if you do a double-fold hem, fold just ½" first, and then again by 1".)
Sew a straight seam along the fold to create a wide channel - one at the top, one at the bottom.
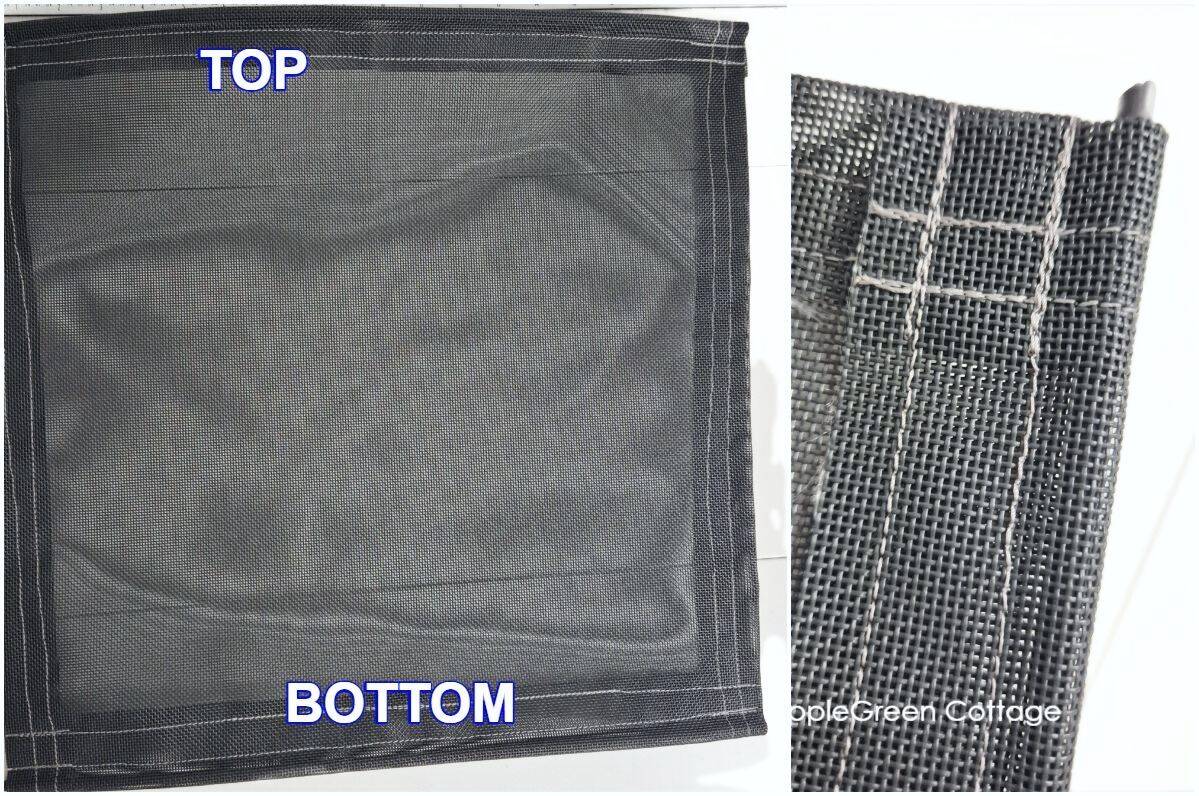
Like before, insert the spline into the top and bottom channels, then sew another seam along the original seam, this time as close as possible to the spline. Back piece done - add the top rail and attach to the frame!
Reattach the bottom and back to the frame
Now the last bit of work to do, screw the seat and the back to your patio chair frame. This can be snug - pull evenly to avoid twisting. Once you have the rails back in place, tighten the screws. Done!
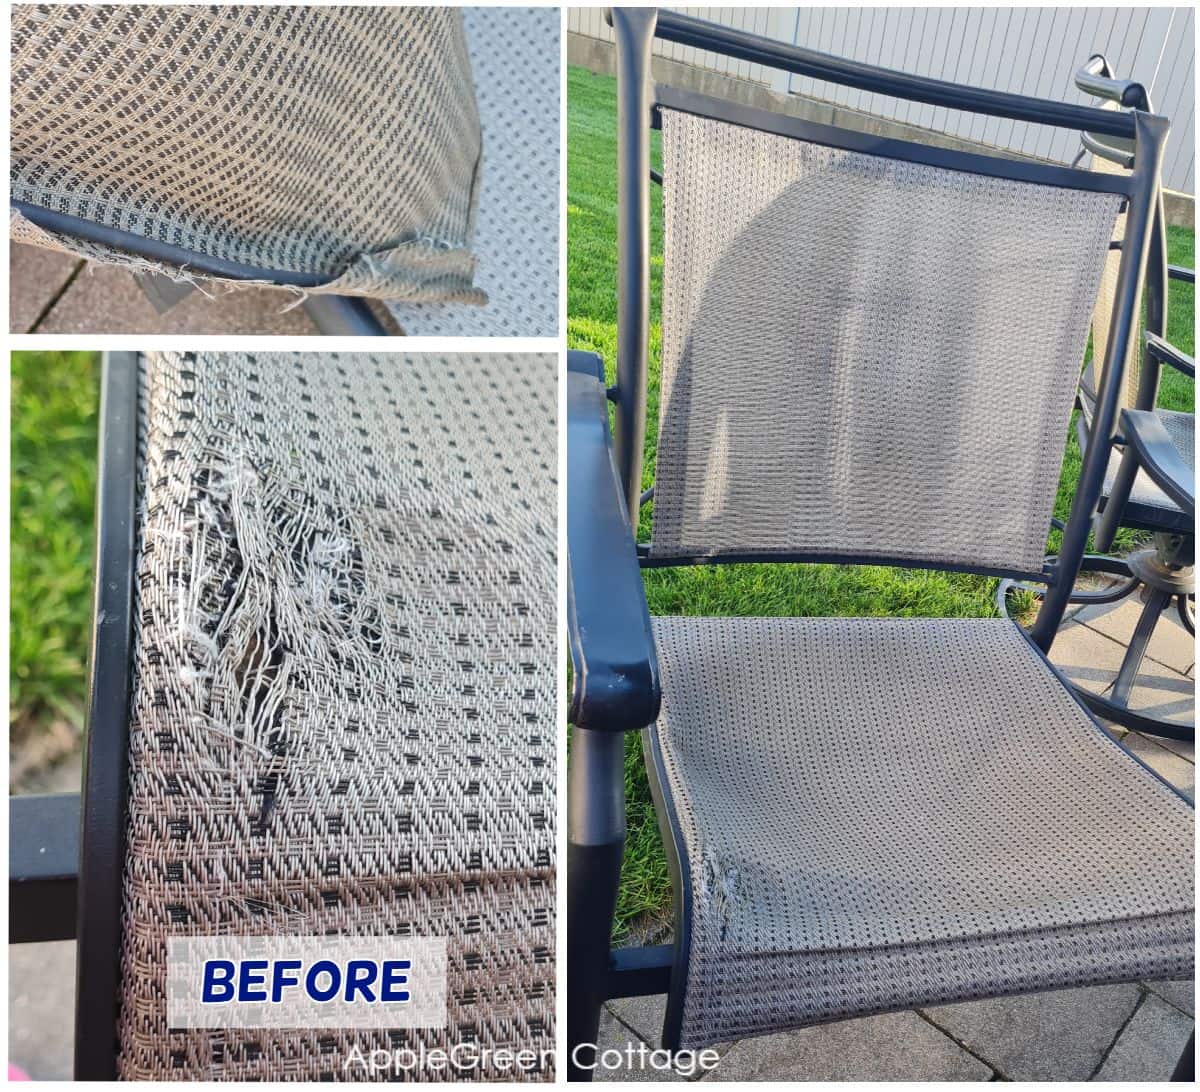
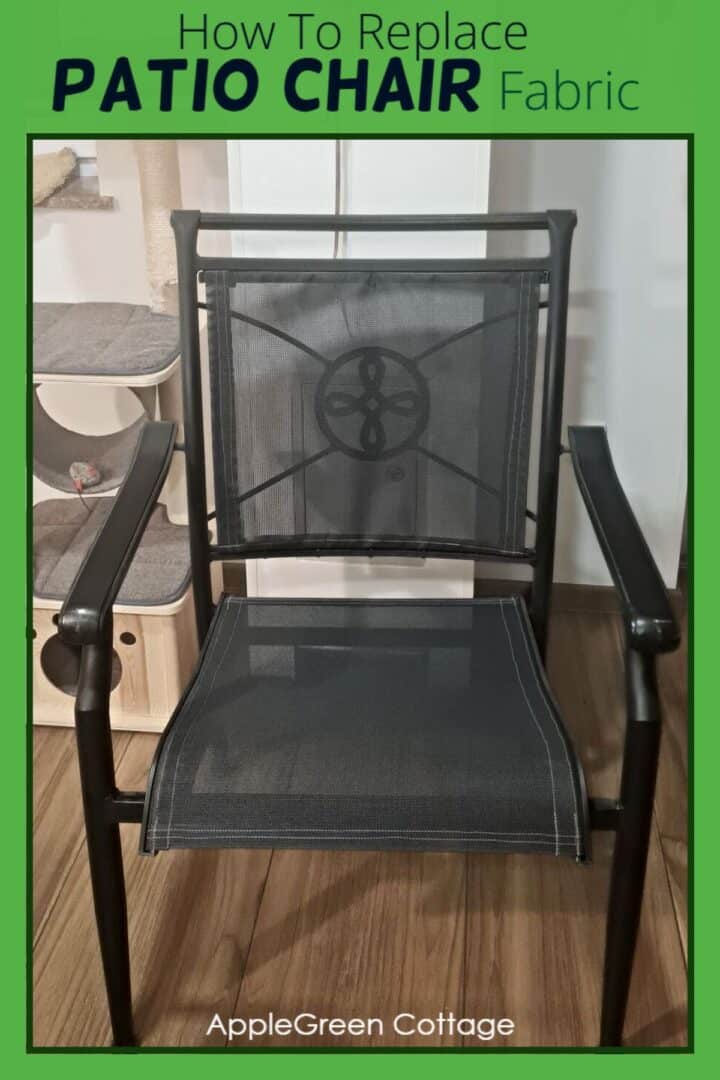
Let's see the before and after!
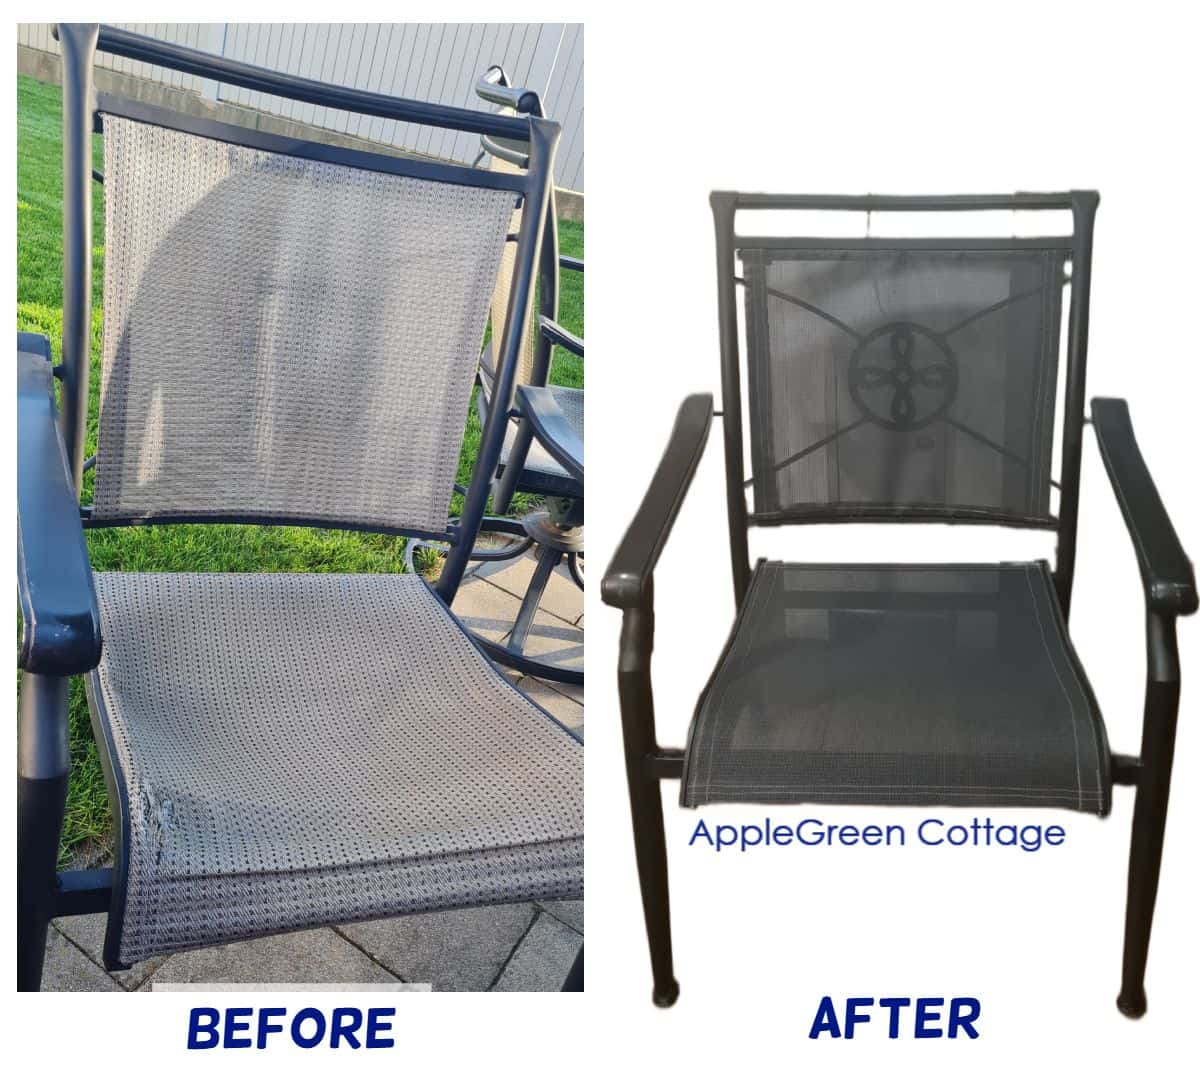
Tighten all screws, sit back, and enjoy your "new" outdoor chair. You've just finished your own patio chair sling replacement!
Conclusion
That's it - I hope this tutorial has helped you repair patio chairs by replacing just the fabric. No need to buy a whole new set!
This patio chair fabric replacement method is quick, inexpensive, and keeps your outdoor furniture looking stylish season after season.
Once you know how to reupholster patio furniture, you can:
- Mix colors for a fun, modern outdoor look
- Use matching fabric for your umbrella, shade sail, or pillows
- Replace all your worn-out sets at once for a cohesive patio refresh
Popular Questions
If the top and bottom of the seat back aren't parallel, it's better to draw the shape instead of measuring. This means you create a pattern piece - I explain it here in the next lines:
If the top and bottom of the seat back aren't parallel, it's better to draw the shape instead of measuring. While the fabric is still on the chair, trace along the rails with a marker to get the correct shape, a 'pattern'. Also, if your fabric is distorted or torn, then also do this once the fabric has been removed: tape a transparent material, vinyl, to the frame with double-sided tape. Use a marker to trace right along the metal frame, marking where the fabric meets the chair on all sides. Keep the marker snug against the metal so your marks show the exact fabric edge, even if it's not perfectly straight. Add all the seam allowances and you've created a pattern piece.
More Ideas
Always looking for home improvement and do-it-yourself tips? Here's how to repair a shade sail - the easy way, and more:


Join the FREE 7-part email course and make 6 beautiful items for your home! You'll love it!


Lori Bishop says
What a wonderful tutorial! My question is my chairs have padding in them. Are the only differences are getting the right sized padding and making the proper allowances for it? Let me know if you’ve had experience with this. Thanks so much!
Damjana Jakos says
Hi Lori! Great question. The most important first step is checking if your chairs are the same size as mine. Since my tutorial chairs have no padding, yours might have a totally different assembly. If yours are larger or have thick cushions, just be sure to increase your fabric allowances so everything wraps and secures properly. Hope that helps!