
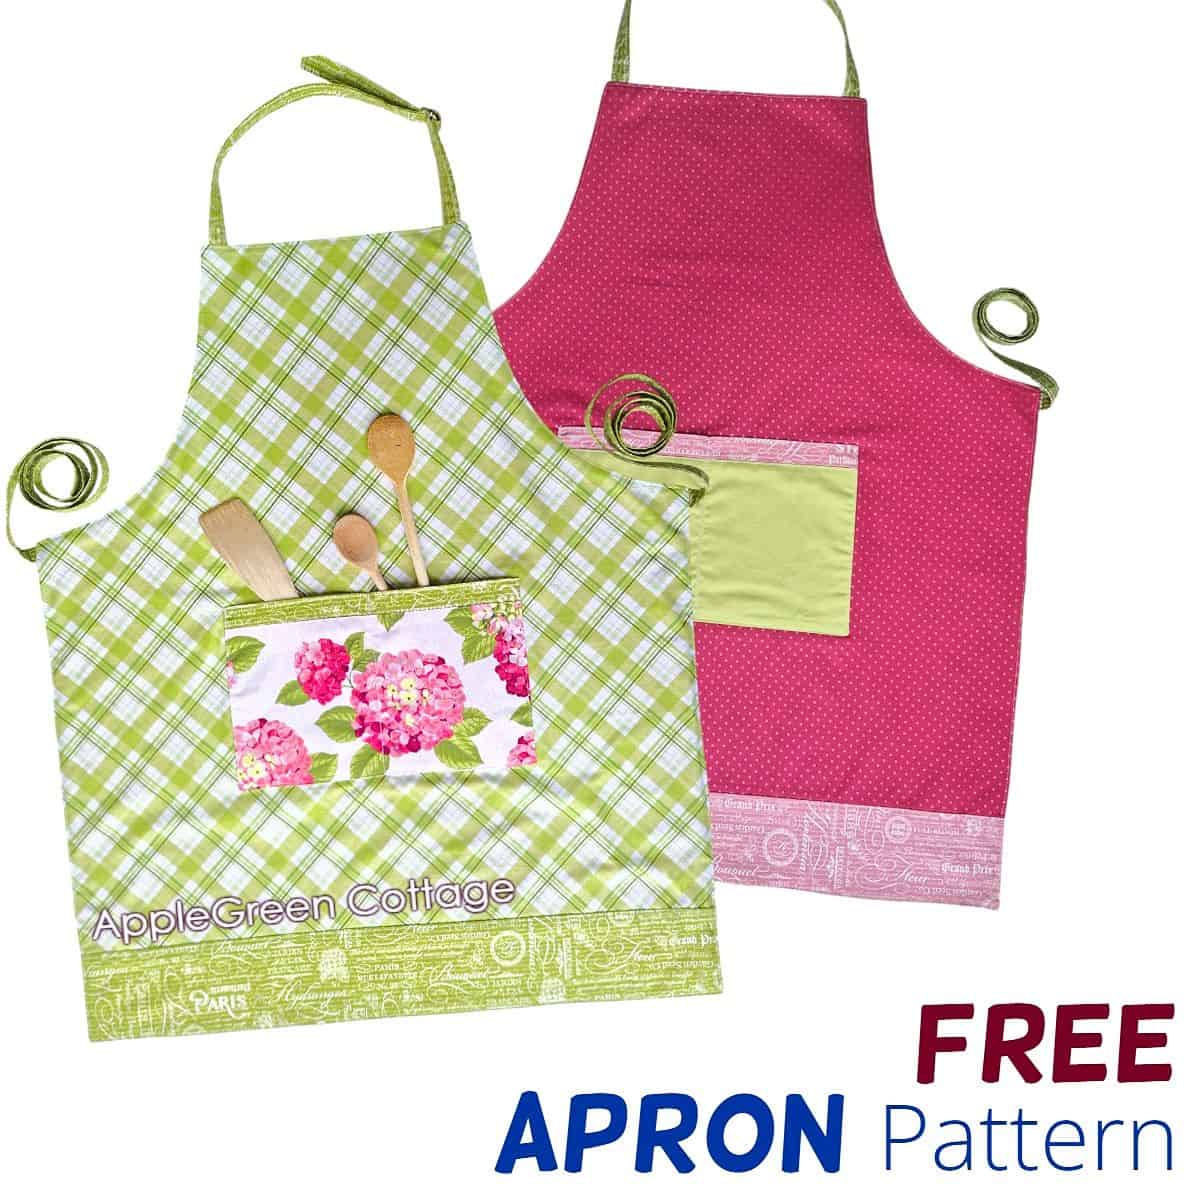
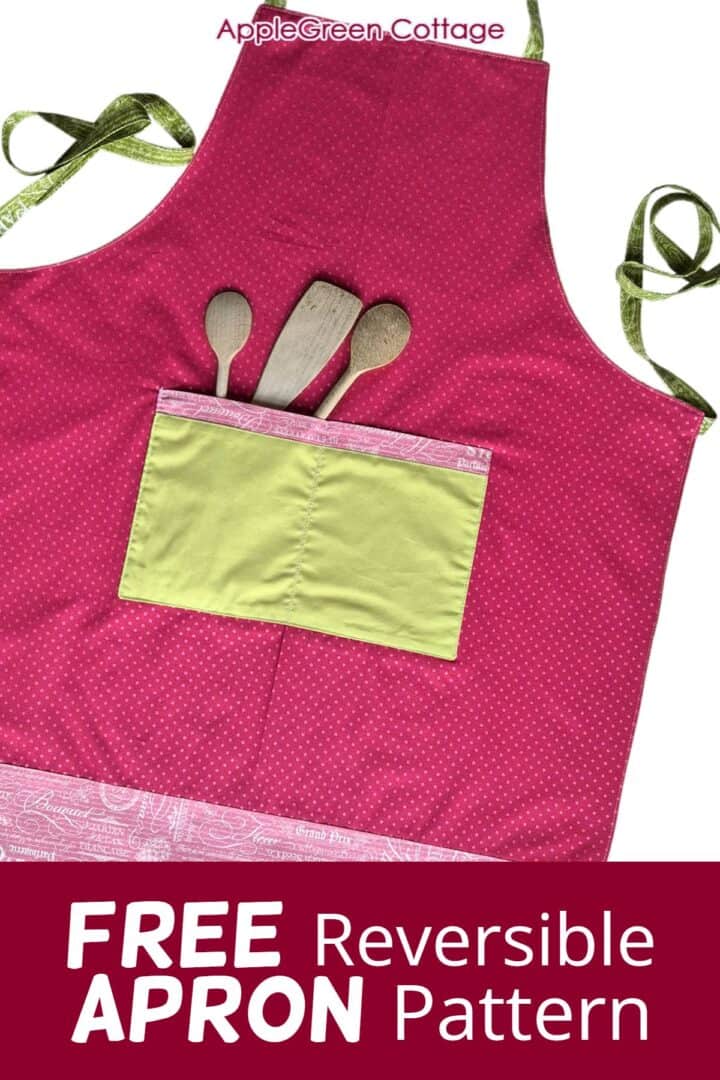
Sew a beautiful reversible apron using our free apron pattern in 2 sizes for kids and adults - with smart tweaks you don't usually see in free patterns.
An adjustable neckband and a divided pocket make it both pretty and practical. And the 'W-hack' makes strap ends neater - borrowed from bagmaking! See it all in the tutorial below.
The result? A well-fitting, fully reversible apron with smart details you'll love.
Came JUST for the free apron pattern? Grab it → here
Prefer an ad-free printer-friendly option of the whole tutorial+pattern? See the → optional PDF file in our shop.

This tutorial is also part of Printable Tutorials BUNDLE
100 PDF tutorials now, and growing!
Table Of Contents
Why You'll Love This Apron Pattern
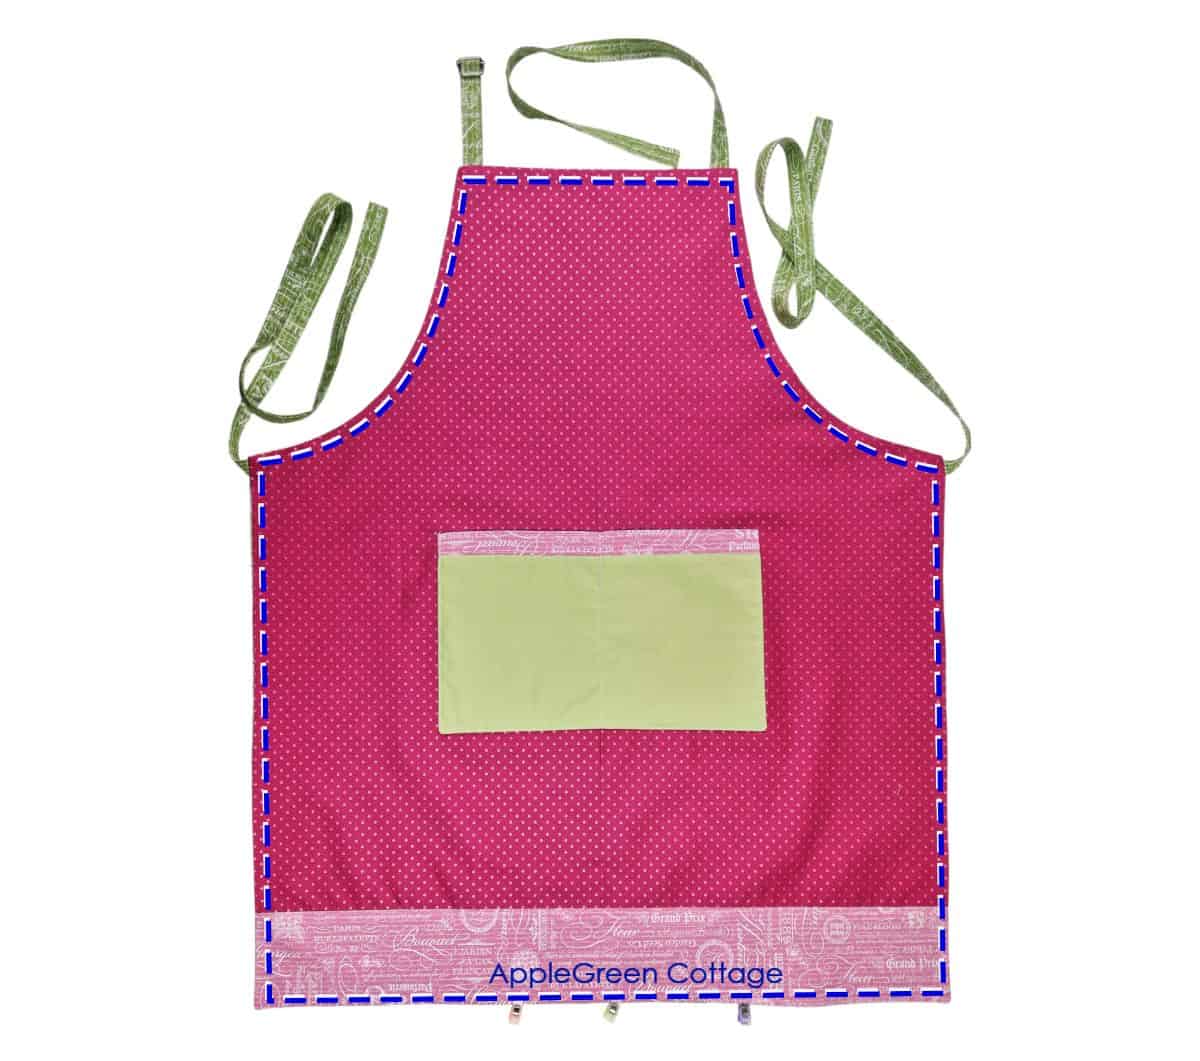
I wanted an apron that is easy to sew and looks beautiful. So I designed one that has it all:
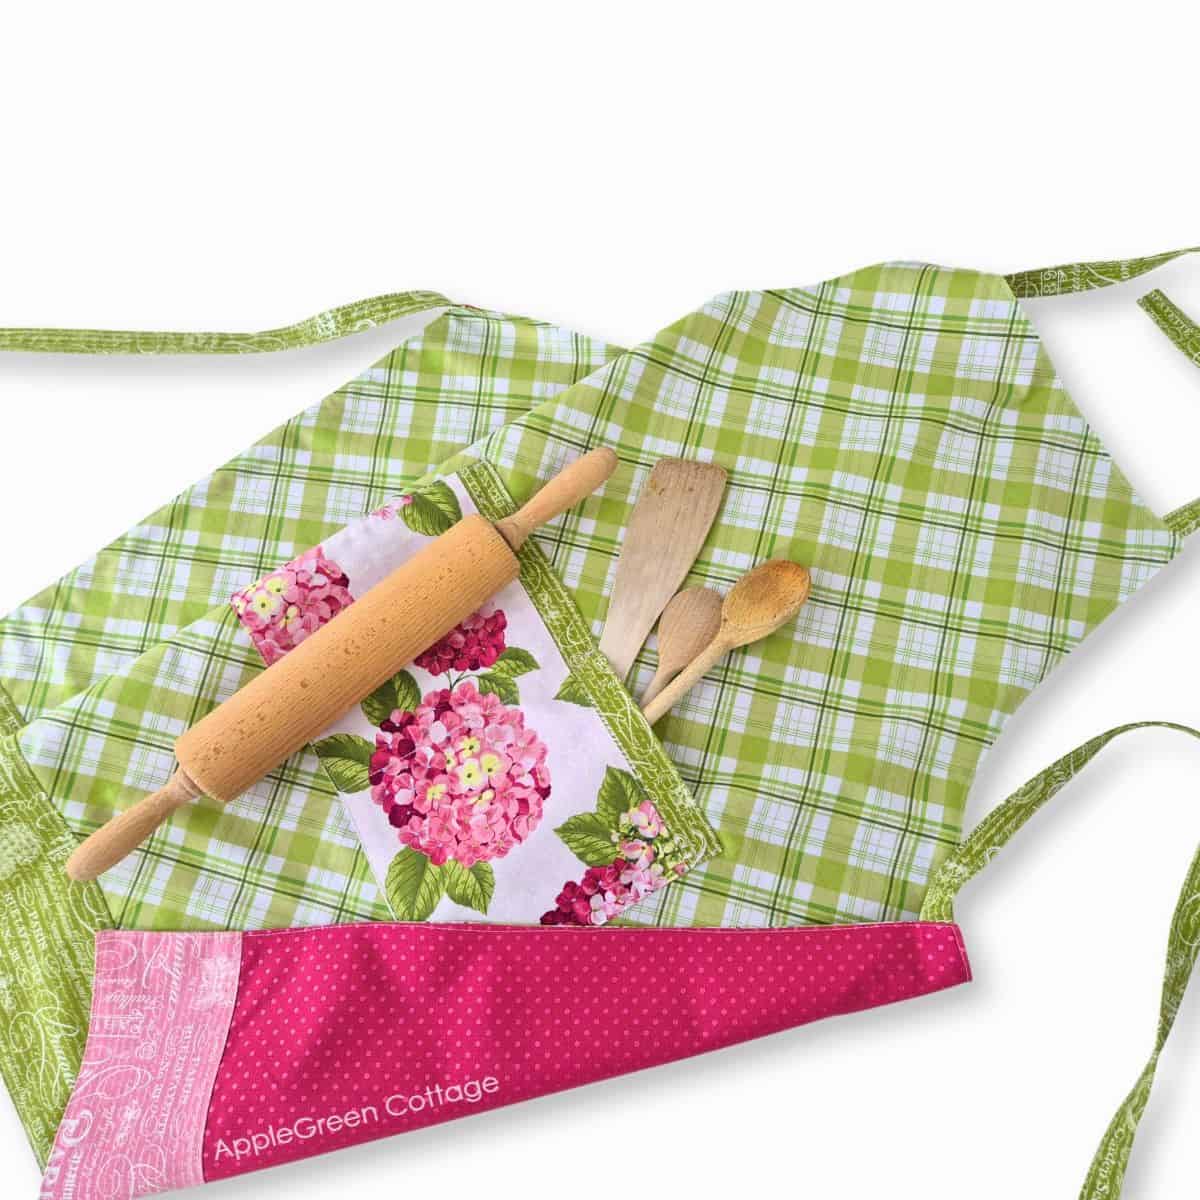
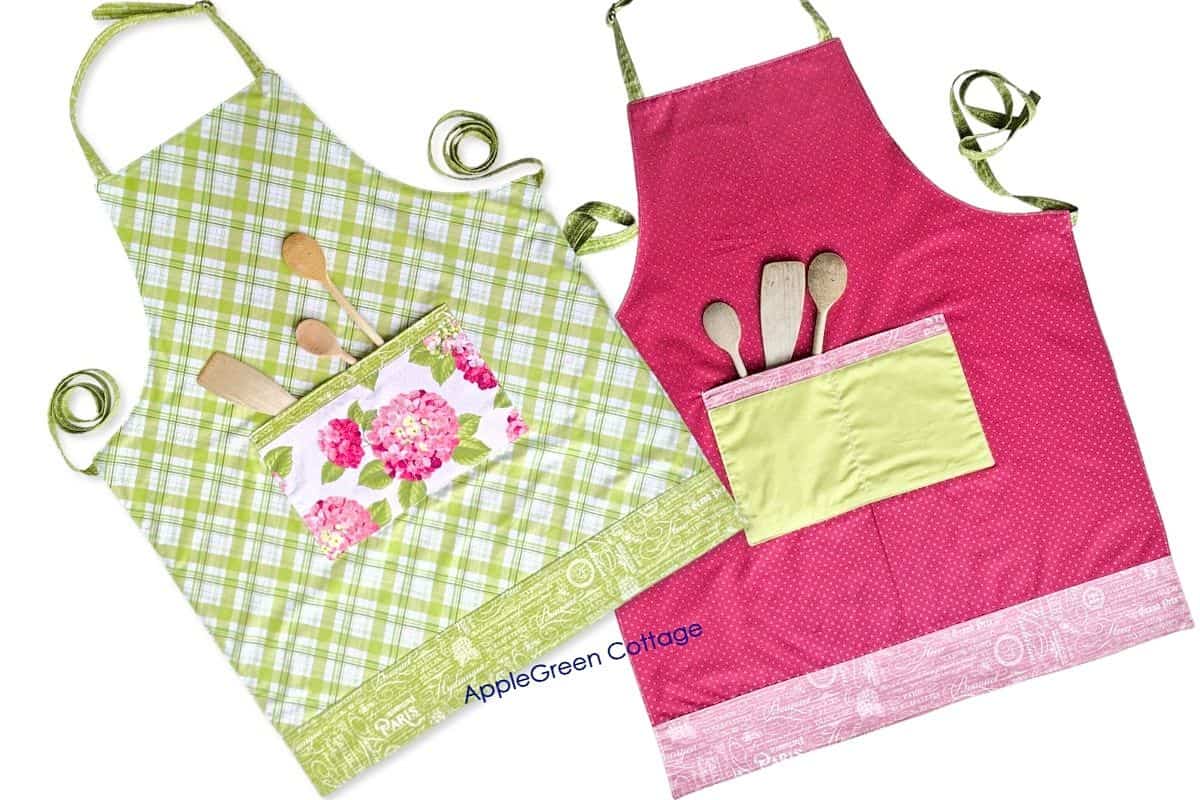
- Fully reversible - two looks in one apron
- Large double pocket - on both sides
- Easy to customize the length - add or skip the wide bottom strap
- Adjustable neckband - comfy (my FAVORITE!)
Plus, two sizes, for you and kids!
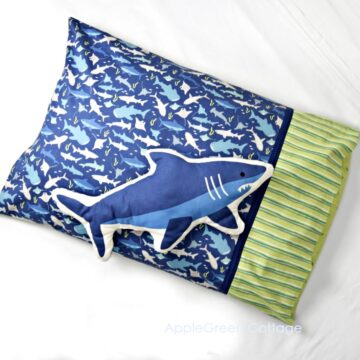
Are you here for even more home sewing? Check out this storage tote pattern and my best free home sewing projects.
Video - Strap Slider Neckband
That adjustable neckband slider is one of my favorite details. See here in this video how easy it is to use:
Supplies
Shop my personal favorite sewing supplies on Amazon HERE.
- quilting cotton fabric in different prints/colors, see below
- a ¾" size strap slider (also called slider buckle, or strap adjuster)
- coordinating sewing thread
- sewing machine
- needle, iron, pins or clips
- scissors or rotary cutter and a cutting mat
- free pattern in 2 sizes
How Much Fabric for a reversible apron?
- Fabric A & D: 1 yard each (¾ yard each for child size)
- Fabric B: ½ yard (⅓ yard for child size)
- Fabric C & F: fat quarter each
- Fabric E: ½ yard (fat quarter only for child size)
Some fabric will be extra - make a set with these cute diy round potholders with pockets!
What fabric to use for an apron pattern?
Since this is a reversible pattern for an apron, go with quilting cotton as it has 2 layers. It works beautifully for this pattern.
Also, this pattern allows you to mix prints boldly - so you can use your favorite colors and prints like I did here. I used Hydrangeas in the Garden collection by Jennifer Bosworth for Riley Blake Designs. Perfect!
Finished Apron Sizes
This free reversible apron sewing pattern includes two sizes - adult (27" wide × 30" tall) and child (19" wide × 22" tall). An adjustable neckband and long waist ties make it easy to get a comfortable, flexible fit for many body sizes.
SMART TIP: You can adjust apron length too! You can skip the wide bottom strap if you want the apron shorter.
How to sew a reversible apron - STEPS
Step 1 - Get the free pattern
Join our mailing list and get the pattern emailed to you:
Prefer an ad-free printer-friendly option of the whole tutorial+pattern? See the → optional PDF file in our shop.
How To Print this PDF file
For best results, download the PDF to a desktop or laptop, open it in Adobe Reader, and print at 100% size. (I recommend not printing directly from a browser window or from mobile, it could cause issues.)
Step 2 - Select your Fabric
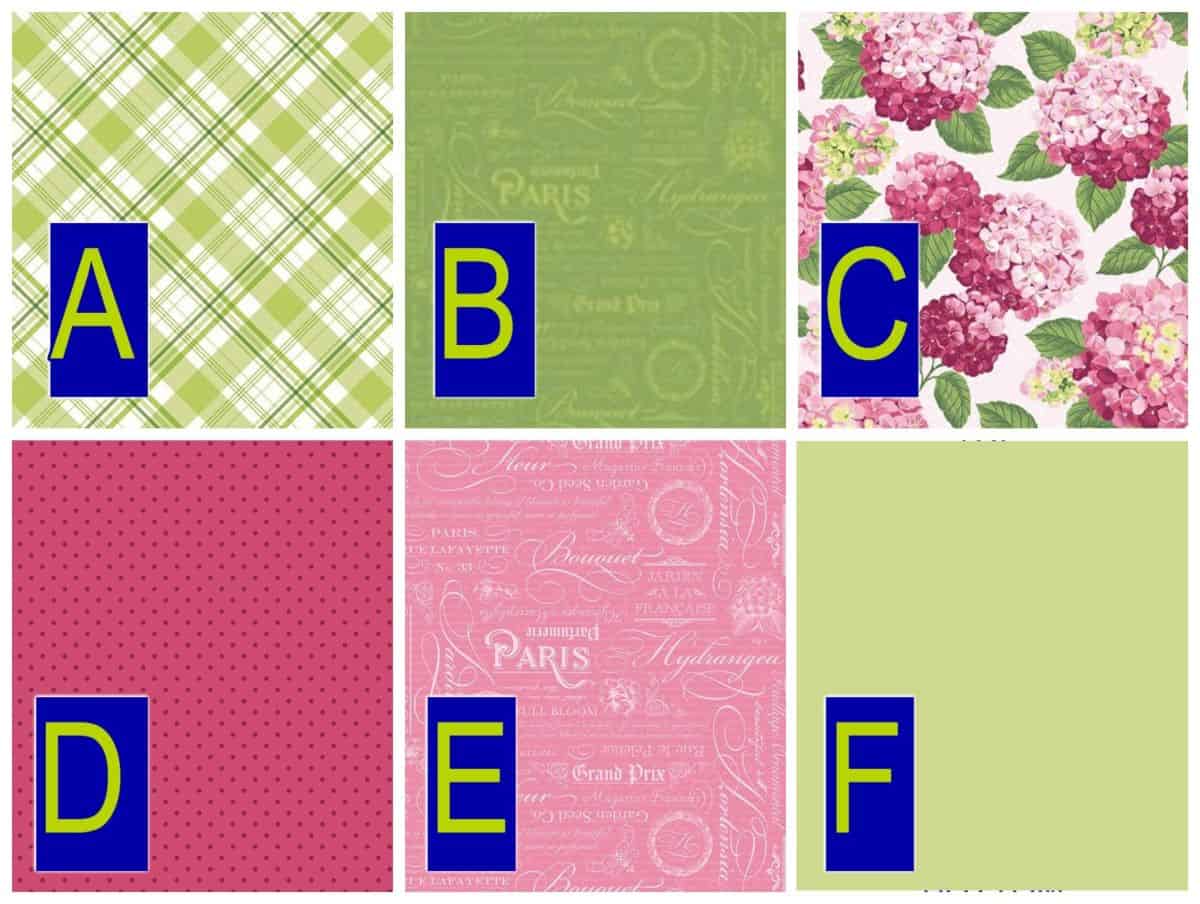
Select the fabric pieces in the colorway that will work best for your project. Keep in mind that two prints will be your focus:
- Fabric A and D (Front and Back Bodice) - your Main Fabrics
- Fabric B and E are your Accents - the secondary print on each side of your apron.
- Fabric C and F for the Pocket exterior.
Fabrics A + B + C on the front side, and Fabrics D + E +F for the back.
| Main Bodice | Bodice Bottom + Pocket Lining | Pocket EXTERIOR | STRAPS (NECK- and WAISTBAND) | |
| APRON FRONT | FABRIC A | FABRIC B | FABRIC C | FABRIC B |
| APRON BACK | FABRIC D | FABRIC E | FABRIC F |
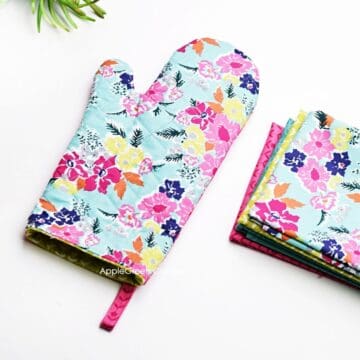
Make a Matching Oven Mitt!

+Free Oven Mitt Pattern!
Use matching fabric and create this cute oven mitt - 2 sizes, no binding!
Step 3 - Cut the apron pieces - Cutting Directions
Cut all pieces in your desired size.
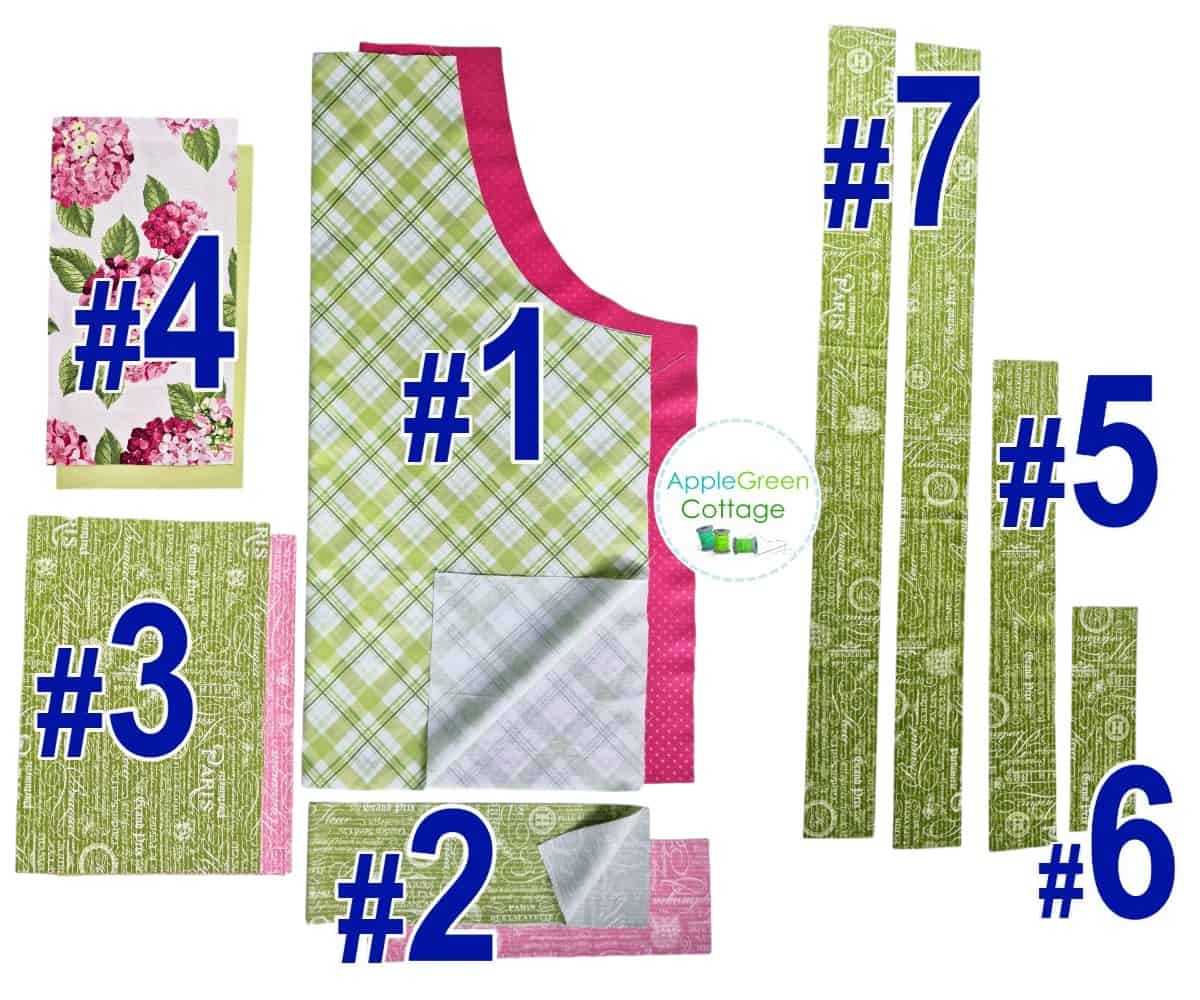
| Pattern Piece | Cut Fabric: |
|---|---|
| #1 BODICE | 1 from Fabric A (for front) 1 from Fabric D (for back) |
| #2 Bodice BOTTOM | 1 from Fabric B (for front) 1 from Fabric E (for back) |
| #3 Pocket LINING | 1 from Fabric B (for front) 1 from Fabric E (for back) |
| #4 Pocket EXTERIOR | 1 from Fabric C (for front) 1 from Fabric F (for back) |
| #5 NECKBAND part 1 | 1 from Fabric B |
| #6 NECKBAND part 2 | 1 from Fabric B |
| #7 WAISTBAND | 2 from Fabric B |
Step 4 - Create the 2 Pockets
First we'll sew the front and the back pocket. For each, gather the 2 pieces: the Pocket EXTERIOR (#4) and the slightly taller Pocket LINING (#3):
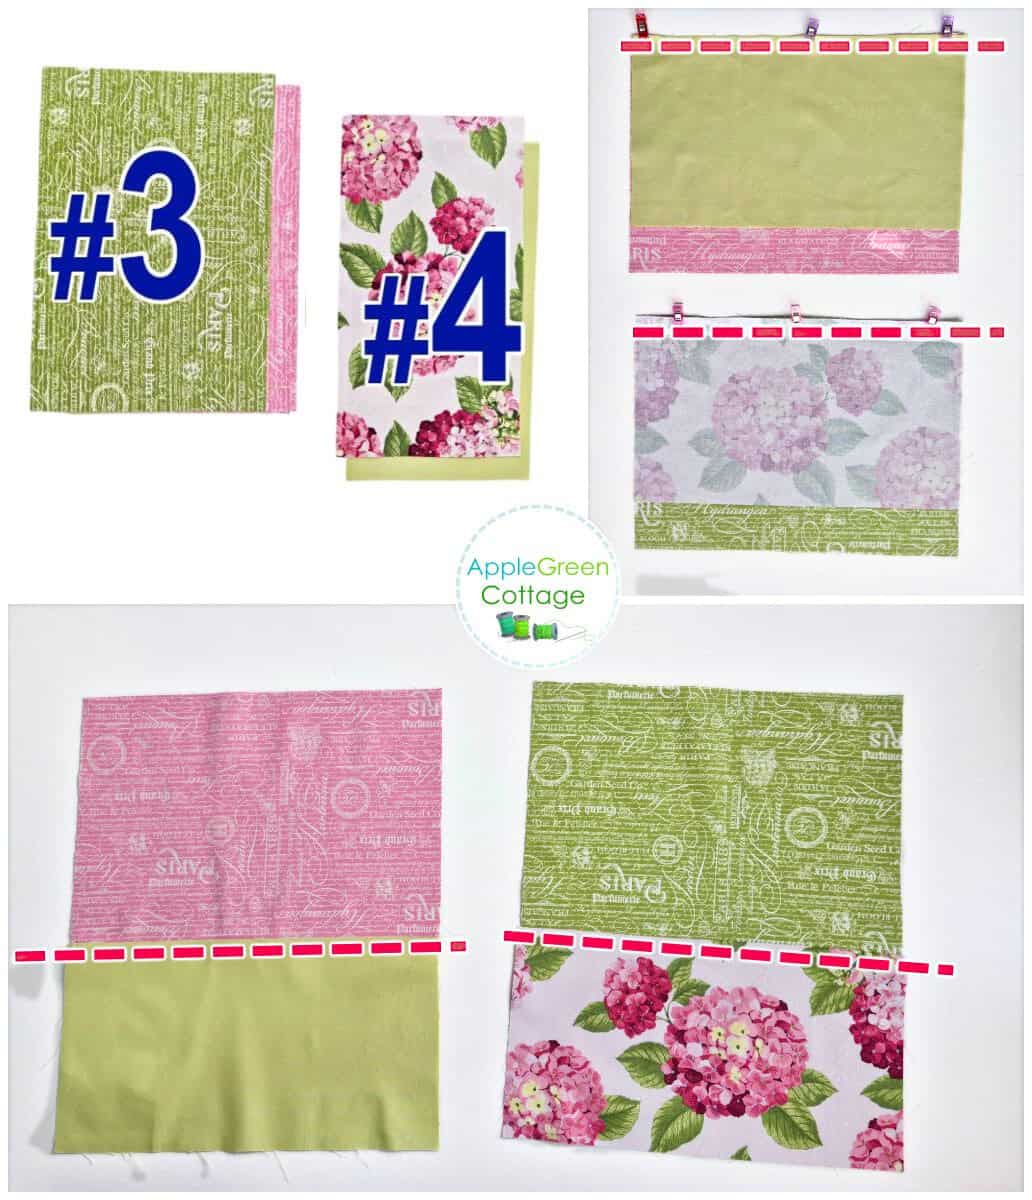
Make 2 sets: place the front set of pocket Exterior and Lining with the right sides together, aligned along one long edge. Sew them together with a ⅜" seam allowance.
Unfold, press the seam allowance towards the Exterior piece, and topstitch on the Exterior piece side, to catch that seam allowance into the seam.

Next, let's refold our joined pieces in half with right sides together and sew the sides and part of the bottom - leave a turning hole at the bottom. When you turn both pockets right side out, you'll notice that each pocket has a lovely strip of color at the top.
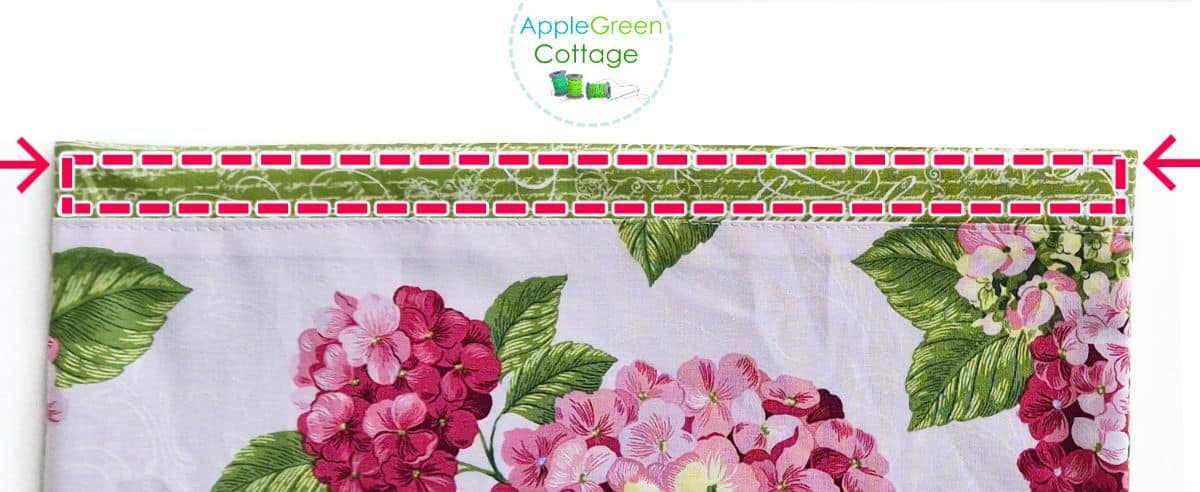
Press the pockets and topstitch a rectangle along the 'accent' top part. ↑ This will stabilize the pocket top - and make it look so professional!
Step 5 - Assemble Apron Bodice
We'll join bodice pieces #1 and #2 together for the front, then repeat for the back.
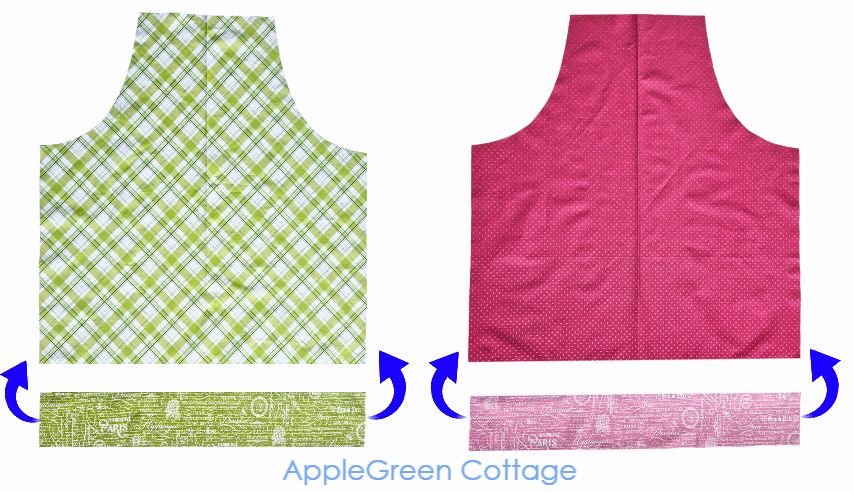
Place the #2 Bodice Bottom strip right sides together with the bottom edge of the main #1 Bodice piece, aligning raw edges. Sew across with a ⅜″ seam allowance.
TIP: If you're using a directional print, make sure #2 strip is upside-down when sewing it to the main bodice piece. So when you finish, the design ends up right-side up. Spot the little green person in the image below? THIS direction.
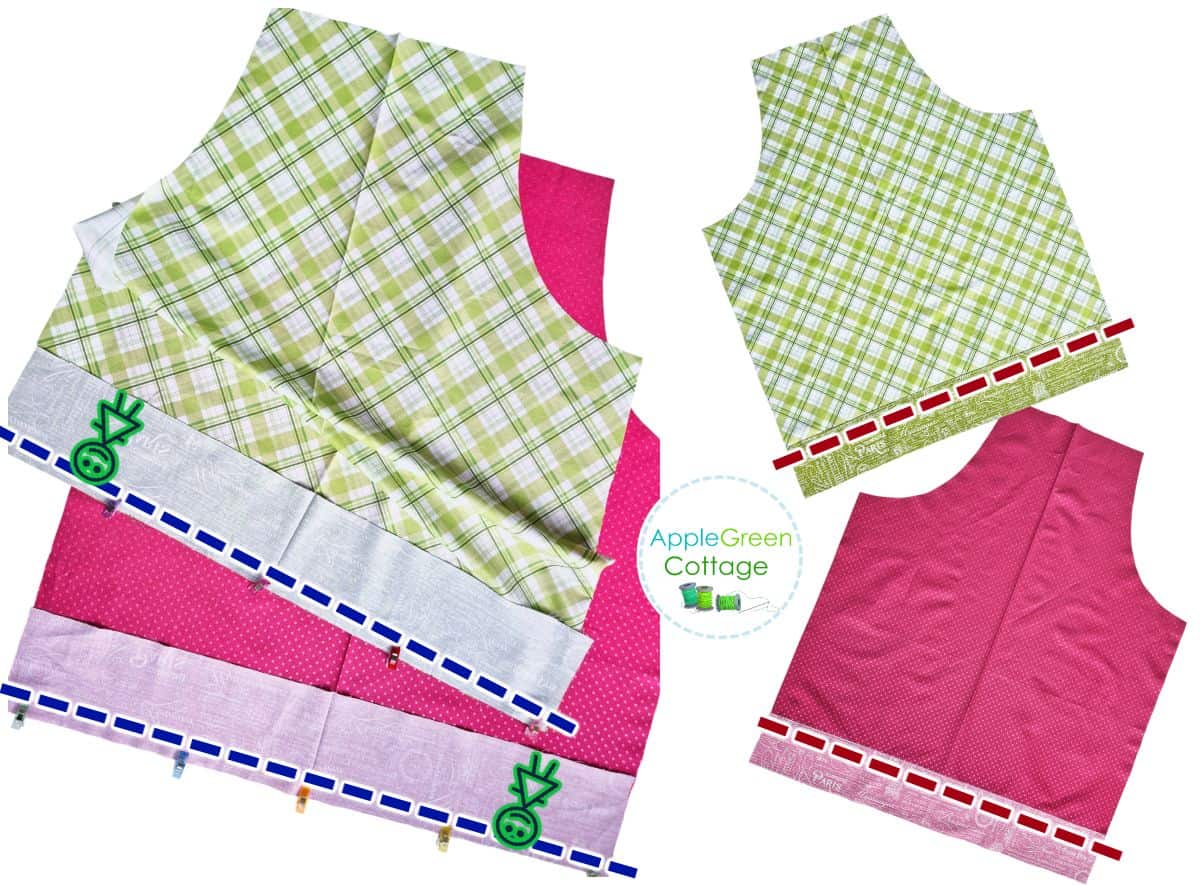
Unfold the piece and press the seam allowance down toward the bottom strip.
From the right side, topstitch on the bottom piece, close to the seam, to keep the seam allowance neat and flat.
Step 6 - Attach Pockets to the Bodice
Time to attach the front and the back pocket to the front and the back bodice pieces!
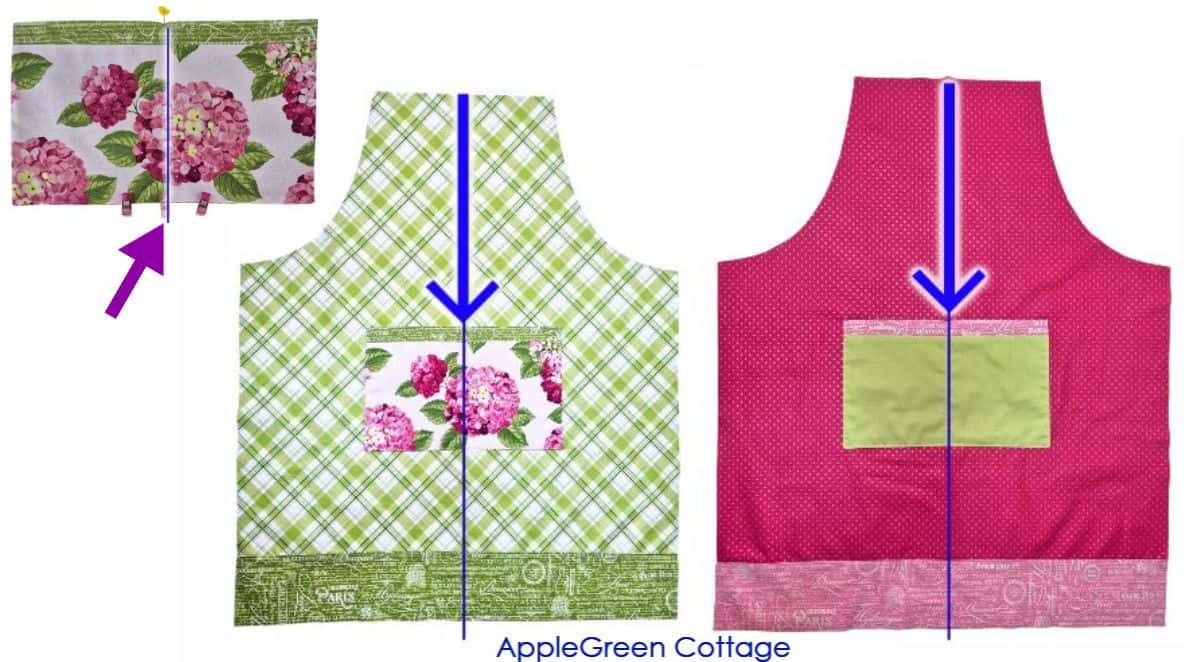
Mark the vertical center of your finished pockets, and align them on the bodice, 15" down from the top edge of the bodice. Pin and sew the pockets in place like this:
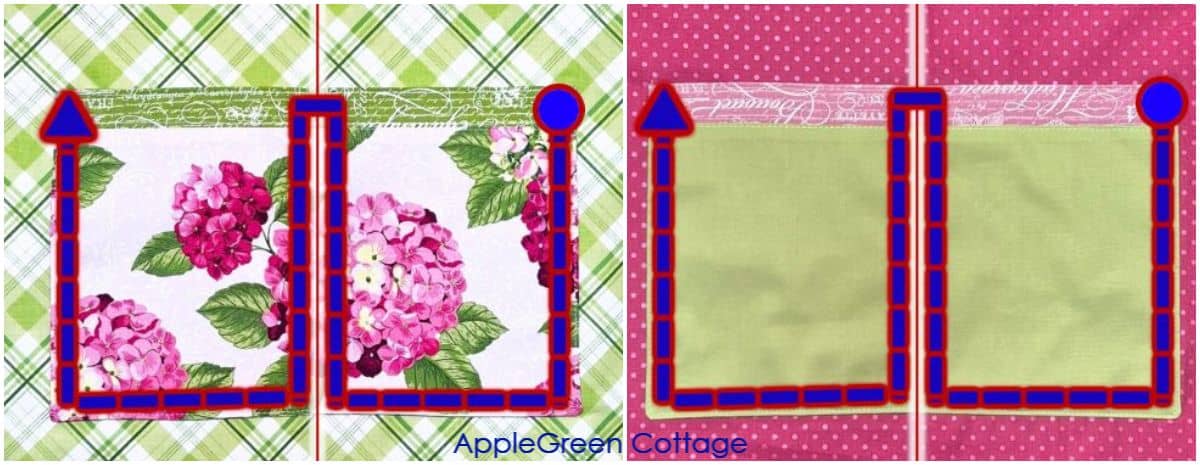
To make a vertical divider and form two pocket sections:
- Start sewing the pocket at the top right corner.
- Sew down one side of the pocket, pivot and sew along half of the bottom
- pivot again and sew up and down to create a pocket divider,
- pivot again and sew to the edge, and then pivot and sew back up to the top of the other pocket side.
TOP TIP: Backstitch at the top, in the middle and sides, for extra strength and security.
Step 7 - Finish 3 strap ends (the 'W-hack')
For neat strap ends, we'll finish just ONE END on each of these 3 straps: both waistbands (piece #7) and the LONGER of the two neckbands (piece #6). Take the 3 strap pieces and go:
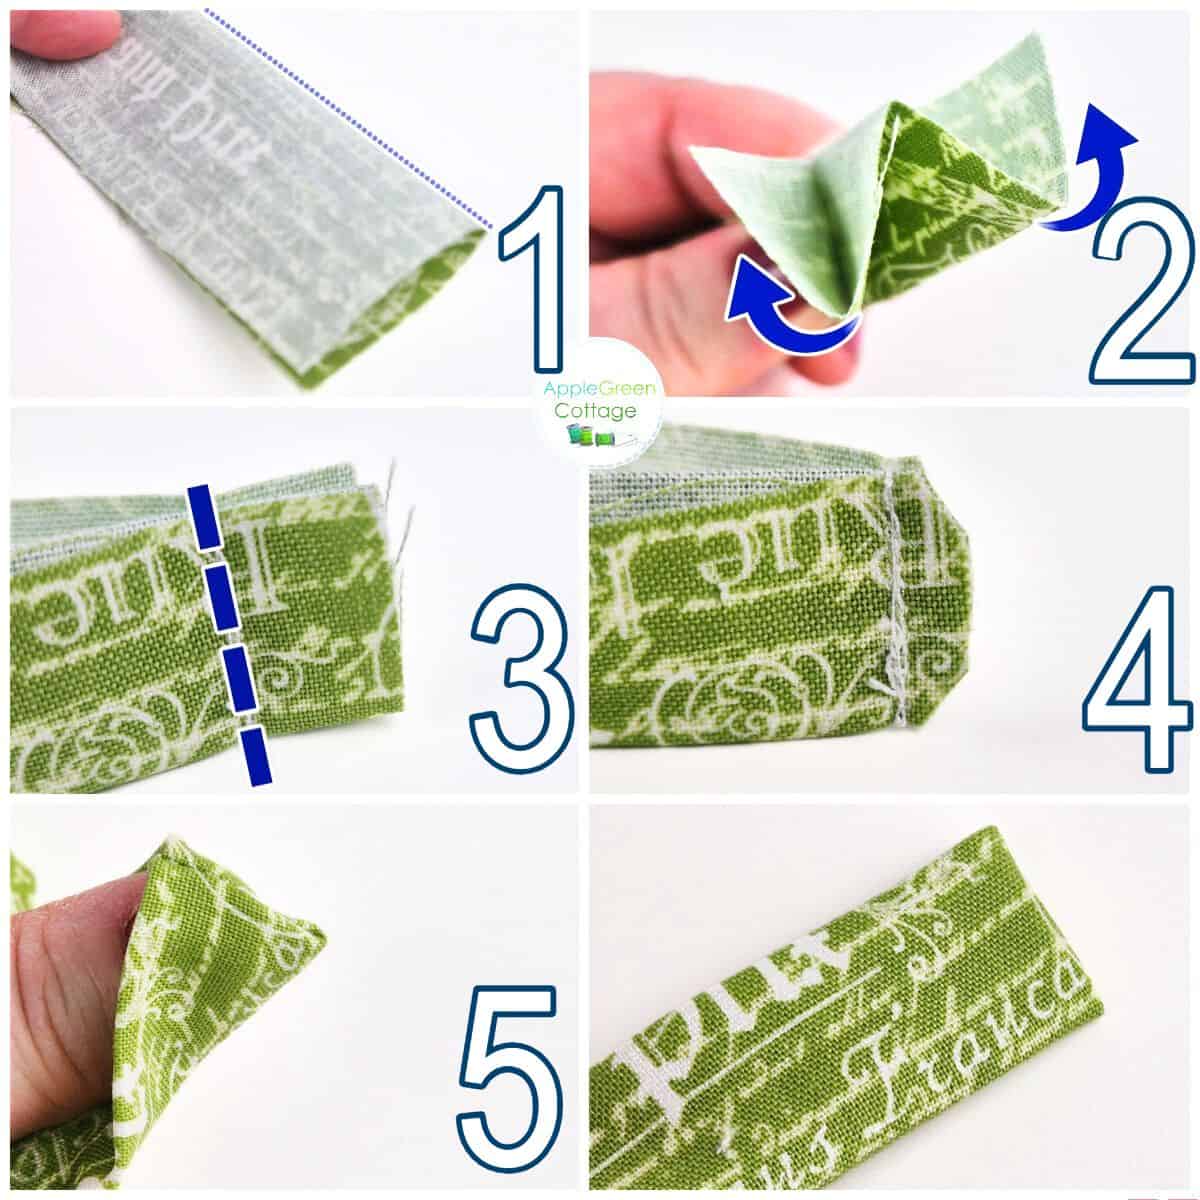
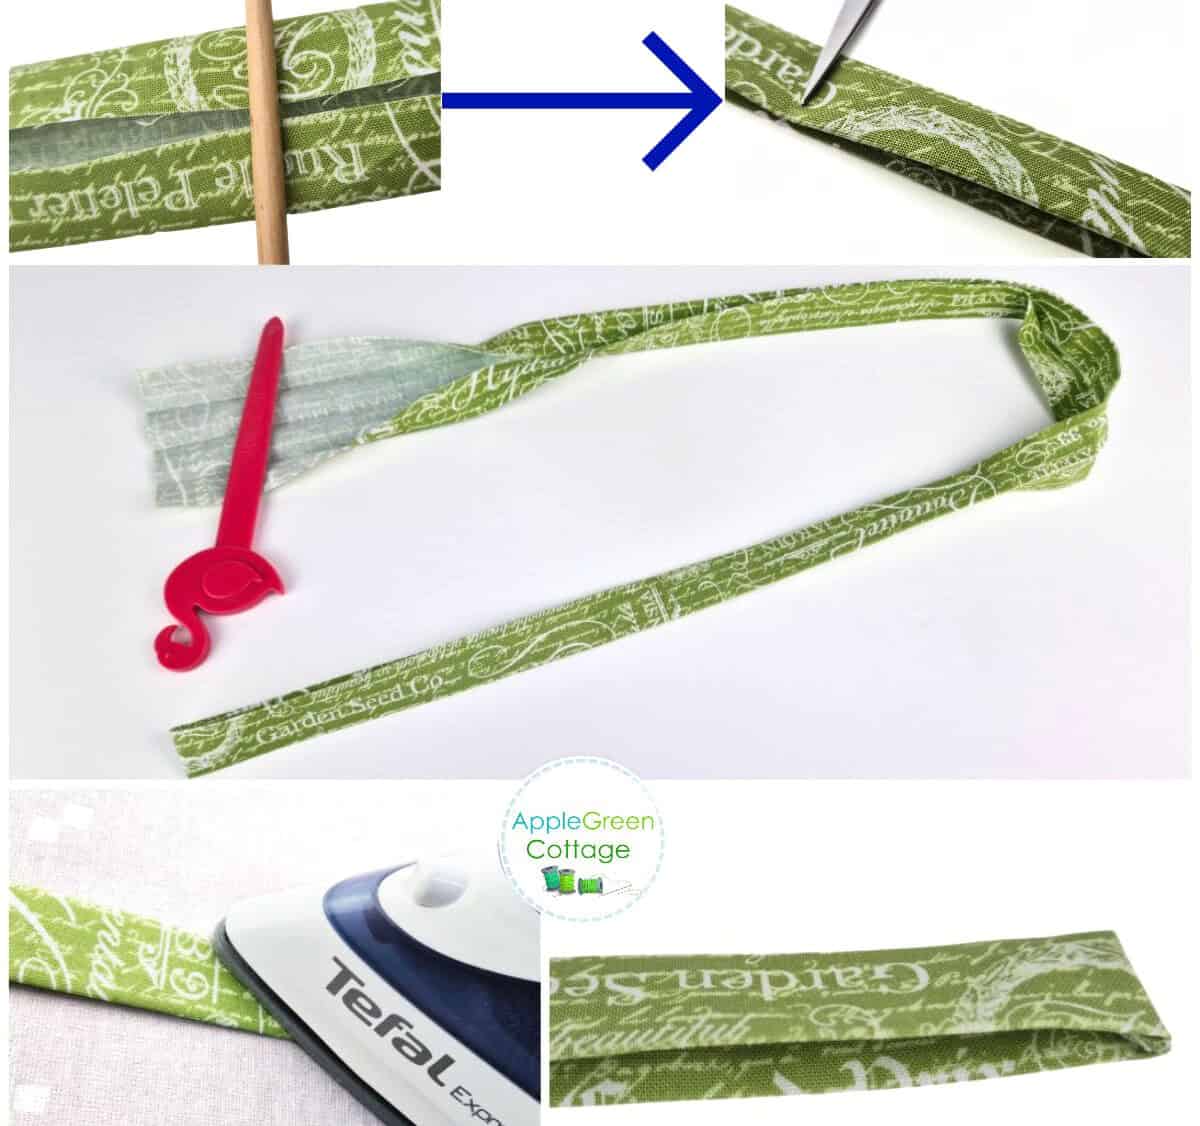
- Fold the strap ends in half along the center with right sides together. Press.
- Fold the long raw edges up to meet the center fold with wrong sides together. Press. The end resembles the letter 'W'.
- Pin and stitch over the short end using a ⅜" (1 cm) seam allowance.
- Trim the corners on the seam allowance.
- Flip it right-side-out to hide the raw seam.
DO NOT repeat for the other short end of the straps. Just one end - on each of the three strips.
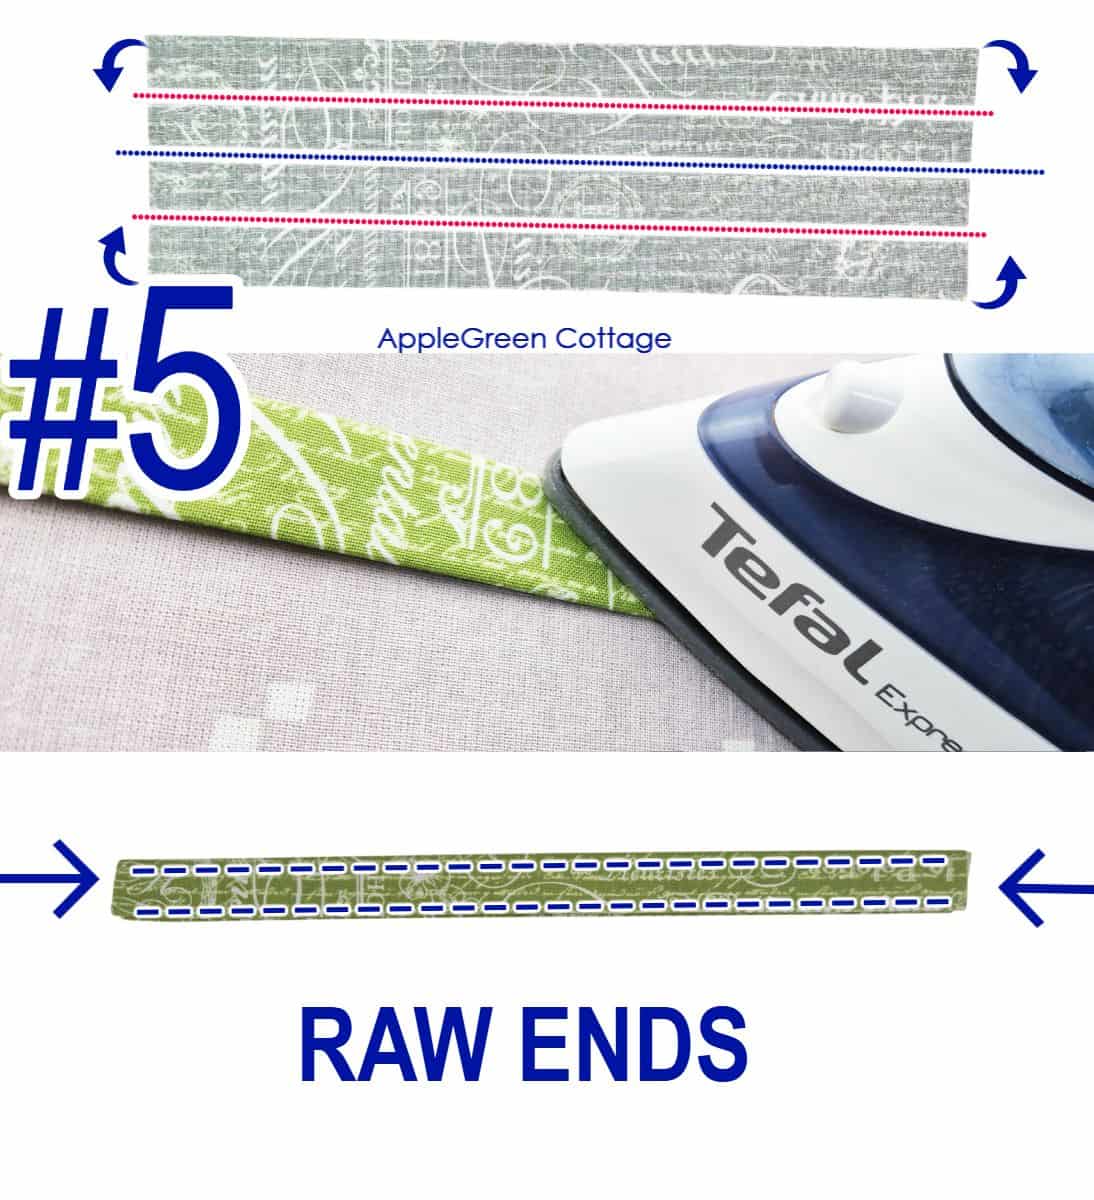
Fold the remaining portions of the straps to get them all to a ¾" width:
- Fold both long edges towards the center.
- Fold the strap in half along the center again and press.
- LEAVE the other strap end raw.
- Once you've folded and pressed the entire strap, topstitch along the two long edges.
You now have 3 straps, each with one end unfinished.
Step 8 - Create the neckband anchor (piece #5)
First, fold and press the fabric strap piece #5:
- Fold both long edges towards the center.
- Fold the strap in half along the center and hold it using clips.
- Once you've folded the entire strap, topstitch along the two long edges.
Then add the slider:
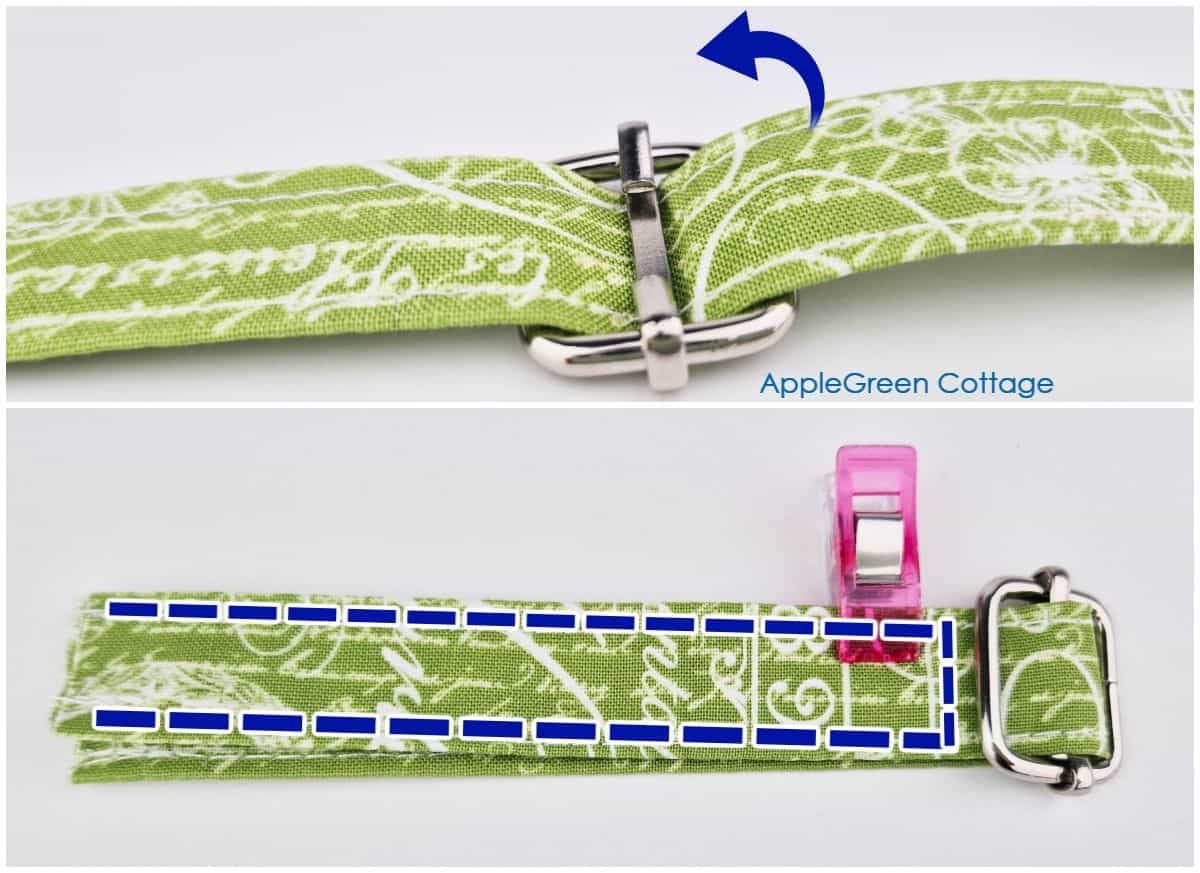
- Feed one raw end of the strap through the slider around the middle bar.
- Keeping the slider in the center, fold back the strap end.
- Topstitch along the long and short edges of the new 'anchor piece' to secure it.
Step 9 - Baste on all straps
Transfer the 2 waistband markings and the 2 neckband markings from the Bodice pattern piece #1 to the semi-finished front apron panel.
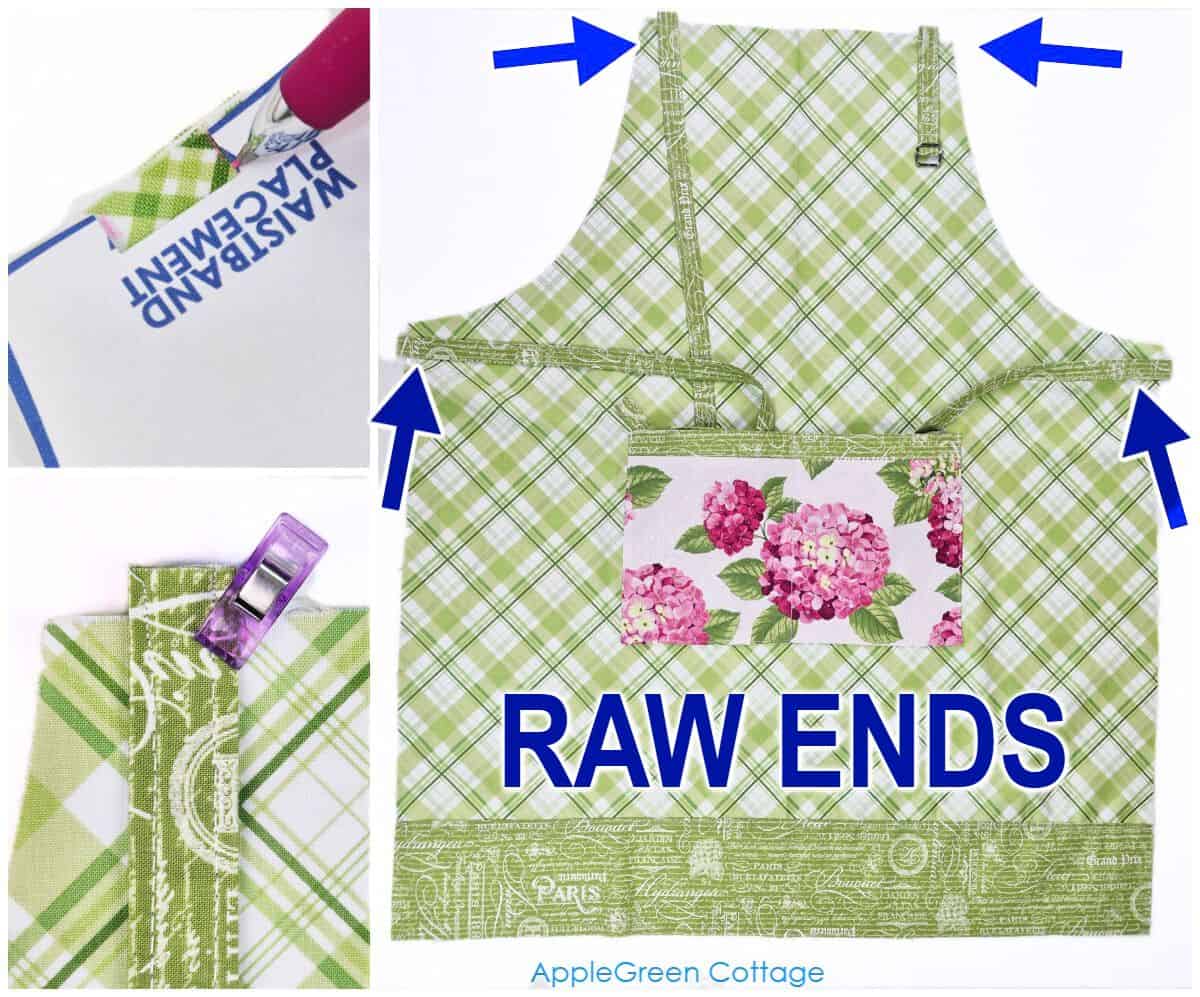
- Place the raw ends of the 2 waistband pieces onto the 'waistband' marking.
- Place the raw ends of the 2 neckband pieces onto the 'neckband' marking.
- Pin and baste in place. Tuck the finished ends into the pocket or use painter's tape to temporarily keep them in place.
NOTE: the finished ends will be pointing towards the center of the apron. The raw ends are peeking outwards by at least ¼", for stability.
Step 10 - Join Front and Back
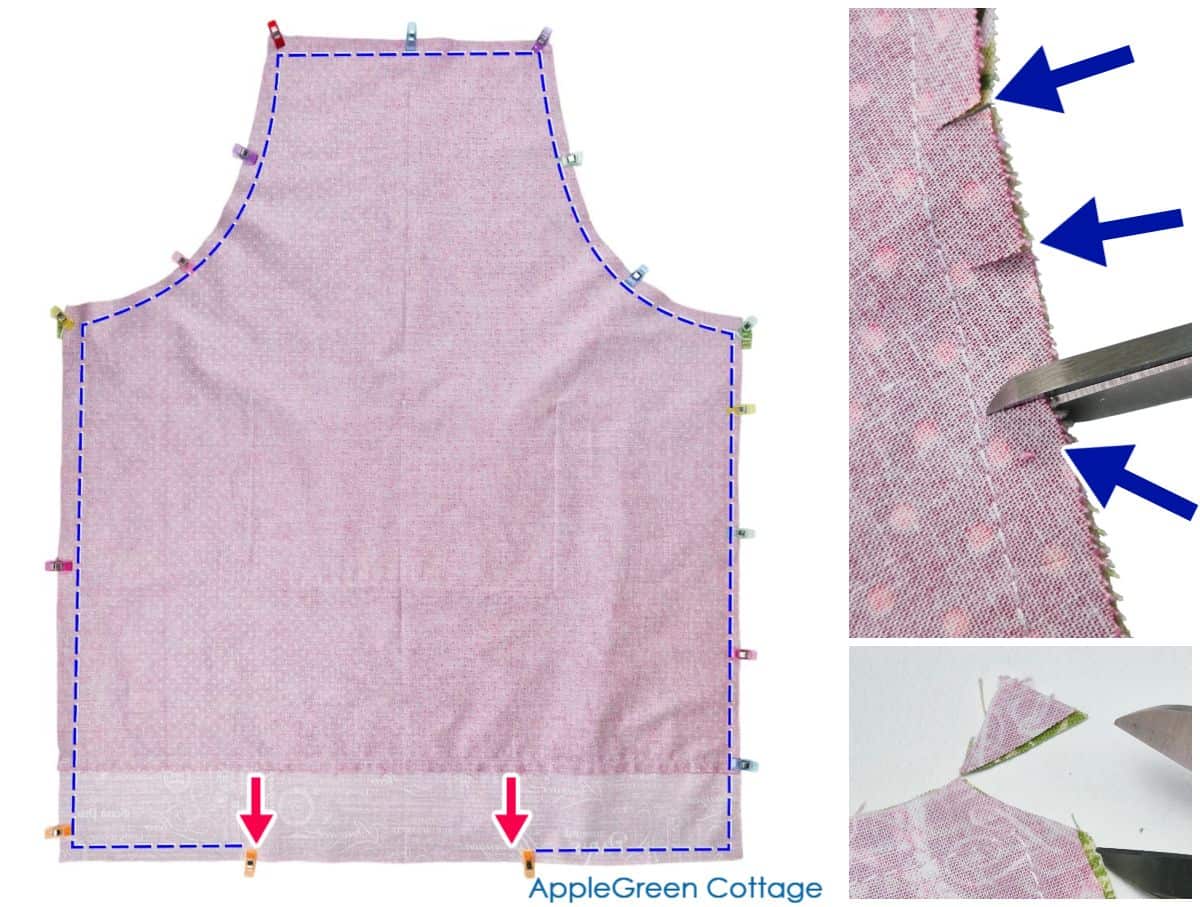
Sew around the entire bodice using a ⅜" seam allowance, leaving a turning gap at the bottom of the apron. 5" is enough.
Trim the corners and clip the curved portions of the seam allowance. Do not snip into the seam.
Step 11 - Turn and topstitch around
Turn right side out, press, and topstitch around - either from the front or from the back, as shown here. Your reversible apron is done - ready for cooking, crafting, gifting, or everyday use.
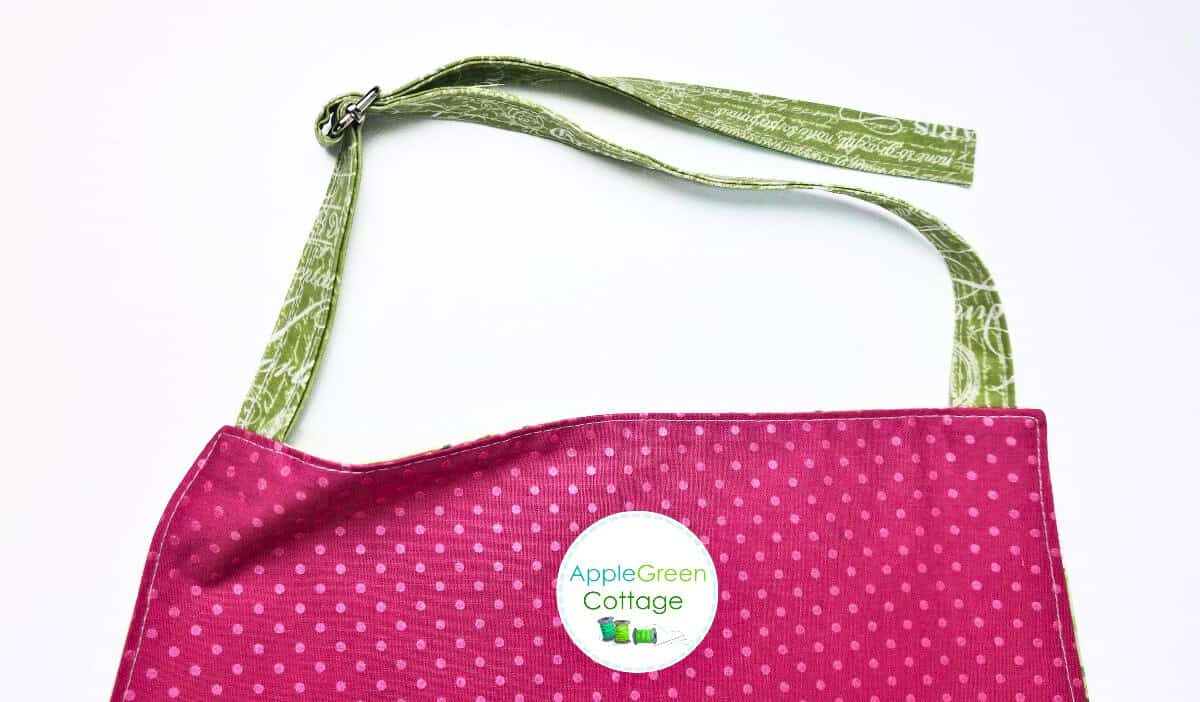
How To Tie the Apron Neckband
This apron has an adjustable neckband: one tie is loose and the other has the buckle (strap slider, or triglider) attached. Some people ask me how to use the slide buckle on the apron neckband to fasten an apron neckband.
How to thread the neckband
- Hold the slider so the center bar (already wrapped in fabric) is in the middle.
- Insert the loose strap through one outer opening (from the underside toward you).
- Bring it over the center bar.
- Feed it back down through the second outer opening.
- Pull the loose end to shorten the neckband.
- For extra hold, feed the loose end back through the first opening once more to secure it in place.
More Tips
In the last step, you can add additional topstitching seams to better bond the two apron layers. I didn't feel it necessary.
Want a more uniform look? Go with just 2 prints: main and accent, and just swap the look on the back.
Want to adjust the length of your apron? The bottom strap (pattern piece #2, Bodice BOTTOM) will play the decisive role here: one of my favorite details on this pattern. Keep it for a longer, classic apron look, or leave it out for a shorter version - same pattern, different lengths.
Related Ideas
Looking for more projects like this? Try these:

Conclusion
Sew This Handy Storage Tote!
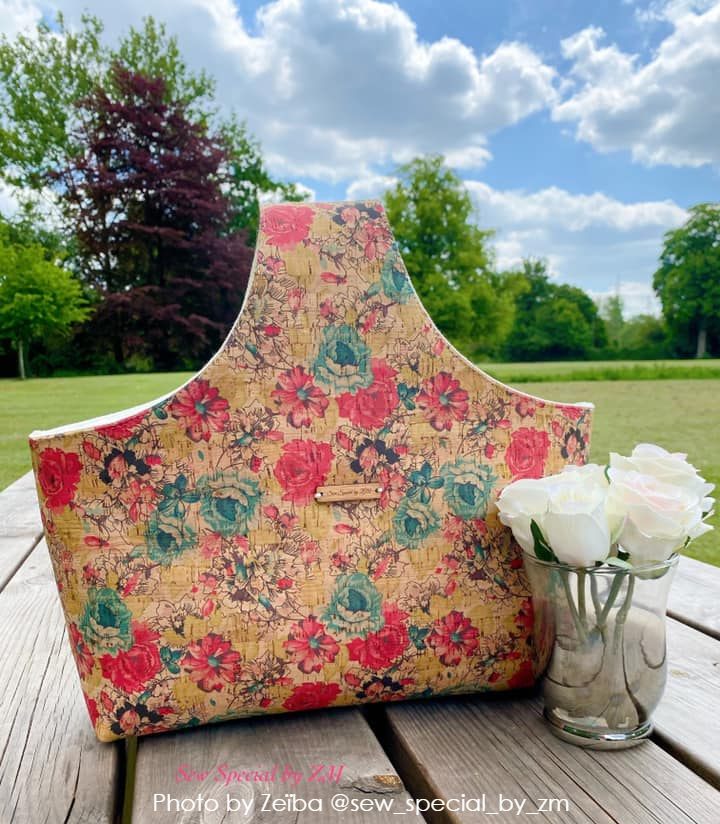
Check out this pretty ALLina project tote pattern in our shop - for all your storage needs!
I hope you liked the tutorial on how to make a reversible apron. As always, I'd love to see if you've made an apron using this tutorial. Please post a picture to Instagram and tag me @applegreencottage or #applegreencottage - so I can take a look!
Want a printable copy of the whole tutorial?
Prefer a full, ad-free and printer-optimized Printable Tutorial with both instructions AND pattern included? ↓↓
This tutorial is also part of Printable Tutorials BUNDLE
100 PDF tutorials now, and growing!

Join the FREE 7-part email course and make 6 beautiful items for your home! You'll love it!


Leave a Reply