
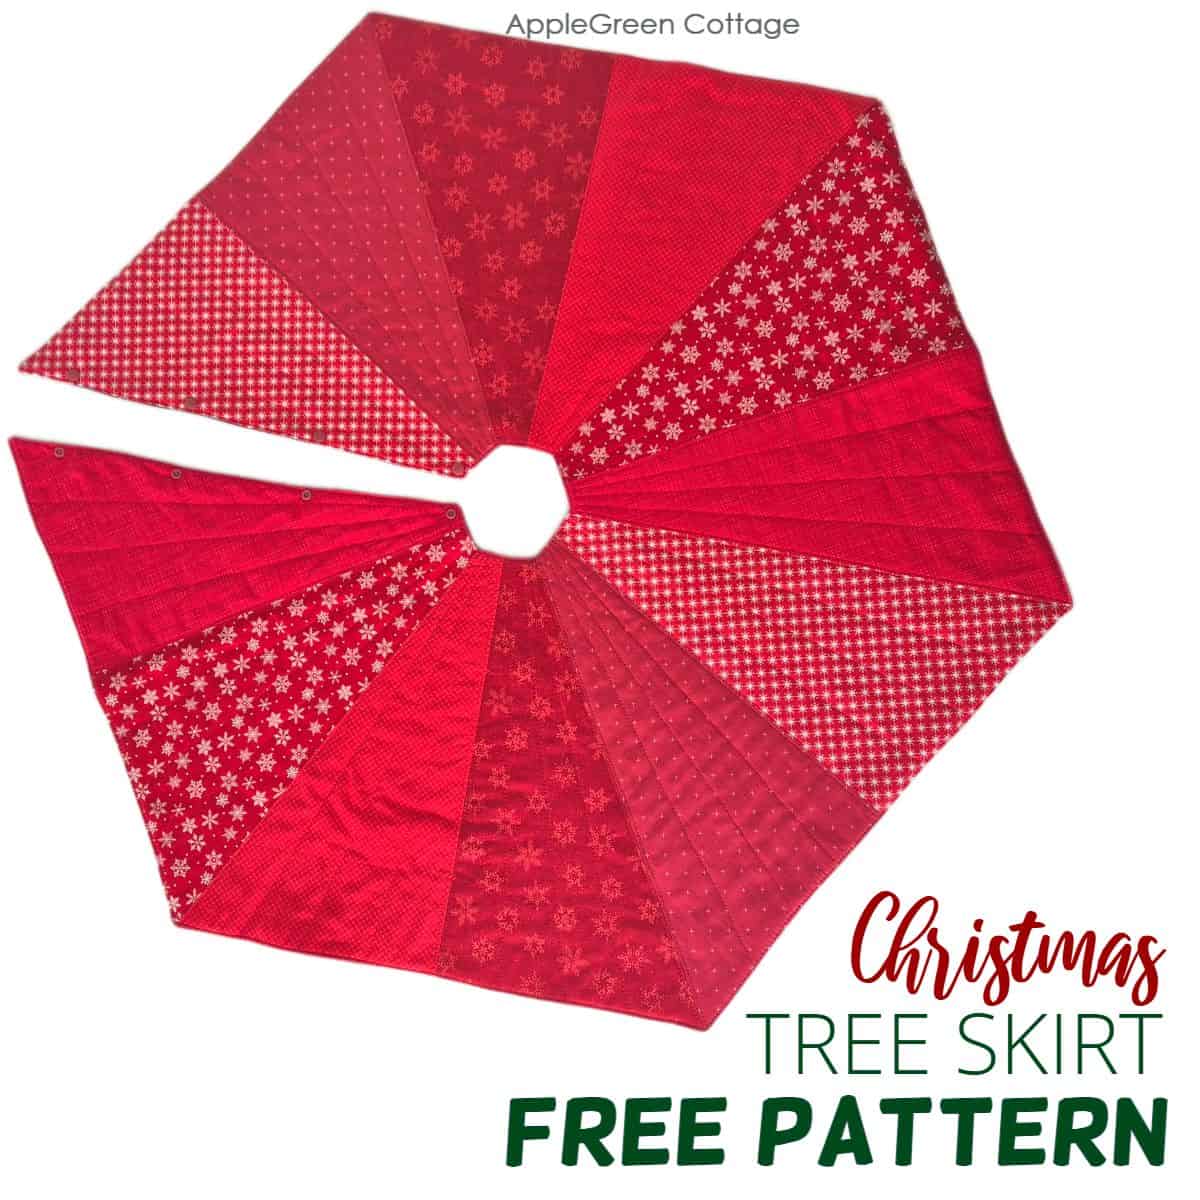
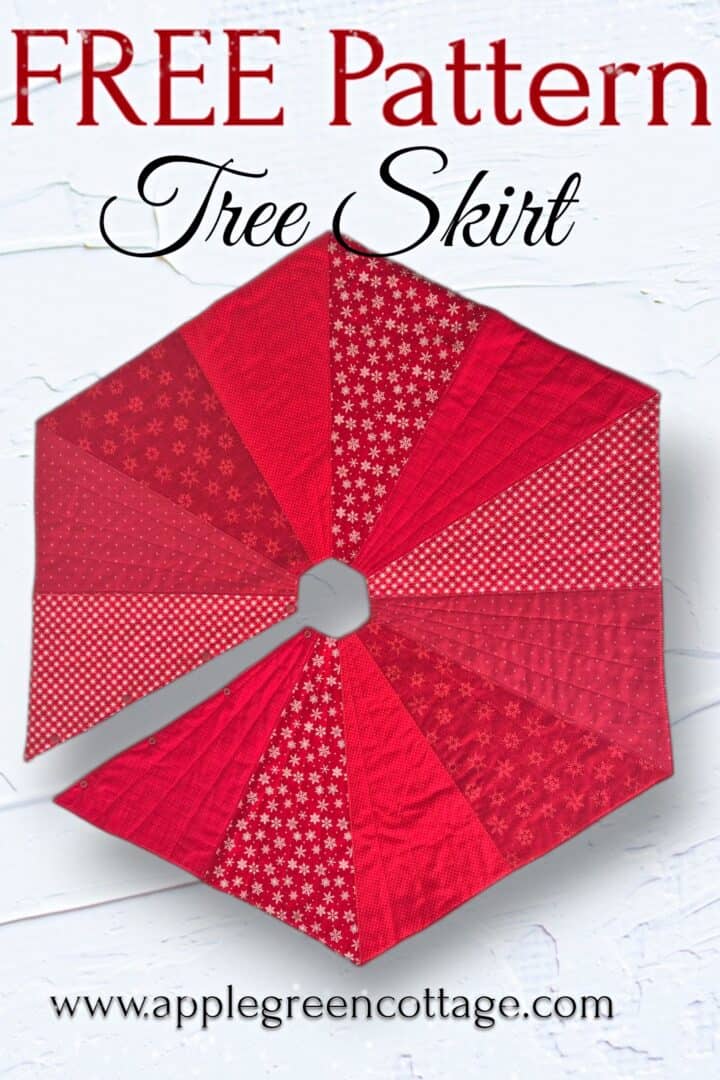
Sew a beautiful tree skirt using our free Christmas tree skirt pattern - quick, reversible, and no binding needed! A perfect weekend project that looks beautiful under any tree.
Did I mention the two looks in one? See the back side below and grab the free pattern!
Want a printable copy of the whole tutorial?
Prefer an ad-free printer-optimized option of the whole instructions + pattern included? ↓↓
Table Of Contents
Why you'll love this tree skirt pattern
- Reversible design - two looks in one!
- No binding needed - clean edges, no extra fuss.
- Beginner-friendly - simple shapes, clear steps.
- Quick weekend sew - and, so beautiful!
Supplies
Shop my personal favorite sewing supplies on Amazon HERE.
- quilting cotton, 6 pieces each 18" by 12", or a yard of different prints for the top
- one and a half yards for the backing
- at least 40" by 50" of batting (baby size batting on Amazon) plus Odif 505, or simply use fusible fleece (low-loft Pellon 987F or high-loft Pellon Thermolam)
- sewing machine (insert a new needle!), thread, iron, and pressing board
- rotary cutter, cutting mat
- a ruler - see my favorite rulers here
- optional: a KAM Snap set
- free tree skirt sewing pattern PDF - enter your email here
Finished Size
This quilted tree skirt pattern finishes at 42" in diameter, measured across the widest point. You can easily make it larger - see the tips below.
To enlarge, print the triangle template at a bigger scale or extend the bottom edge evenly to make each triangle taller. Just remember to keep the same angles - you're changing the size, not the shape.
Sewing Video
Tree Skirt Sewing - STEPS
Step 1 - Get the free pattern
Join our mailing list and get the pattern emailed to you:
Do you want a printable copy of the WHOLE tutorial? → See it HERE or get it in the huge-value BUNDLE!
How to print the christmas tree skirt quilting pattern PDF: download to a desktop, open it in ADOBE READER, and print at 100% size on paper or cardstock. (I recommend not printing directly from a browser window or from mobile, it could cause issues.)
Step 2 - Select the fabric
In total, you'll need rougly 1 yard of fabric for the pieced tree skirt top, and one and a half yards for the backing, and 40" by 50" of batting or fusible fleece.
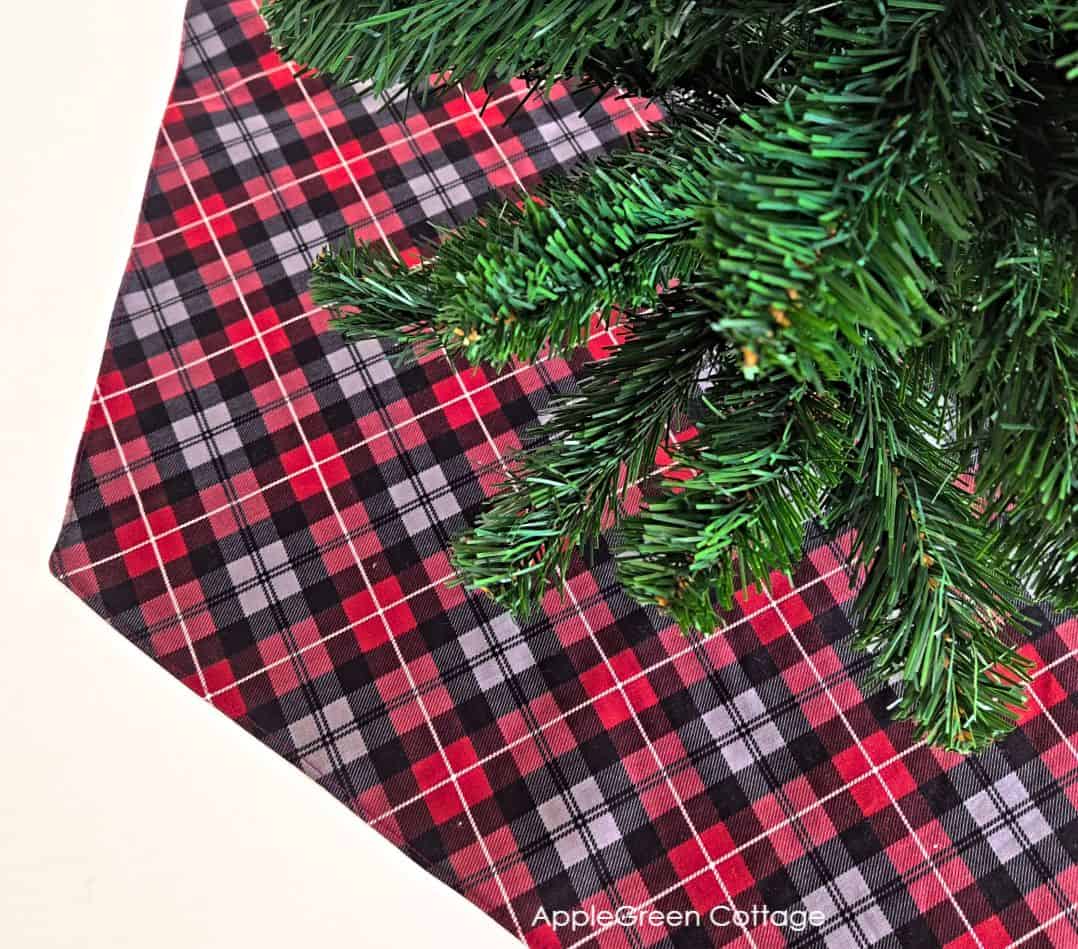
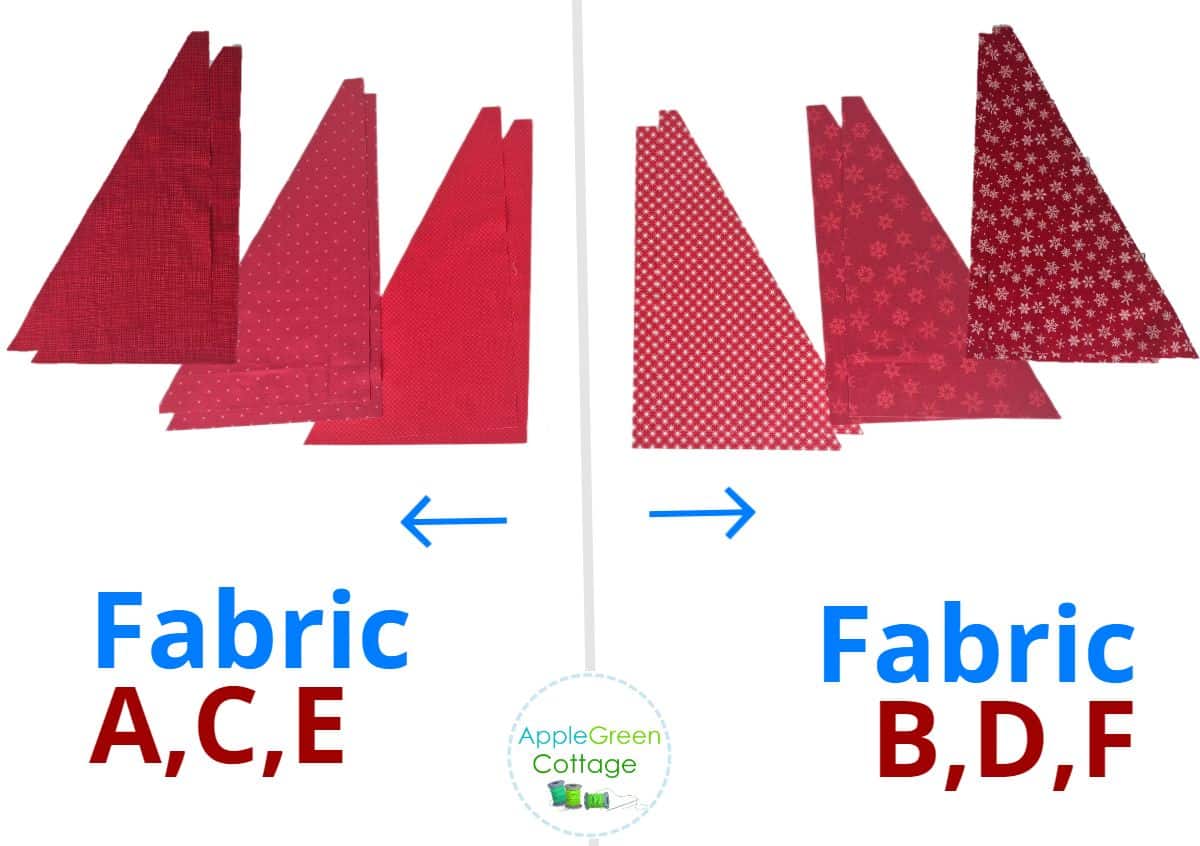
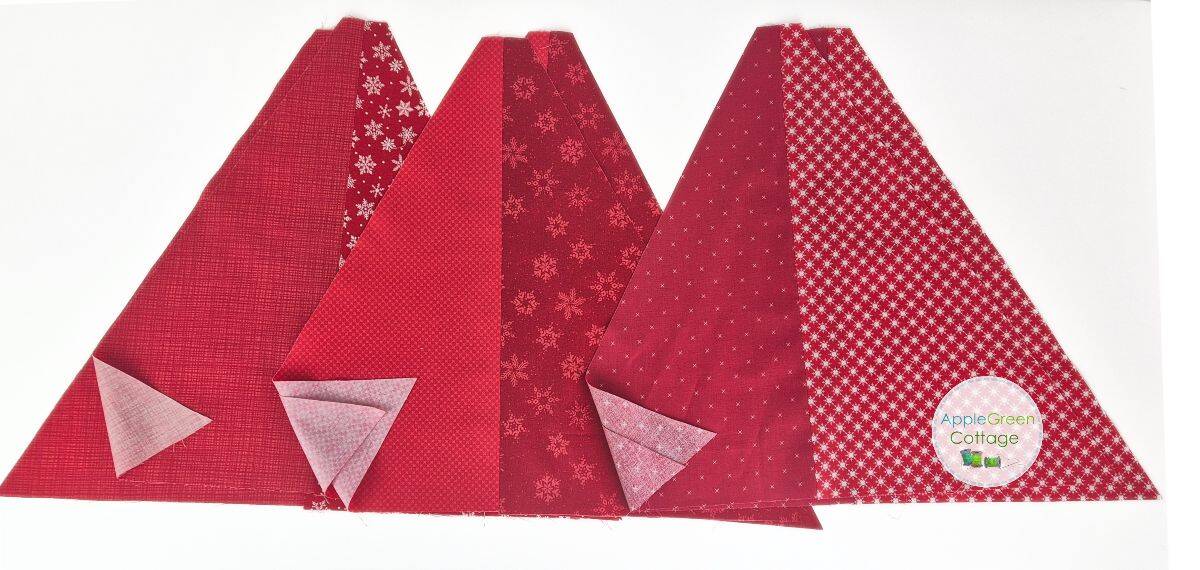
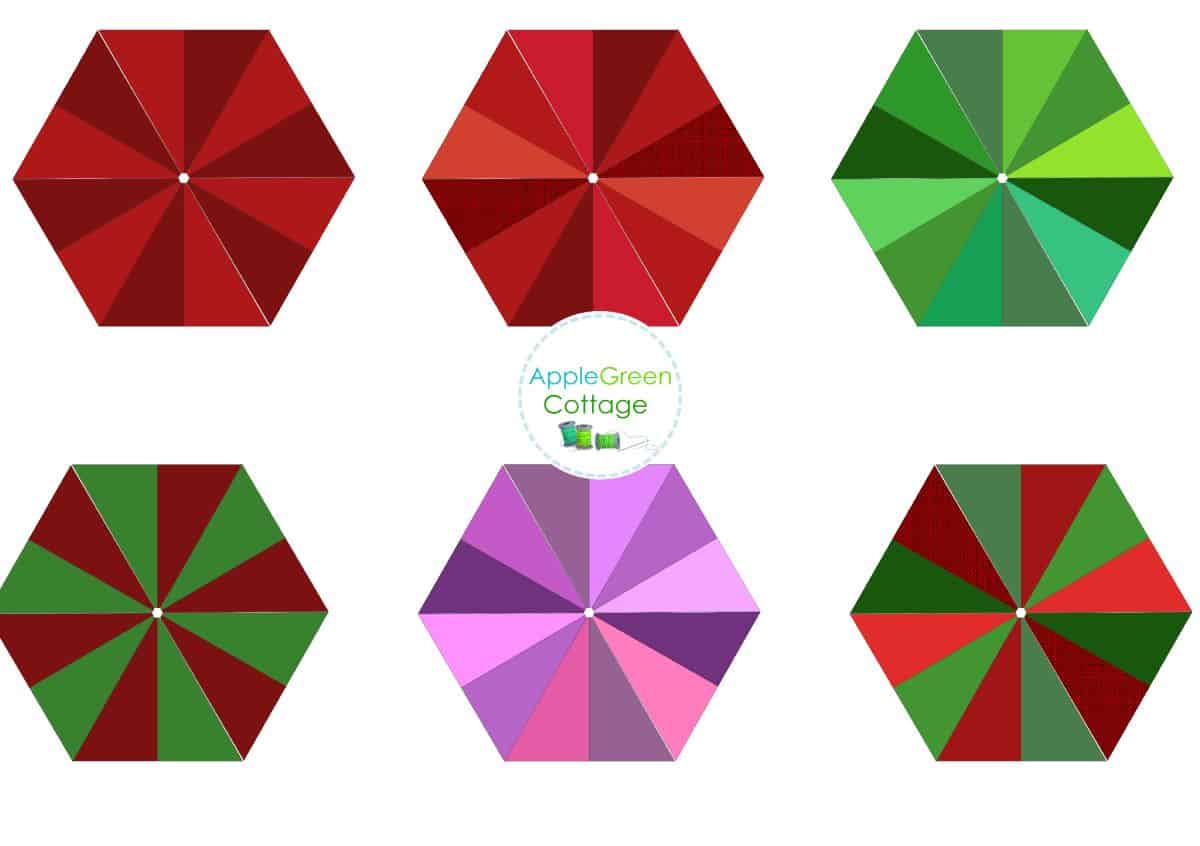
For the look as in the title image, you'll need 6 prints. I paired 3 red blenders (A,C,E) and 3 red Christmas prints from my stash (B,D,F).
Create pairs: A+B, C+D, E+F.
OPTIONS: you can go for any combination that matches your home decor, from 2 up to 12 prints. See a few images at the bottom for inspiration. (I also added a coloring page as part of the free pdf template.)
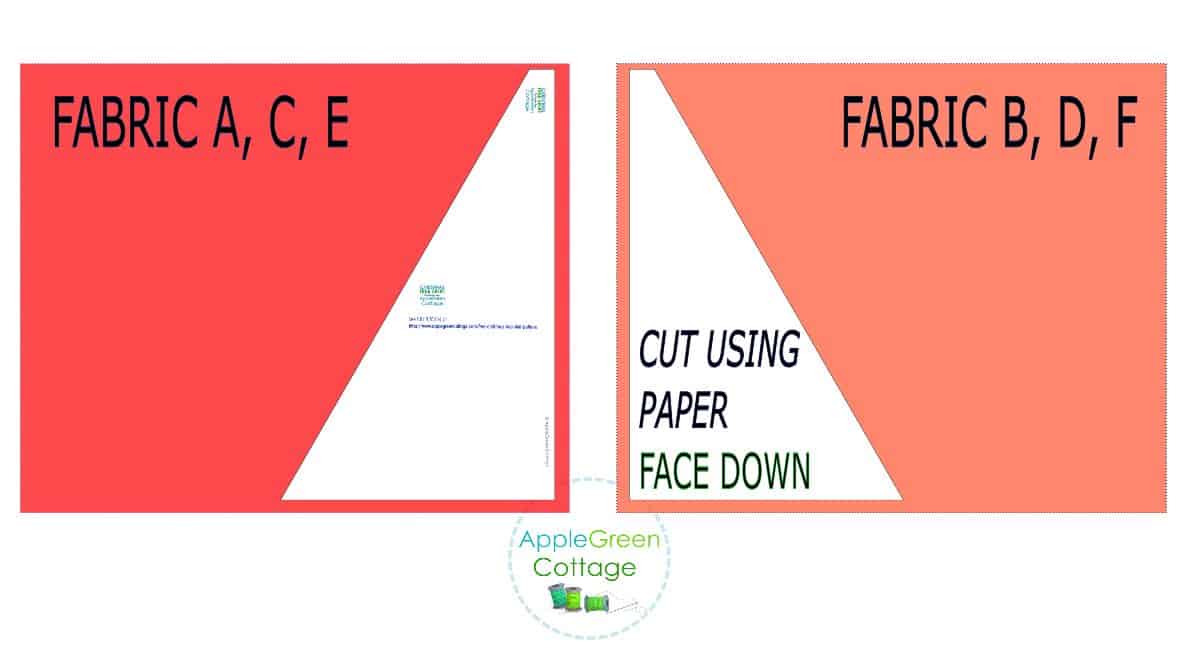
Step 3 - Cut the fabric for the tree skirt top
Cutting Directions for the Top layer: using the pattern cut 12 pieces. We'll work in pairs:
- cut 2 pattern pieces from each: Fabric A, C, and E
- cut 2 pattern pieces MIRRORED from each: Fabric B, D, and F
MIRRORED in this case means that you'll simply FLIP the paper pattern, so the BACKSIDE of the paper pattern is facing up. (print will not be visible). Like this:
This is what you have now: (12) pieces using the pattern:
- 2 pieces from each of the Fabric A, C, and E
- 2 pieces MIRRORED from each of the Fabric B, D, and F
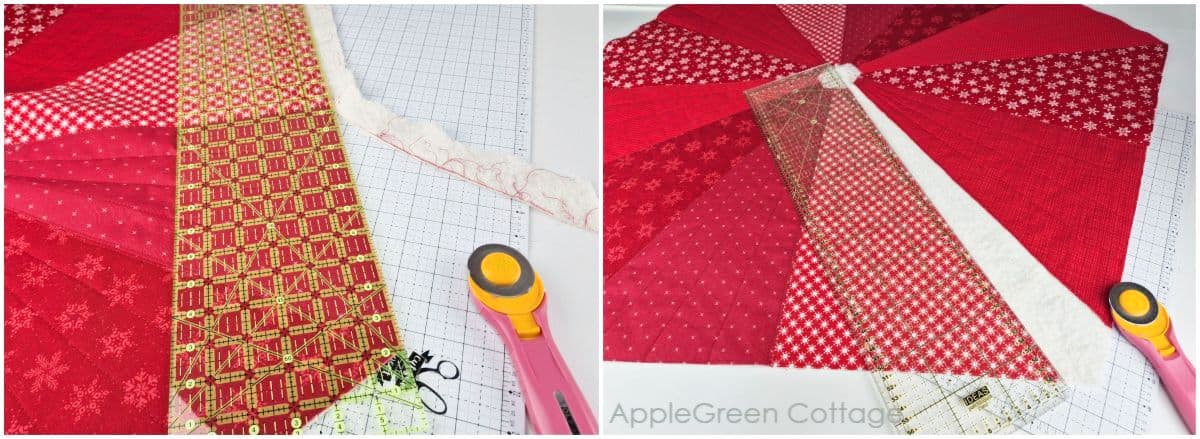
Step 4 - Join Pairs
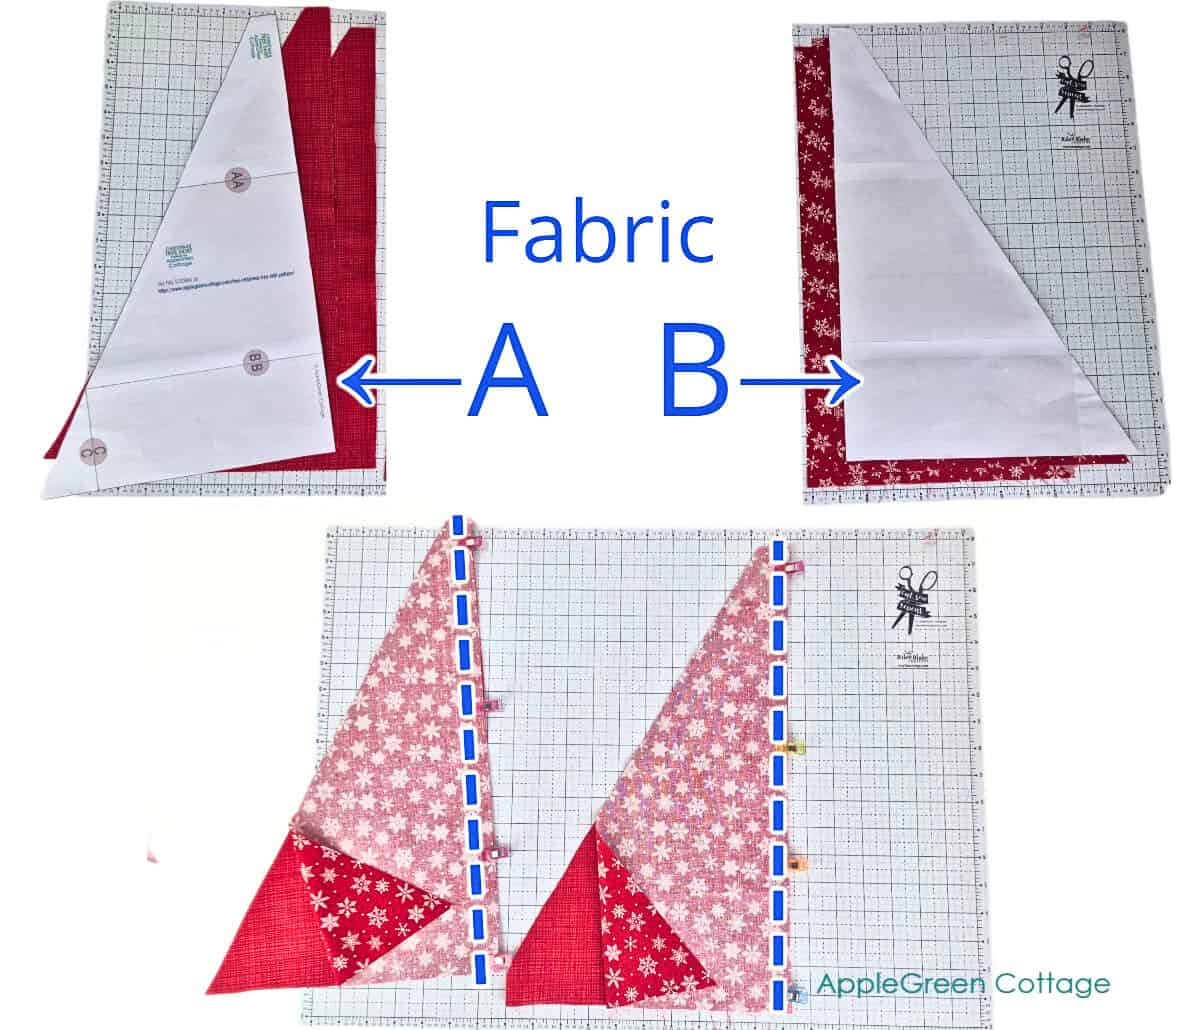
Starting with Fabric A and B, join the vertical line of the pieces to create 2 equilateral triangles. Clip or pin to prevent shifting, then sew together, using a quarter inch seam allowance. Here's more about the seam allowance in quilting.
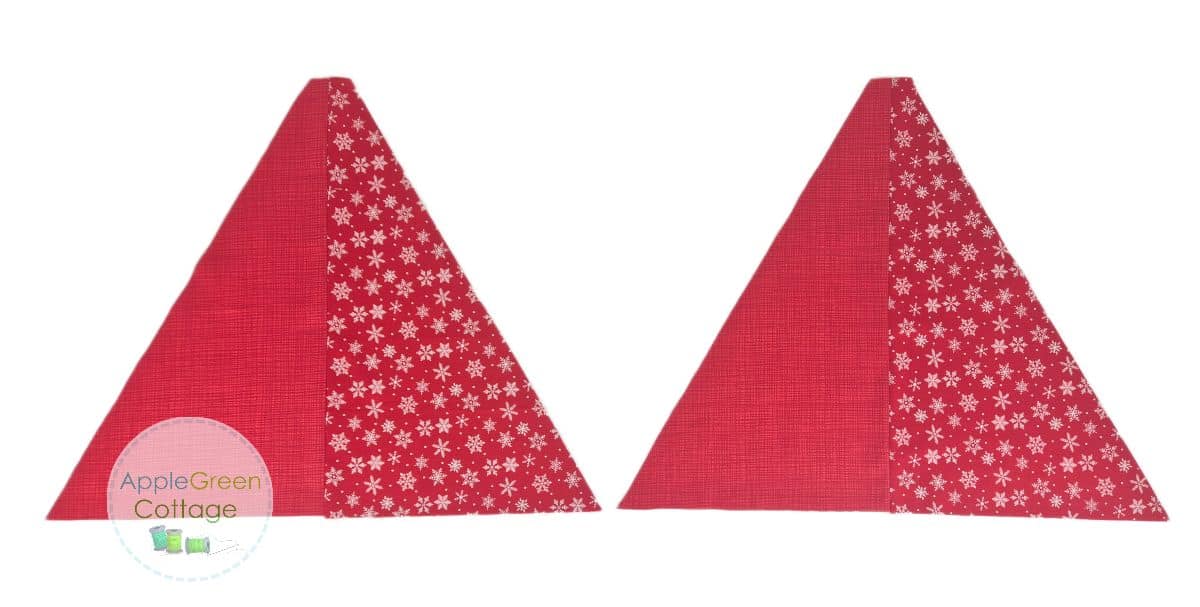
Press the seams open. Then do the same with Fabrics B+D, and E+F.
Step 5 - Arrange Blocks
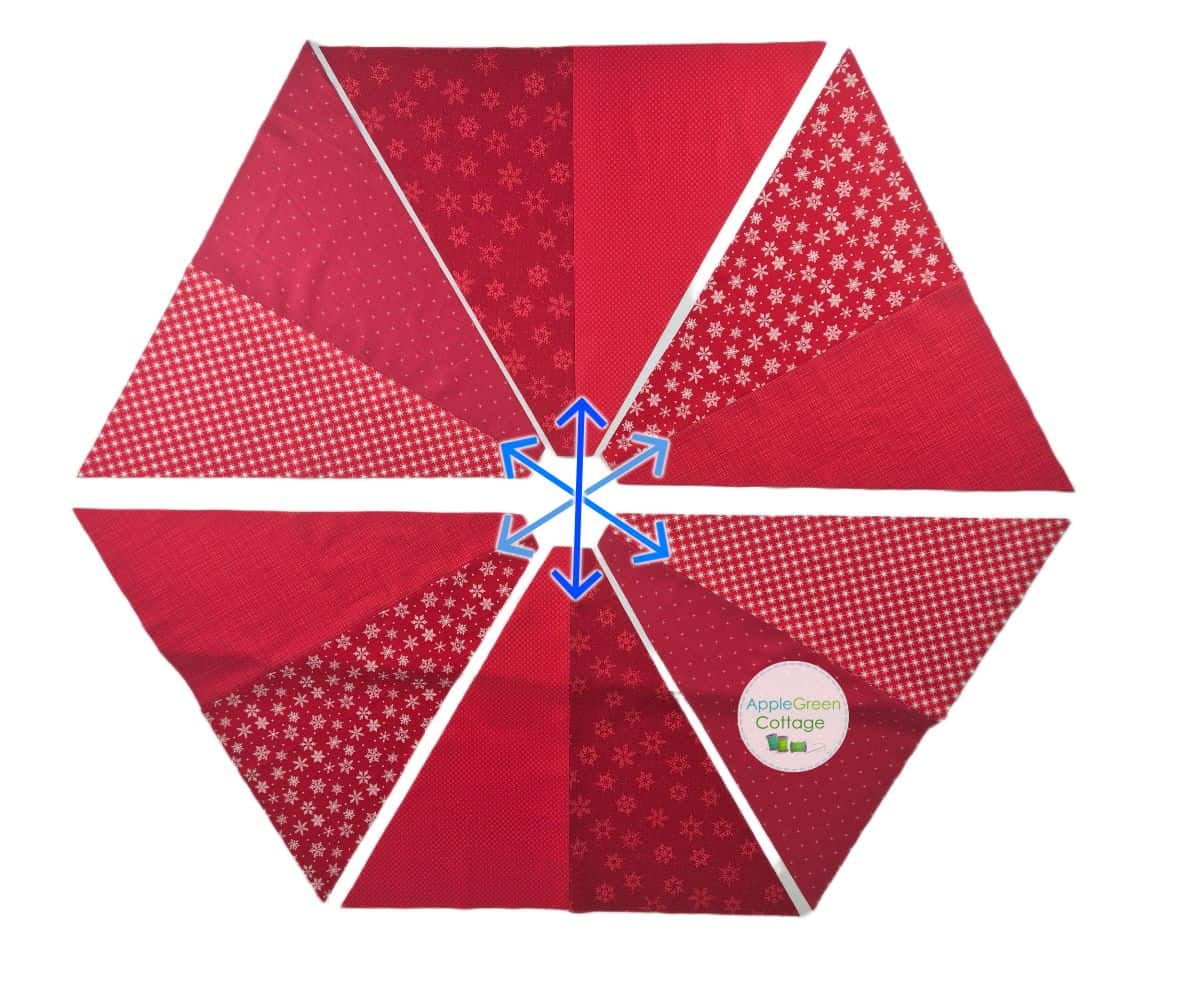
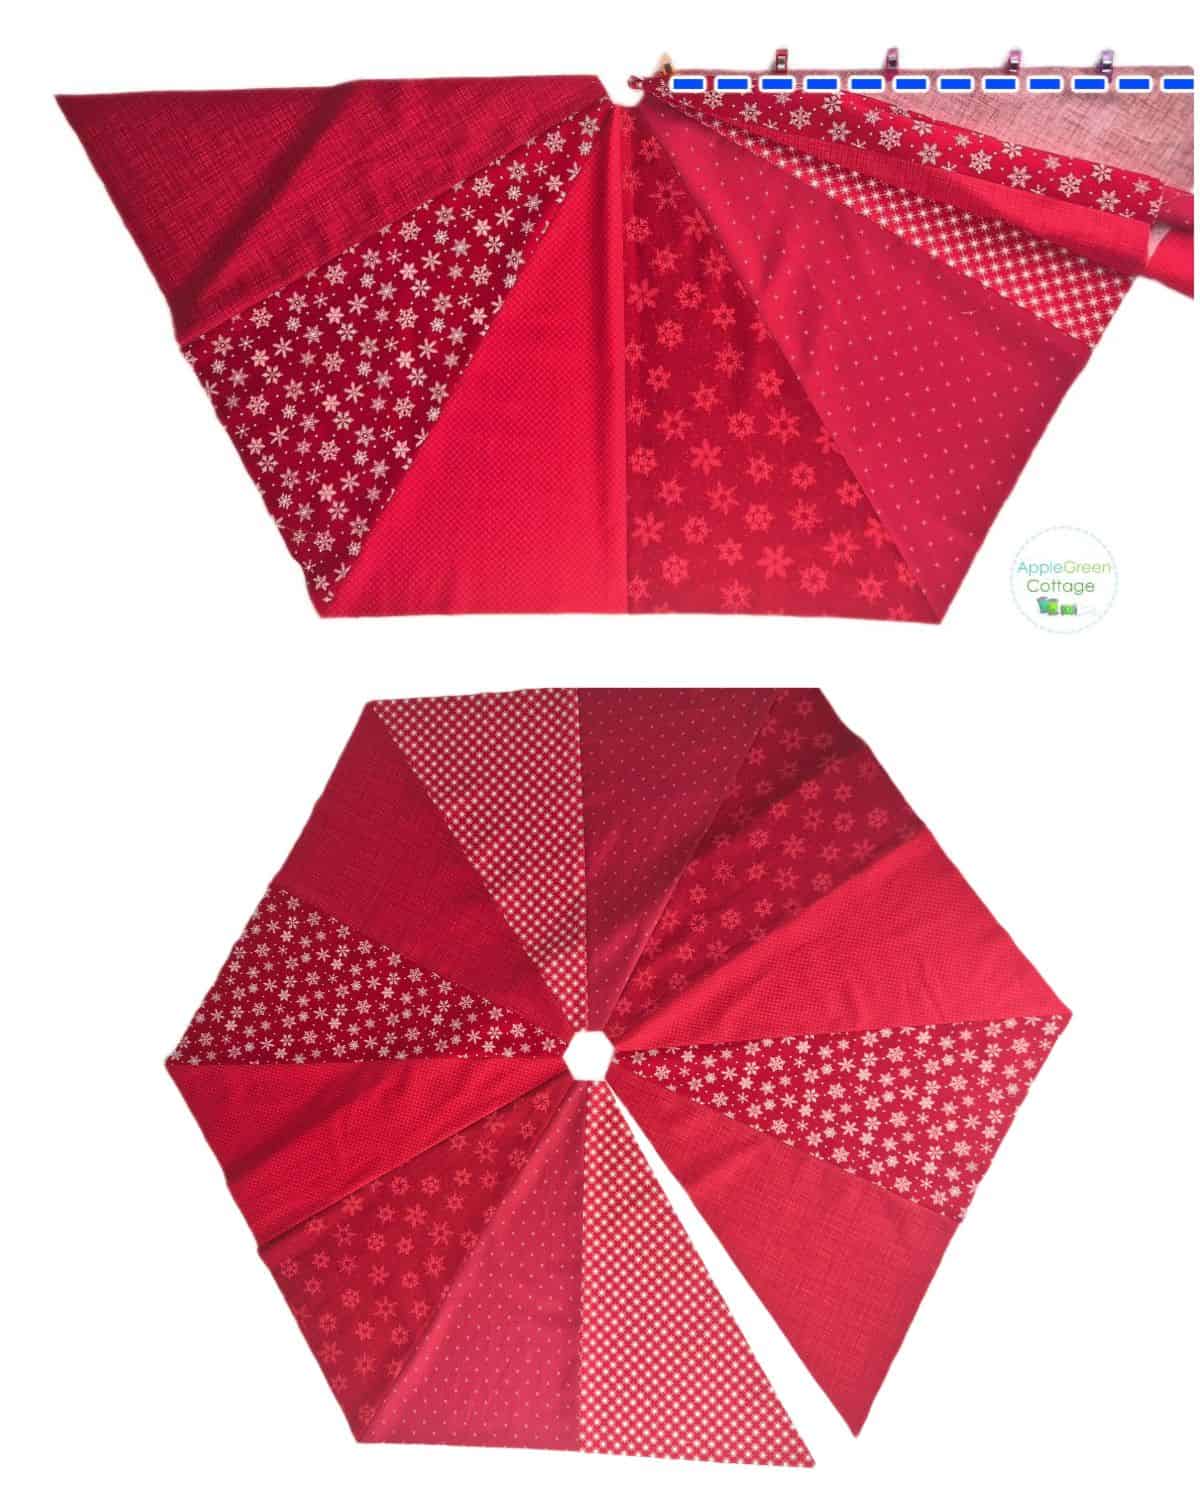
Arrange the triangular blocks in a circle, placing each pair of identical triangles directly opposite each other.
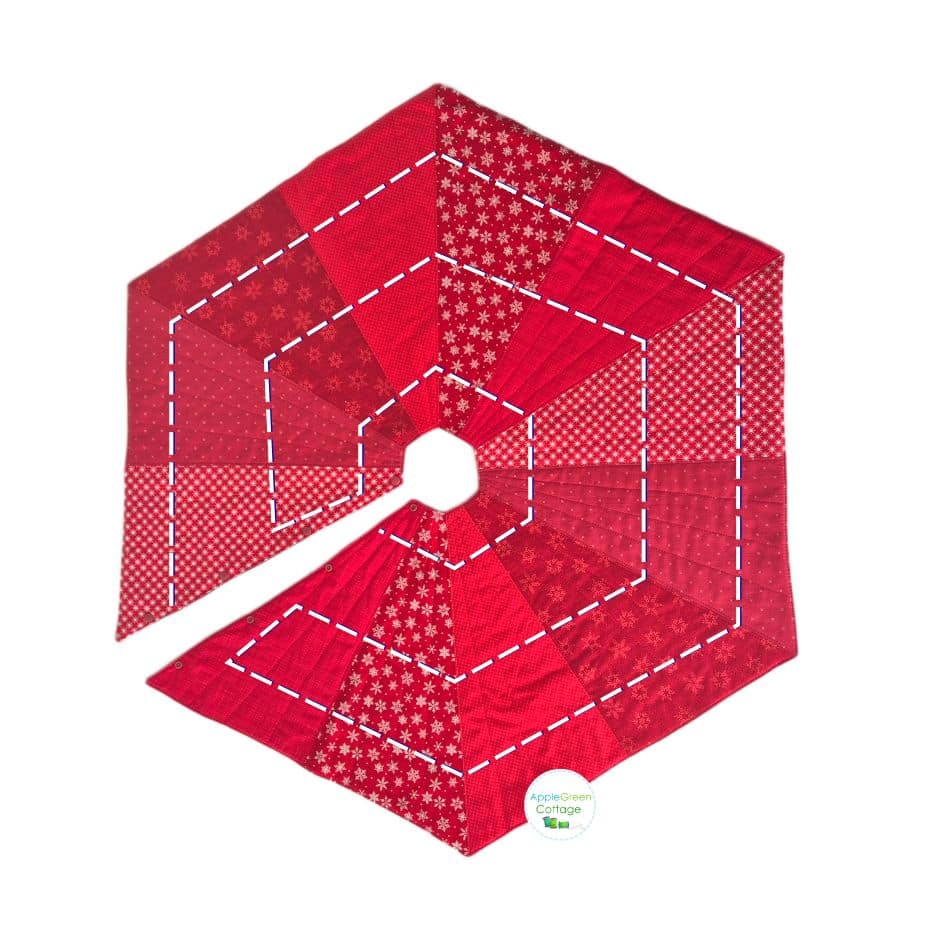
Step 6 - Assemble the Top
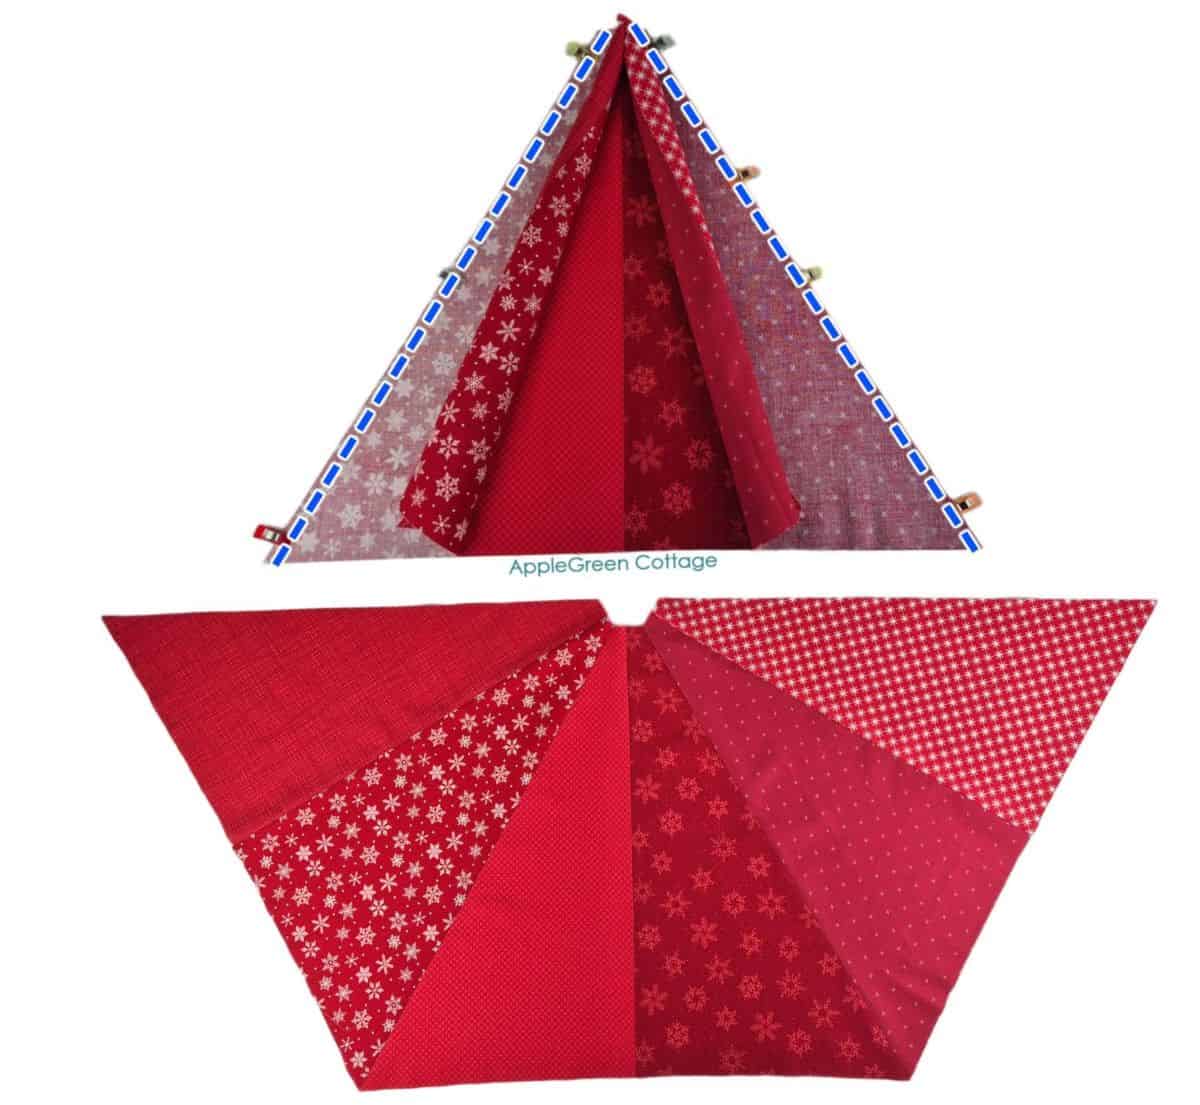
Join the 3 bottom triangles by sewing along the edges of the triangles together, than join the top three triangles. You'll end up with two halves:
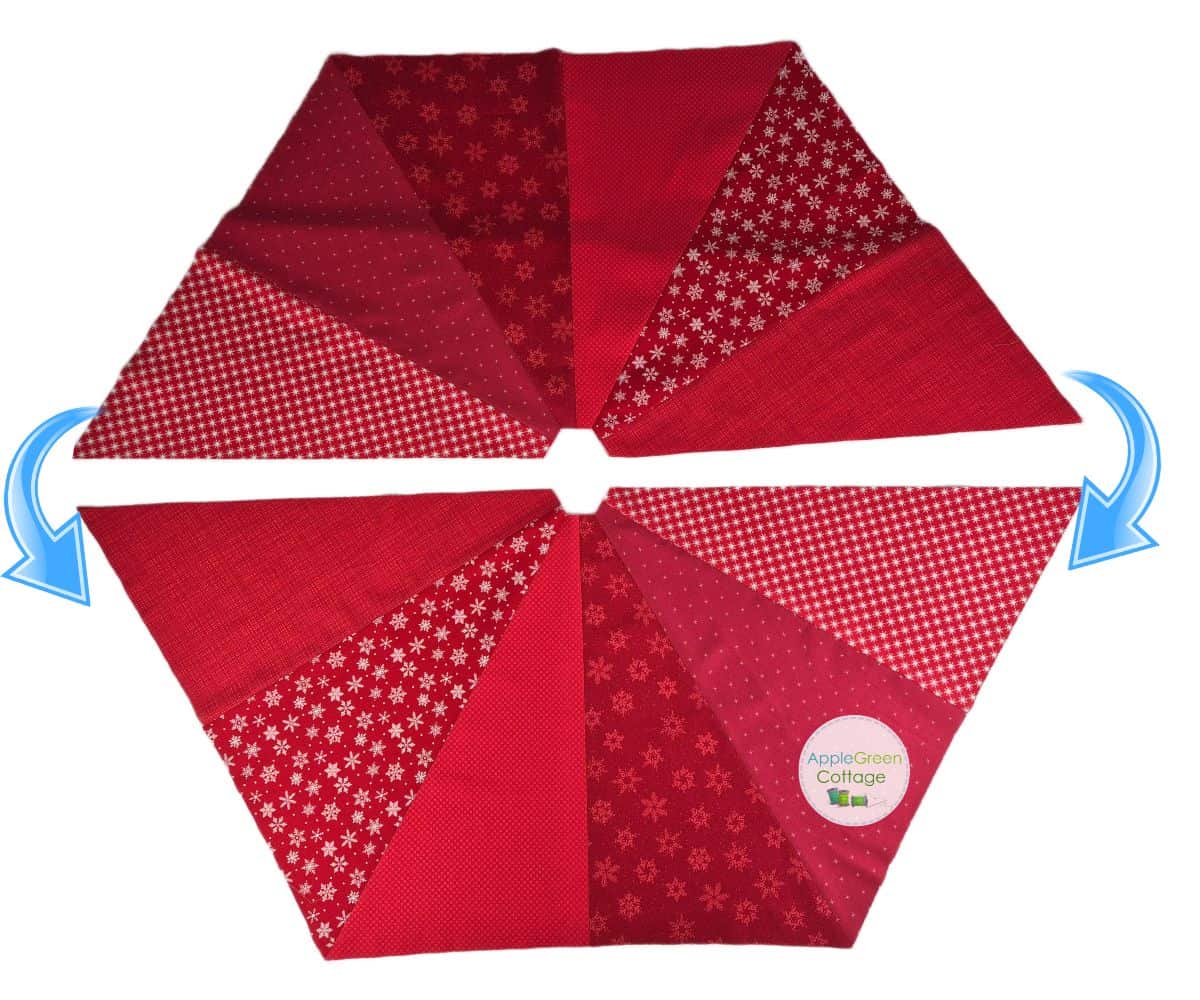
Place them with right sides together, aligned along the longest edge.
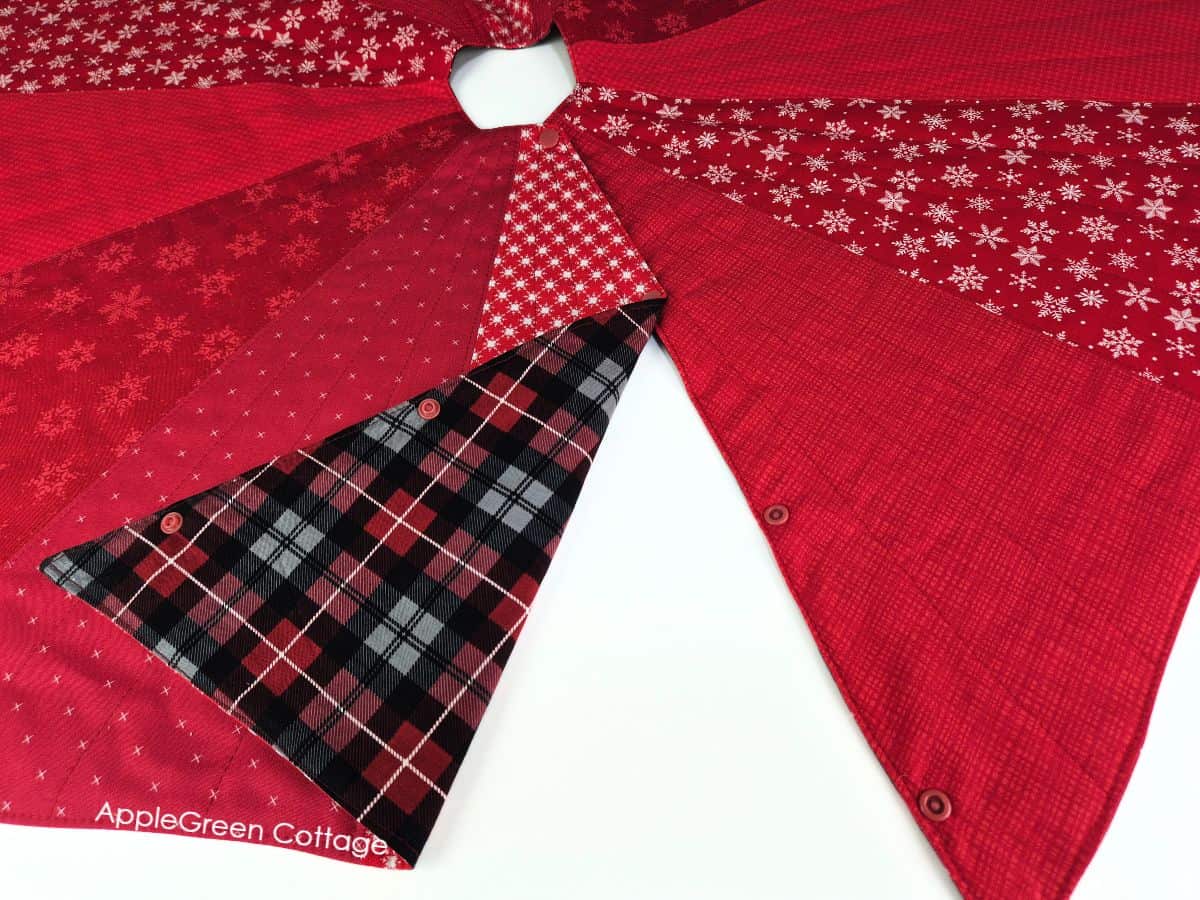
Next, sew one half of the last edge, leaving the other half open. This opening will let you wrap the skirt around the tree:
Step 7 - Add Batting or Fusible Fleece
Place the batting on your table or floor and smooth away wrinkles using your hands. Cover it with the tree skirt top with the right side facing up.
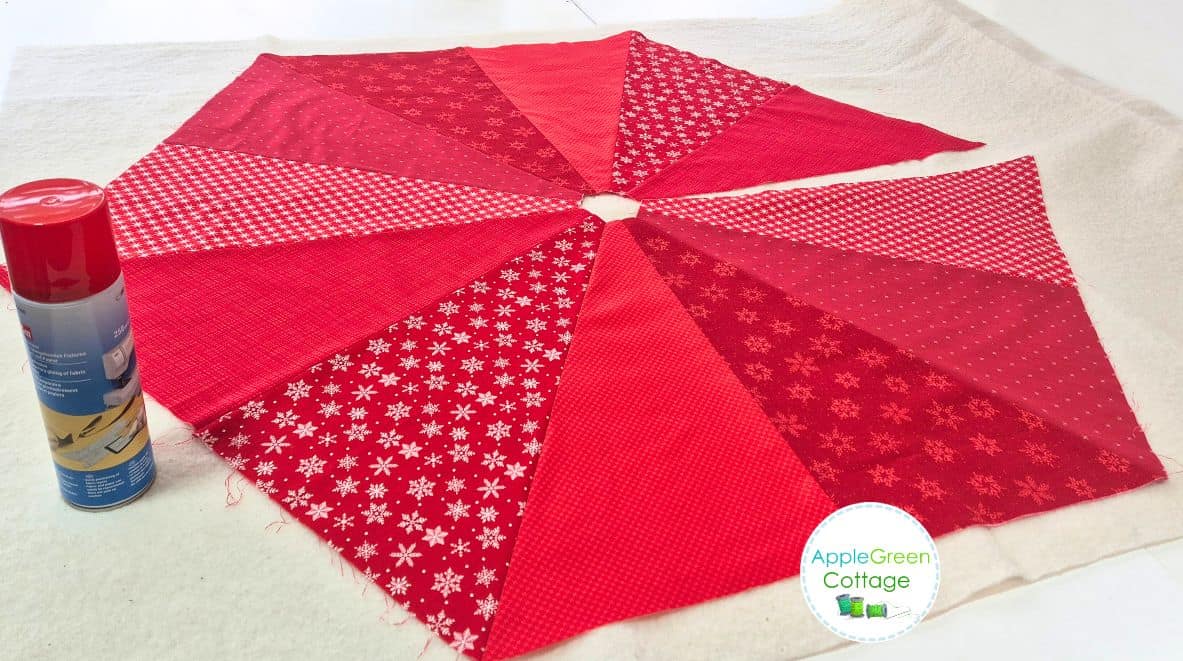
Time to spray-baste: fold the tree skirt back halfway, spray lightly, smooth from the center out, then repeat on the other side. Here's how to spray-baste (with video).
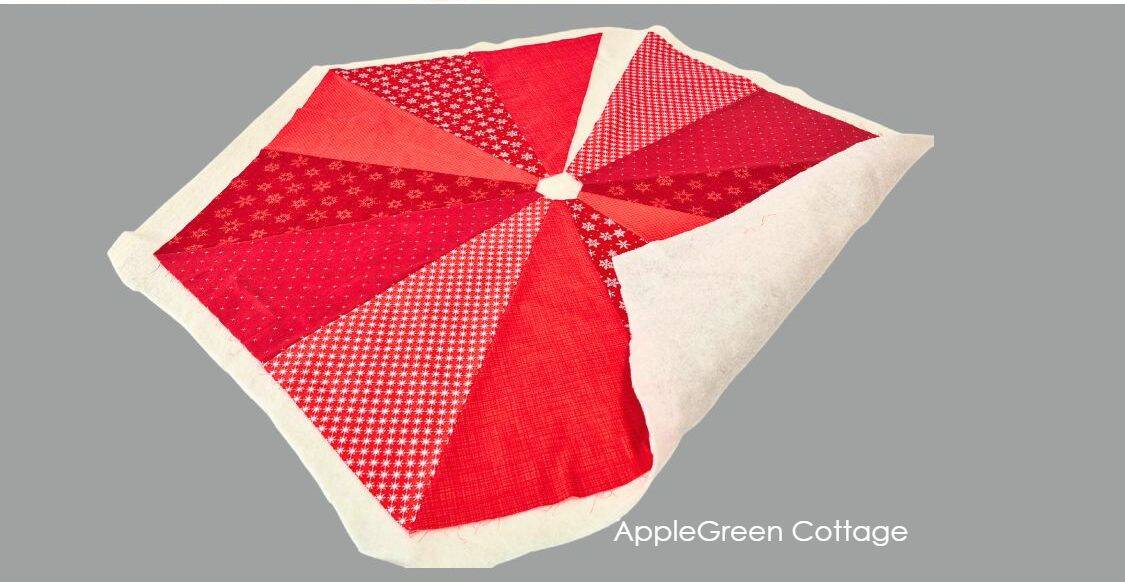
Rough-cut around the hexagon, leaving about 2" of batting all around. Don't cut out the center hole yet - we'll do that neatly after quilting.
Prefer Fusible Fleece?
You can use fusible fleece (Pellon 987F is low-loft, Pellon Thermolam is high-loft) if you prefer your iron to basting spray. Place the fusible fleece on your table, adhesive facing up, smooth away wrinkles using your hands. Place the tree skirt top with the right side facing up.
Cut around, using the top as your guide. Using iron, press the layers together. Here's how to press fusible fleece.
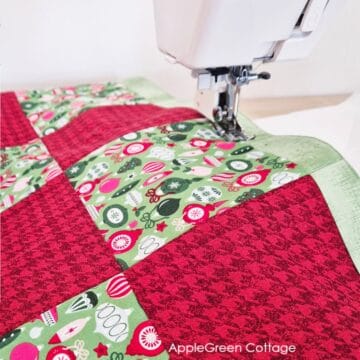
Step 8 - Quilt
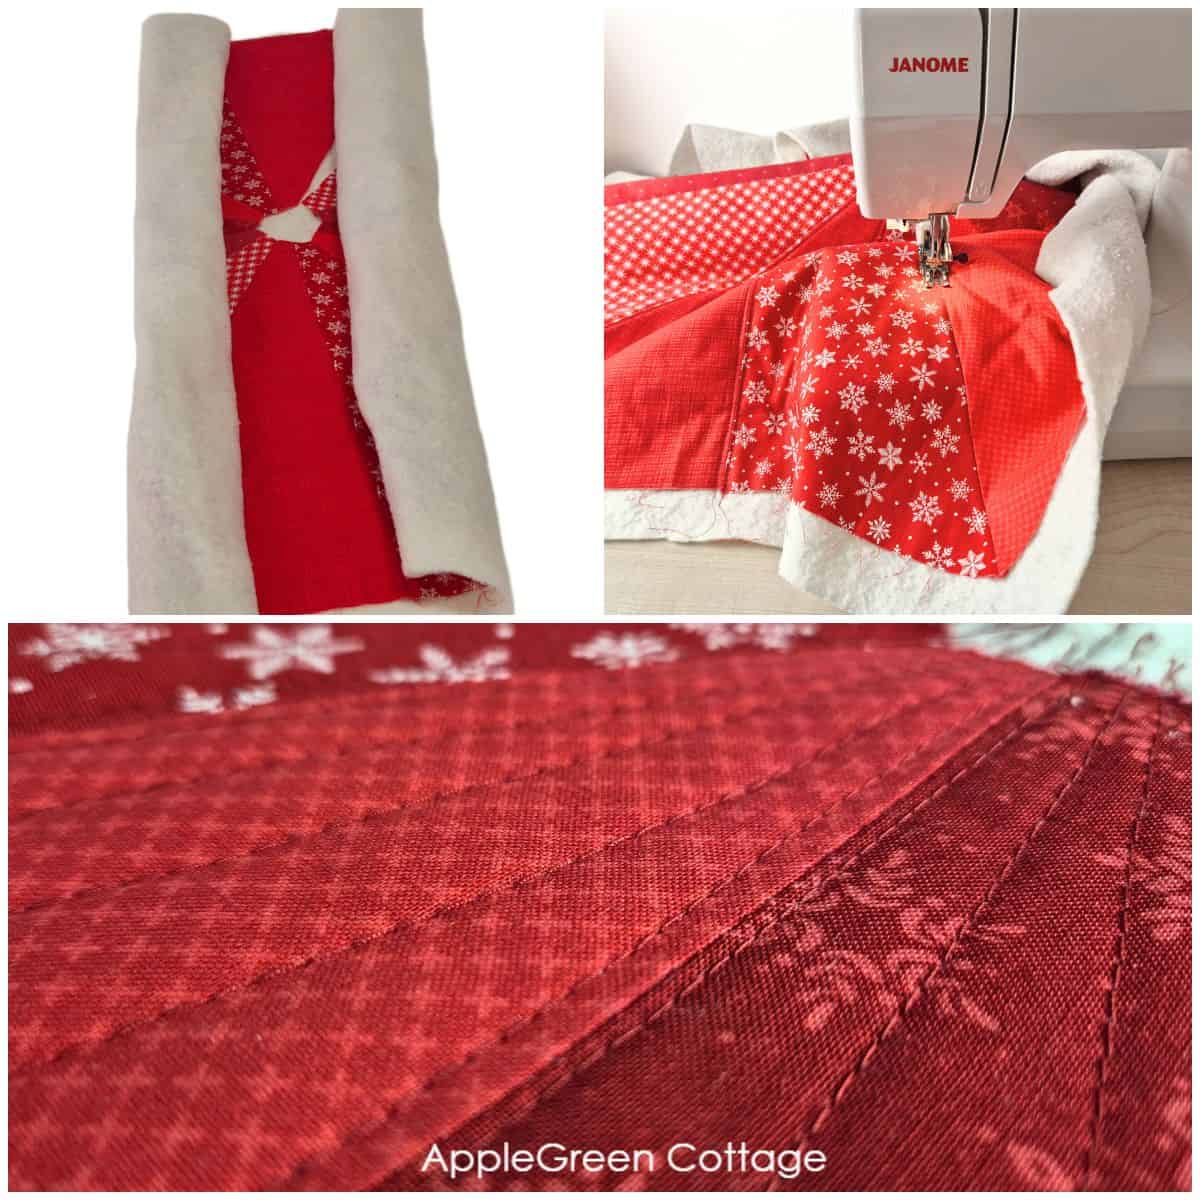
Use a walking foot (Janome brand here) to stitch through both layers. I started by straight-line quilting just ¼" along the seam lines. After that, I did lines between those seams - you can use a removable marker to mark the lines where there are no seams.
TIPS to make it easier:
- Before bringing your quilt sandwich to the sewing machine, roll it from the left and the right side - it will be easier to fit it under your machine arm.
- Start at the center and work towards the outer edges.
- These top 5 quilting tips are great for beginners.
For more easy quilting options, see my favorite 14 walking foot quilting designs.
Tip - Ties or Snaps?
If you're going to add ties, now's the time to add them. I prefer KAM snaps since they are so fast and easy, and they keep the skirt reversible - I'll add them at the end.
Step 9 - Trim all excess batting
After you finished, trim excess of any fabric or batting, you can simply cut along the fabric edge.
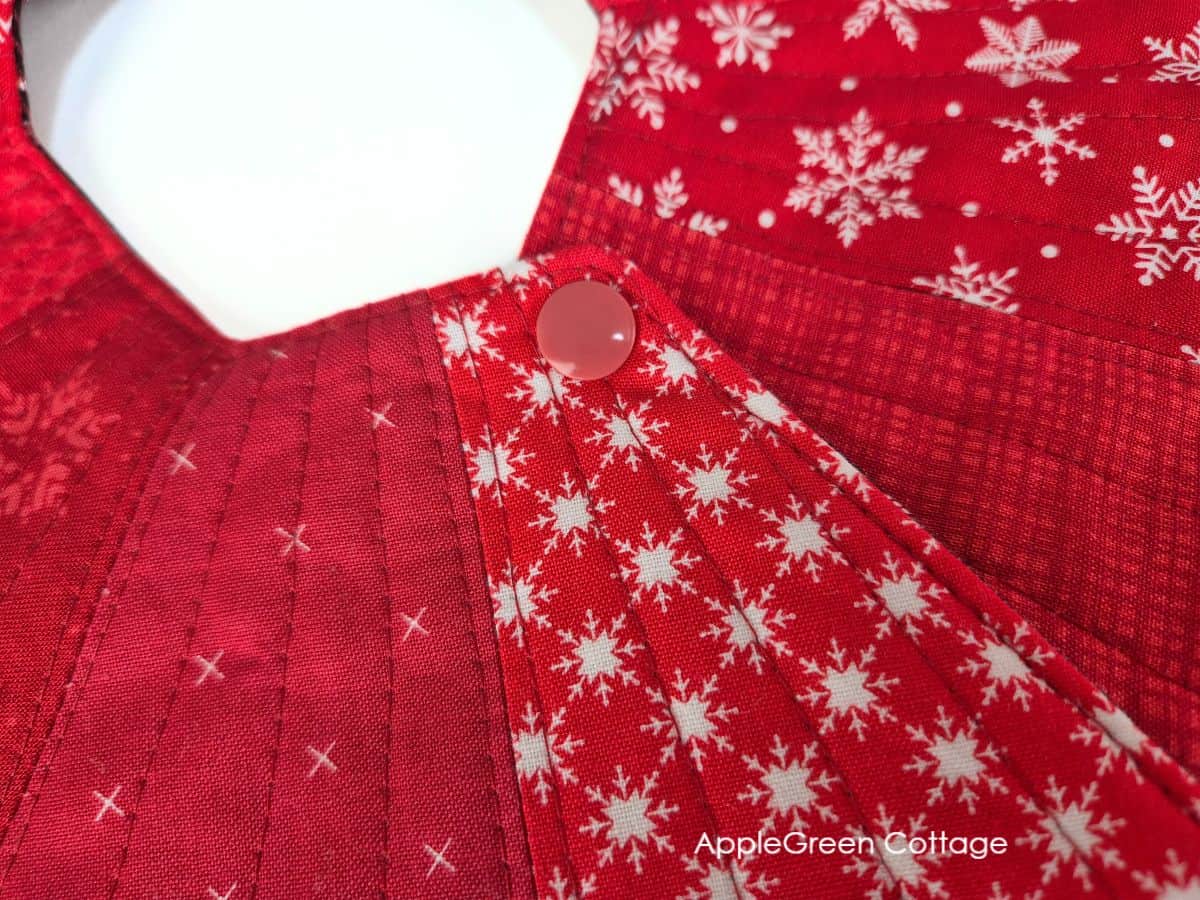
Step 10 - Optional: Center Hole Adjustment
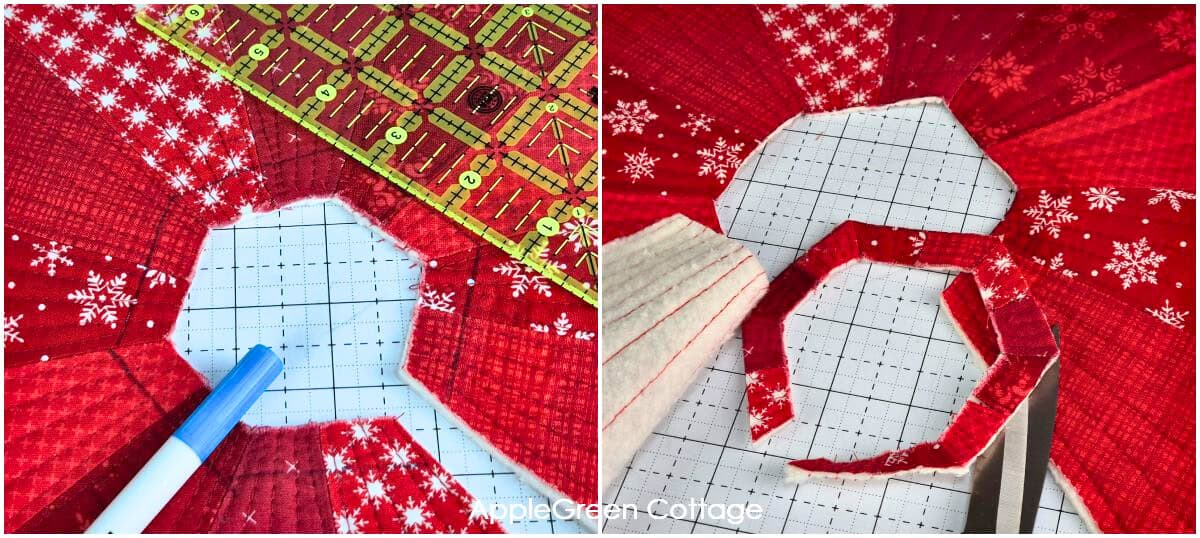
Measure the hole for the trunk!
Measure your tree trunk width and check what size center hole you need.
You'll most probably need to enlarge the center hole for some extra space around the tree trunk. The original hole will give you about 2 ½" opening for the trunk, I wanted a bit larger (also for my KAM snaps), so I trimmed ½" off the inner circle, all the way around. Once sewn, the finished hole will end up a little wider because of the seam allowance.
Step 11 - Add Backing
Cut a backing that is at least 2" larger than the tree skirt top on all sides. I cut it 50" on WOF.
Lay your backing fabric with the right side up and place the tree skirt top right side down on top of the backing - i.e. right sides-touching.
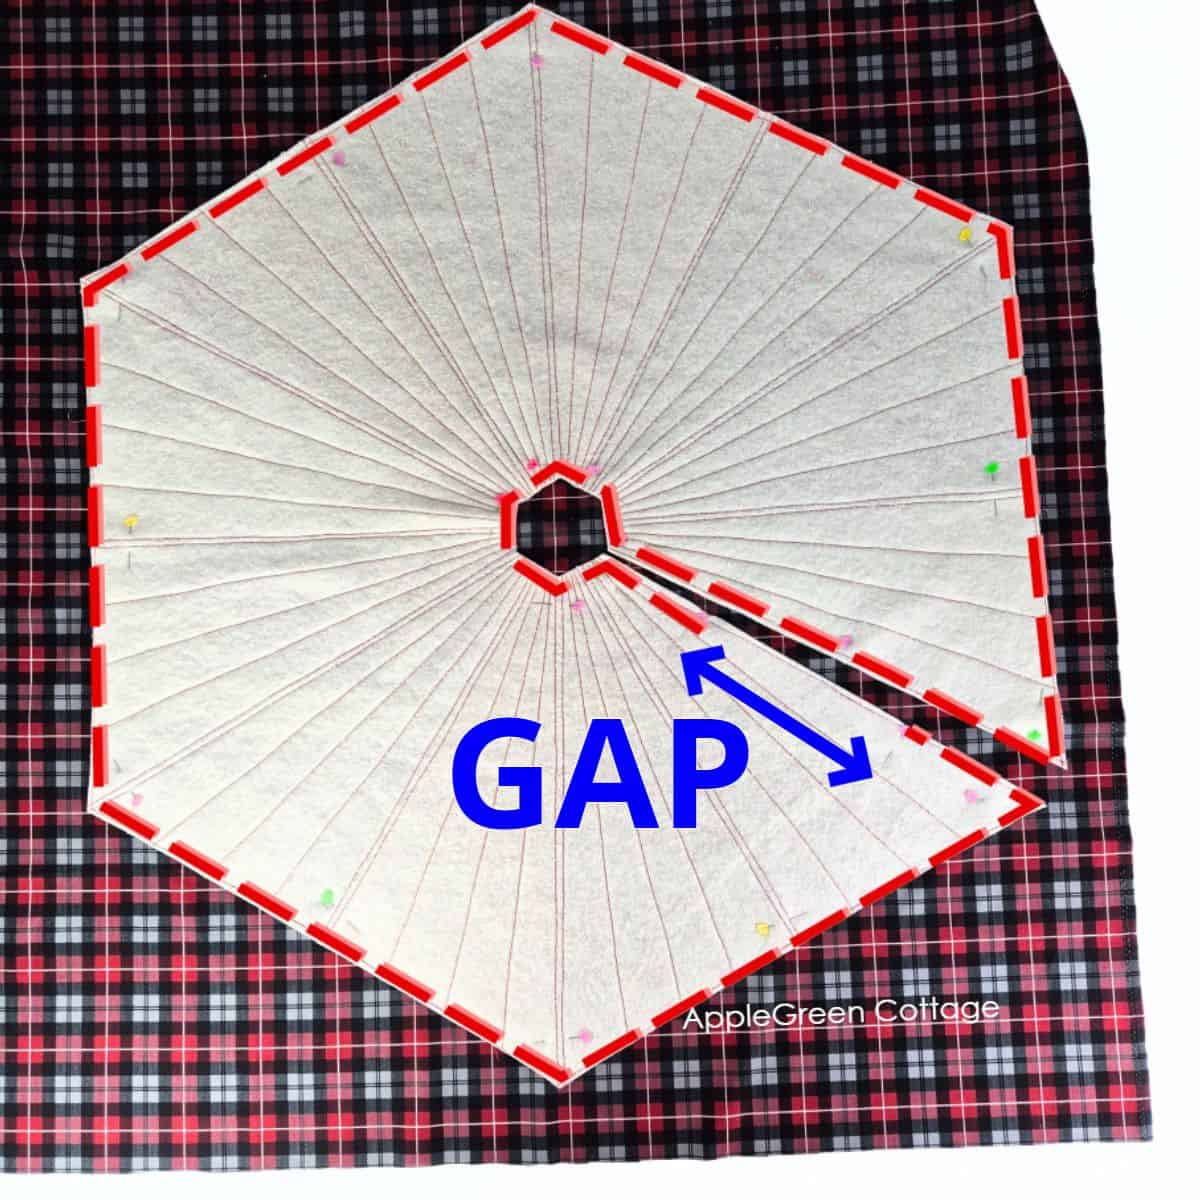
Pin and sew around using a ¼" seam allowance, but leave a 7-9" turning gap unsewn along one of the straight edges of the closing blades.

Finally, cut off the excess backing, leaving some extra just at the turning gap.
Step 12 - Turn and Topstitch

Turn right side out, press, and topstitch at ⅛" away from the edges to close the turning hole and stabilize the edge of your new - reversible Christmas tree skirt.
Top Tip
Pressing makes all the difference - it keeps your edges neat and stops the backing from rolling to the front.
Step 13 - Optional: add KAM snaps
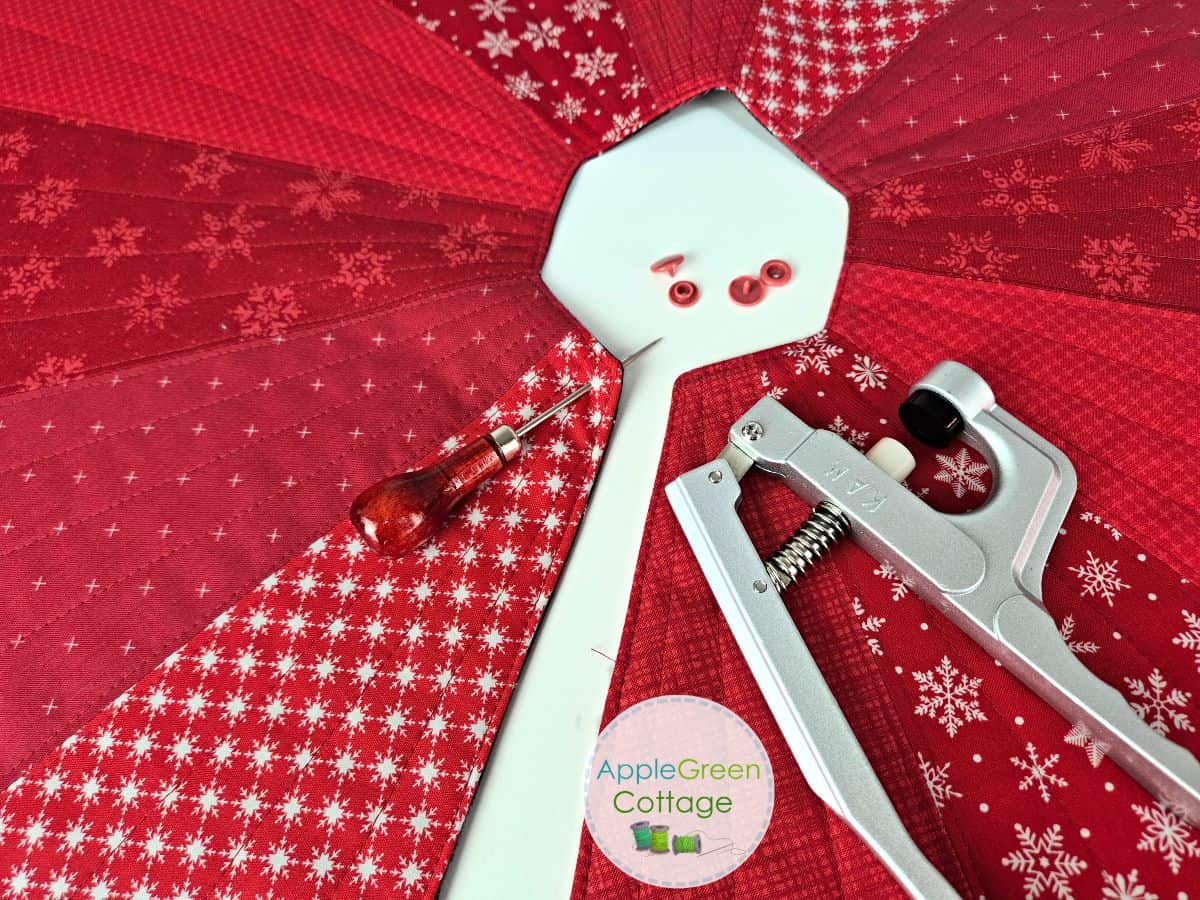
I chose to add KAM snaps to close the tree skirt, because well, I love kam snaps for their ease of use. See here what are KAM snaps ad how to use them. I have noticed that many people skip any type of closure as the tree skirt does not move, and the quilt-weight keeps it in place anyway. Your choice!
Finished, congrats! Want to try the same hexagon shape in a totally different way? ↓
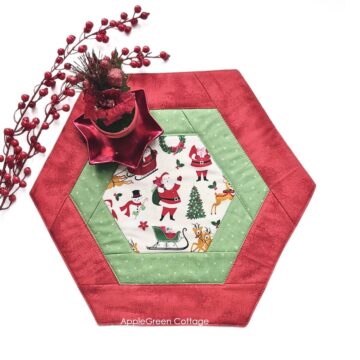
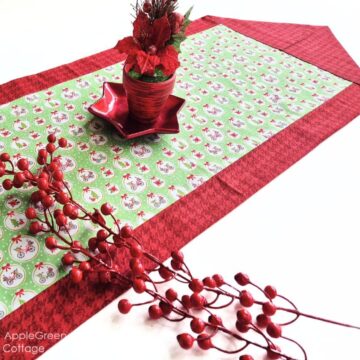
Make a Matching Table Topper!

+Free Hexi Tabletopper Pattern
Use matching fabric and create this cute diy tabletopper for Christmas!
I hope you liked the free sewing pattern for christmas tree skirt! Now, as promised, a list of tips and ideas to make it easier for you:
Variations - Make It Prettier
OPTIONS: you can go for any combination that matches your home decor, from 2 up to 12 prints. I added a coloring page to the free PDF pattern and created a few extra samples for you here:
Option: extra quilting
The top is already quilted, but if you'd like the back to stay smooth too, add a few quilting lines through all layers for extra stability and easier pressing after washing. Flatten and pin the layers well before stitching - here's one way to do it:
More Questions
For a standard tree skirt like our free pattern (see above), plan about 2 yards of fabric. A large, lined Christmas tree skirt can take up to 3 yards of fabric.
It's totally up to you - but a skirt that's slightly wider usually looks best! Aim for a skirt that's slightly wider than the bottom branches of your tree.
Measure your tree stand width, then add about 2" to the diameter of the center hole, so the skirt fits easily without bunching. (You'll need some of the extra space for KAM snaps!)
Machine-wash cotton items on a gentle cycle and tumble dry low. Fold the skirt loosely, avoid sharp creases, and store in a dry place to keep it looking fresh each year.
Related Ideas
Looking for other projects like this? Try these:


Want a printable copy of the whole tutorial?
Prefer a full, ad-free and printer-optimized Printable Tutorial with both instructions, pattern, and images included? ↓↓

This tutorial is also part of Printable Tutorials BUNDLE
90+ PDF tutorials now, and growing!
And if you want to create even more, check out all the free sewing patterns here at AppleGreen Cottage. Or join this free email series:

Join the FREE 6-part email guide and make super easy diy GIFTS - each in 30 minutes or less! You'll love it!


Leave a Reply