
Looking to start sewing but don't know where to begin? This post is the perfect place to start! I'll hold you by the hand and explain all you need to know to start using your sewing machine.
I'll help you get started on your sewing journey - from showing you around the machine and its main parts, threading your machine and inserting the needle, to mastering the basic stitches. Including 'must-knows' and useful tips, like that thing about bobbins.
You'll be creating beautiful handmade projects in no time!
See these FREE complete sewing guides:
- Sewing for Beginners: A Complete Guide to Get You Started
- Sew a Perfect Bag: Tips, Tutorials, and Hardware
- Sewing Zippers Made Easy: A Comprehensive Guide
- Sewing Tools and Supplies Every Beginner Needs in Their Kit
Table Of Contents
- Get To Know Your Sewing Machine
- What are the main parts of a Sewing Machine?
- How To Insert A Sewing Machine Needle?
- How To Thread the sewing machine?
- How To Do The First Seams With Your New Sewing Machine?
- More Must-Know Things About Using A Sewing Machine
- Sewing Machine Maintenance: Keeping Your Machine in Tip-Top Shape
- Troubleshooting
- How To Use a Sewing Machine - Easy Projects!
Quick-Fix Sewing Mistakes - Beginner Guide
Stop Sewing Mistakes - Grab Your Quick-Fix Guide Now! ✂️
Get To Know Your Sewing Machine
If you're just starting out with sewing, congratulations! It's such a fun and rewarding hobby. Everything here in this guide is meant to make it easier for you. Explained in clear terms, all you need to know about how to use a sewing machine if you are starting to sew today. First, the types out there:
Types of Sewing Machines
Choosing a sewing machine if you're a novice sewer can be overwhelming, to say the least. Let me put them into a few groups to make it less confusing. Here are some common sewing machine types:
- regular (household) sewing machines - this is the ONE we're talking about today!
- among home sewing machines, there are mechanical and computerized
- then there are specialized machines like a serger (overlocker if you're in UK), a coverstitch machine, and an embroidery machine
- and industrial ones (we'll ignore this huge group, as this is an entirely different beast.)
But for now, I want you to focus on just the regular, good all-purpose home sewing machine.
Either a mechanical sewing machine, one with the good old knobs and dials (my favorite!) and no display, or a computerized one with a built-in computer system and a handy display. Now we're getting somewhere.
Are You Looking for your first sewing machine?
You most probably already own one if you're reading this guide. But if not, here's what to consider when choosing the best sewing machine for beginners - hands-on tips on what to look for when buying your first sewing machine - this will make it easy for you, truly!
What are the main parts of a Sewing Machine?
So, I figure by this point you've already unboxed your new sewing machine? Or undusted it, if it was hiding in the basement? Good, just on time - you'll want to take a closer look at it!
Now, let's get to know the most important parts of a sewing machine so you can start sewing. This machine scheme is for your reference, so you can return to it any time:
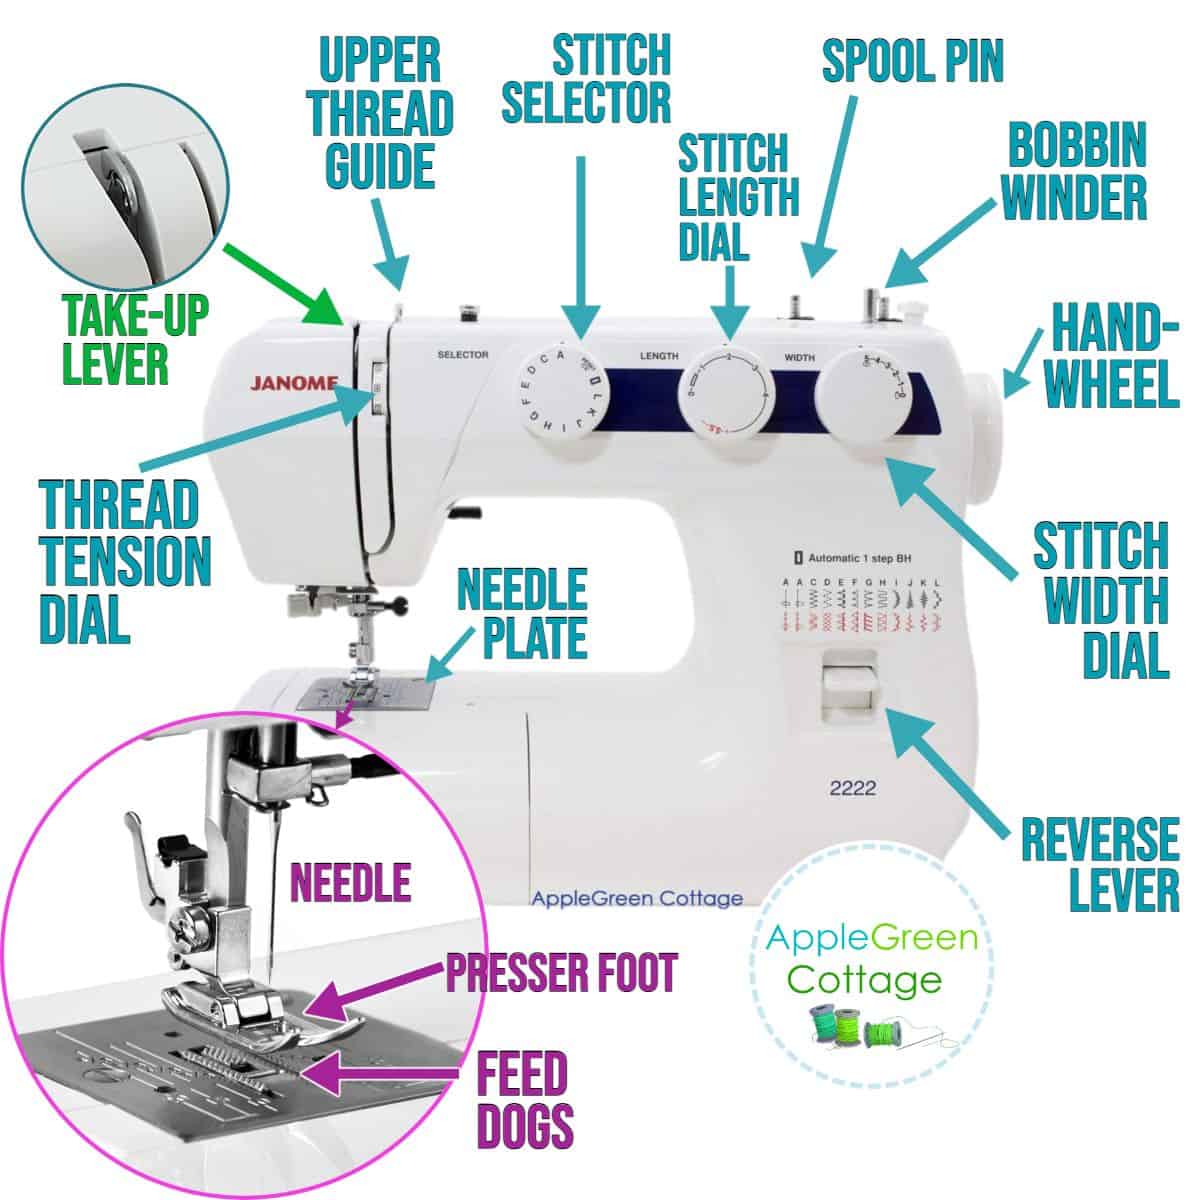
- Spool pin
- Bobbin winder (spindle and stopper)
- Stitch width and length dials
- Stitch selector: a dial that allows you to choose the type of stitch you want to make, such as straight stitch, zigzag stitch, or buttonhole stitch.
- Handwheel
- Reverse stitch lever
- Thread guide(s)
- Top thread tension dial
- Thread take-up lever
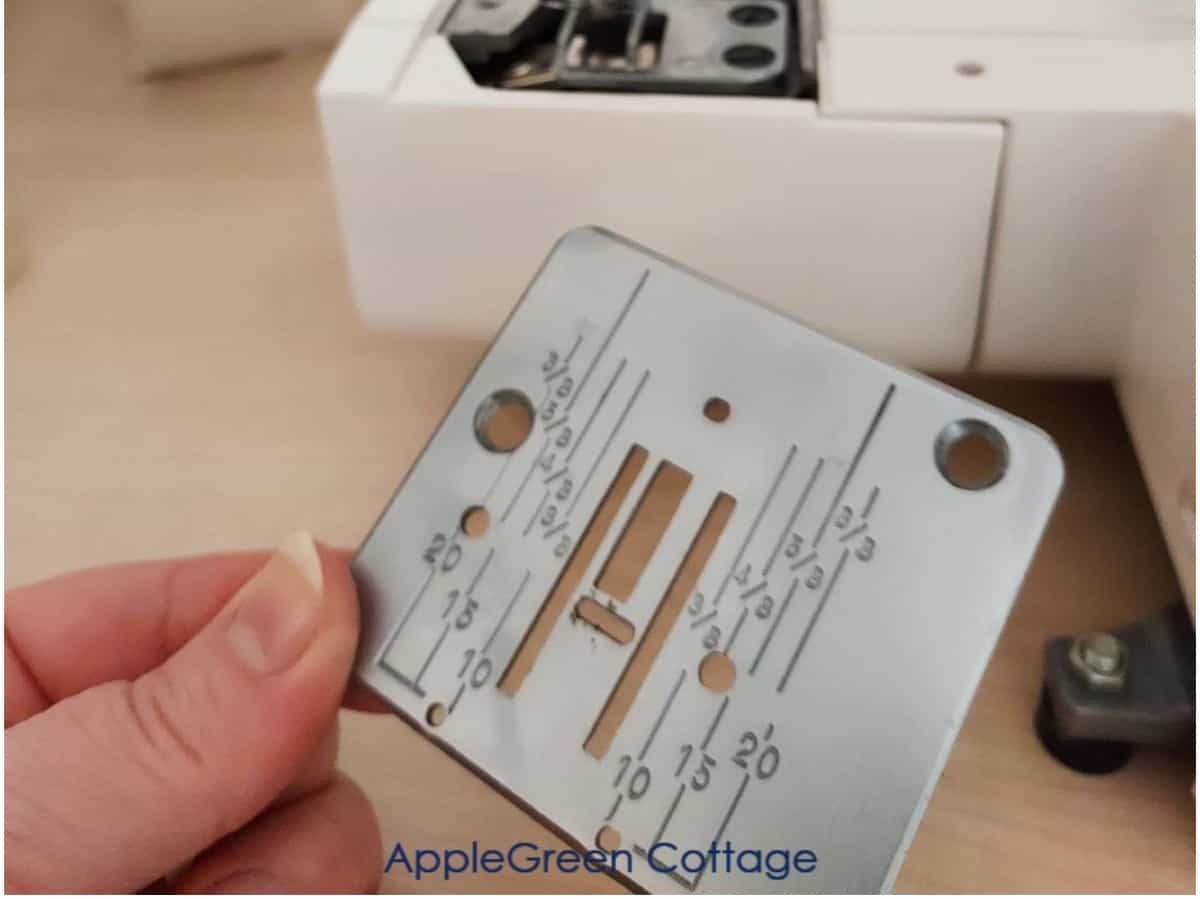
- Needle plate
- Presser's foot
- Feed dogs
- Needle
Now, take a good look at your sewing machine. First, find the power switch, then the thread spool pin, try to locate all the things I mentioned above. There will be variations between my and your sewing machine, but no worries. You've got it!
The Bobbin Compartment
And finally, look for the bobbin. You'll see why I kept it a separate thing to explain: some machines come with a front-load bobbin, and some with a top-load bobbin.
two different types of sewing machines: the front-load machine and the top-load sewing machine. Which one do you have: a front-load machine or a top-load sewing machine?
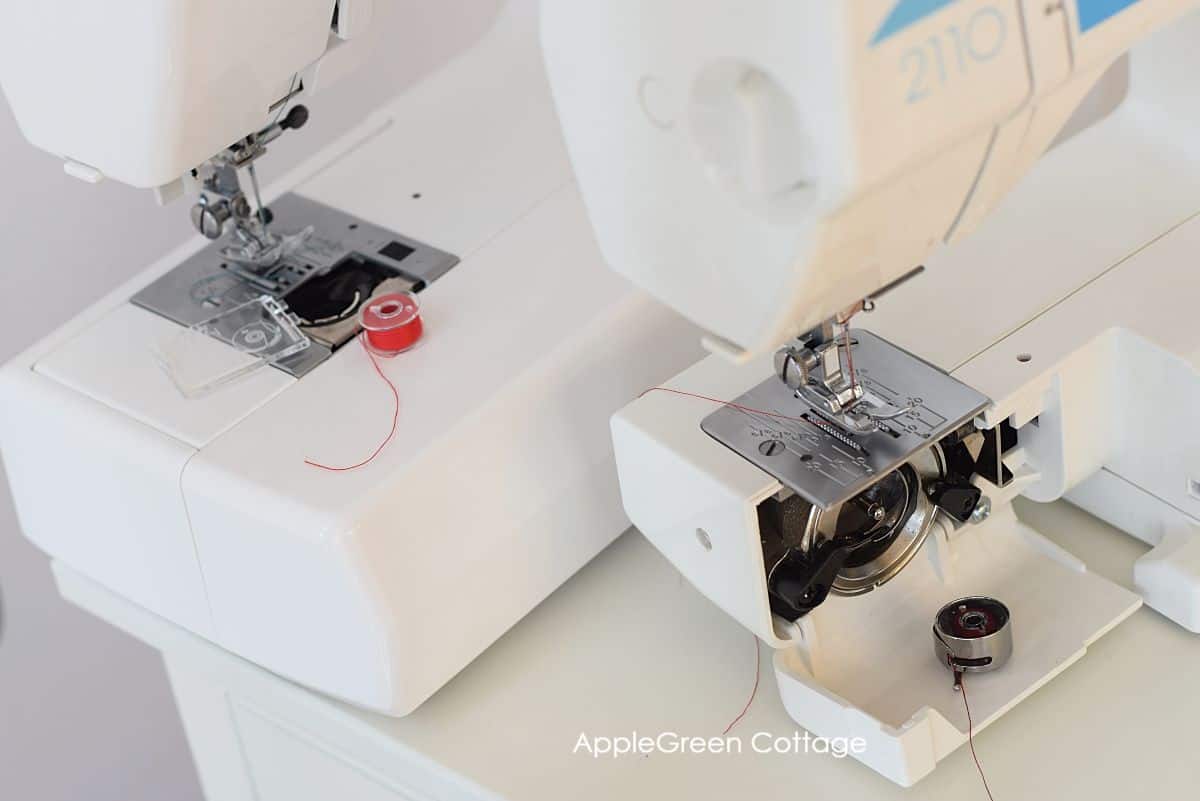
What type of bobbin case does your machine have?

Now you know. Let's move on to the part where the actual sewing happens: now take a closer look at the presser's foot and the spot where the sewing machine needle is located.
PRO TIP: Also, you'll need to find out what bobbins your machine uses: the metal bobbins, or the transparent plastic ones? Just one of these types will fit into your machine, and they are not exchangeable! My machines use plastic bobbins.
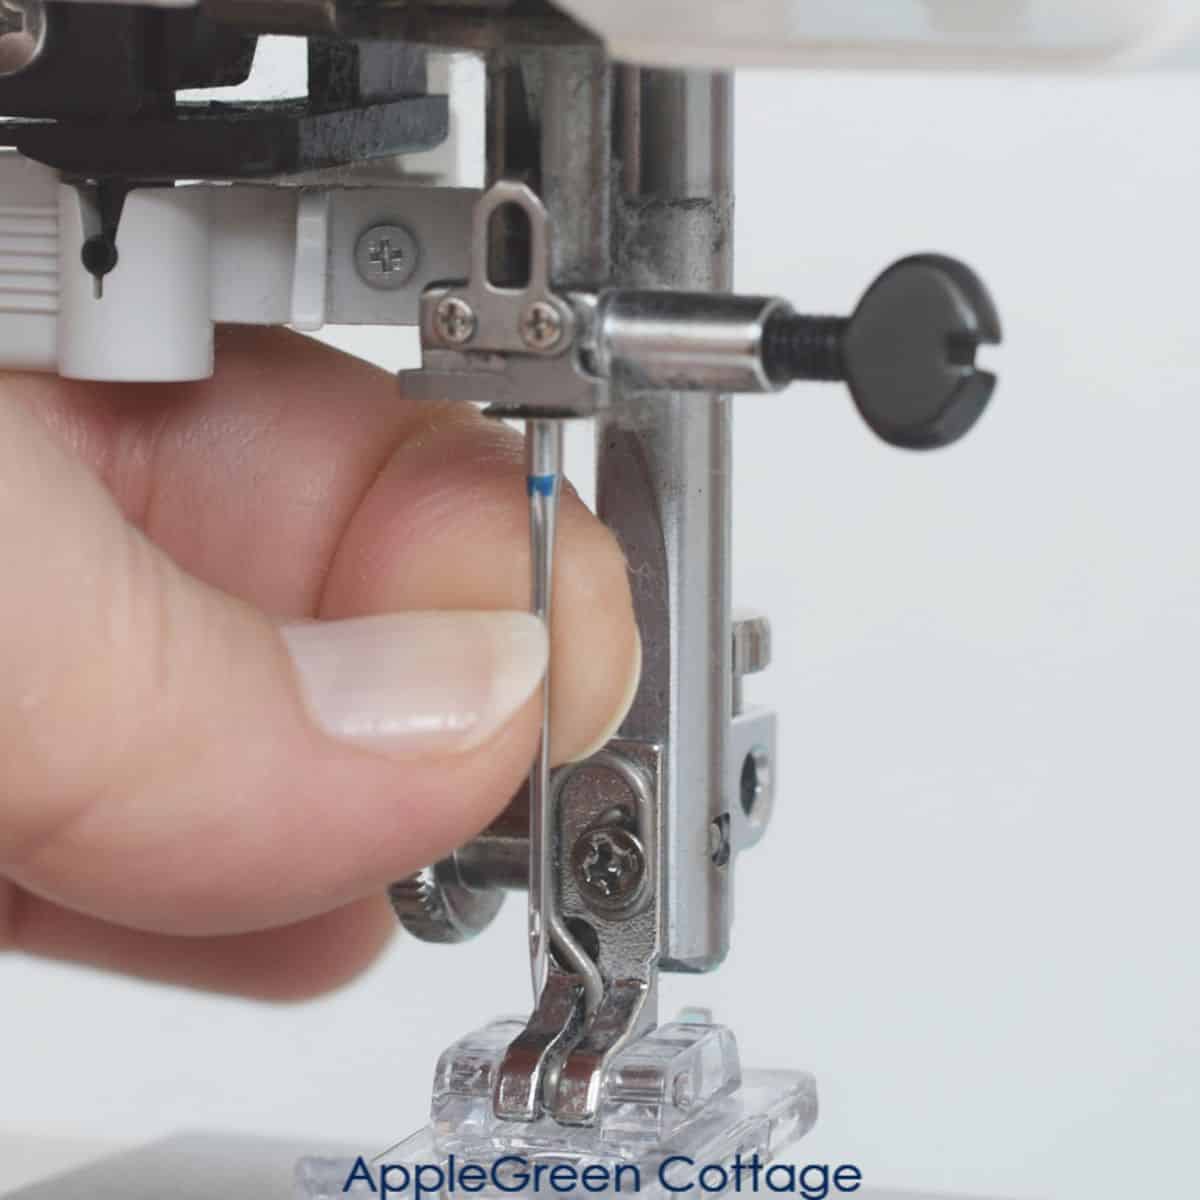
How To Insert A Sewing Machine Needle?
Knowing how to replace a sewing machine needle is an essential part of this 'how to sew with a machine' guide. But -
while changing the machine needle might sound like a big deal if you've never done it - it's simple. Really. Just hold a needle the right way, and turn one knob - that's it. I went ahead and made an easy tutorial, so you can see how to insert it into your new machine, or how to change a broken needle on your sewing machine.
How To Thread the sewing machine?
Next, you'll need to thread your sewing machine. You can't sew without threading it first. As you will probably know, the sewing machine needs both a top and a 'bottom' thread to make stitching work.
A little bit scared? Don't be. Let me help you. I made a detailed video on how to thread a sewing machine, both the top thread as well as the bobbin thread:
We've also created a photo step-by-step threading the sewing machine tutorial. It includes another threading video to help you up your sewing game asap, including how to use a semi-automatic needle threader. (Some machines have no special threader, and the higher-end models have an automatic needle threader. You can also purchase a small needle threader device separately to make it easier to thread the sewing machine needle eye.)
How To Do The First Seams With Your New Sewing Machine?
Now we got to the part to show you how to sew with a sewing machine. First, the general steps to sew a seam on a sewing machine:
- Prepare the fabric by cutting it to the desired length and width, and pressing it if necessary.
- Set up your sewing machine with the correct needle and thread for the fabric you are using.
- Pin the two pieces of fabric together along the edge that you want to sew, with the right sides facing each other.
- Switch on the power.
- Lower the presser foot on the fabric and position the needle at the beginning of the seam.
- Lower the needle into the fabric by turning the handwheel toward you, and then start the machine by pressing down on the foot pedal - or use the start button.
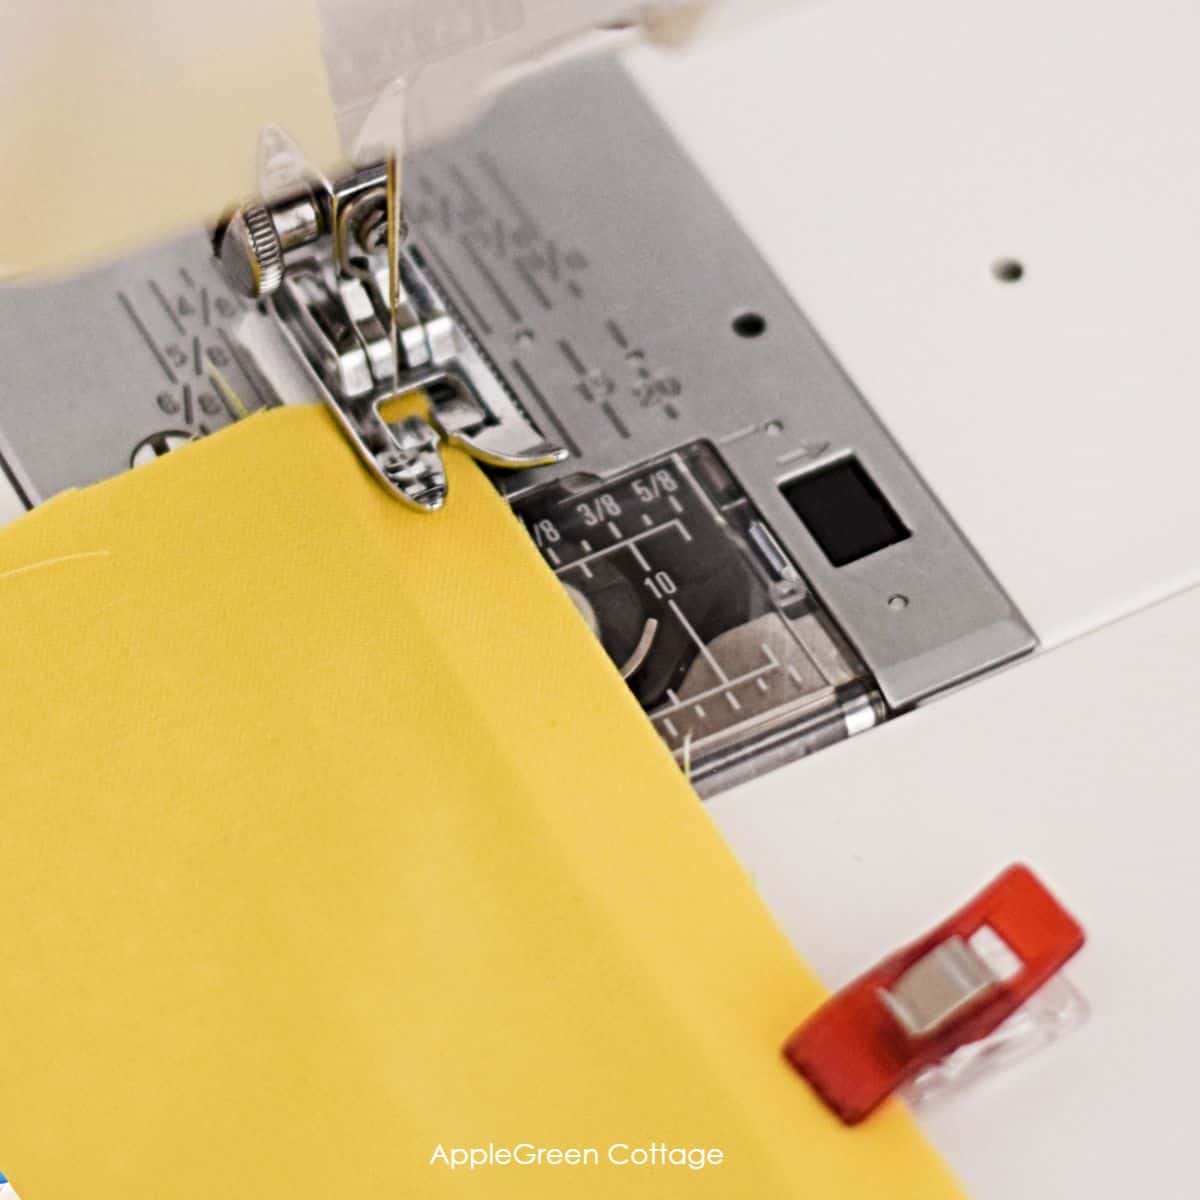
- Guide the fabric through the machine, keeping the seam allowance (the distance between the stitching and the edge of the fabric) consistent.
- Stop before you get to a pin and remove a pin, then continue sewing. Do not sew over pins to avoid breaking the needle.
- When you reach the end of the seam, stop and press the backstitch button. Press down the foot pedal and sew backwards a few stitches to secure the stitch.
- Once the seam is complete, lift the presser foot and remove the fabric.
- Trim any excess thread. Press the seam to set it.
- Turn off the sewing machine.
Remember to always practice on scrap fabric before sewing on your project.
Start with some simple straight lines: Here's how to sew a seam on a sewing machine. Play around with different seam lengths and get a feel for the fabric. Remember, you don't have to be perfect the first time. Just have fun and enjoy the process!
Then try sewing a few square corners, and lastly, curves.
Here's where this tutorial on Basic Machine Stitches comes in handy. Use it as a next step.
How To Turn And Sew A Square Corner
That's somethign that is good to know. See it once and you'll know it forever:
- Stop the machine a few stitches at the spot where you want your seam to be turned 90 degrees.
- With the needle down in the fabric, raise the presser foot.
- Pivot the fabric around the needle to change the sewing direction.
- Lower the presser foot and start sewing in a new direction.
More Must-Know Things About Using A Sewing Machine
Safety with using the sewing machine
Always turn off the power switch and unplug from the power supply:
- when leaving the machine unattended.
- when attaching or removing parts like sewing feet, replacing the needle, or
- when cleaning and oiling the machine.
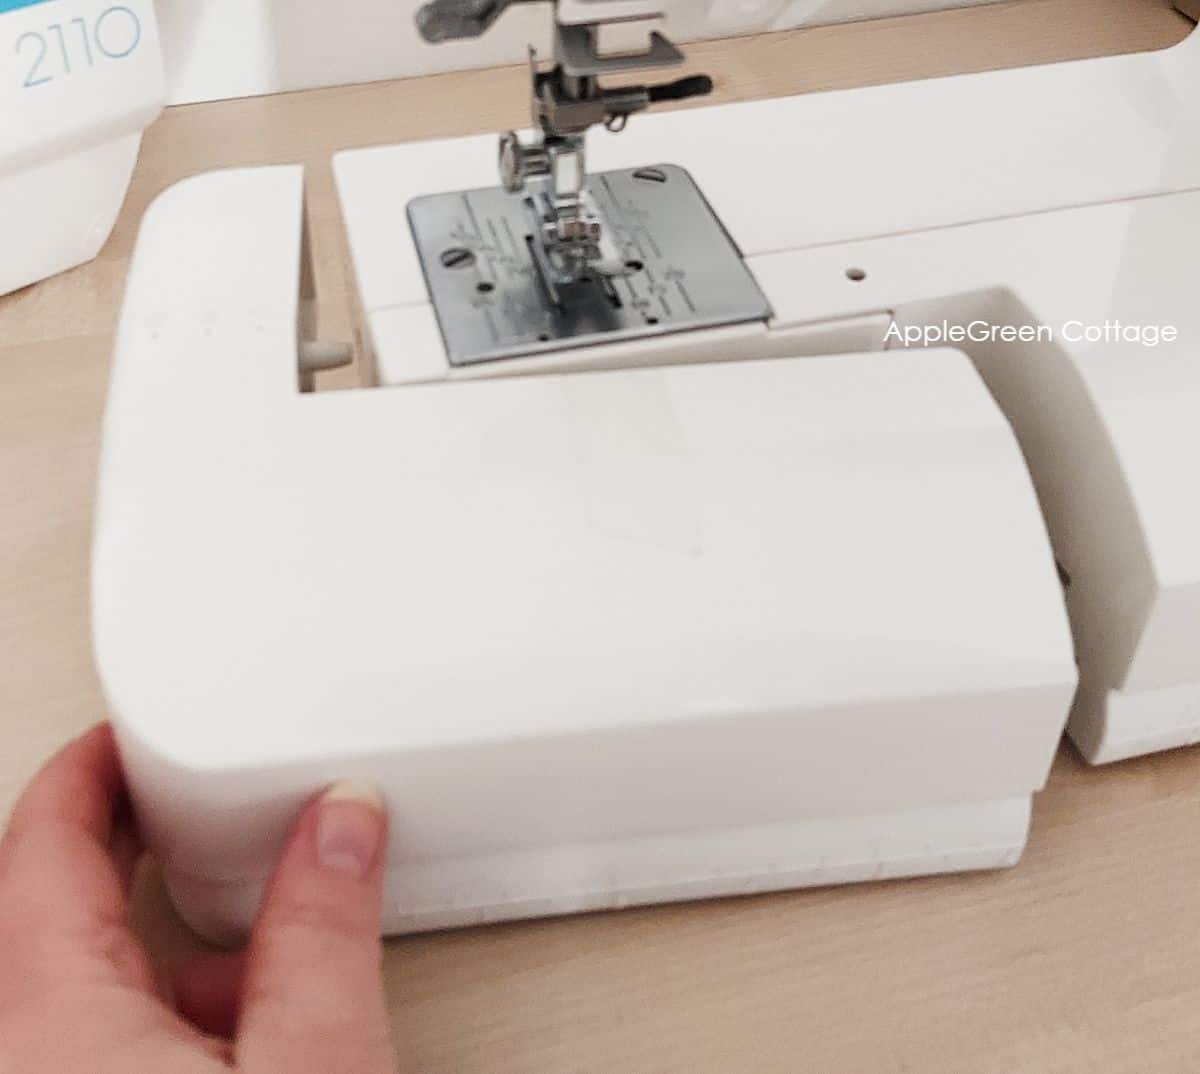
What is a free arm on a sewing machine?
The free arm is a part of the sewing machine that gets exposed when you remove the tool box. You can get to it by taking off the removable toolbox that's attached to the machine.
The free arm on a sewing machine will make it easier to sew cuffs, sleeves, and small items like pouch openings and doll clothes. For me, it's a must, as I sew a lot of small items.
Does my machine have a free arm?
If your sewing machine has a free arm, you'll notice that there's a removable tools box close to the machine needle plate, at the base of the machine. Remove that box and you'll expose the machine's free arm.
How do I use the free arm on my sewing machine?
To use the free arm on a sewing machine, first take off the removable box on the machine. Then, slide the sleeve or cuff onto the free arm and position it under the needle. Start sewing.
How do you adjust the thread tension?
The tension dial is a small numbered wheel near the takeup lever. It controls the tension of the thread as you sew. Sometimes, your fabric will start bunching, you might notice puckers on your seams, or loops forming on the underside. These are signs to check if you need to adjust your top thread tension.
Adjusting the thread tension on a sewing machine will ensure even and balanced stitches. Look for the tension dial. It is usually pre-set to 3, a middle value. Smaller numbers mean lower tension and higher numbers will increase the tension.
If the upper thread is too loose, it will cause loops on the underside of the fabric. Increase the tension by turning the dial to a higher number or symbol.
If the upper thread is too tight, the fabric may start to pucker. Decrease the tension by turning the dial to a lower number.
Sewing Machine Maintenance: Keeping Your Machine in Tip-Top Shape
You'll want to properly maintain your sewing machine to keep it in good condition. To make it short and easy to understand, just a short to-do list so you can take care of your sewing machine properly:
- dust off the lint regularly. Most important.
- oil the machine regularly. Second-most important. Just a few drops to just a few spots. you can refer to your machine manual as it will have oiling points marked. No rocket science, just these two to know when you're starting out.
How to clean lint from the sewing machine?
You need to keep your sewing machine clean to work properly. Here's a tutorial on sewing machine cleaning. Do it like a pro and keep your machine in top shape!
PRO TIP: never just blow into the hook race, it just pushes the tiniest bits of dust and lint further into the machine. No good. Don't use compressed canned air either, it will push debris deeper into the machine.
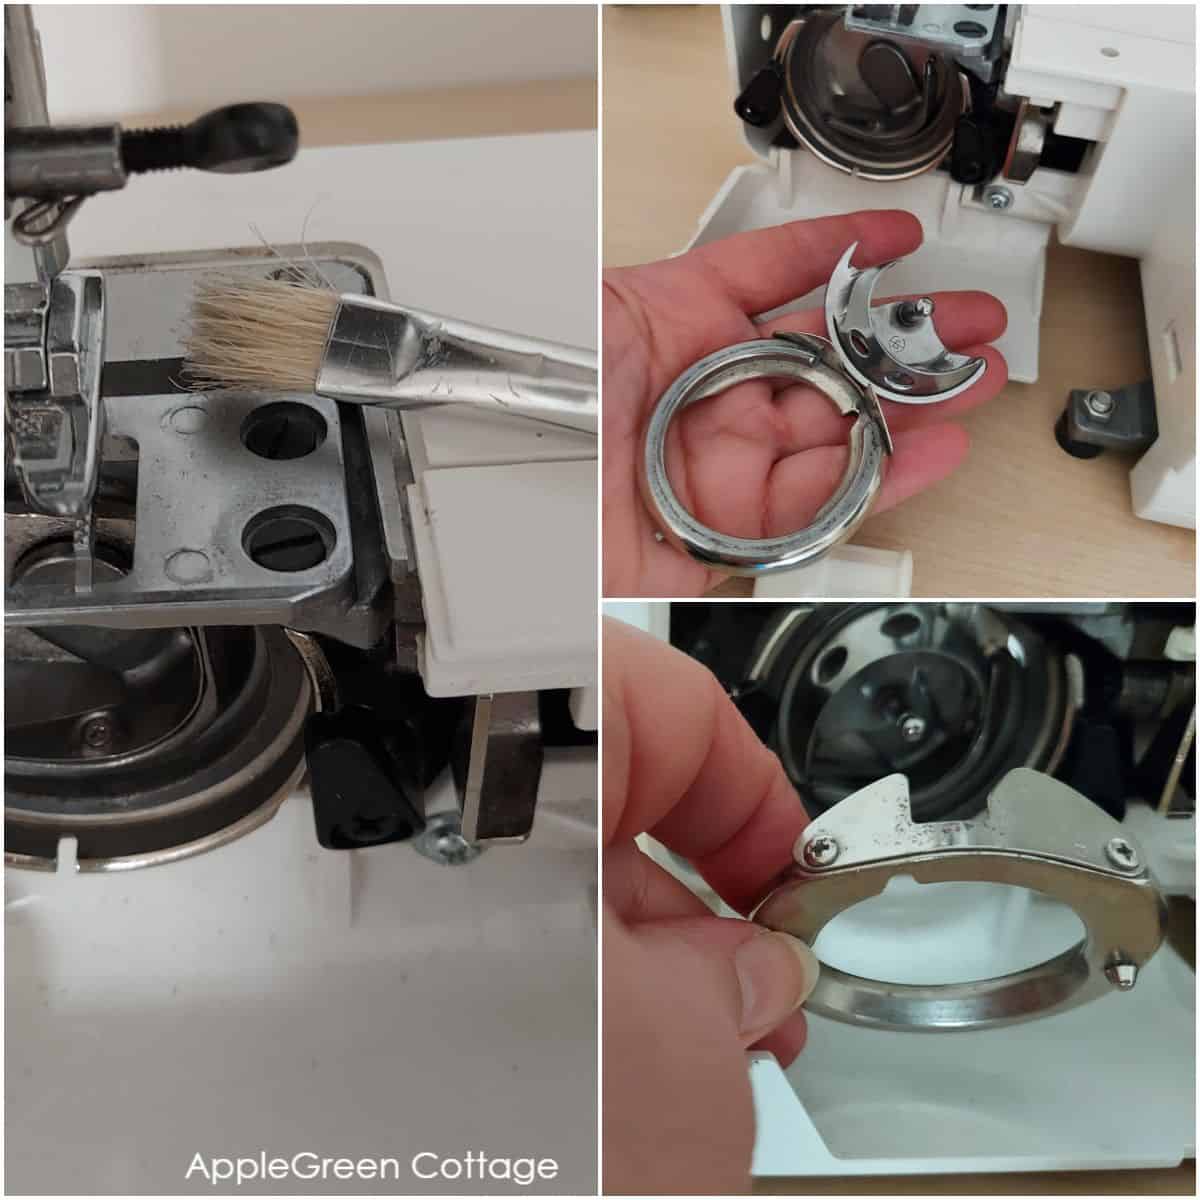
What you see above is an oscillating shuttle hook mechanism on a machine. It's vertical. I removed the bobbin case parts when cleaning the machine. When you take the shuttle hook apart like this, it's essential to place the parts back in the same order. But I've got you covered:
Oiling the Sewing Machine
Oiling your sewing machine is an important part of maintenance that can help keep it running smoothly and extend its lifespan. See this sewing machine oiling post.
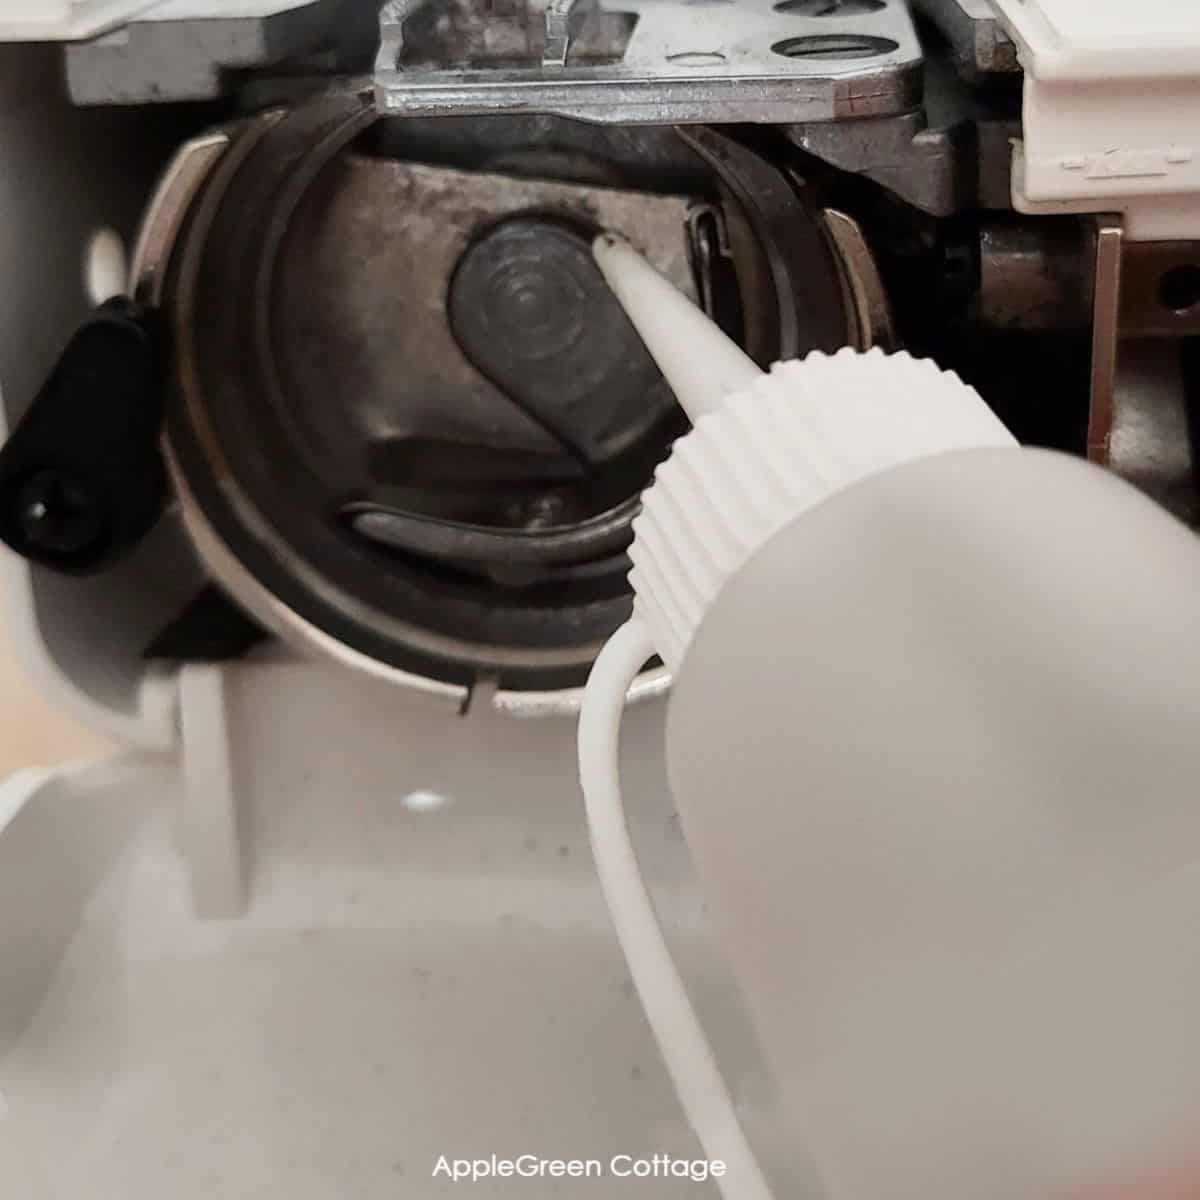
The exact spots for oiling your machine model are not the same with all machine models. Check out the tutorial on how to oil sewing machines - I show you to how I oil two different machines.
Troubleshooting
Are you looking to solve sewing machine problems? I have planned a whole new big guide on troubleshooting sewing machine issues, but for now, let me just give you the most common sewing machine issues, the possible causes, and how to solve them. Here's a basic 101 troubleshooting list:
1 - The machine does not work:
- The machine is not plugged in. (Don't laugh. It happens more often than you'd think, even to the best of us 🙂
- Bobbin winder spindle is in the winding position. If you've been winding the bobbin lately, you may have forgotten to push the spindle back into the 'sewing' position.
2 - The machine does not run smoothly and is noisy:
No 1 reason, in most cases: the machine may need oiling or cleaning. Try oiling your machine and cleaning it as shown above. (maybe the feed dogs are packed with lint?)
PRO TIP: If the machine is really noisy even after you've oiled and cleaned it, and changed a dull or bent needle, there could be a serious problem with the timing. The timing is the way the needle and the bobbin work together. If you think this is the problem, it's best to take your machine to a professional to get it fixed.
3 - The needle thread breaks:
- The needle may be dull or bent. If so, see needle replacement tutorial
- The needle thread tension might be too tight. Lower it.
- The machine may be threaded incorrectly. Rethread the machine
- The thread may be either too heavy or too fine for the needle. (Schmetz universal needle 80/12 or even 90/14 and the All-purpose Guetermann poly thread is my best bet for most of my beginner projects)
4 - The bobbin thread breaks:
- The bobbin thread may not be threaded properly in the bobbin holder. Rethread the bobbin thread.
- Lint has collected in the bobbin holder. See above for how to remove lint from the machine.
- The bobbin may be damaged and does not turn smoothly. You need to replace it (see how to put the bobbin thread into the machine)
5 - The needle breaks:
Here's how to quickly change a sewing machine needle, and the possible causes of needle breakage:
- The needle may have been incorrectly inserted, damaged, or blunt.
- Check out the needle clamp screw - fix it if it's loose.
- The tension of the needle thread may be too tight. Lower the needle thread tension.
- The needle might be too fine for the fabric being sewn (usually, 80/12 is a good size in general for sewing with quilting cotton)
- The stitch selector dial has been turned while the needle was in the material.
6 - Skipped stitches:
- Make sure the needle is inserted correctly, and not bent or blunt.
- The needle and/or threads may not be suitable for the fabric you are working with.
- The needle thread may not be threaded properly.
- The presser foot pressure may not be strong enough. Adjust it if you have an option.
7 - Seam Puckering:
- Maybe the needle thread tension is too tight.
- The needle thread may not be threaded correctly.
- The needle may be too heavy for the fabric being sewn.
- The presser foot pressure may not be correct. Adjust it.
PRO TIP: When sewing extremely lightweight materials, you can place a sheet of paper underneath the fabric to prevent puckers.
8 - Stitches form loops below:
The needle thread tension may be too loose. Look for the tension dial and change the setting towards a higher number.
But most often on my machine, I fix the issue by rethreading the bobbin thread.
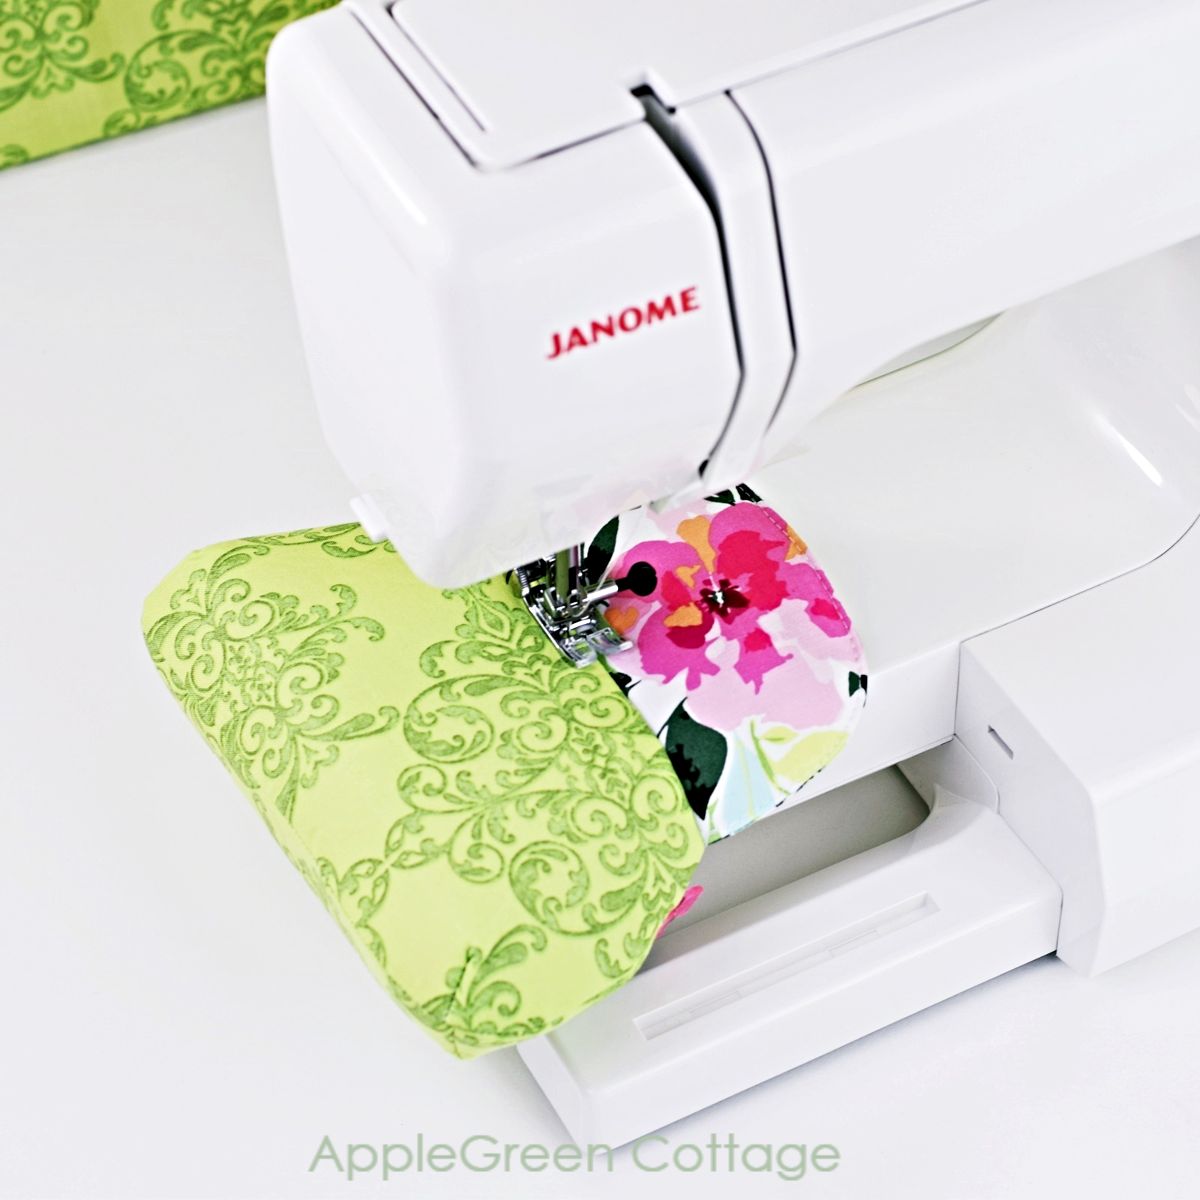
How To Use a Sewing Machine - Easy Projects!
Now, what next? On to your first sewing project!
Once you've managed to get a grasp of the basic sewing line, time to get your hands on a couple of easy sewing projects. This is one of our most popular resources for free and easy sewing projects at Applegreen Cottage:

Online sewing classes, too, are a great way to kickstart your sewing journey without breaking the bank. It's usually best to start with an easy sewing course and work your way up.
Conclusion
Sewing offers a great way to reduce waste, to create more sustainable fashion options, and to craft unique handmade items that perfectly match your taste. It can also save you some money along the way. Win-win, if you ask me!
I hope this post has given you a starting point for learning to use the sewing machine. I'm always just an email away if you have a question.
And, if this post helped you unpack your machine and decide you'd like to give it a try, I'm super happy about it. This was the real, main mission of this post. I'm so excited to see what you sew!
More Resources
So here are a couple of additional, good free beginner guides to get you started:
- Sewing terms glossary
- Beginner sewing tips you'll need to know if you sew.
- Sewing apparel? If you're new to sewing with stretchy fabric types, check out these tips on sewing with knit fabrics. Must-know before you sew!

Join the FREE 6-part email guide and make super easy diy GIFTS - each in 30 minutes or less! You'll love it!


Leave a Reply