
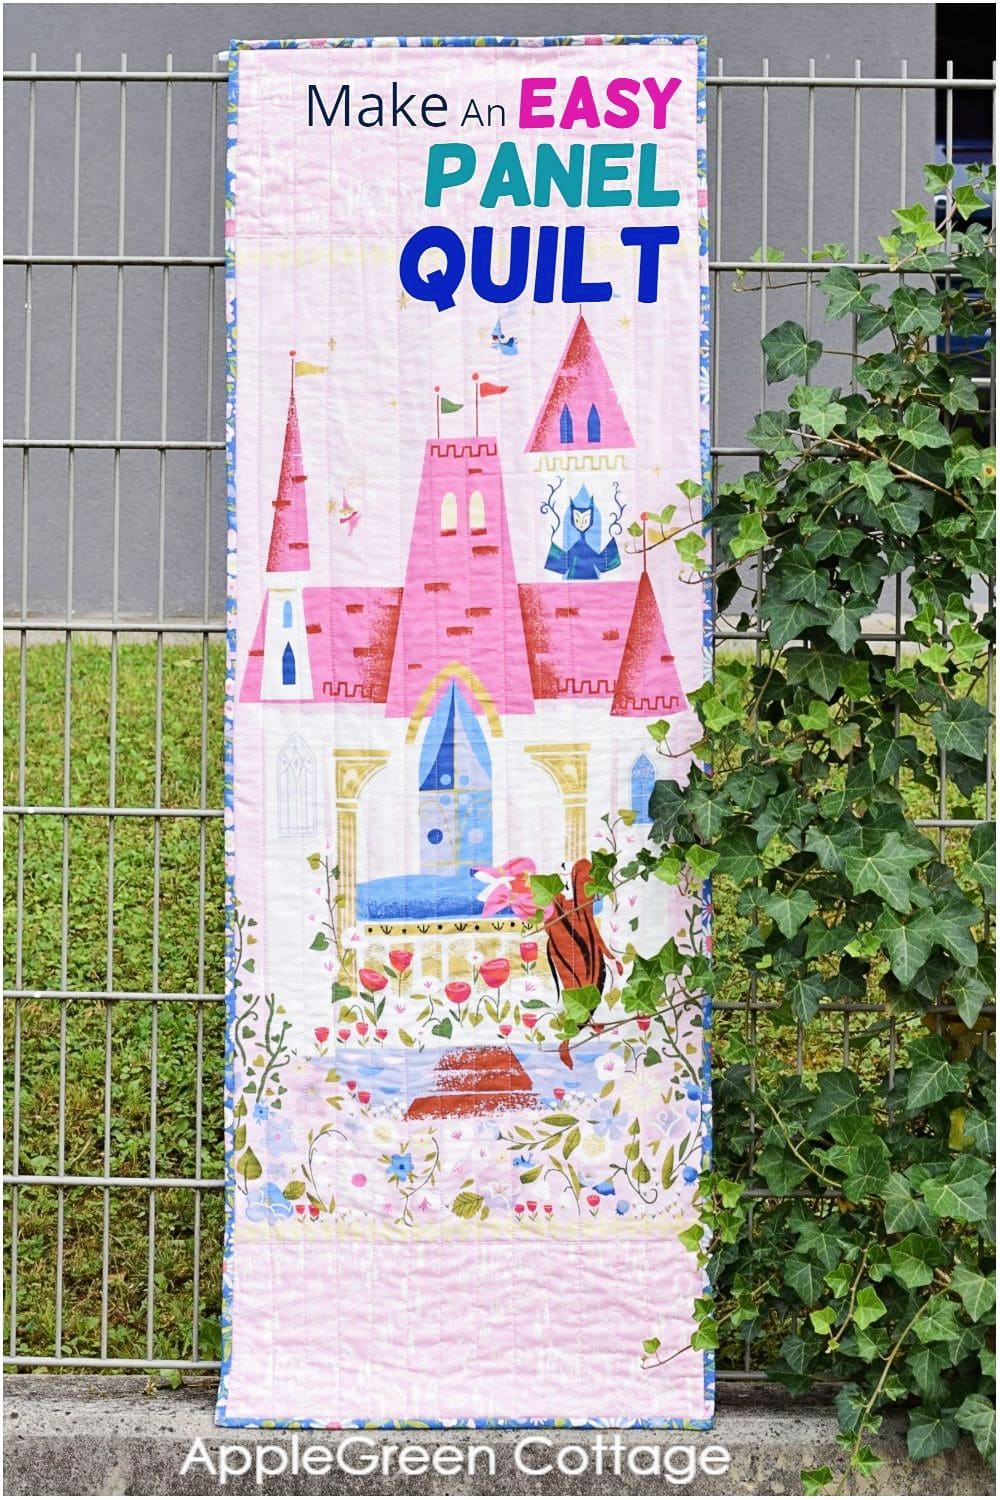
See how to make a quilt with panels using your home sewing machine. No quilting hoop, no longarm, no fancy equipment. If I can do it, you can do it too! (And see where I hung it!)
Because sometimes, you just want something pretty to look at. A picture on your wall, or door. And that a fabric one! And if you haven't made a quilt before, this tutorial will teach you how to make a quilt from a panel - all my beginner quilting tips included!
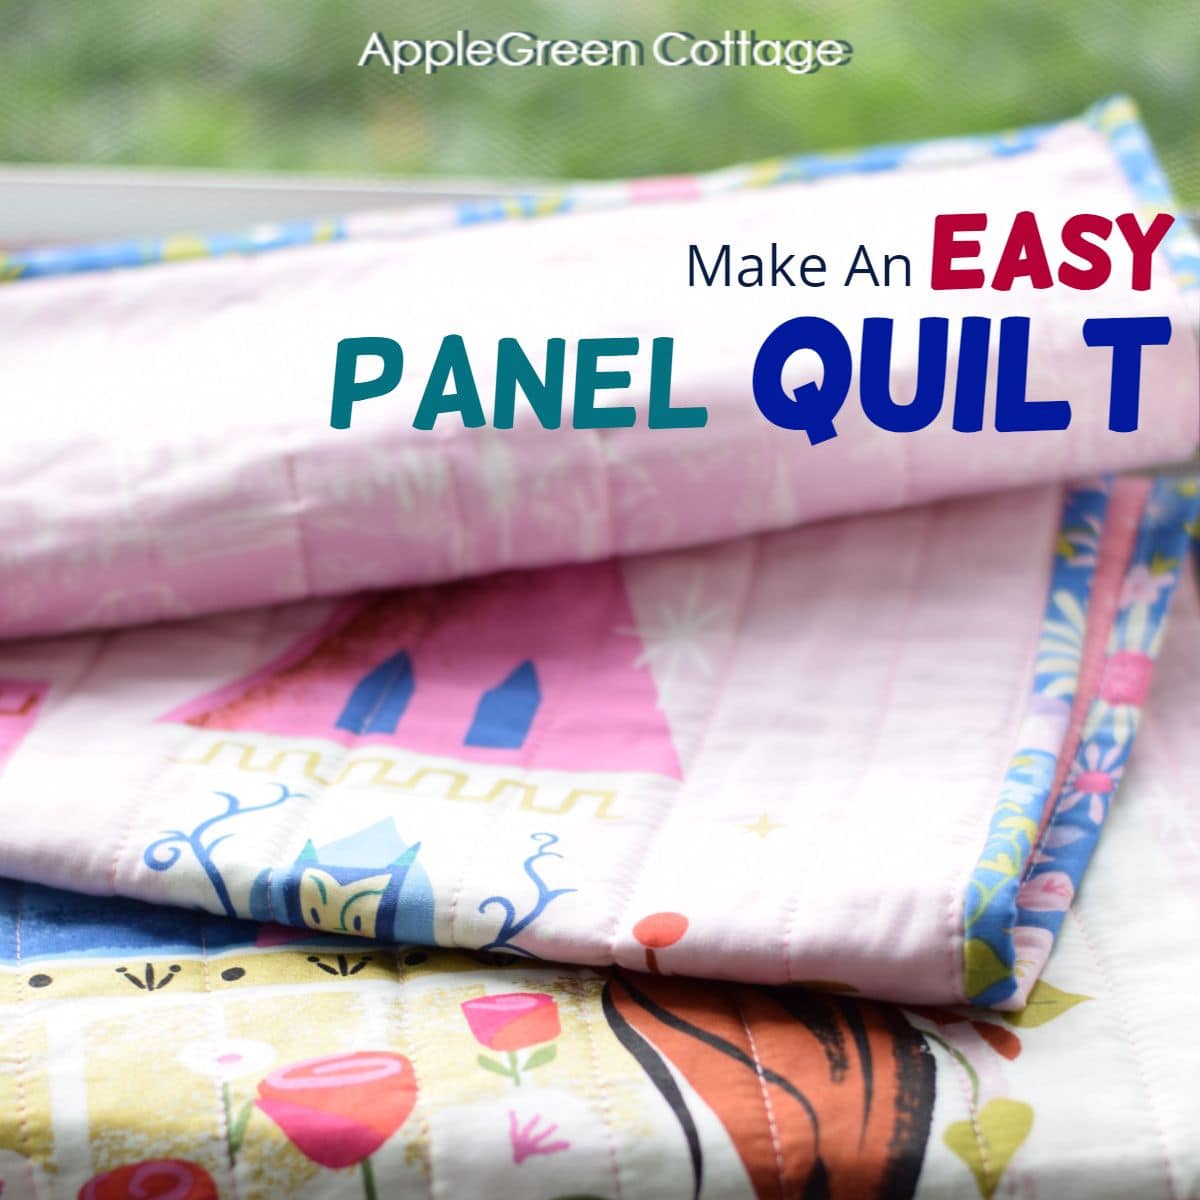
Table Of Contents
- How to Make a Quilt with Fabric Panels
- What is a fabric panel?
- How To Make A Quilt From A Panel Tutorial
- Make Math EASY - Get FREE Quilt Calculators!
- How To Quilt Large Quilts On A Home Sewing Machine?
- How do you keep a straight line when quilting?
- Tips For Quilting With Panels
- How To Piece a Quilt Using Quilt-As-You-Go technique?
- How To Measure The Window For A Quilt
- The EASIEST Patchwork Quilt!
- Stay Organized in Style!
Do you happen to have a beautiful door with a French window that needs more privacy? But you certainly don't want to switch it for a plain flush door, do you? Me neither. So I made a pretty quilt with panels to make this beautiful door even prettier - and more functional. See how!
How to Make a Quilt with Fabric Panels
")
My daughter's room has a beautiful three-quarter lite door, accompanied by a narrow side panel, adding to the natural light in the house. But also, once she's no longer a toddler, this kid's room might use more privacy. I wanted to cover the main glass door. I did not like the thought of a stick-on window film and was looking for a more permanent solution - a pretty one.
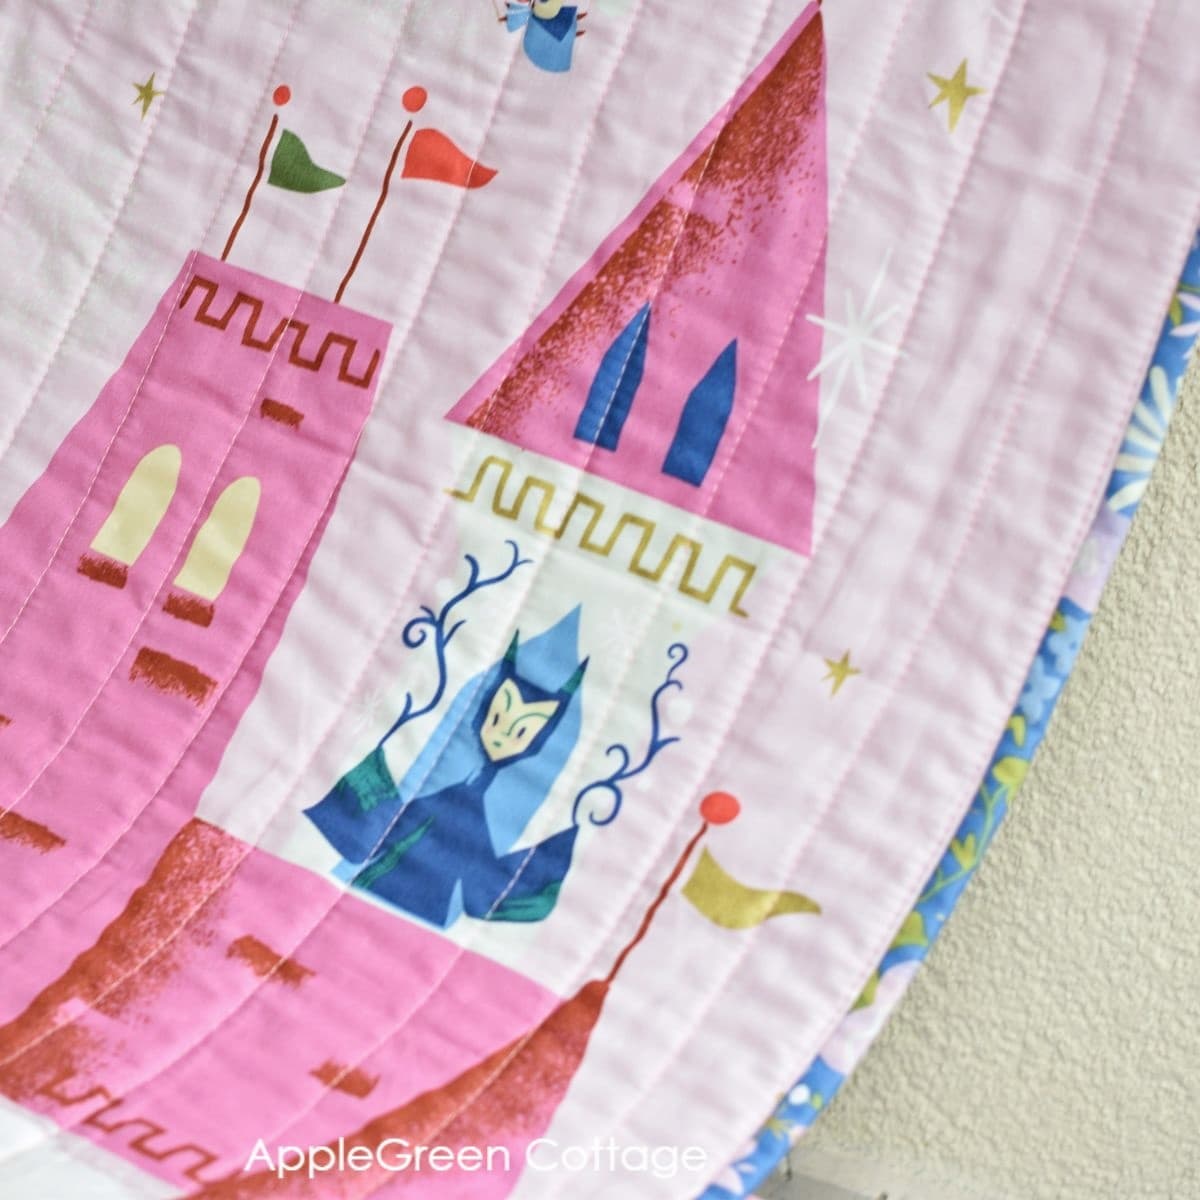
Then I spotted the Little Brier Rose fabric panel.
It was a no-brainer. A beautiful fabric, adjustable curtain rod, and a day later, here it was: adorable panel quilt for my daughter's door. I created a fitted rod sleeve and hung the quilt inside the window casing for a streamlined look.

Shading, noise reduction, privacy. And pretty.
It turned out so beautiful and I'm so proud of it.
What is a fabric panel?
First things first: a fabric panel is a design printed on fabric and sold by the yard. There are several types of fabric panels for quilting. For example, large print fabric panels, like mine here in this tutorial. A large fabric panel is, simply, a large design printed on the WOF (width of fabric). It will take up half a yard, three-quarters or even a whole yard of the bolt. That is called an 18", a 27", or a 36" repeat. There are also smaller fabric panel designs. These are perfect as fabric panels for pillows, wall hangings, and cut and sew fabric panels (I made a few - see photos in my pillowcase tutorial!). Fabric panels for baby quilts and quilted blankets are very popular too. And themed fabric panels are a star of the holiday season: I have made a tutorial with one of the Christmas panels for quilting (check out what I made!)
Fabric panel quilts are fast to make and a perfect first quilt if you haven't yet made one.
TOP TIP: If you're new to quilting, this guide on how to make a quilt for beginners is super helpful. Check it out!
Supplies To Make A Fabric Panel Quilt
- your fabric panel (I used Little Brier Rose fabric by Jill Howard)
- border pieces: any extra fabric you'd like to add to the top, bottom or/and sides of your panel.
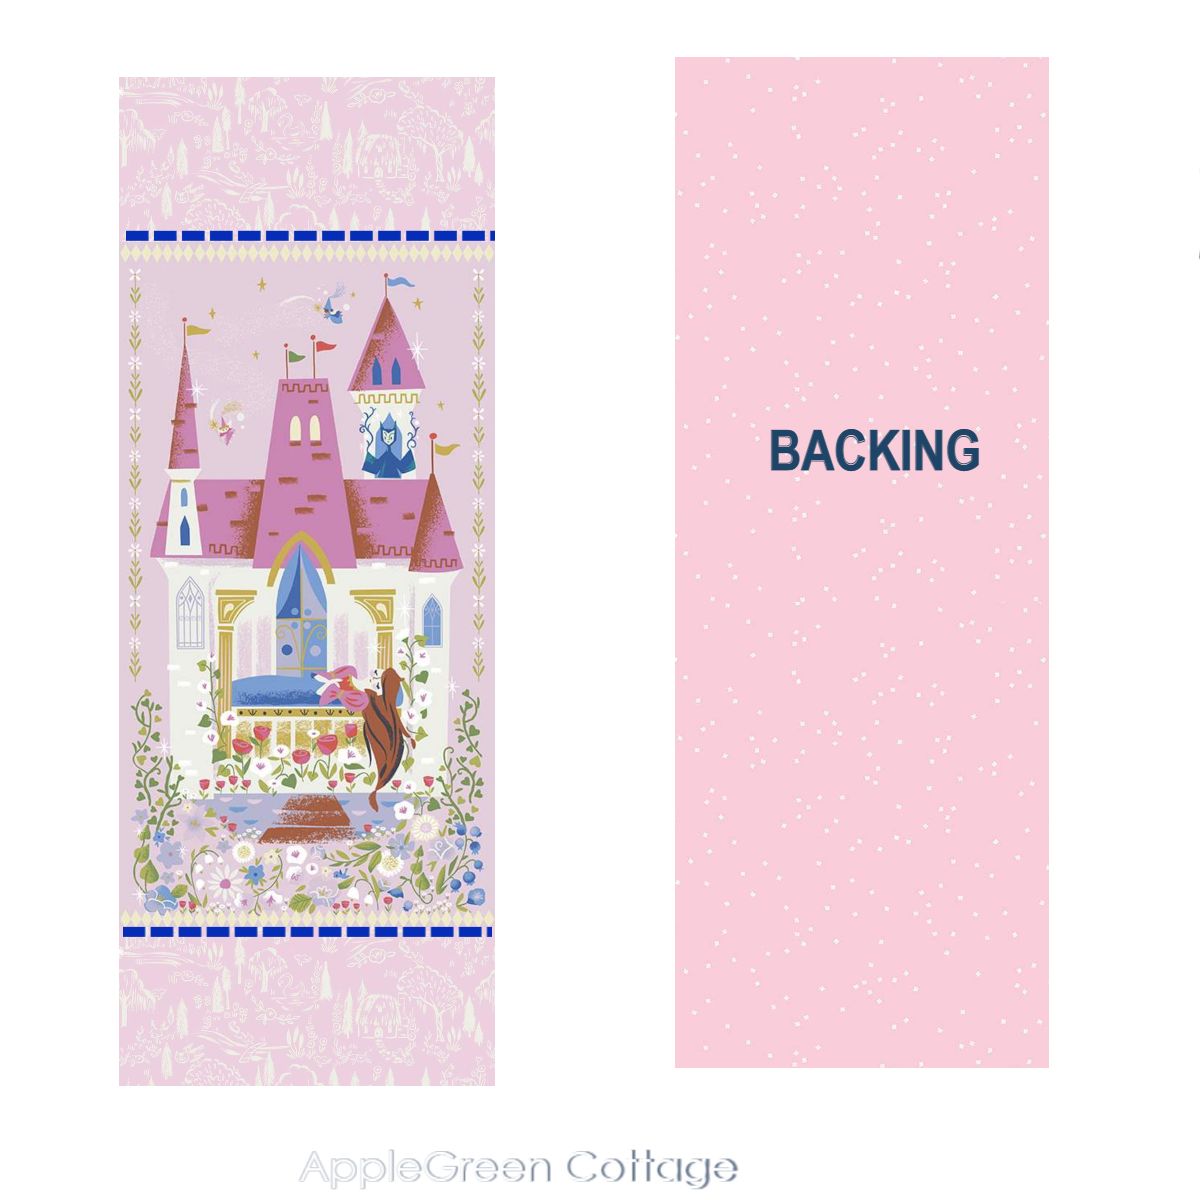
- Also, you'll need a large piece of backing fabric, a few inches larger than the planned finished panel quilt.
- Batting, it needs to be a few inches larger than the finished quilt
- Quilt binding, either purchased or make it yourself - here's how to make your own quilt binding
- a basting spray (my fav is Odif 505) or quilting pins
- A walking foot helps a lot!
- the usual tools and notions, matching thread, sewing machine, cutting mat and a rotary cutter, needles
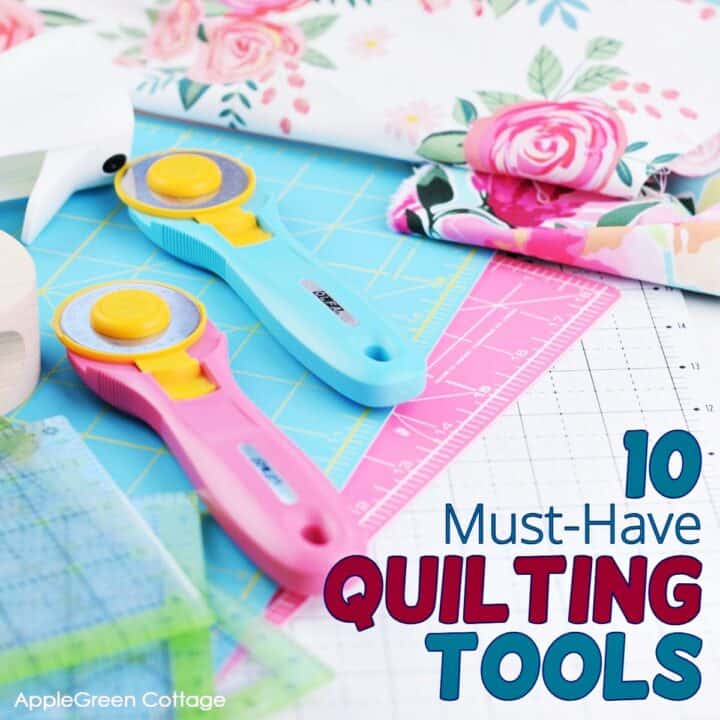
See My 10 Favorite Quilting Tools
How To Make A Quilt From A Panel Tutorial
You can either make a random size quilt, one adjusted the size to the size of your fabric panel or make a larger-than-your-panel quilt, simply by adding additional strips of fabric around. But it's easy.
NOTE: If you want to cover a French door window like I did, check out exact measurement instructions at the end of this fabric panel quilt tutorial. My fabric panel quilt needed to be 20" wide and 59 ½" tall when finished.
Need some help to figure out how much binding, backing, and batting you need? THIS! ↓↓↓
Make Math EASY - Get FREE Quilt Calculators!
Join our mailing list and get FREE Quilt Calculators - Make quilting math a breeze!
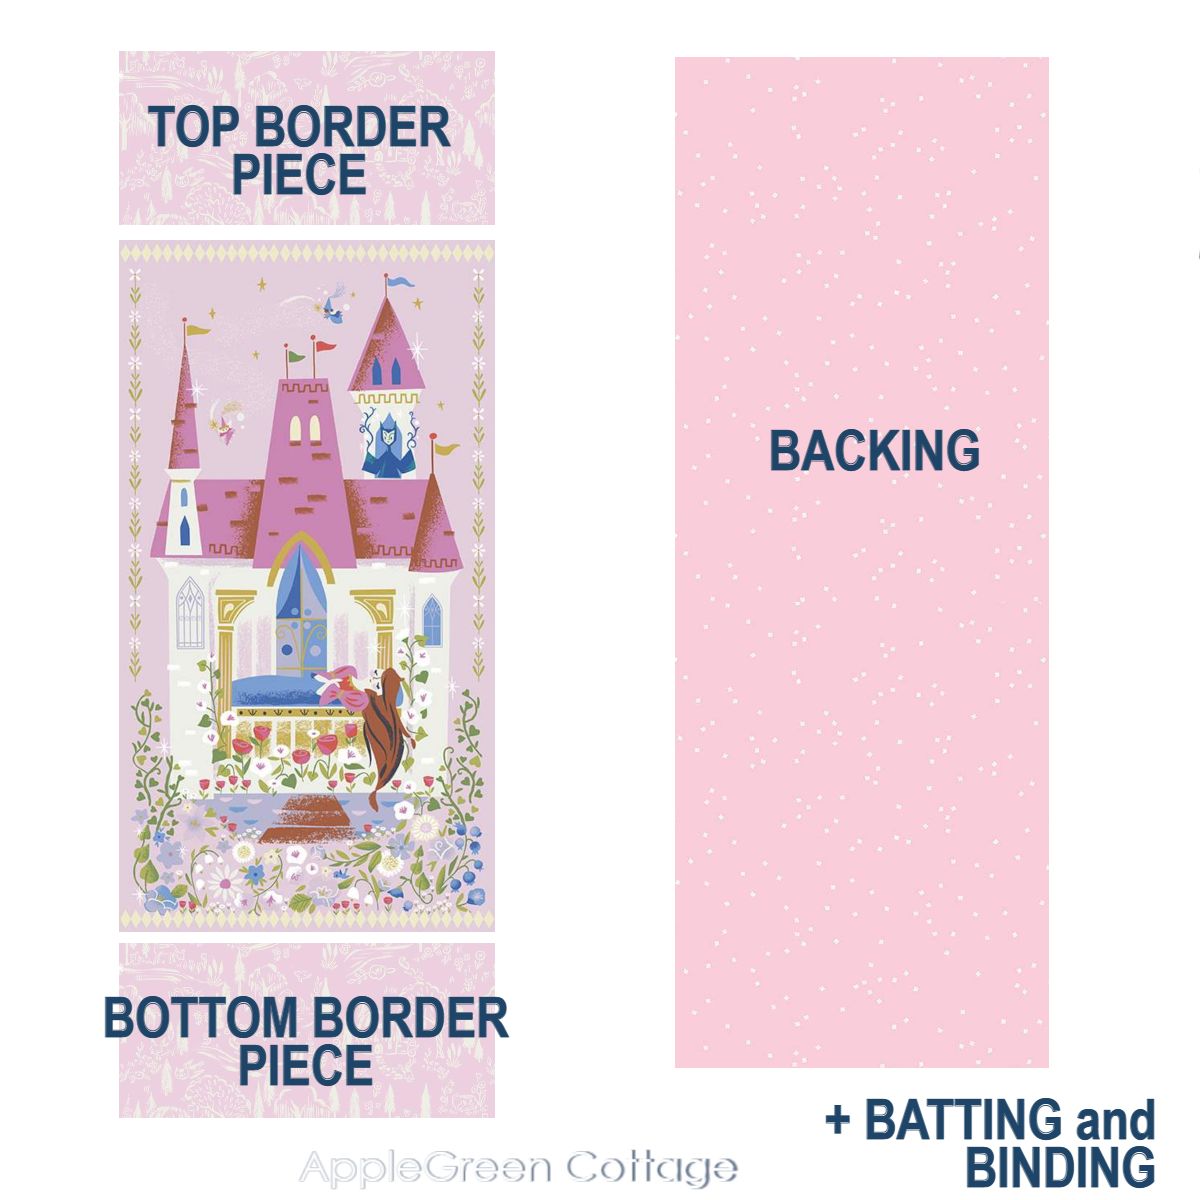
Step 1 - Gather Supplies For A Fabric Panel Quilt
Once you know how large your panel quilt should be, you'll need your main rectangular piece of fabric - your fabric panel. If you want to use just a portion of it, decide on what to keep and what to cut off.
If you want to make your panel quilt bigger than just the panel size, add a few rectangles of fabric around. No limitations here - I only added two pieces at the top and bottom sides to make my diy fabric panel quilt fit the desired measurements. You don't need to. This is what I got:
I'll tell you more about binding later, let's start at the quilt top:
Step 2 - Add Any Borders
And by adding borders, I mean adding rectangles or strips (that is, borders) to any side of your panel, if you need to enlarge your fabric panel. To make it easier for the first time, simply imagine having a several-piece patchwork to make. This is what my panel quilt top here actually is: a three-piece patchwork.
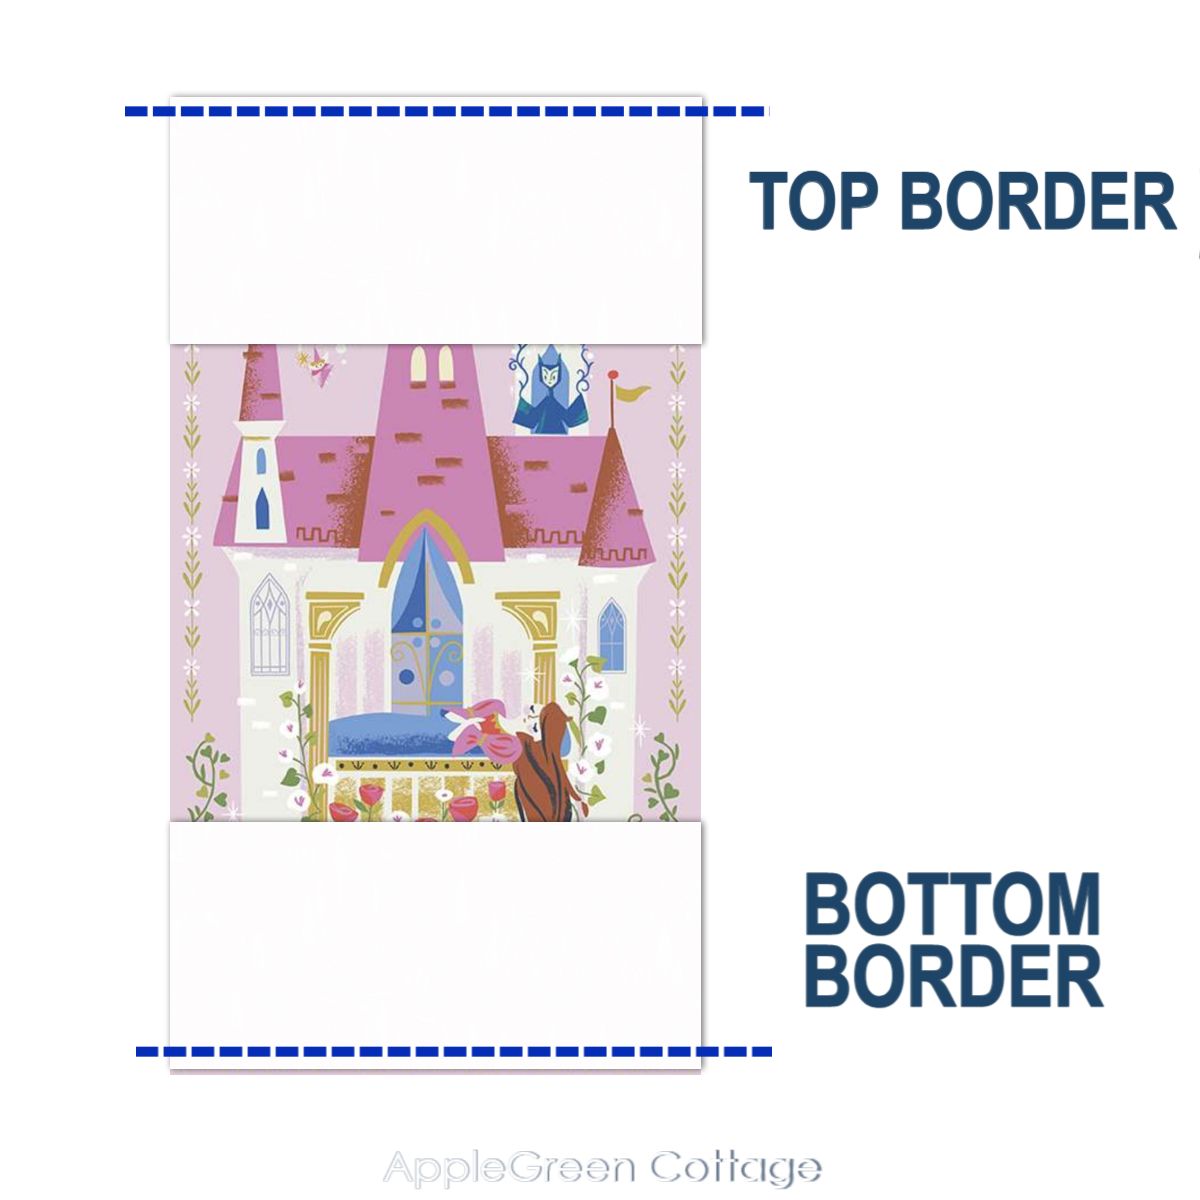
Then flip your borders outwards, press, and topstitch close to the stitching line. (You can topstitch later too.)
Ta-daa, piecing done! See how now the quilt top is approximately the same dimension as the backing, the latter usually being slightly larger.
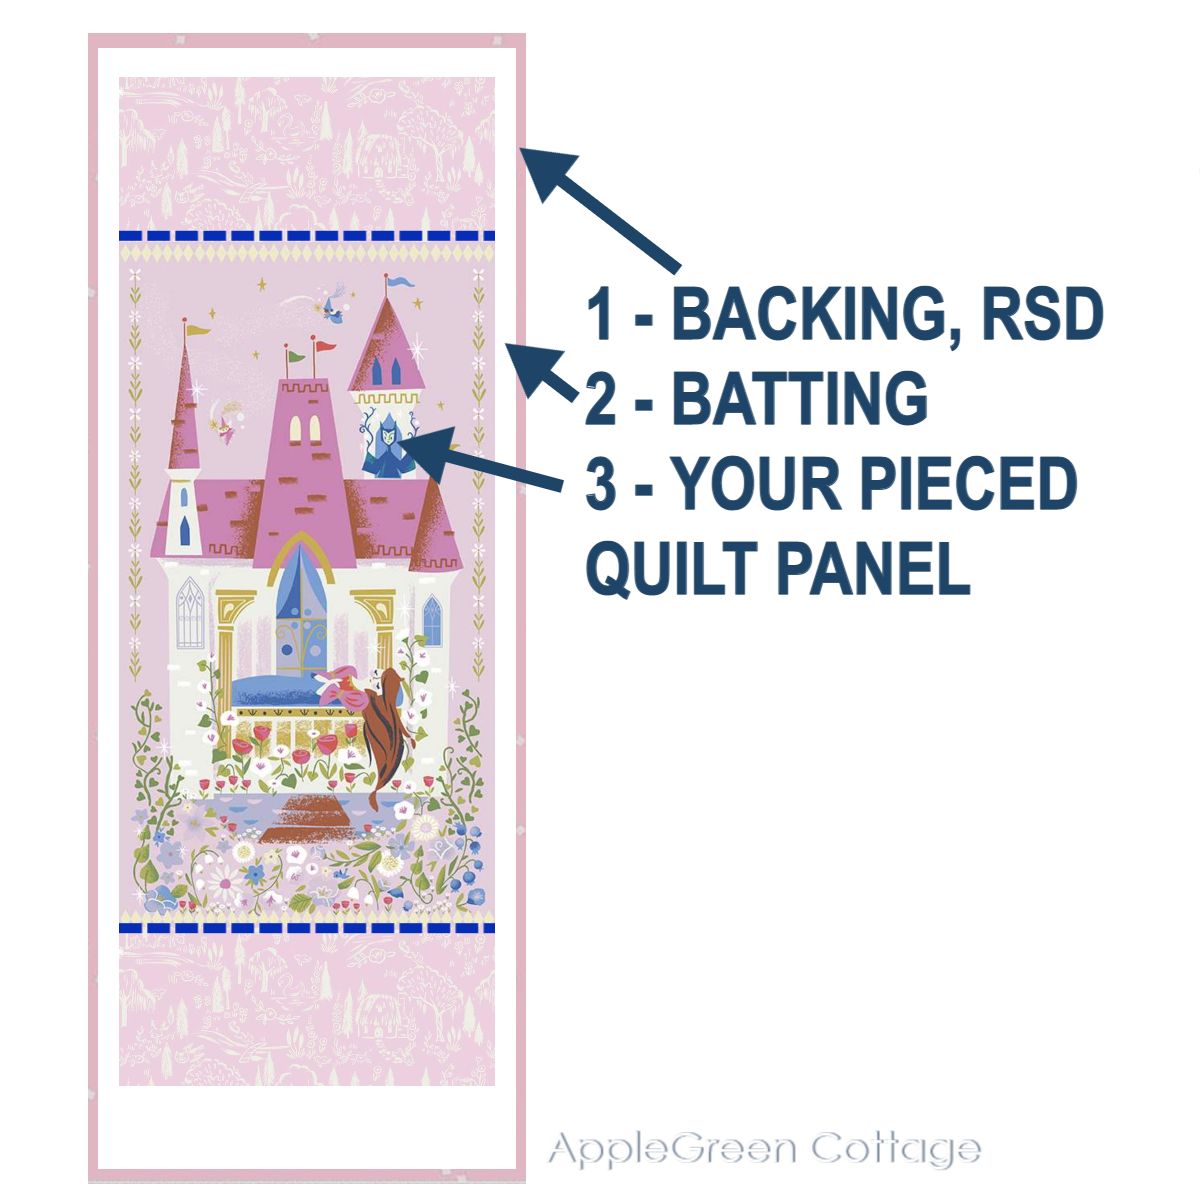
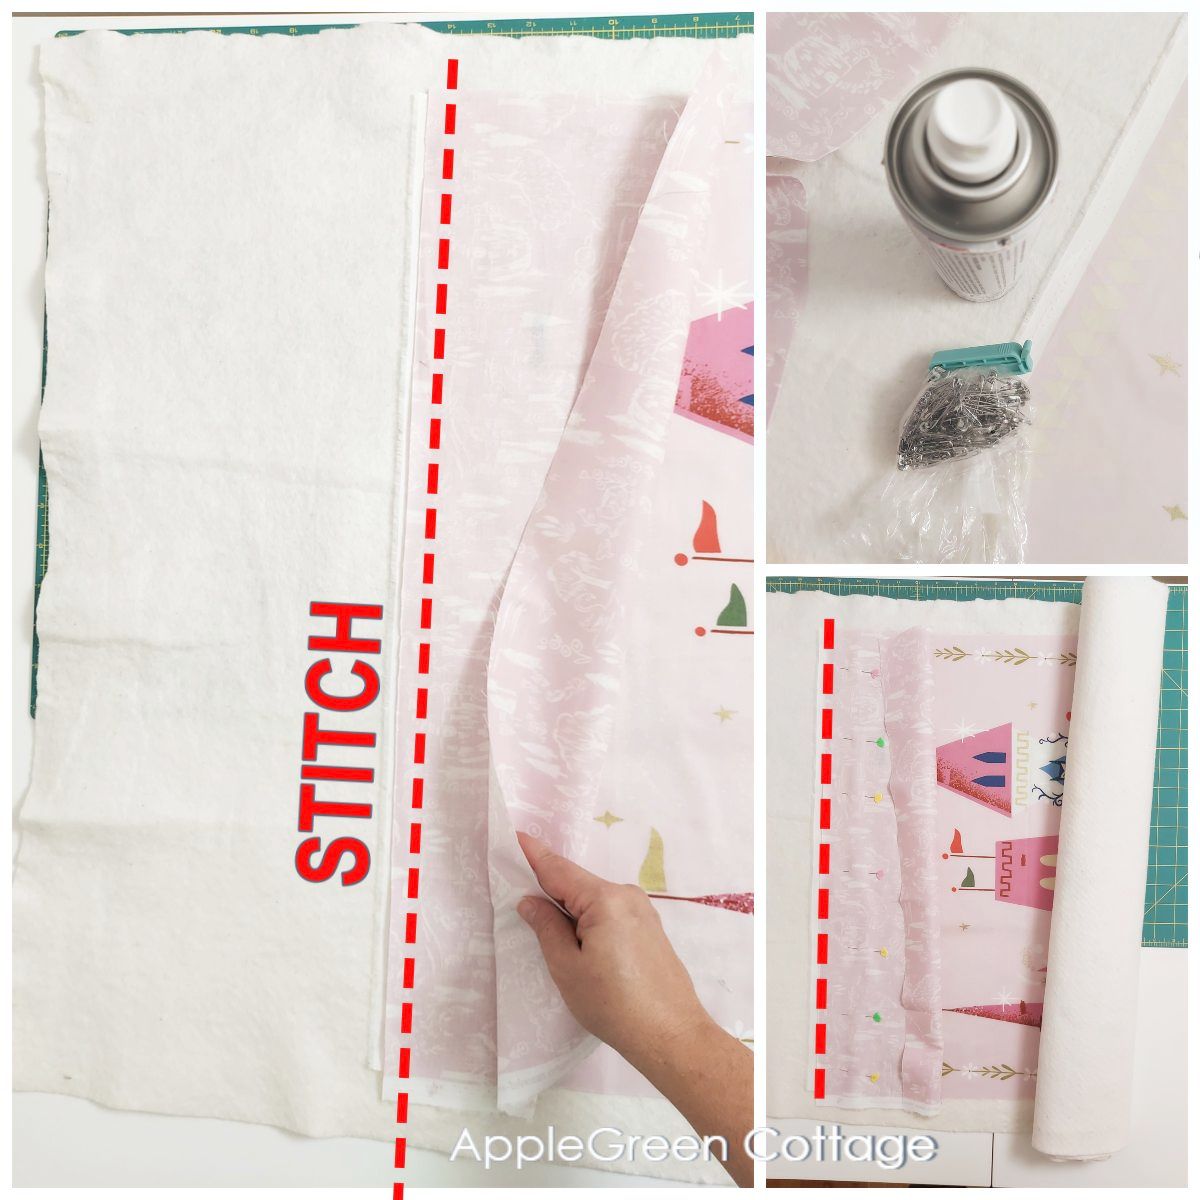
Step 3 - Make a Quilt Sandwich
Let's make a quilt sandwich! That is, layer your quilt top, batting, and backing. Make sure the batting is always touching the wrong side of the fabric, either the backing or the quilt top fabric panel:
I'll show you how to sandwich the quilt using a basting spray:
- Use a large table or a clean floor surface to spread and smooth out your backing, face-down.
- If spray-basting, spray the back of backing following the manufacturer's instructions.
- Place your batting on it, centered. Make sure there are no wrinkles!
- Spray again over the batting layer.
- Place your quilt panel on top, right side facing upwards, you.
- Heat set the basting spray (= press).
Make sure to smooth out any wrinkles. If you don't have a fabric adhesive spray, use safety pins (quilting pins) to fix the layers together and prevent shifting. But if you're like me and want to make it easier, get some basting spray first (Odif 505 is easily available, my fav too). It makes it so much easier!
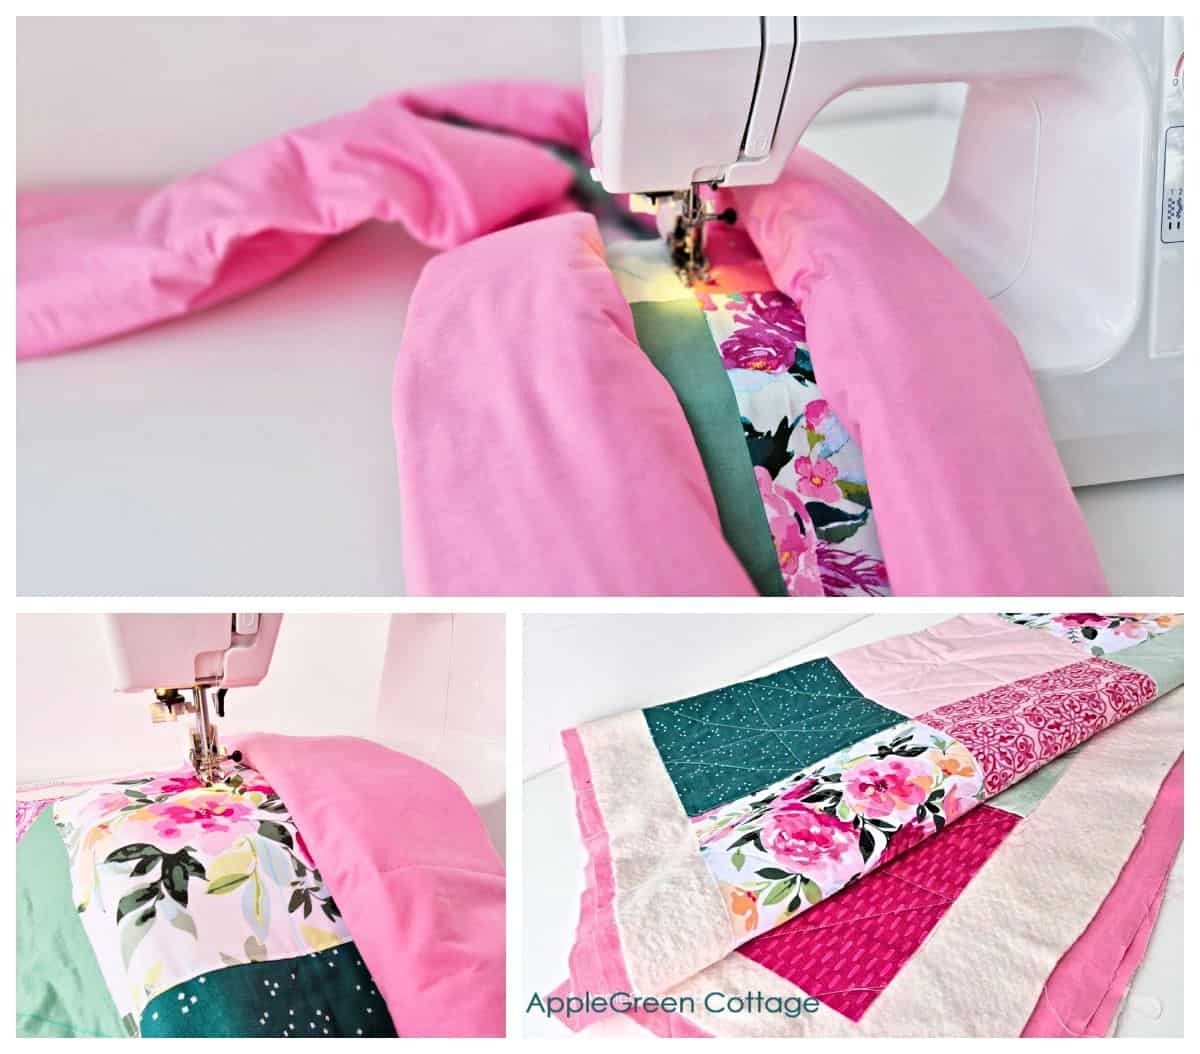
Step 4 - Quilt!
Time to quilt your quilt sandwich! While you have no limitations whatsoever on how to sew over your layers, two things: first, you may want to start with what I think is the simplest way - that is straight-line quilting. In other words, simply sew straight lines either vertically (like in this tutorial) or horizontally, or on a diagonal, that's so pretty too!
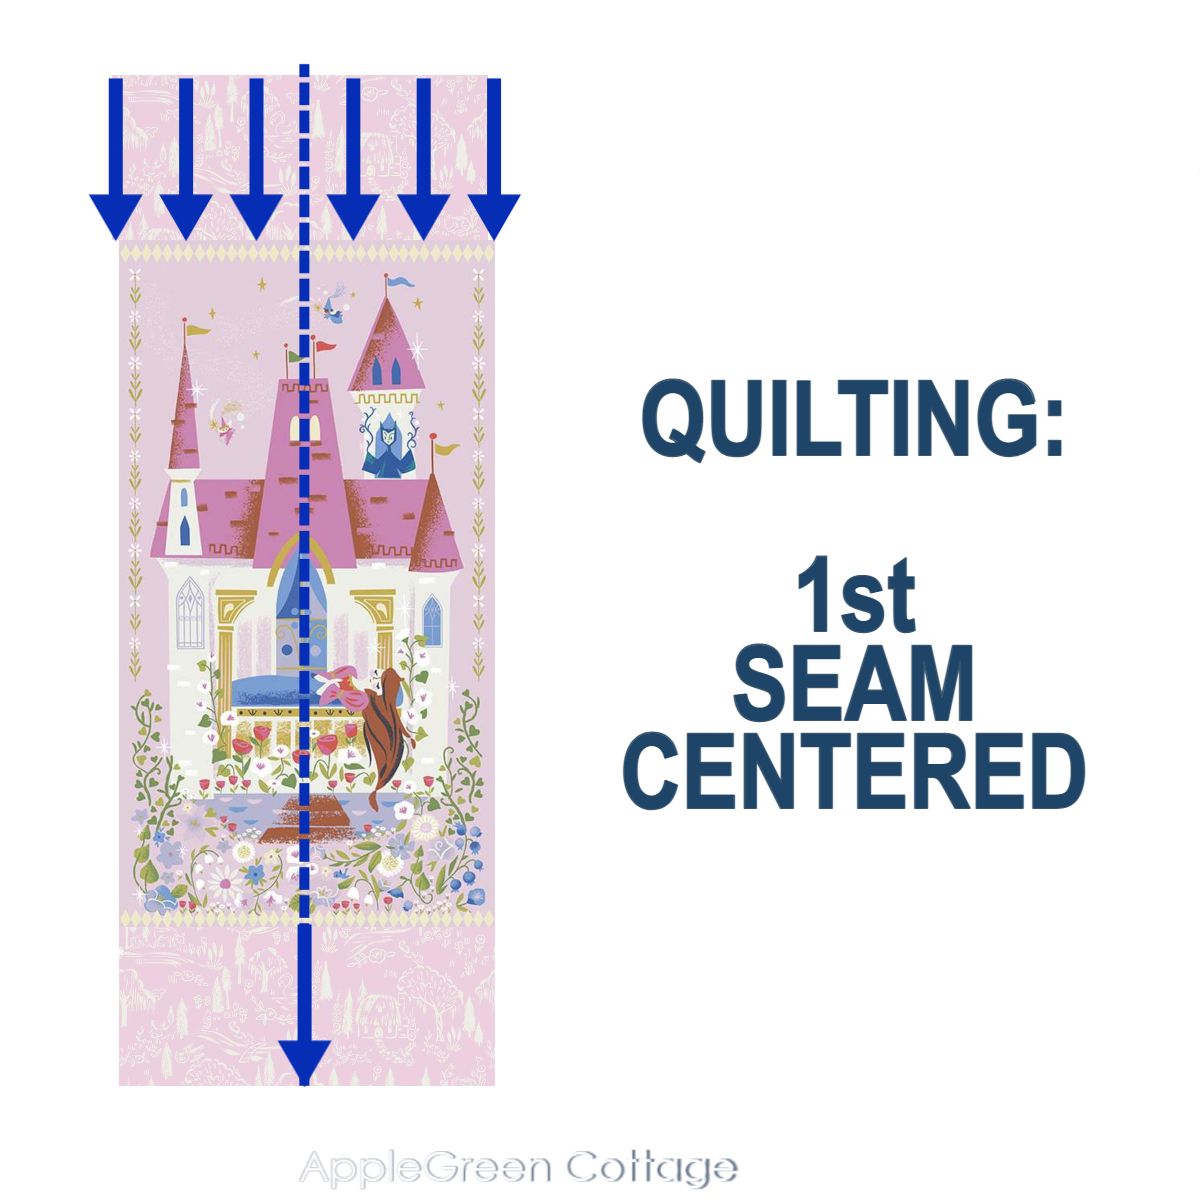
And secondly, start in the center and work your way outwards, always from top to bottom - same direction. Why? You'll get a better-looking quilt: your quilting stitches going in the same direction will keep your stitching more evenly spread, and without puckers.
So quilt your straight lines in the same direction.
How To Quilt Large Quilts On A Home Sewing Machine?
You probably don't own a longarm, unless if you're a long-time quilter. And chances are, you don't own a large-throat sewing machine that's perfect for quilting large pieces. Neither do I. This is the only trick I use to quilt anything on my home sewing machine:
I mark the center of my quilt sandwich and additionally reinforce it with pins (you won't see that often, but they make it easier for me to follow the straight seam line) then roll both sandwich sides towards that center. What I get is a nice fabric 'roll' I can easily lift from the cutting table, bring to my home sewing machine and - quilt.

Once I've made that initial center seam, I simply follow (same direction, from top to bottom), slowly unfolding on one side of the quilt. If need be, you can always take your quilt sandwich back to the cutting table, re-roll to have your next vertical seam spot clean and ready, and bring back to the machine.
Same here, with my lap-sized patchwork quilt tutorial, simply rolling the sides makes it so easy:
How do you keep a straight line when quilting?
A walking foot helps a lot, so if you've got it, always use it when quilting. It grabs your quilt from both the top and the bottom sides, feeding the layers evenly through the stitching area - no slipping!
Oh, and this is the simple tool that can make all the difference in keeping your lines straight - I don't even need to mark the quilting lines (gasp!), except for the first one in the center. This is my beloved guide bar that came with my walking foot:

I simply attach it onto the walking foot, there's a tiny hole at the back of it, and determine the size of the gap between my straight (or straight-ish!) quilting lines.
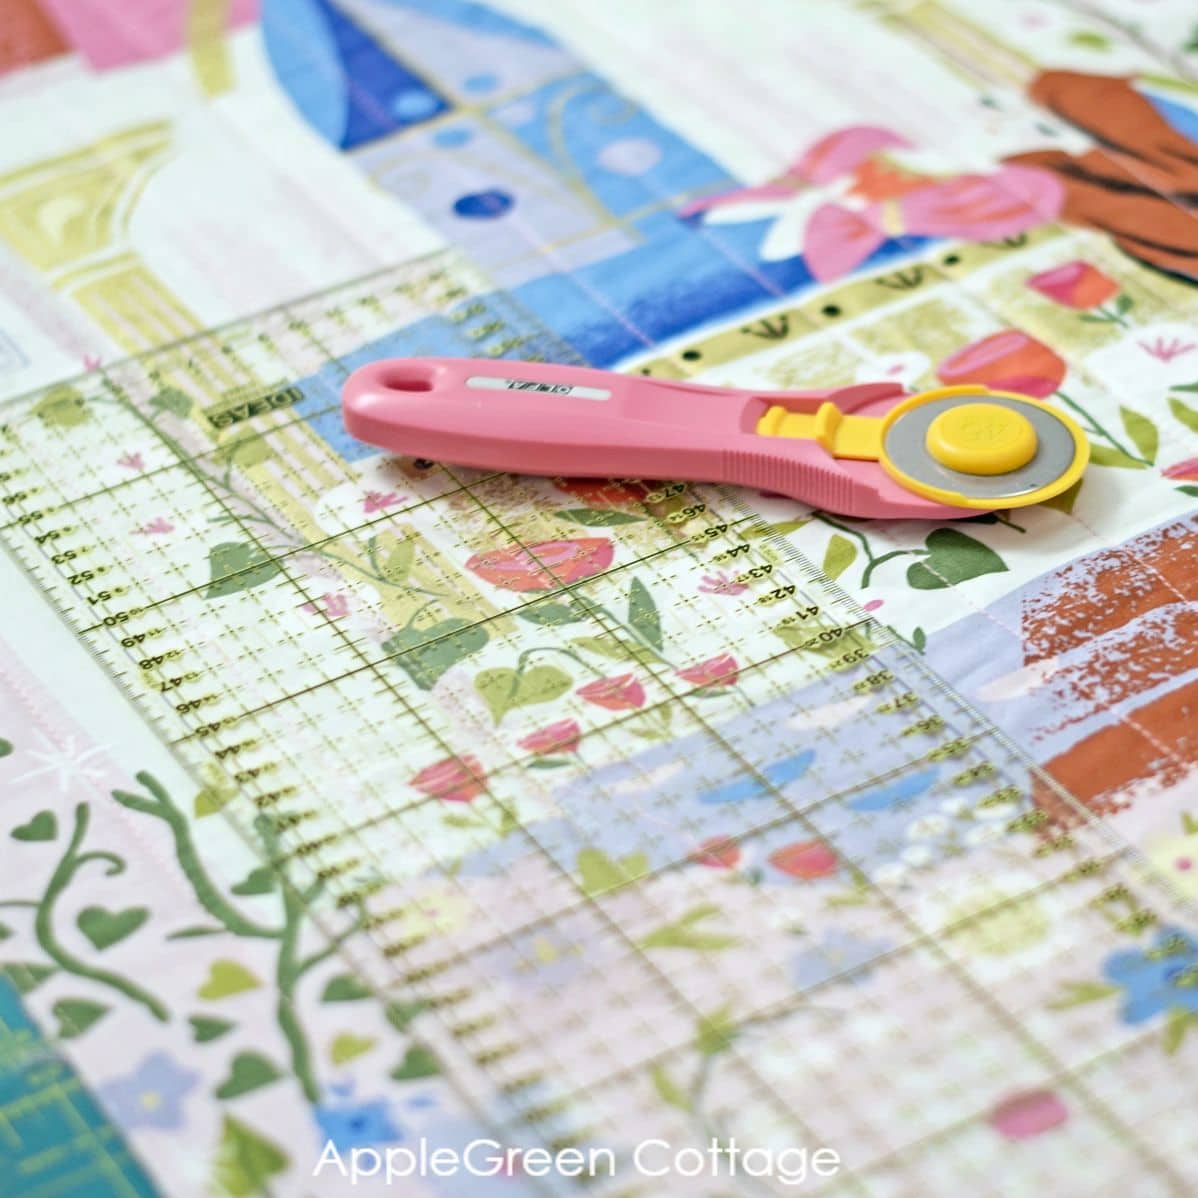
Step 5 - Square Up Your Quilt
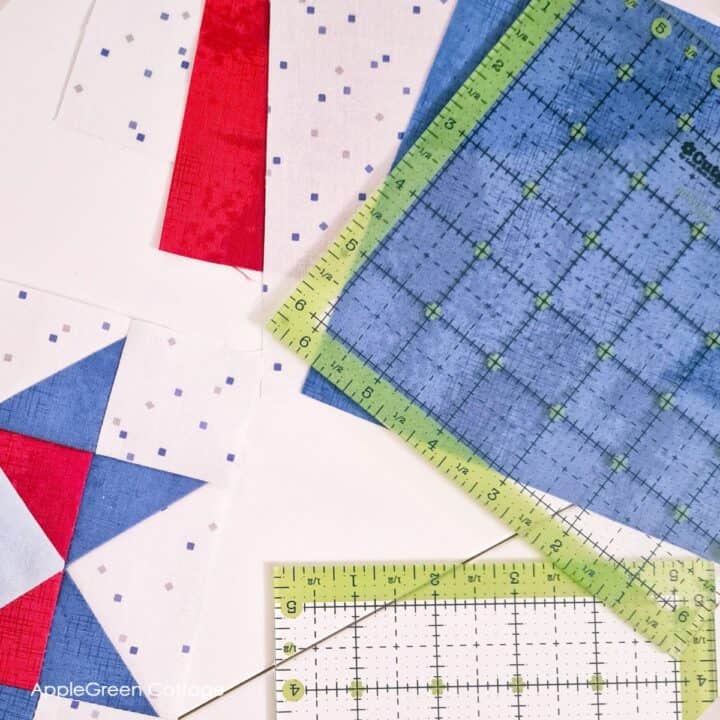
See my 4 Favorite Quilting Rulers!
Once you've quilted your layers, it's time to bring it to the cutting table and use your cutting mat and rotary cutter to make all the edges as straight as you can, and all the corners at 90 degrees. This is called squaring up a quilt sandwich. Same as that easy quilted potholder, just bigger. Keep in mind your finished quilt measurements.
Once done, baste around to keep the layers together on all edges.
Step 6 - Add Quilt Hanging Sleeve (optional)
This is how I added a slim quilt sleeve as I knew exactly how I wanted to hang my quilt: the sleeve had to fit my slim hanging rod for window curtains.
See a good post on how to hang a quilt here.
I simply cut a strip same width as my quilt sandwich and just 3" wide (I only needed a narrow, half-inch sleeve for my slim curtain rod for French windows ). Then I double-hemmed the narrow edges, folded in half with wrong sides together and basted the raw edges aligned to the top edge of my quilt sandwich. Before adding binding, that is.
If it seems a bit tricky, just drop a comment below and I'll create a simple quilt sleeve sewing tutorial for you. I'm always up for it! 😄(Edited: here's the quilt sleeve tutorial. Actually, two.)
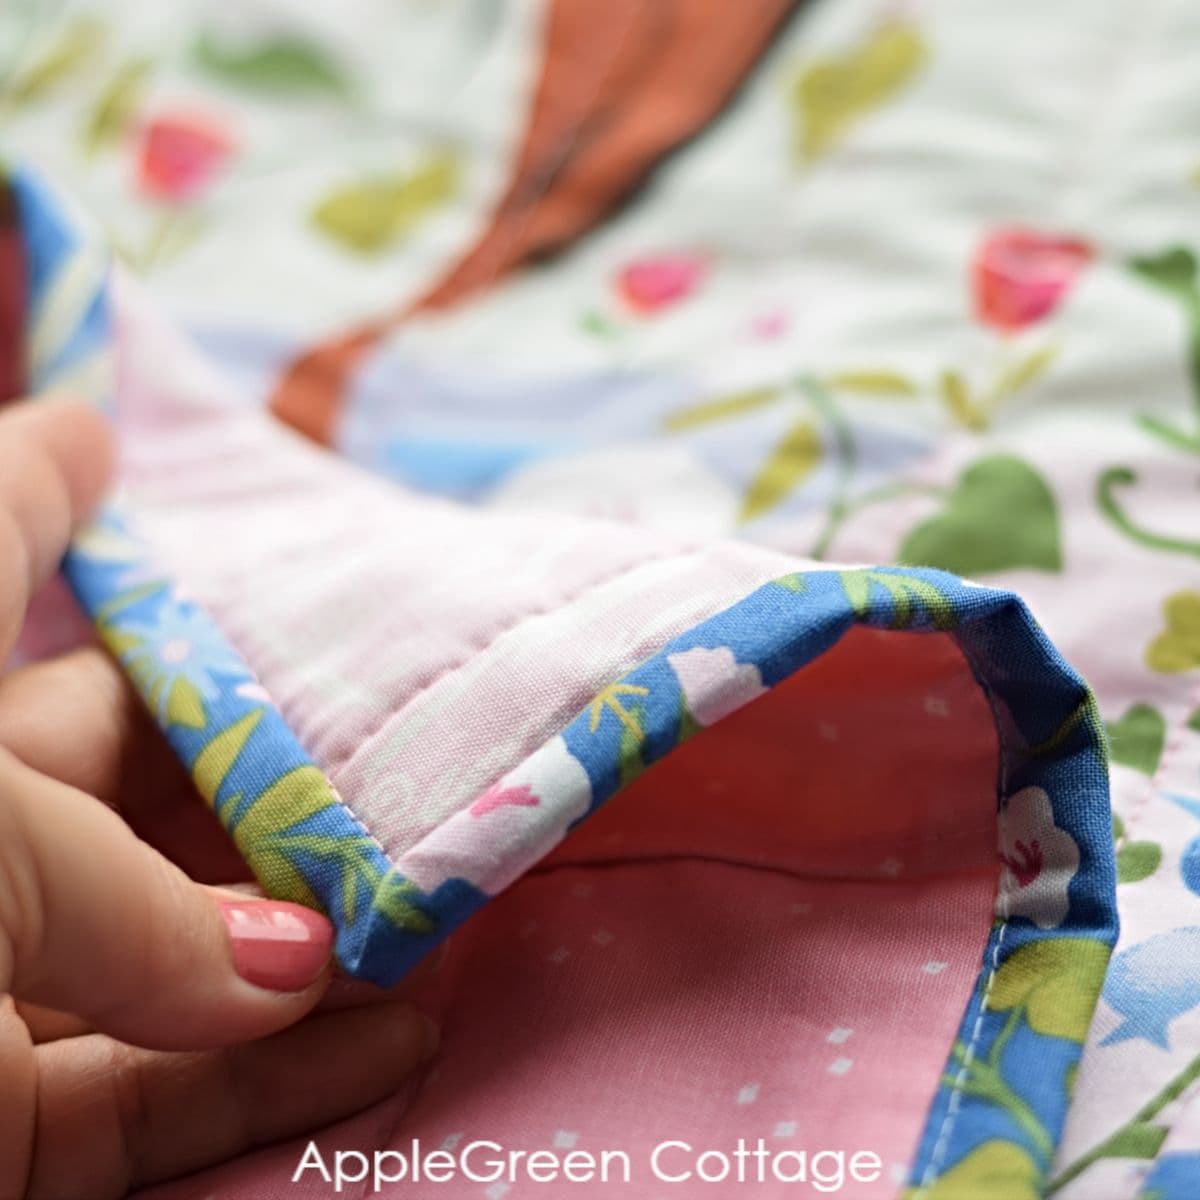
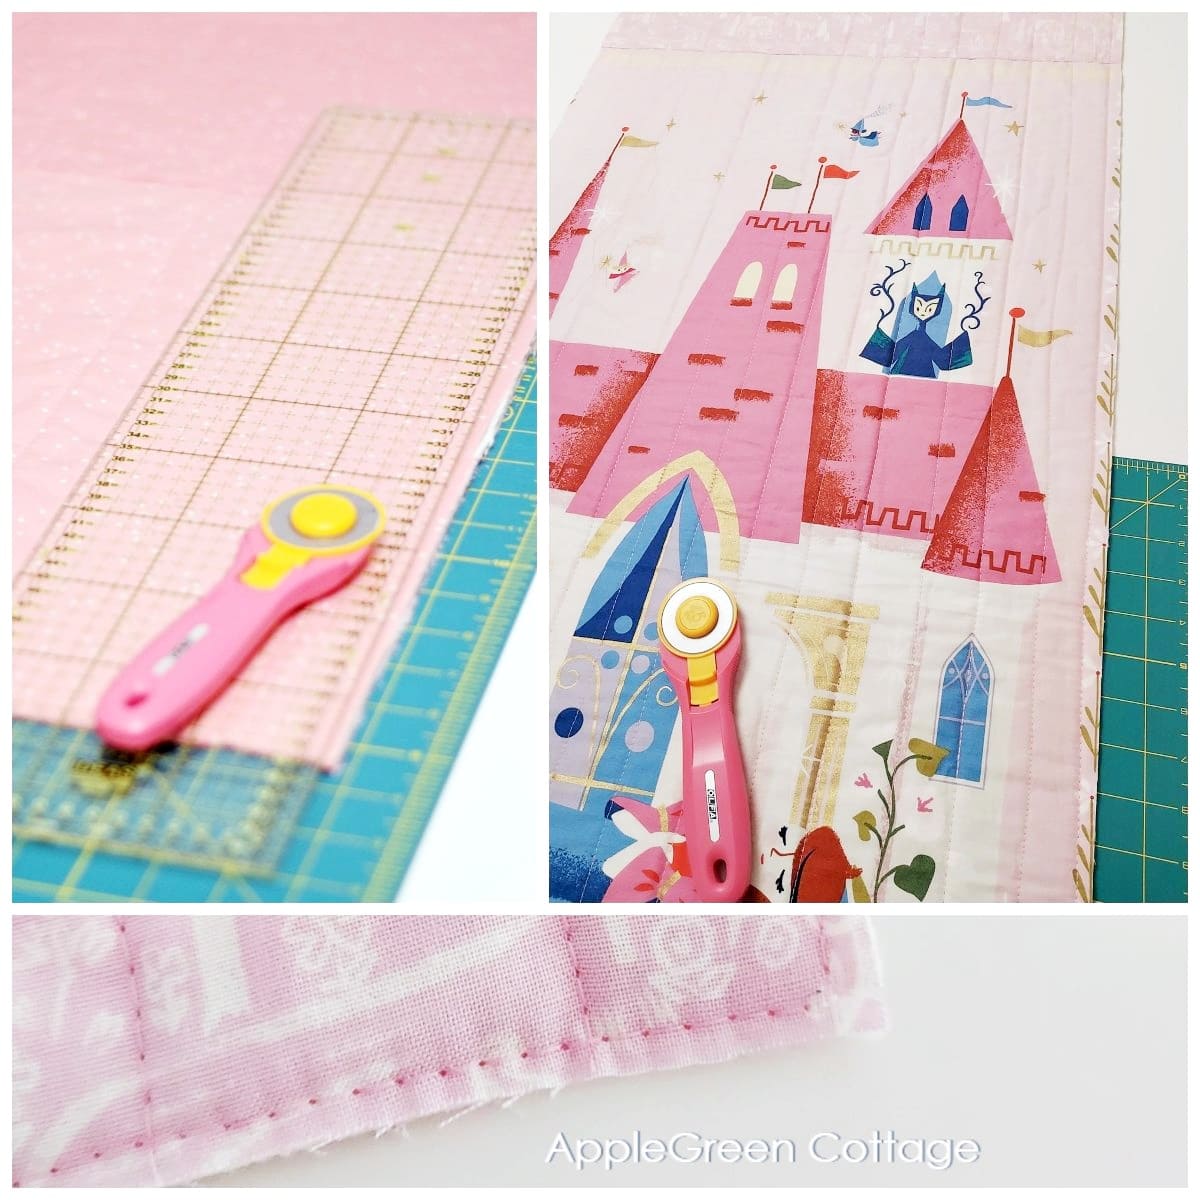
Step 7 - Add Binding
Fear not! What you need is the simple straight-grain binding, or in other words, quilting binding. No need to cut anything on bias (yey!)
Here's a detailed tutorial to sew quilt binding, the easiest way, plus steps to join pieces, cut and everything else.
And here's a short step-by-step of how I did it here if you don't need a whole tutorial:
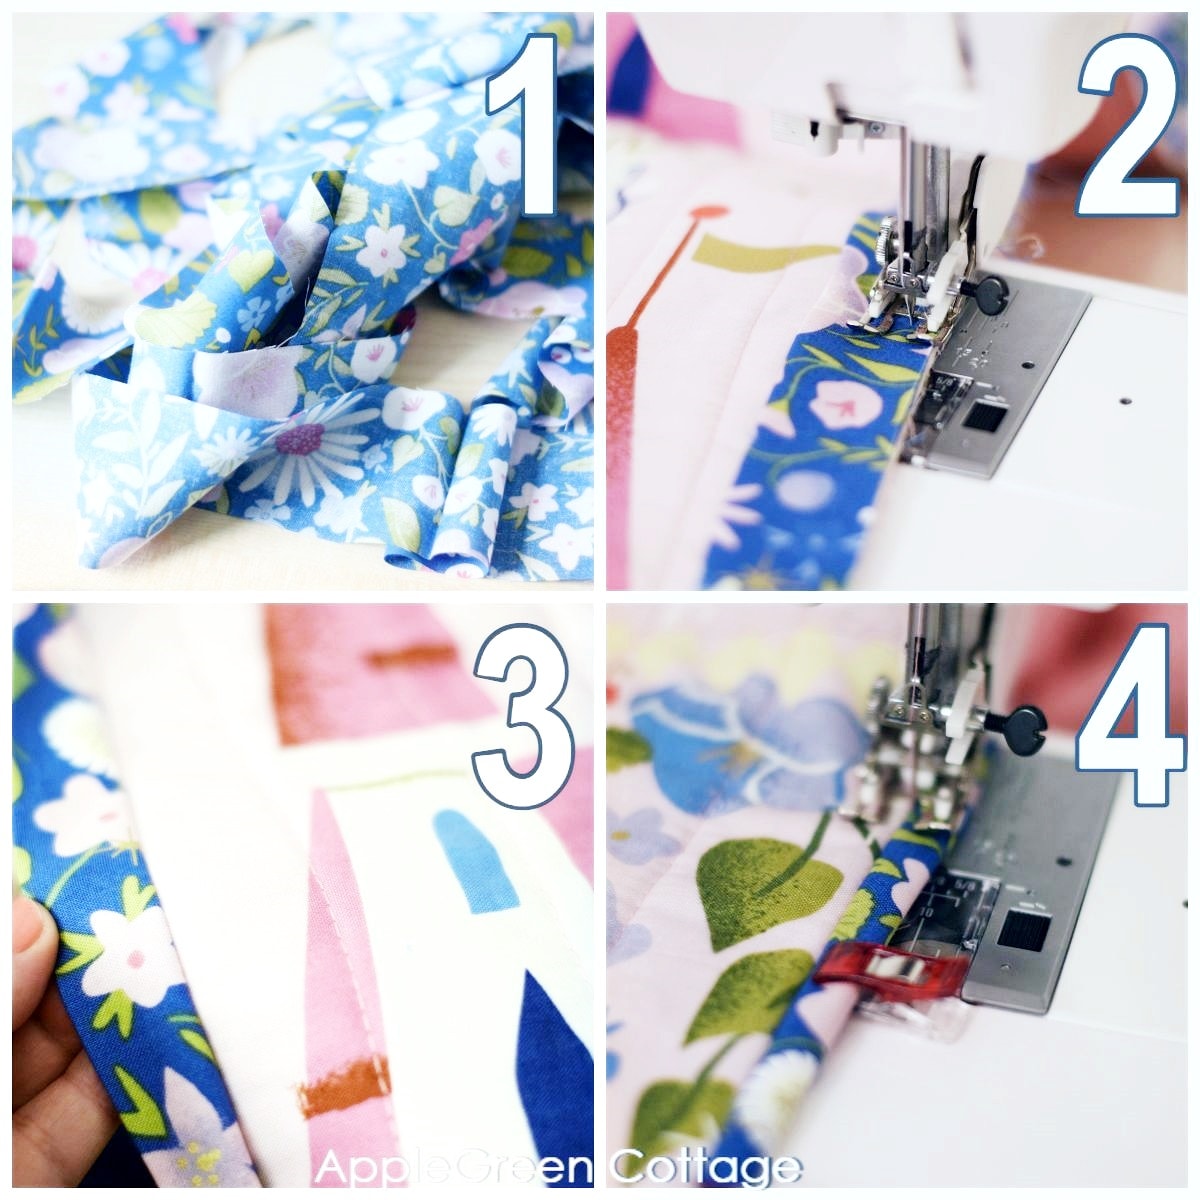
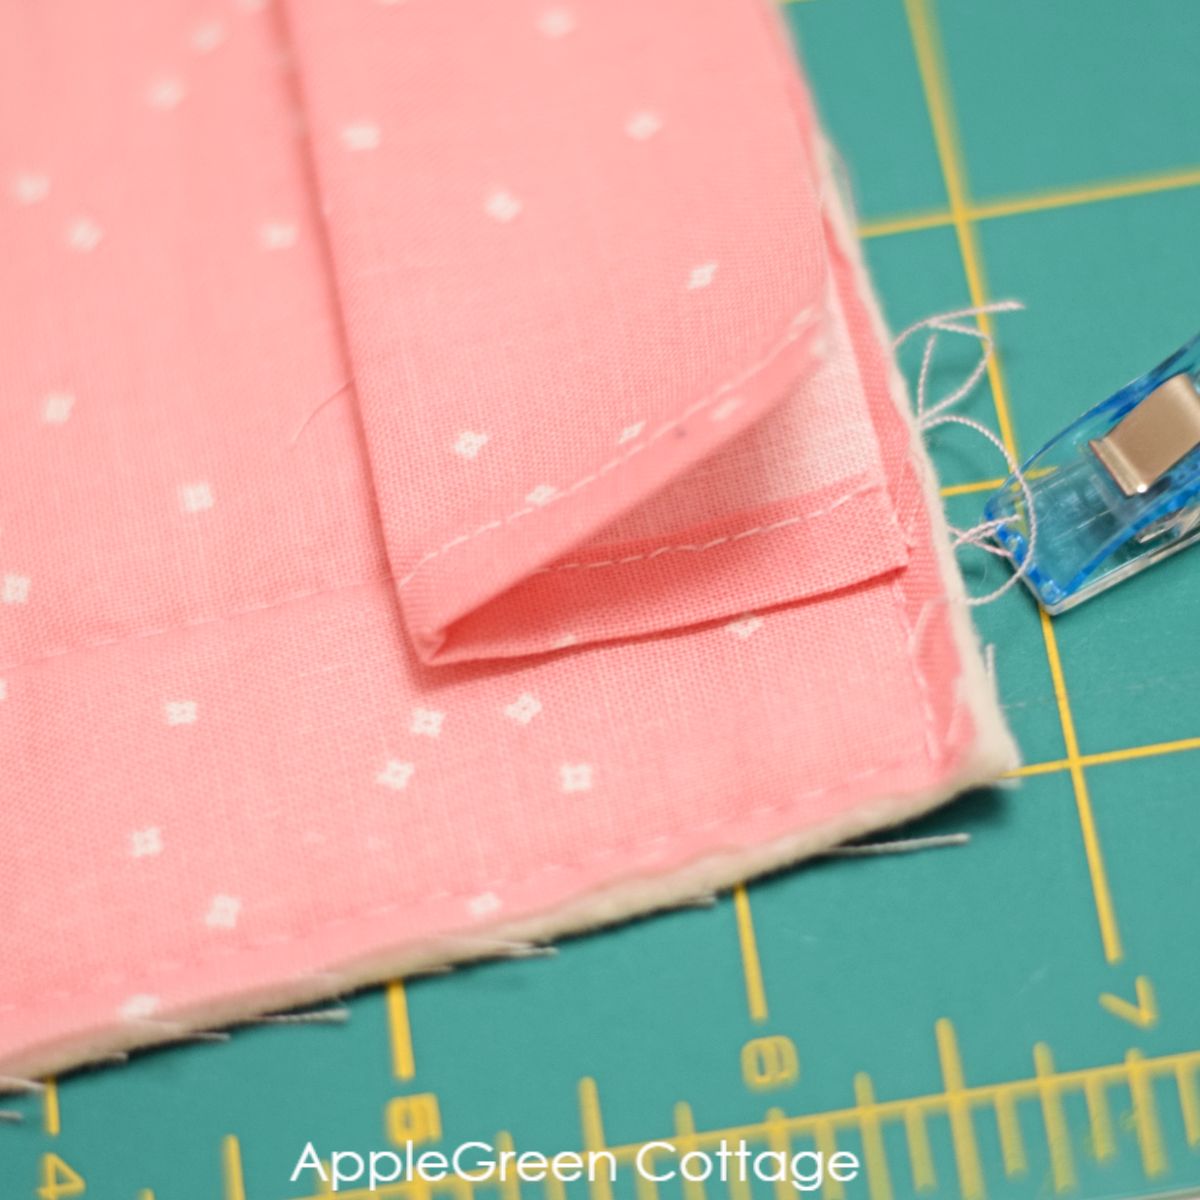
- First, measure the outer edge of your quilt allll around and add 10". Cut 2 ½" wide strips and join them.
- There are tons of ways to attach the binding to a quilt. What I did this time, I knew I wanted the quilt top finish to look impeccable (-ish), so I started attaching binding at the front. (see image 2)
- Then I folded it backwards (see image 3) and
- ... finished by machine stitching it in place from the front (see image 4). I did that by stitching in the ditch, and keeping an eye on the back to make sure I caught every layer.
Again, this binding tutorial is an easier way to do it if you've never yet worked with binding.
Finished! Now hang your first panel quilt somewhere you can admire and enjoy every day!
Don't forget to tag me with @applegreencottage if you post your quilt on Instagram, or tag me with #applegreencottage. I'd love to see your DIY panel quilt too! Let's take a moment to admire it and share a few thoughts!
Tips For Quilting With Panels
I have tons of bits of advice for you to make your quilt with panels. Because so far, I've made my share of mistakes and I want to spare you from making your own. So, straight to No 1 - Purchase all fabric at the same time to avoid shortages. I made the mistake of not have planned for the quilt backing. Ack.
At the same time, tip No 2, a first-aid band if you committed that same mistake already: if all else fails, nobody will judge you if you piece the backing - same print or even better, create a matching backing with several matching basics. (insert a happy grin from this impro-loving lady)
How To Piece a Quilt Using Quilt-As-You-Go technique?
You will usually piece your quilt top by sewing borders to your fabric panel using a ¼" seam allowance - before sandwiching anything. Having said that, some of us are fans of the quilt-as-you-go technique. Welcome to the club! You can also sew the top and bottom border together with the batting. First spray-baste the panel to the center of your batting then qayg the borders on. Good thing, this way you'll end up with batting already partly attached to your quilting cotton when you start quilting your sandwich. Absolutely not a necessary part of your quilting journey, just info for qayg nerds like me 🙂
- first I spray-basted fabric panel to the center of my quilt batting
- Only then, I added the top border by placing the raw edge along the top of the panel, with right sides together.
- Stitch along the edge using a ¼" seam allowance, flip and topstitch (optional, but I always do)
You can definitely skip this, and if you're not a fan of quilting-as-you-go technique, you can join the panel and border pieces separately, before sandwiching the quilt layers.
How To Measure The Window For A Quilt
Since I made this panel quilt to fit exactly into a French door window, I'll show you how to measure your window so you can replicate this project on any size window in your home too:
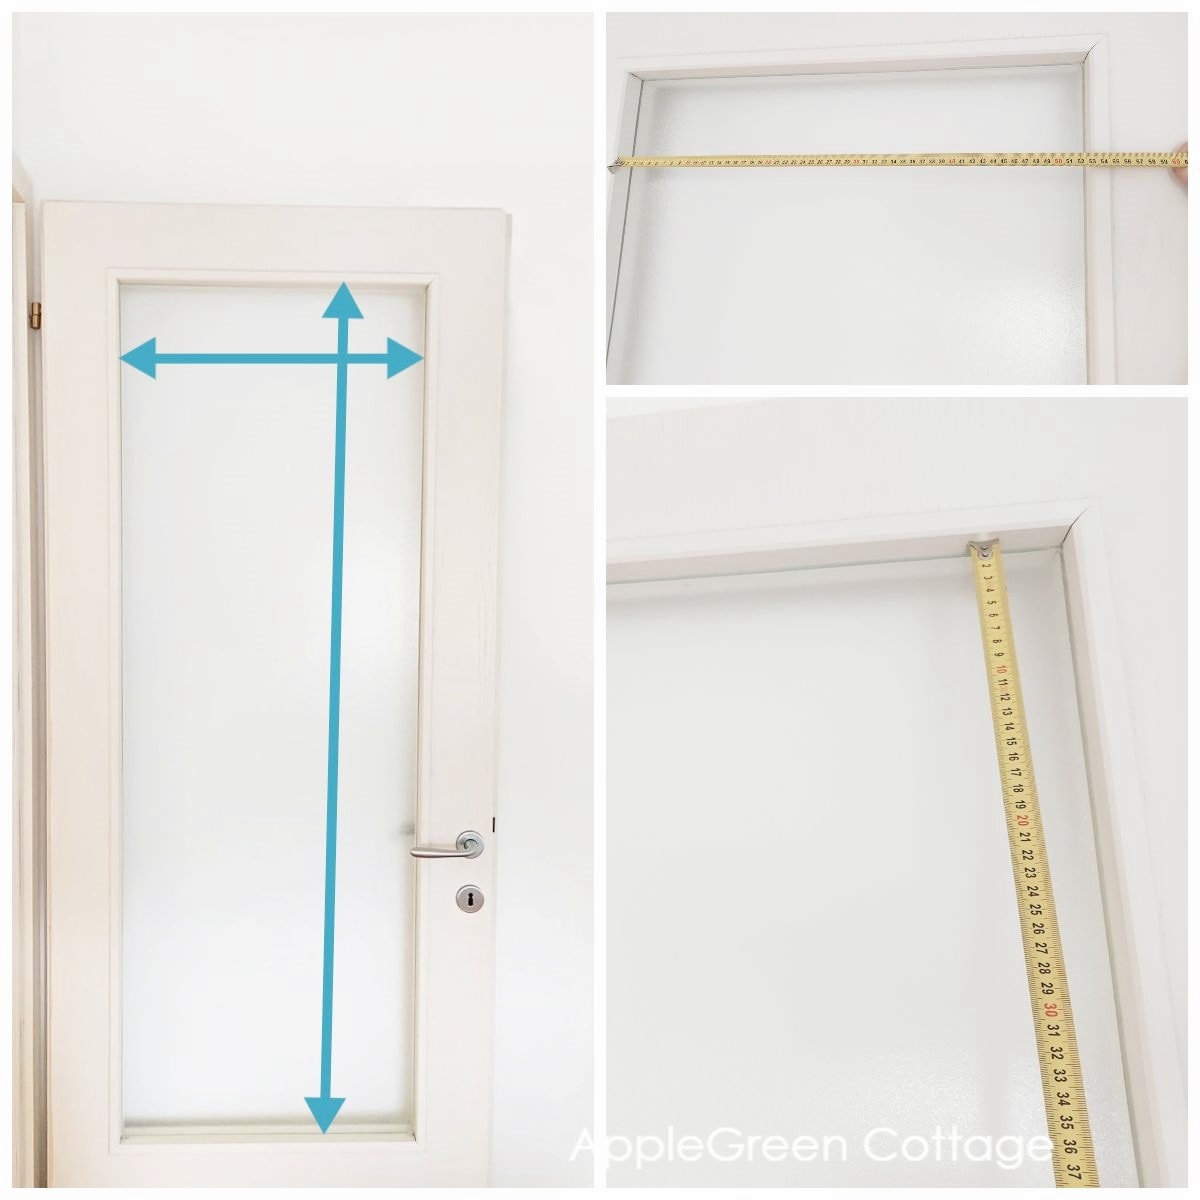
Our three-quarter lite door window measures 20" wide and 59 ½" tall. I'm sewing a fabric panel quilt that will be fitted inside the window. And since it will only cover the window, I will only measure the actual window area.
Since the quilt hanging rod will fit at the top of the window (at the same time, installed into the quilt hanging sleeve I made to fit exactly at the top) - I won't have any space left at the top. So I don't need to account for any differences. However, if the hanging rod is not entirely at the top of your window, you'll need to account for that difference.
Now measure the horizontal width of your window glass. No special math needed.
I hope you've enjoyed this how-to make a quilt with panels tutorial. Did it teach you something new? I hope so. And even more, did I convince you into making one? I sincerely hope so, they are heirloom pieces and you'll be able to brag about it to everyone, for years. I sure will!
Here's one more idea for a quick weekend sew:
The EASIEST Patchwork Quilt!
Or, if you're more for a modern look (no tricky points to match either!) ↓
Randomize Quilt Pattern
Love modern quilts but want something simple - and NO tricky points to match? →THIS.
Or, if you're eager to try quilting without committing to a large fabric piece, start with this cute quilted zipper pouch - a great start into quilting before your first panel quilt - or make this easy quilted table runner!
Before You Start: Get FREE Quilt Planner Sheet
Want to make planning easier? Get your free quilt project sheet now and start with a solid plan!
Stay Organized in Style!
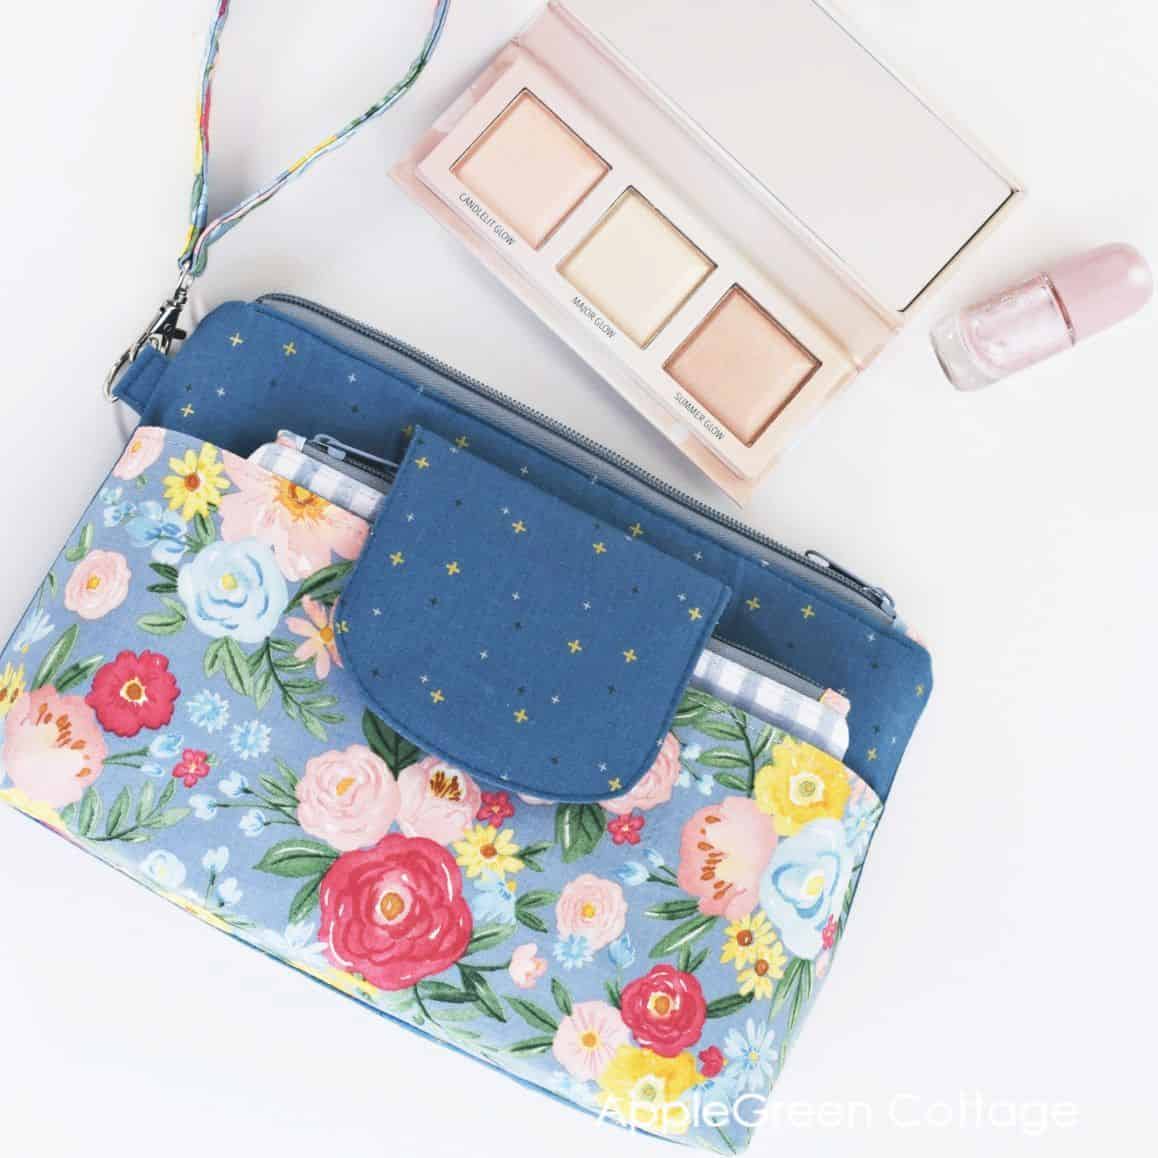
Keep your essentials neat and tidy with the SILA Duo Pouch.


Mea Cadwell says
Seeing this helped me figure out how to do window quilts. They have a sleeve on the top so I can pull them to the side during the day but cover the windows at night (and my regular curtains are over the window quilts). After I made them I used an infrared thermometer and the window quilts have really made a difference in how much heat is lost out my windows.
Thank you!
Kathy says
Thank you for straight up simple! I’m a newbie and can’t wait to get started.
Pat says
Fabulous tips and pictures. Beautiful panel quilt too. Well done and yes I would love a tutorial on quilt sleeves cause you love us that much and you are crazy! Lol
Lisa from Cucicucicoo: Eco Sewing & Crafting says
This is fabulous! I've been wanting to start quilting for a while, and this is full of great tips! I just put your suggestion of basting spray on my shopping list!
Robyn Lidstone says
Thank you Damjana for showing how to make this lovely quilt. Your tutorial arrived on the morning of my birthday. A lovely surprise.
Your method will work fine on my Husqvarna machine that has a wider than normal space to work in. It's not the widest, but not the smallest either.
How good is not having to do all the intricate piecing of a range of fabric squares and shapes? Sewing the straight quilting lines is much easier for a beginner than free motion.
Now I'll have to source a suitable fabric panel for a feature wall hanging or even a cute baby quilt.
Sharing your expertise is generous and so helpful for quilters all around the world.
Best wishes from Queensland, Australia.
Robyn
Rose says
Great job and good instructions, A big thank you.
Damjana says
Thanks for reading, I'd love to see if you make a quilt like this one for yourself too!
xoxo, Damjana