
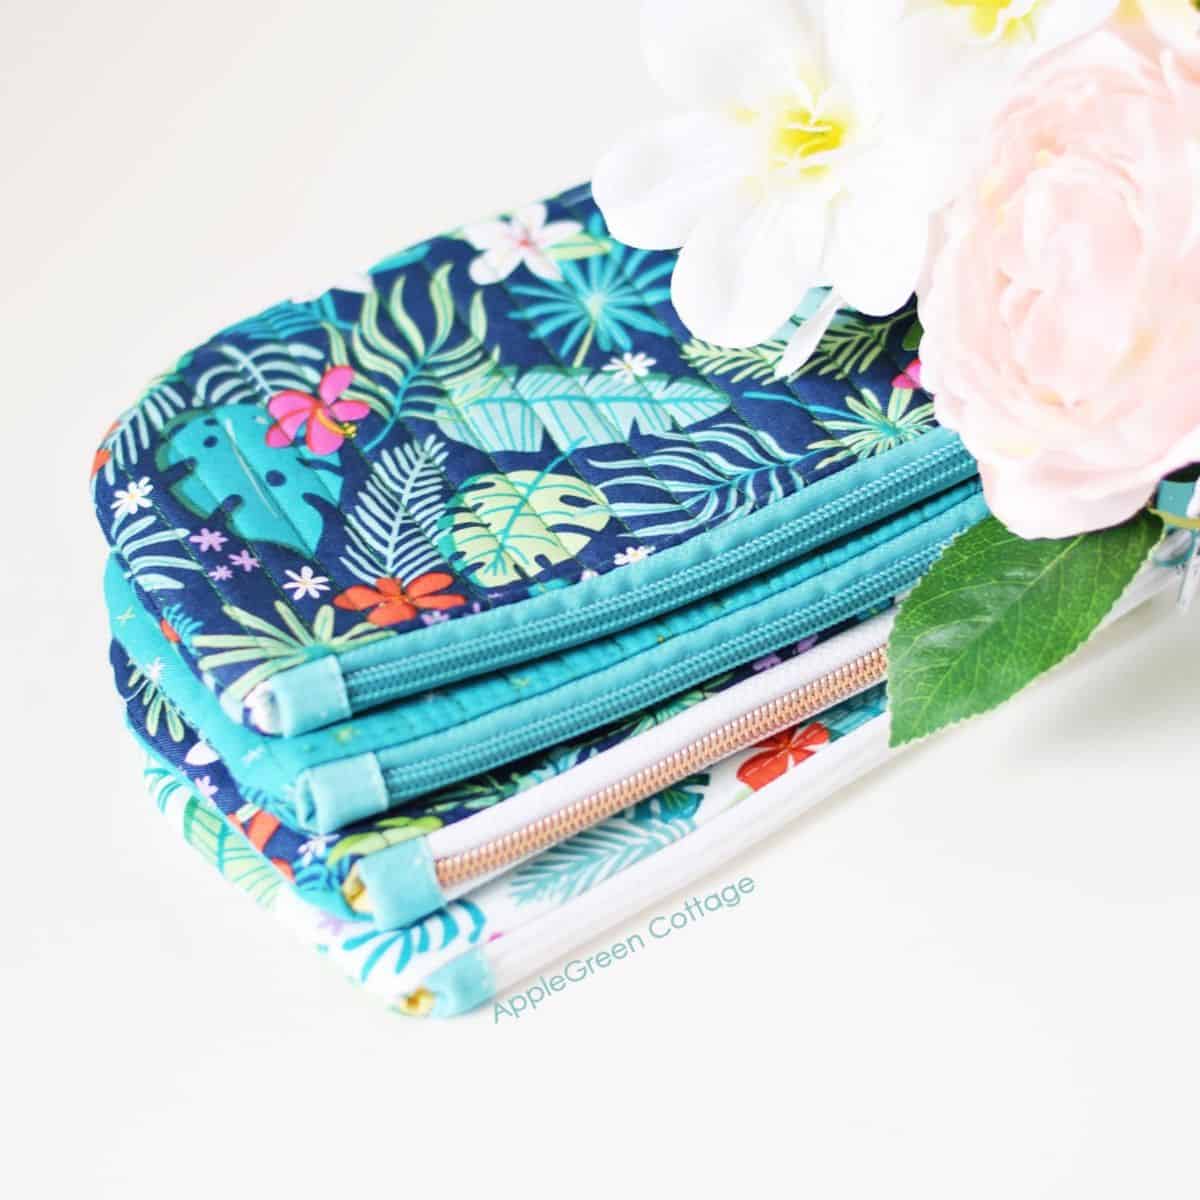
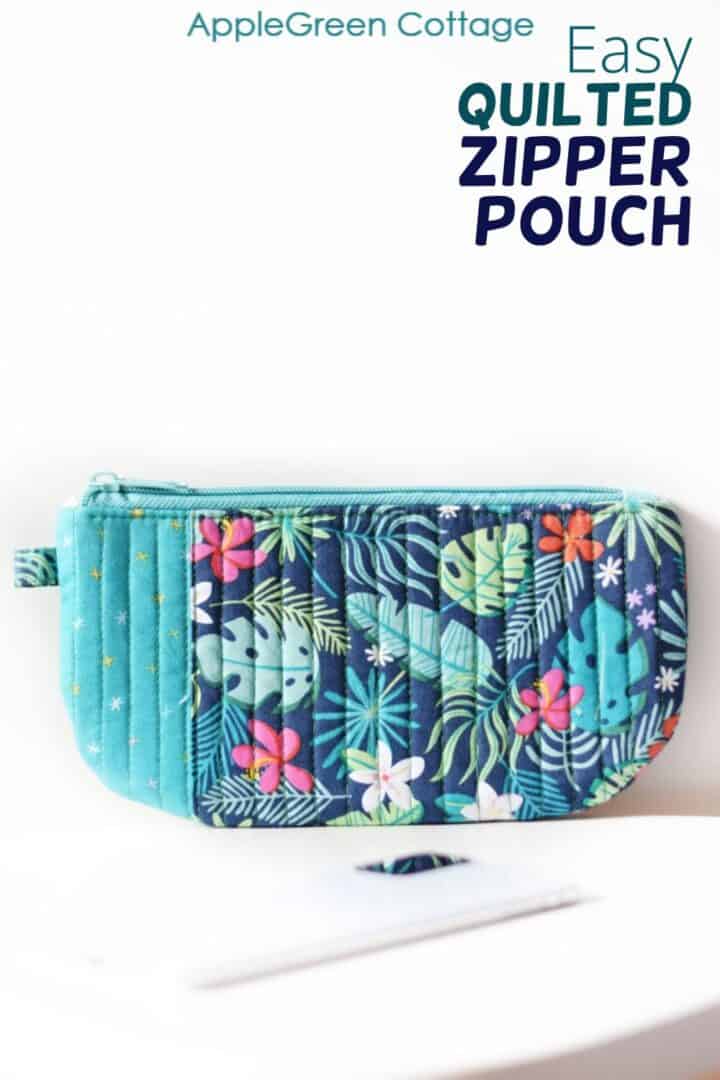
Have you never made a quilt sandwich yet? You might start with this one! See how to quilt and make a zipper pouch in one go!
This might be THE quilted zipper pouch pattern to sew if you love sewing zipper pouches and bags but would like to try your hand at quilting. It's a perfect project if you're new to quilting, too.
And it gets even easier with the 4 free zipper pouch templates I designed for you, scroll down and grab them now.


This tutorial is also part of Printable Tutorials BUNDLE
100 PDF tutorials now, and growing!
Table Of Contents
If you like making pouches and bags, you'll love these free projects, too:
- BOXED Zipper Pouch Pattern - 2 Sizes, SMART Sewing!
- My Best Drawstring Bag - FREE Pattern!
- The QUICKEST Diy Pencil Case
- This Amazing Market Tote!
PDF Zipper Pouch Pattern In 4 Sizes
This simple quilted zipper pouch is a perfect beginner sewing project and makes a cute, small gift.

This lovely quilted pouch can be used as a pencil pouch, as storage for makeup brushes or lipstick, sewing supplies, or simply, a pouch for little trinkets.
It has no raw edges, the outer layer is quilted so you get to experience quilting without the need to master the more 'intricate' details of quilting like making and sewing quilt binding, or basting large fabric pieces together.

In this tutorial, you will learn how to make a zippered pouch with a quilted look and shorten a long zipper. I'm also giving you a free template to use. Four, actually:
4 Finished Sizes
- ORIGINAL small: 8" wide, 4 ½" tall (20cm x 11cm)
- ORIGINAL wide: 9" wide, 4 ½" tall (22.5cm x 11cm)
- TALL: 8" wide, 6 ½" tall (20cm x 11cm), and
- TALL wide: 9" wide, 6 ½" tall (22.5cm x 16cm)
Supplies
Before you start following the quilted zipper pouch tutorial, gather these supplies:
- a nylon coil zipper or zipper tape plus 1 zip slider - 10"/25 cm zipper length
- in total, a fat quarter of fabric: Outer #1, Outer #2, Lining Fabric
- two 2" (5cm) squares for the zipper tab and the optional side tab
- 11" x 13" (28x33cm) of quilt batting
- 11" x 13" (28x33cm) of backing fabric that won't be visible (can be utility cloth)
- a fat eighth of light-to-midweight interfacing for Lining (can be skipped)
- thread, pins or sewing clips, sewing machine
- basting spray or safety pins
- iron, scissors, or rotary cutter plus cutting mat (I use this one by Olfa)
A good-to-have item is definitely a walking foot, as it will make sewing through several layers much neater. I have an open-toe walking foot on Elna and a closed-toe walking foot on my Janome HD1800.
Shop my personal favorite sewing supplies on Amazon HERE.
Quilted Zipper Pouch Instructions
The seam allowance for this project is ⅜" inch (1cm). There are 4 sizes, today we are making what is called the ORIGINAL WIDE size.
Step 1 - Get the FREE Pattern
Get the template from the shop here - it's absolutely FREE! Print and start cutting and sewing right now.
I've created a template that you can download for free. To download the FREE ROUND-Bottom Pouch TEMPLATE, click the button below. You'll be taken to the shop - scroll to ROUND BOTTOM Zipper Pouch Pattern, it's $0!
Get the free pattern HERE. It's $0 in the shop, no code is needed. Optional, as an alternative:
OR do you want a printable copy of the WHOLE tutorial? Scroll to the bottom of this tutorial for more details!
Step 2 - Cut and Piece the Outer Layer
- Cut 11" x 13" (28x33cm) from batting
- Also, cut 11" x 13" (28x33cm) from backing fabric (won't be visible)
- Cut 8" x 12" (20.5 x 30.5cm) from Outer Fabric #1 (here: floral)
- Cut 3" x 12" (7.5 x 30.5cm) from Outer Fabric #2
Now, let's piece the Outer Fabric #1 and #2 into a rectangle by placing them with the right sides together and sewing along the 12" (30.5 cm) edge with a ¼" (6 mm) seam allowance.
Step 3 - Make a Quilt Sandwich
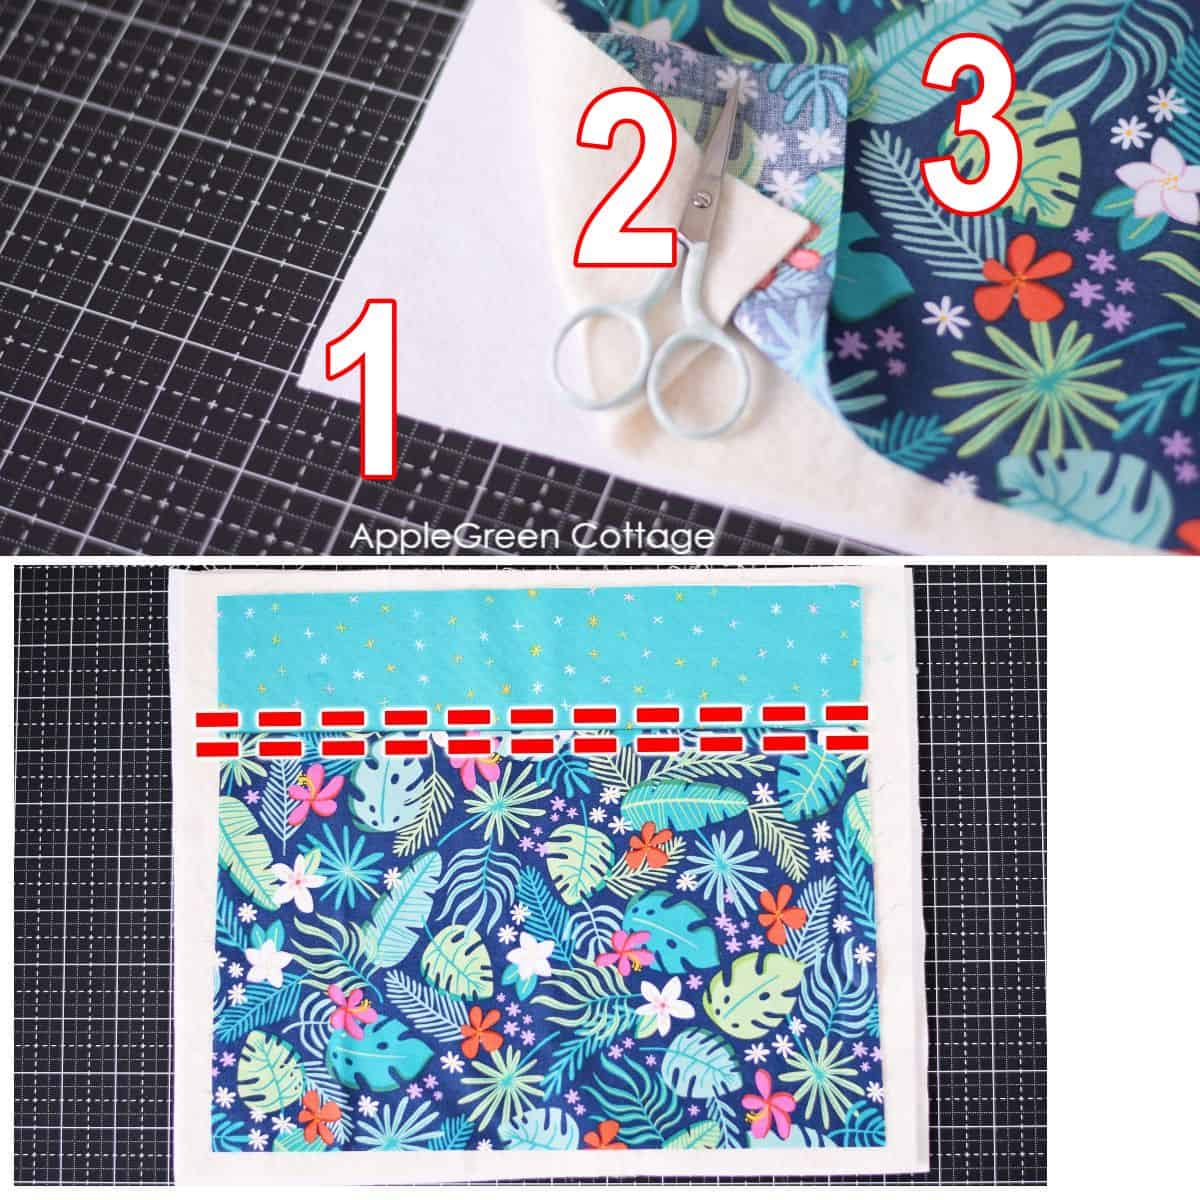
Let's make a quilt sandwich! That is, layer your pieced backing (1), batting (2), and quilt top (3).
I spray-basted the layers (use safety pins if you have no basting spray), then stitch along the top seam - I did two stitching lines on either side of the piecing seam, as seen above. You can also stitch in the ditch. This will fix the seam, so it stays straight.
Step 4 - Quilt The Layers
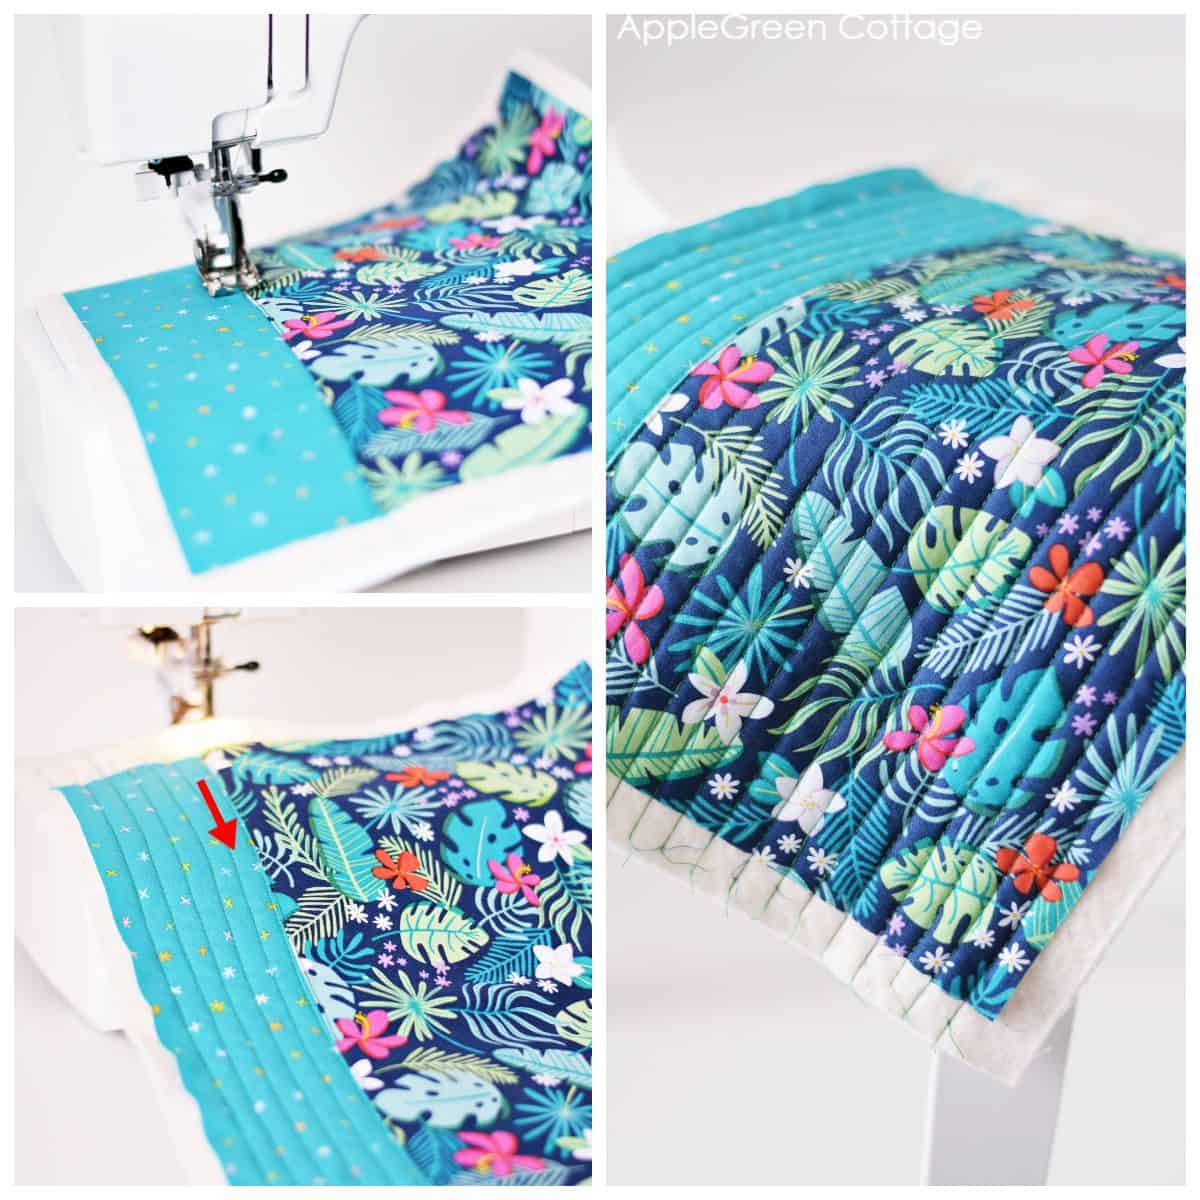
Starting close to the seam(s) made in the previous step, quilt the piece by sewing in approximately ½" inch or 1.2 cm intervals towards the outer edge. Next, repeat the same from the other side of the seam towards the other edge of the piece.
Useful tip: make sure to always start your lines on top and sew towards the bottom to avoid puckering or uneven shifting of fabric.
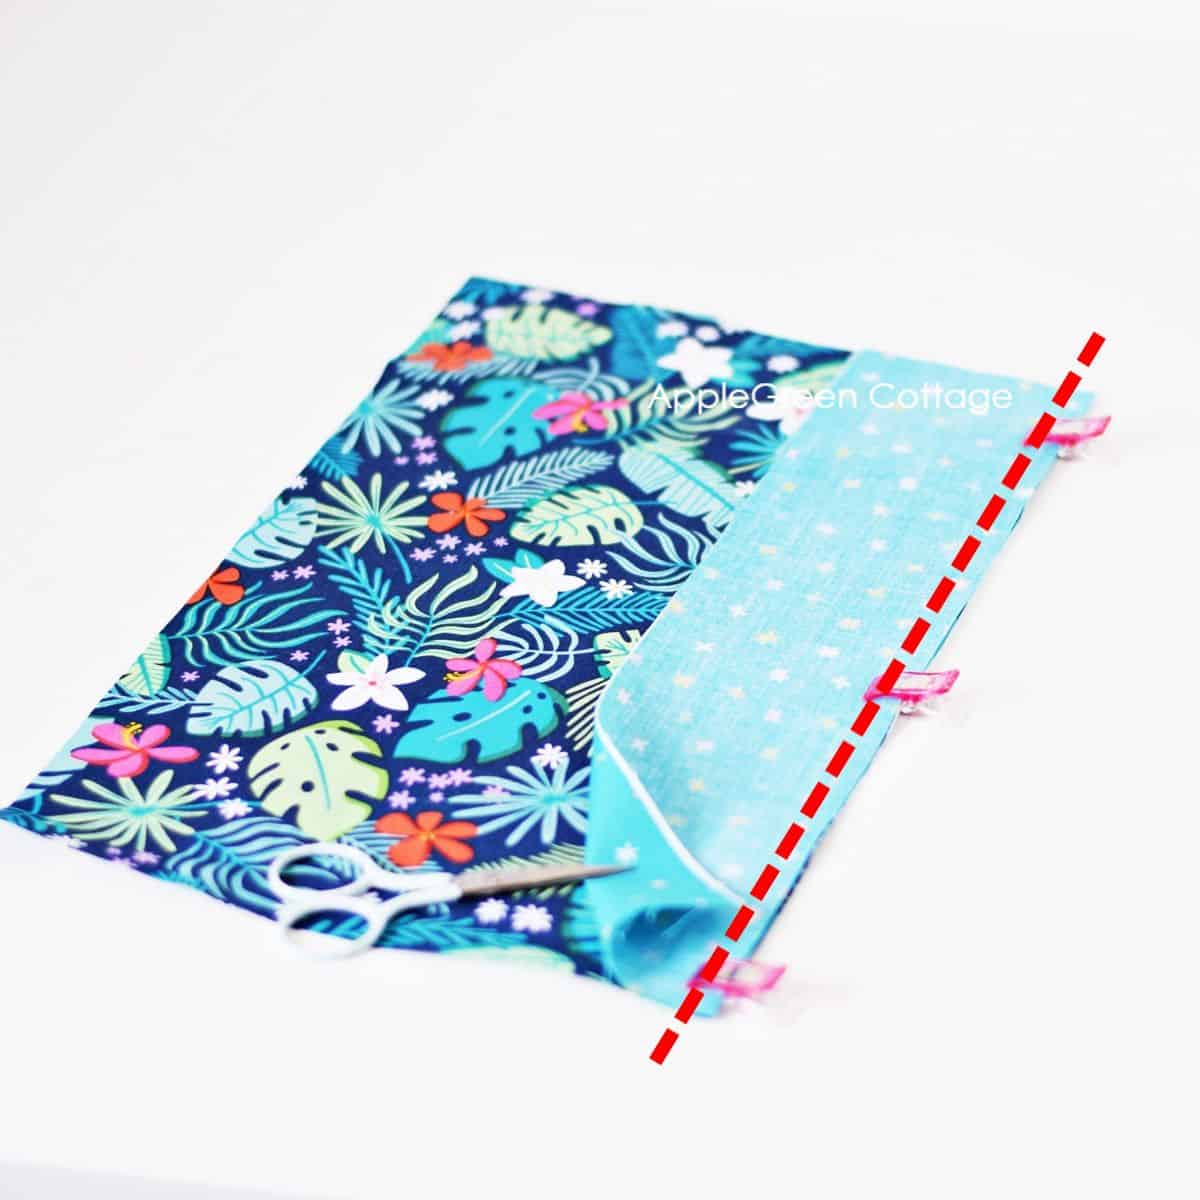
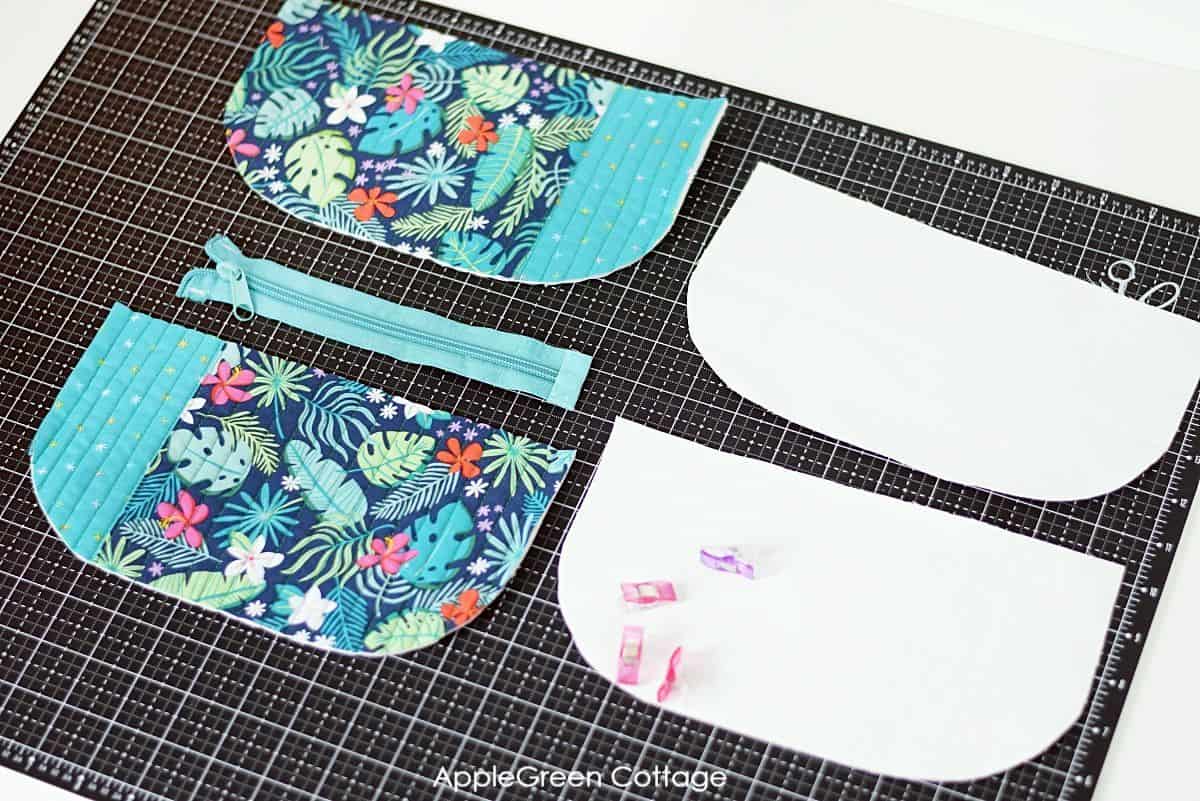
Step 5 - Cut Outer Pieces and Lining
First, we'll cut the 2 Outer pieces from the quilt sandwich in a way that will keep the seams perfectly aligned. It's easy.
To start, place the zipper pouch template on your quilt sandwich like this:
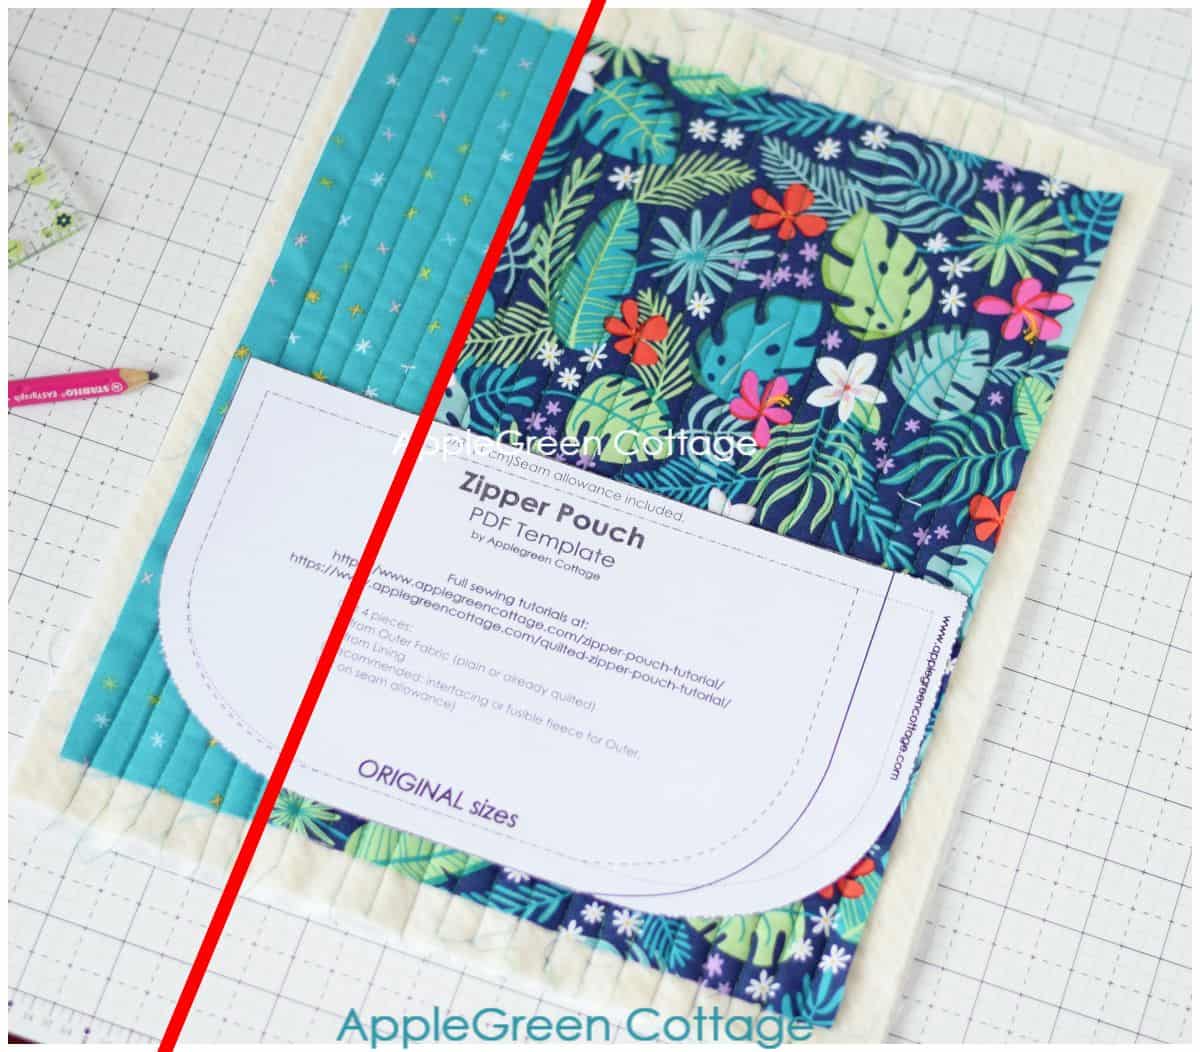
On the paper template, mark the spot where the Outer Fabric #1 and #2 meet (image 1 below) and fold the template along that vertical line (image 2 below).
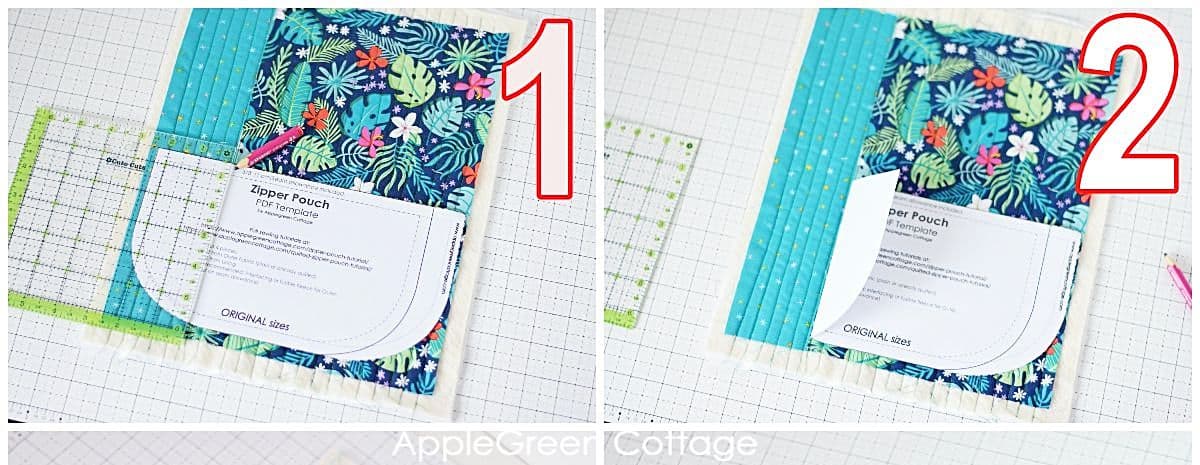
Cut the outer piece with the fold exactly on the seam where the two fabric prints meet. Now flip the paper template up and cut the other Outer piece, again with the fold line exactly on the seam where the two fabric prints meet (images 3 and 4).
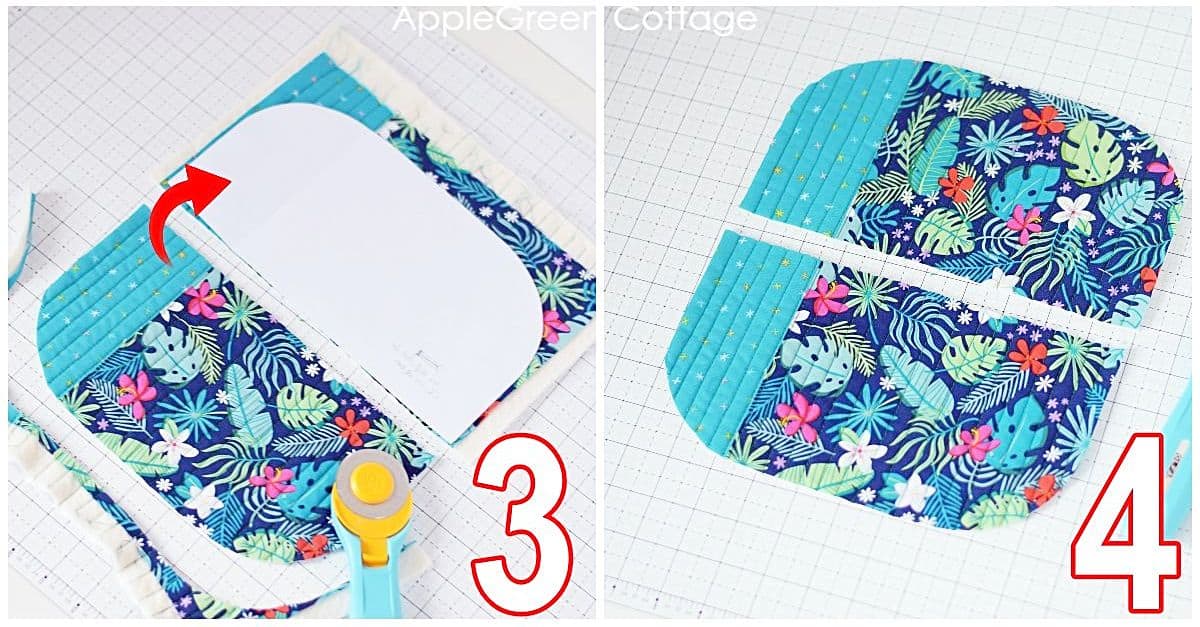
Then, cut:
- 2 pieces from Lining fabric using the same template
- two 2" (5 cm) squares for the zipper and an optional side tab (not pictured)
You can add light-to-midweight interfacing to the Lining.
Step 6 - Prepare Zipper And Add Zipper Tab
Measure and cut your zipper to 10" (25.5 cm) or cut a 10" piece from your zipper tape and add a zipper slider. We'll add a tab to the zipper bottom and fold the top zipper ends outwards, keeping them apart.
First, create a bottom zipper tab:
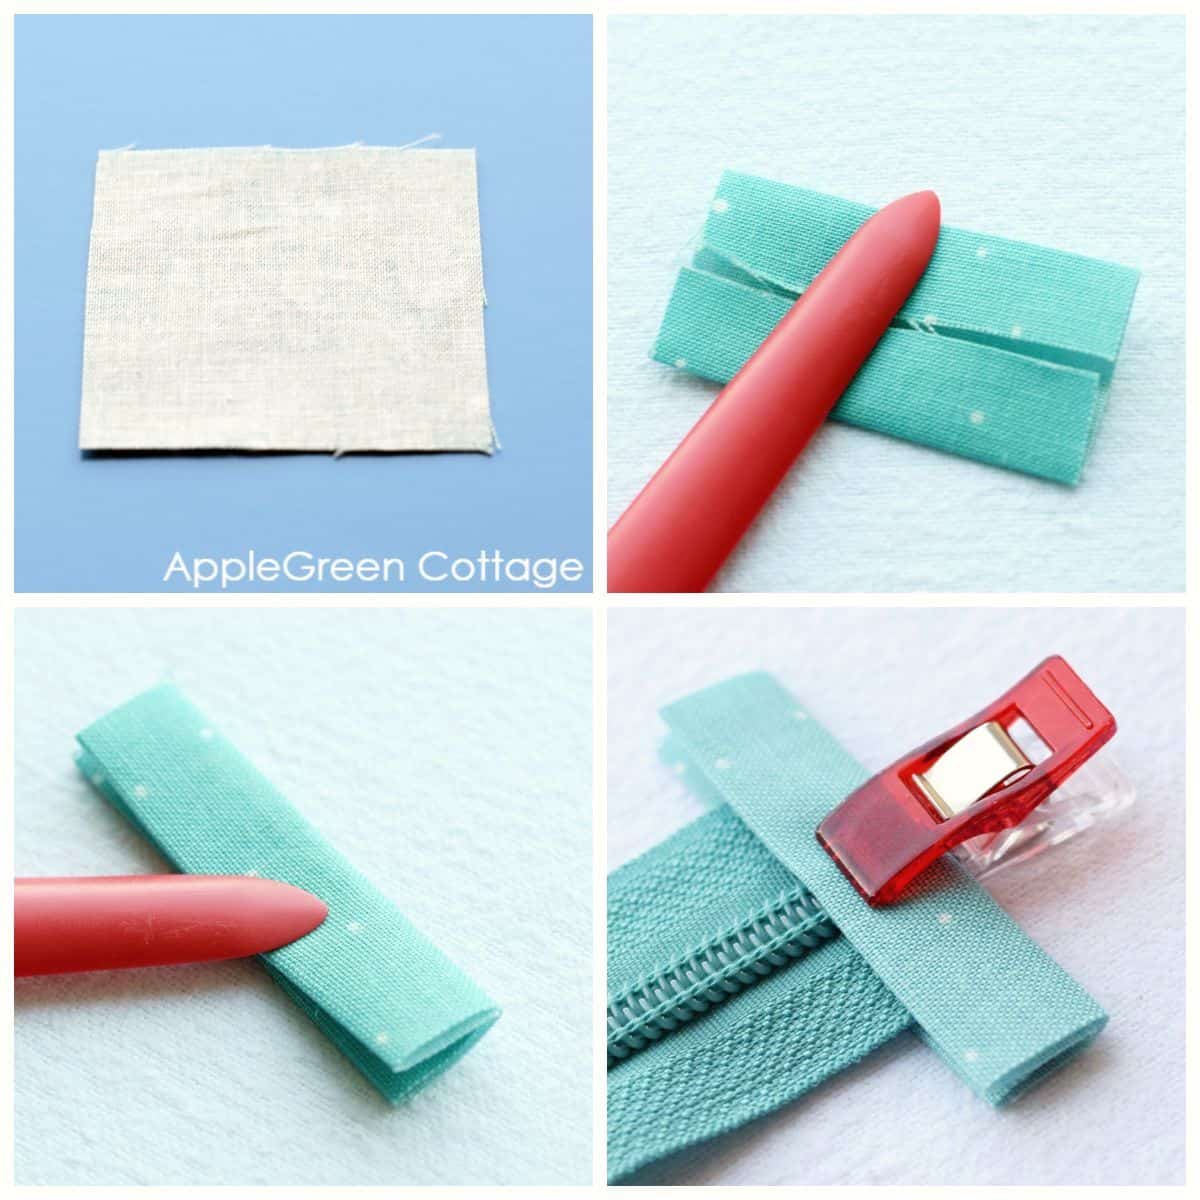
- Place your 2" x 2" (5 x 5 cm) piece wrong-side-up.
- Fold one edge to the center and do the same with the opposite edge.
- Fold again and press.
- Slide on the bottom zipper end and topstitch in place, catching both the upper layer of the tab as well as the bottom layer.
Cut off any excess fabric on the sides.
Finish the other end of the zipper tape by folding the ends of the zip tape out of the way and basting them.
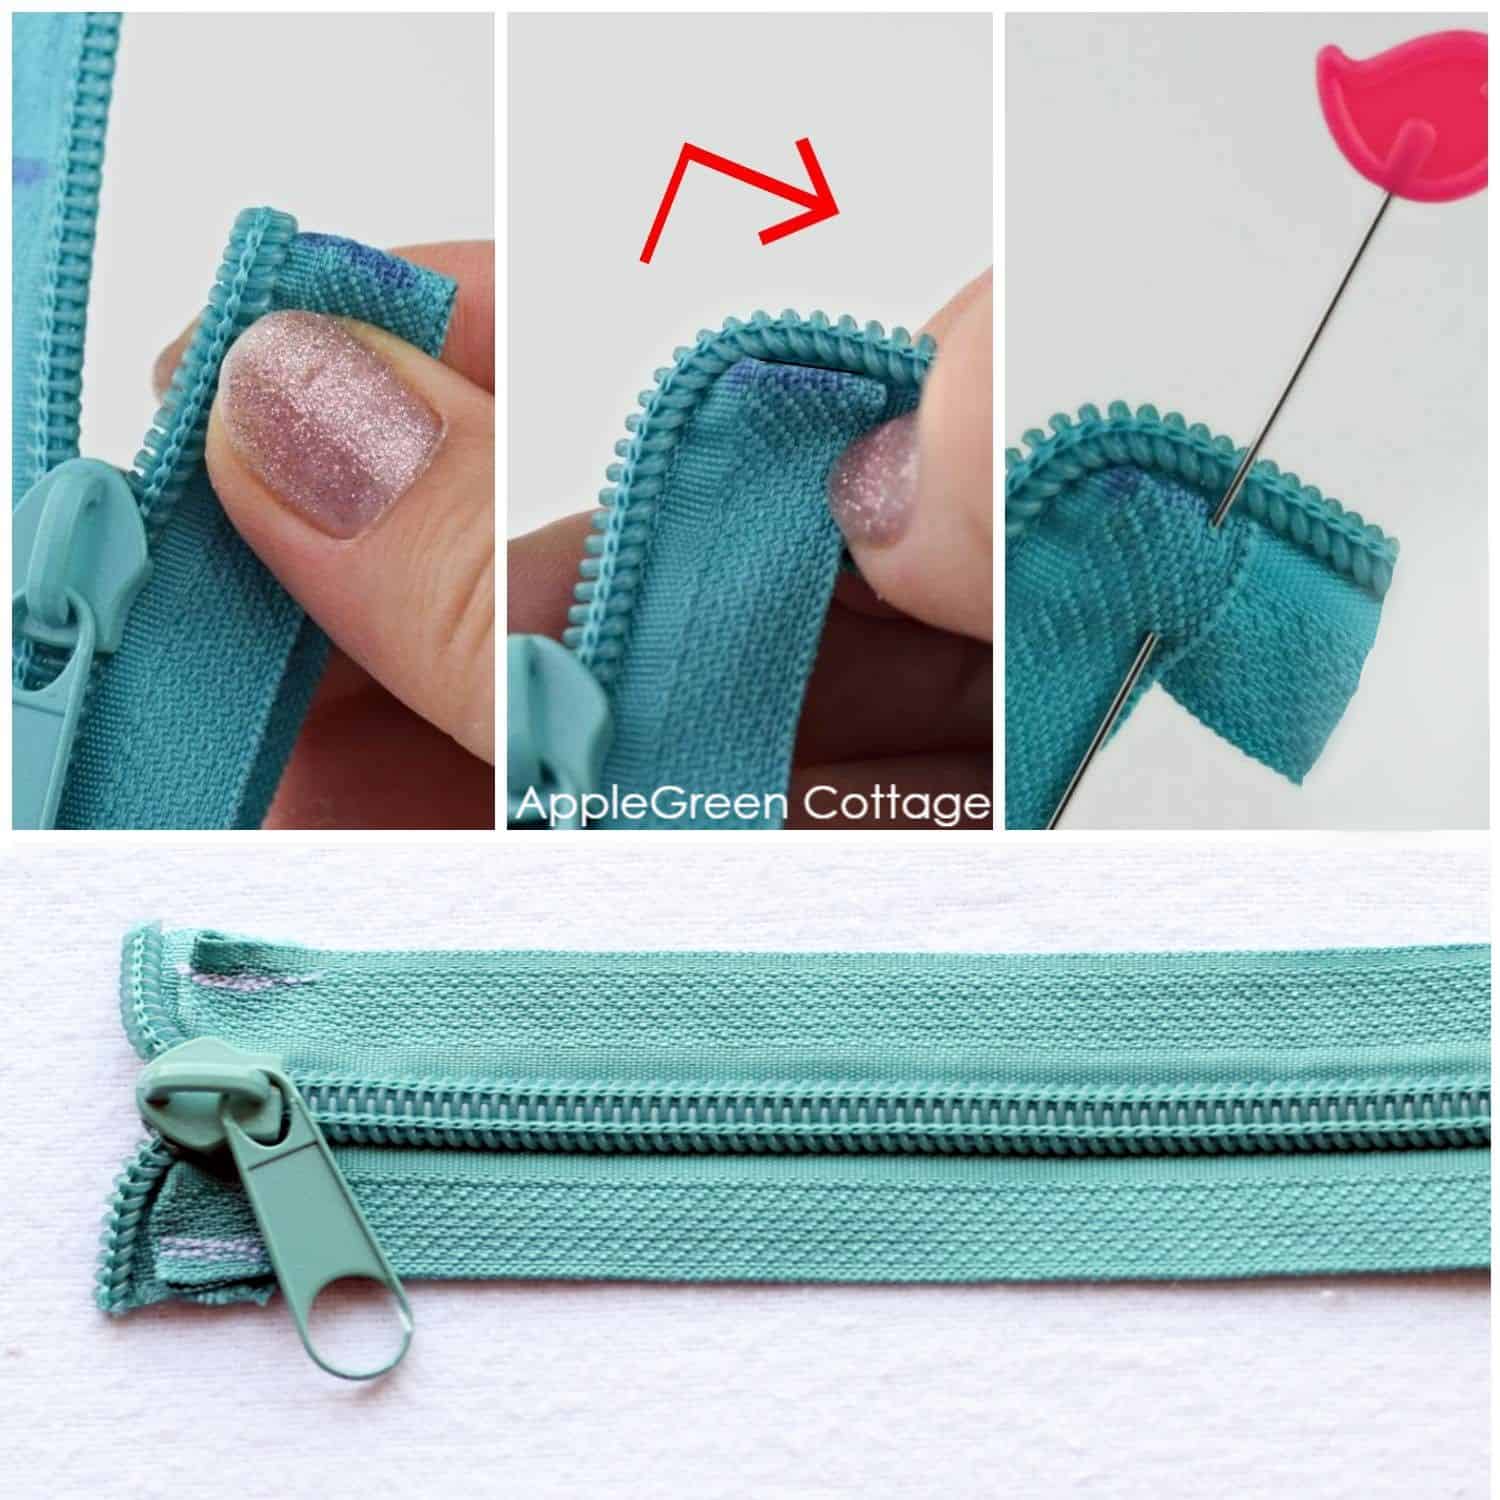
How-to:
- Measure from the tabbed bottom end of the zipper and make a mark at 8 ¼" (21 cm). Open that end of the zipper tape.
- Pinch the zipper tape exactly on the marked line and pull the tail down at 90 degrees.
- Pin in place. Repeat for the other side of the zipper tape, making sure the ends are even.
- Stitch or glue in place so the fold is secure.
- Trim off any excess zipper tape.
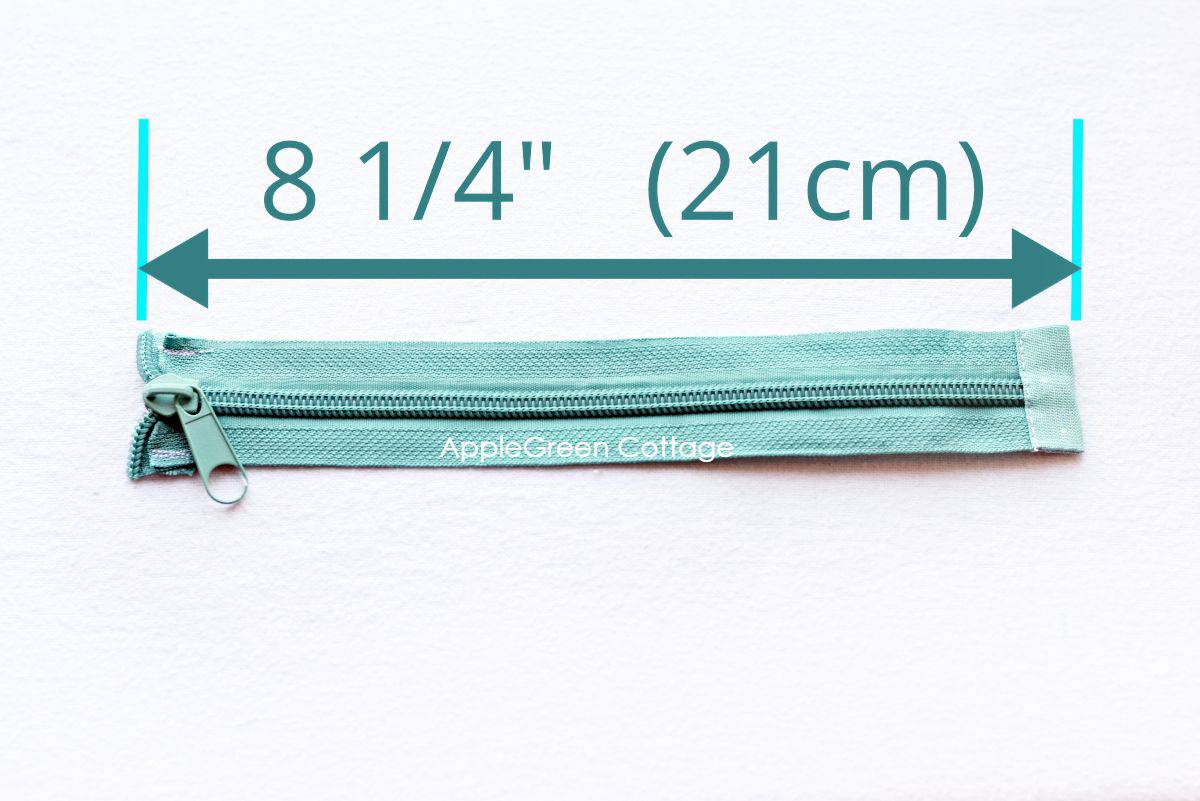
The zipper is ready to be installed.
Step 7 - Attach the Zipper
Lay down the front Outer piece (face-up), then the zipper (face-down, with the closed zipper pull on your left) and finally the Lining piece (face-down!) as seen in the photo below:

Sew through all three layers. You can use the zipper foot. Move the zipper slider out of the way as needed. Backstitch at the beginning and end to secure the seam.
Now let's attach the other zipper edge: flip the pieces to show the remaining free edge of the zipper tape, then stack these layers:
- place the other Lining piece on your table with the right side up.
- Cover it with the sewn piece with Outer facing down, and align with the zipper tape edge.
- Then place the other Outer piece facing down, aligned as well.
Now sew the stack together, just like you did the first time (sewing through all 3 layers). Stitch back and forth at the beginning and end to secure the seam.
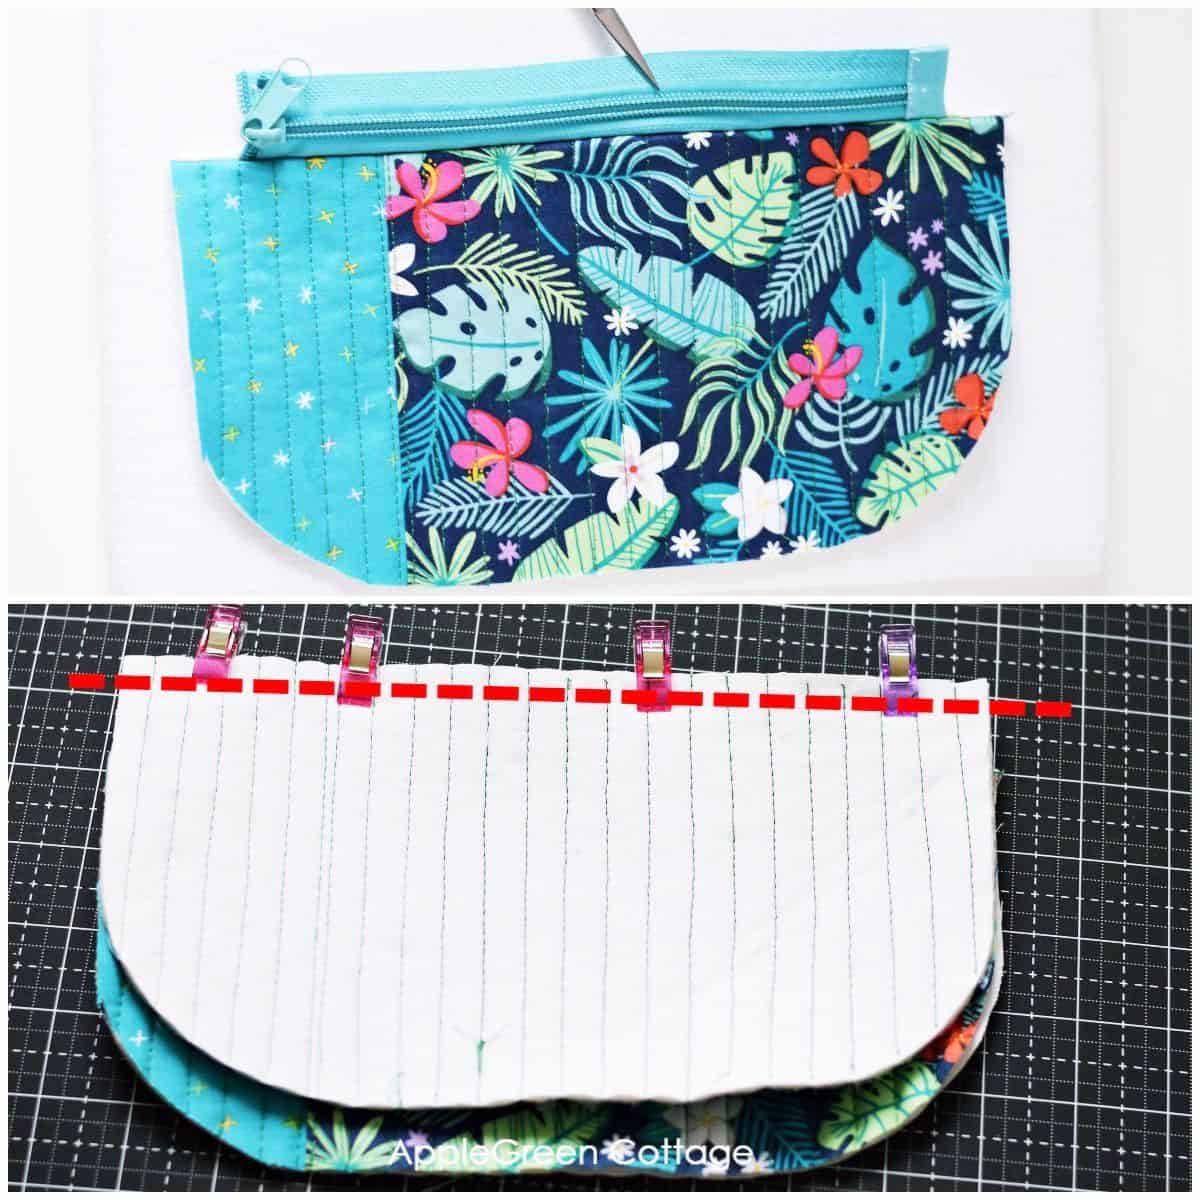
Step 8 - Topstitch Along the Zipper
Press all the fabric away from the zipper and topstitch along the zipper at ⅛" (3 mm) away on both sides, using a longer stitch length (mine is usually 4). Make sure to start and stop at the zipper tab - do not topstitch all the way from one end of Outer fabric to the other.
Step 9 - Add the Optional Side Tab
Make and insert a side pull if you like. Here are the folding steps for the pull:
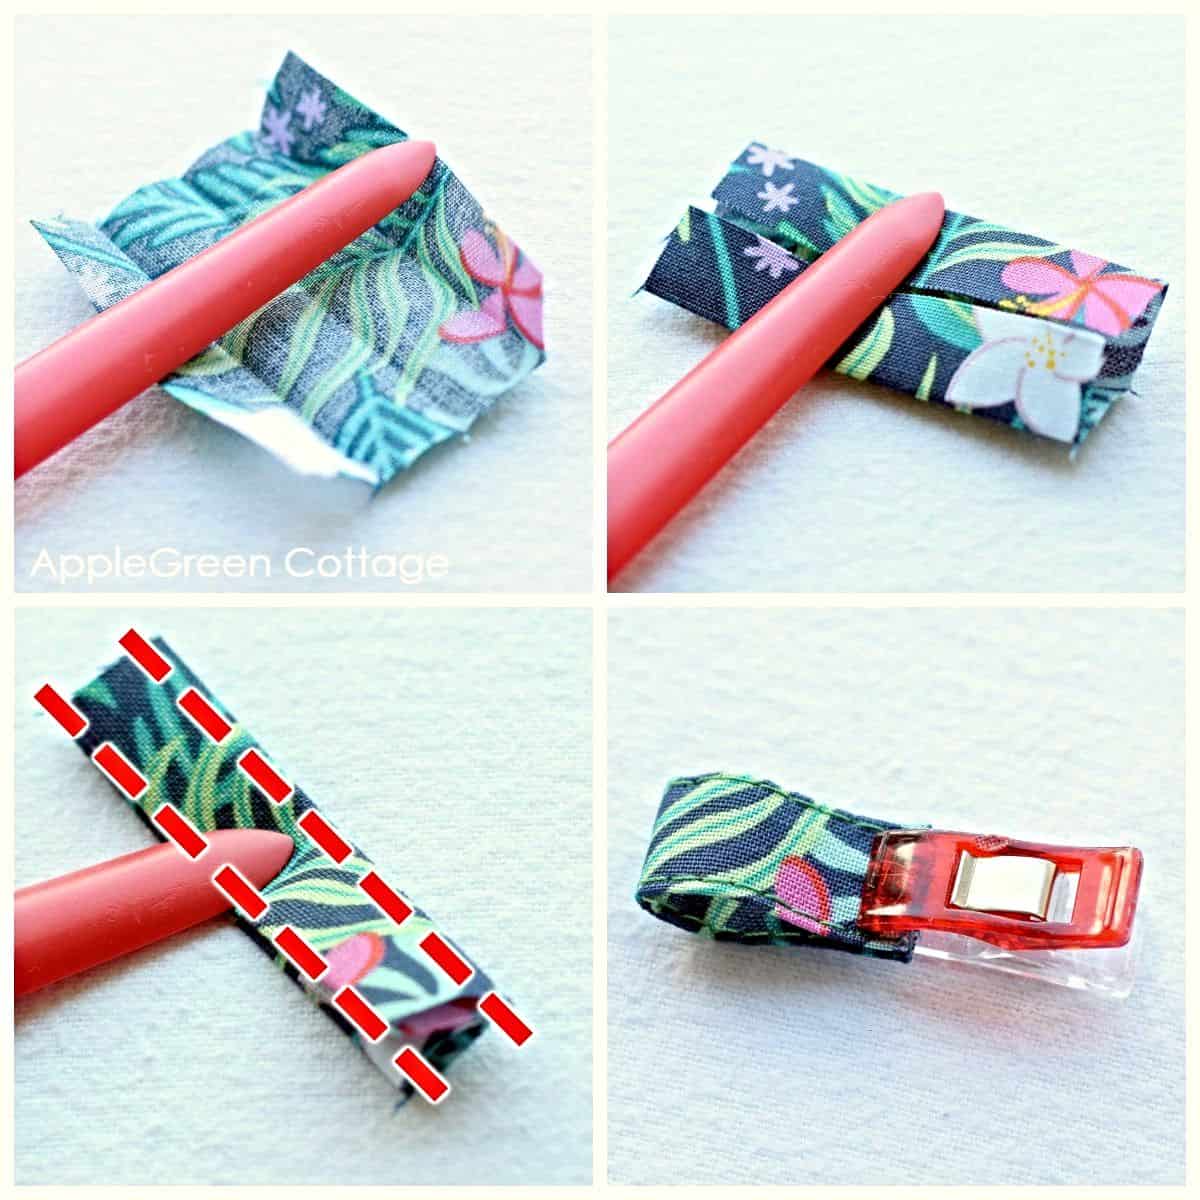
- Place your 2" x 2" (5 x 5 cm) piece wrong-side-up.
- Fold one edge to the center and do the same with the opposite edge.
- Then fold again and press, and topstitch along the long edges, using a longer stitch length.
- Fold in half to make a loop, and baste to Outer layer only.

With the loop facing inwards, attach the SIDE TAB to the left side of the pouch - OUTER LAYER ONLY - shift it down by ½" or 1.3 cm from the bottom edge of the zipper.
Step 10 - Sew The Sides And The Bottom
Now unzip the zipper at least half of the way.
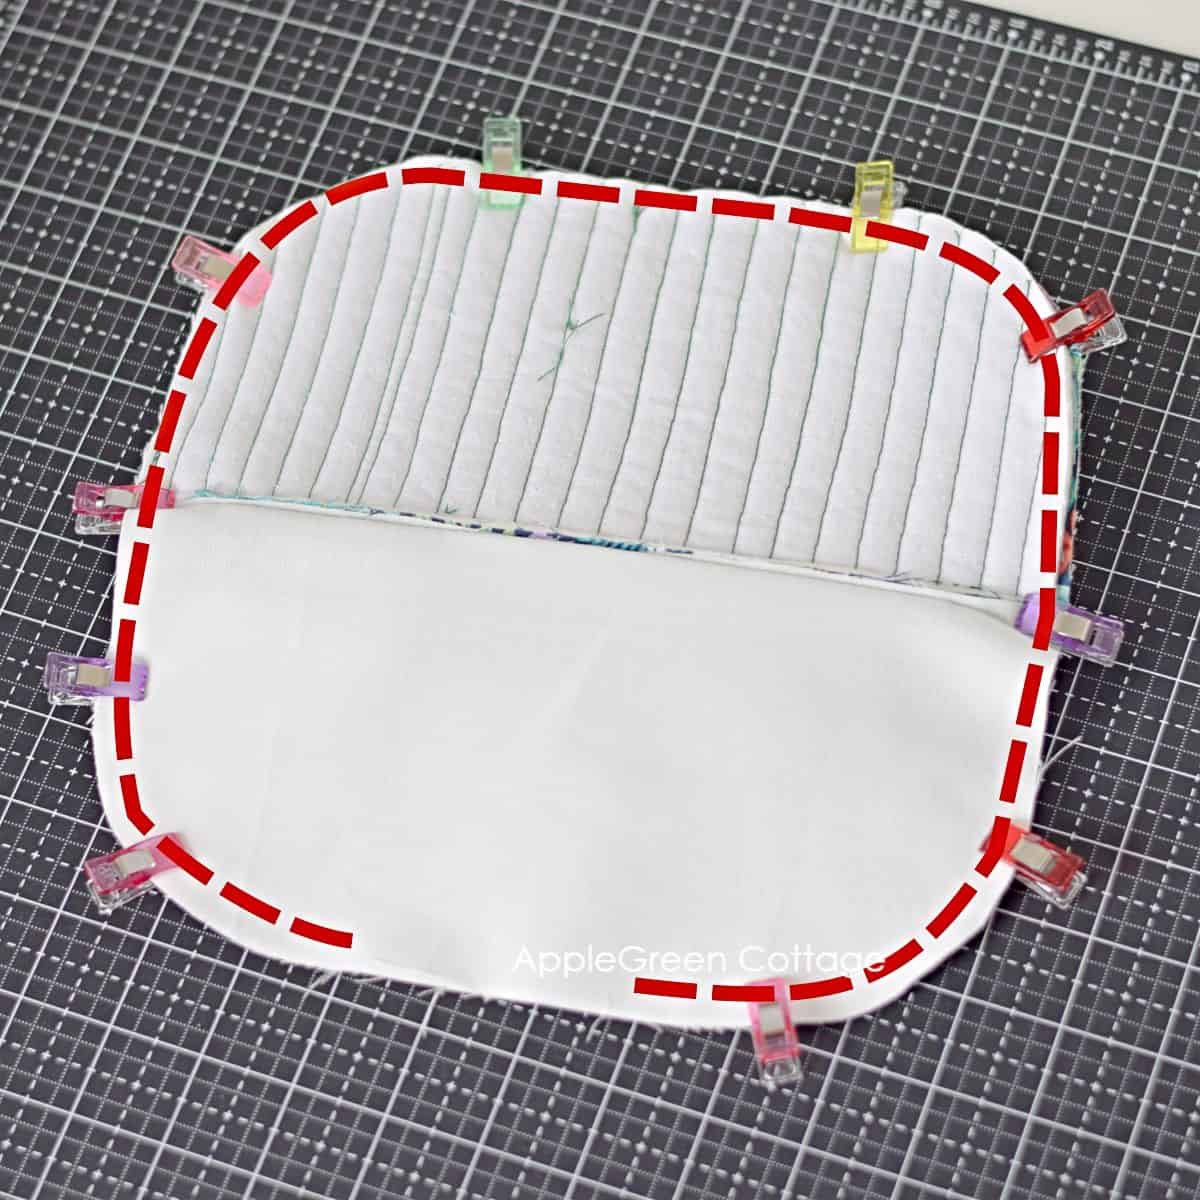
Pull the Outer fabric pieces together, right sides facing. Pull the Lining pieces together, right sides facing, too. Make sure to align the edges, especially at the spots where Lining and Outer meet. Clip and stitch around, starting at the lining bottom. Go around and stop at the lining bottom again, leaving a few inches open for turning.

Trim the seam allowance to avoid a bulky finish - take care not to snip into any stitches.
Step 11 - Turn And Stitch The Opening Closed
Stitch the opening closed, turn the pouch right side out, and press.

Enjoy your beautiful quilted zipper pouch!
I hope you liked this quilted pouch tutorial. Now that you've made your first quilted pouch, you can sew a few more at any time. Let me know if you prefer the quilted pouches, or these simpler, non-quilted zip pouches I showed you a few weeks ago. A mix and match of both types would make a great collection to sell at a craft fair, and zipper pouches tend to sell well. And it's always good to have a few on stock as quick gifts!
WANT A PRINTABLE COPY OF THE WHOLE TUTORIAL?
Do you want an ad-free, printable copy of this online tutorial? Get it in our shop. Or get the whole →BUNDLE!

WANT MORE FREE TUTORIALS AND PATTERNS?
Get email updates and never miss out on new patterns, printables, and tutorials:
Or …check out my latest PDF pattern in the shop - the SILA Duo Zipper Bag pattern. Two patterns in one, see more here:


Barbara Conrad says
Hi, I have never quilted before and I was wondering if I could use adhesive backed batting? also would I put the adhesive side on the outer fabric.
Thank you.
Damjana says
Barbara hi,
you mean fusible fleece? Sure, you can do that! The structure will not be the same, but the piuch wil get the required body and some stiffness too. I've got a lot of fusible interfacing and fusible fleece-backed pouches, they are great!
Maura says
Great pattern and instructions - as always! I love your site. I have learned so much from you and I'm excited to do this, too.
(There is a typo in Step 4. It says "quilt at 1/2 inch or 1.2 mm" instead of 1.2 cm.)
Damjana says
Maura hi,
oh yes you're right there - thank you, I've corrected the typo. I'm glad you like the sewing tutorial. Happy sewing,
Stacey Knights says
Great tutorial, loved the way you handle the open end of the zipper with the 90°angle. Can't wait to try it.
Pictures are also excellent.
Stacey Knights says
Great tutorial, loved the easy you handle the open end of the zipper with the 90°angle. Can't wait to try it.
Pictures are also excellent.
Damjana says
Stacey hi,
thank you - this tutorial seems to be super popular right now, everyone is sewing it up. yay to zippies!
Susan Smith says
Thank you Damjana! Your instructions and color photos are excellent. I do make these little pouches for gifts but have never chosen round bottoms or quilting. Excited to make my first today.
Glad I found your site!
Susan
April q says
I've just found your site thanks to passport to quilting! I love this little bag, going to make it this weekend with the perfect fabric.
I've sewn many zipper pouches and have never seen this zipper technique you do for lined bags. I am excited to try it, definitely looks better that way for sure.
Cindy says
what seam allowance are you using to stitch around the entire pouch before reversing it? it looks more than ¼ inch. thank you.
Damjana says
Cindy hi, you're right, it's bigger. for this quilted zip pouch, I used a 3/8" seam allowance, that's 1 cm. Also, not necessary but a good detail: when sewing the lining, you can even go a bit bigger with the seam allowance (1/2", 1.3 cm), it's called tapering the seam so the lining will fit snuggly into the outer layer. And people will consider you a pro bagmaker if you do this. Enjoy!