
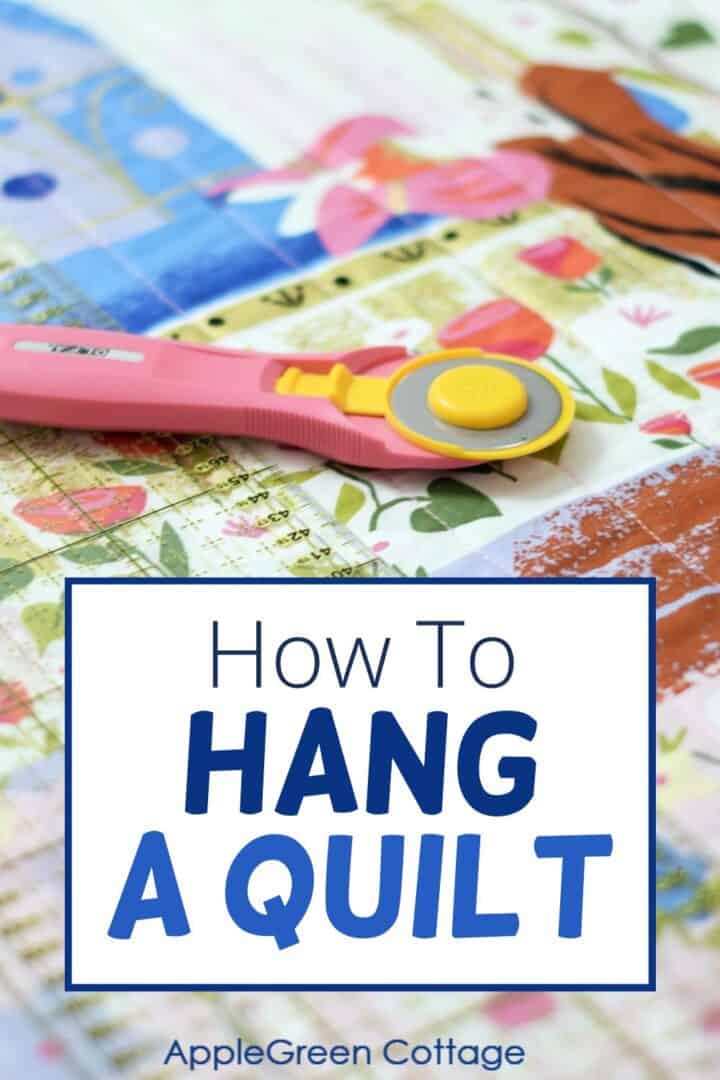
See how to hang a quilt on the wall in your home, or on any vertical surface.
Adding a quilt sleeve to the back of your quilt is no doubt the most popular way to hang a quilt. But rest assured there are several other ways to do that, and I'll list the most popular ones for you. And you'll also learn an easy way to create a hanging sleeve on your quilt.
Have you finally decided on making your first quilt? Yaay! You've decided on the quilt pattern, you've carefully selected the fabric, the batting, and all the things that go with it. Not to mention all the measuring, piecing, quilting, binding - allll the work! Congratulations. Now if you've made it this far you deserve to have your beautiful quilt displayed nicely in your home. I'm here to help you choose the best way to do that.
Table Of Contents
Here are more quilting tips I share on my journey into the quilting world:
- Start with this 7" potholder -cute!
- or first make a four patch block
- or check out this must-see little binding hack!
- Or check out this popular SewPretty HOME series:

Join the FREE 7-part email course and make 6 beautiful items for your home! You'll love it!
2 Most Popular Ways To Hang A Quilt
There are several ways to hang a quilt in your home, let me first list the 2 most popular options to hang a quilt:
1 - Make a Quilt Hanging Sleeve
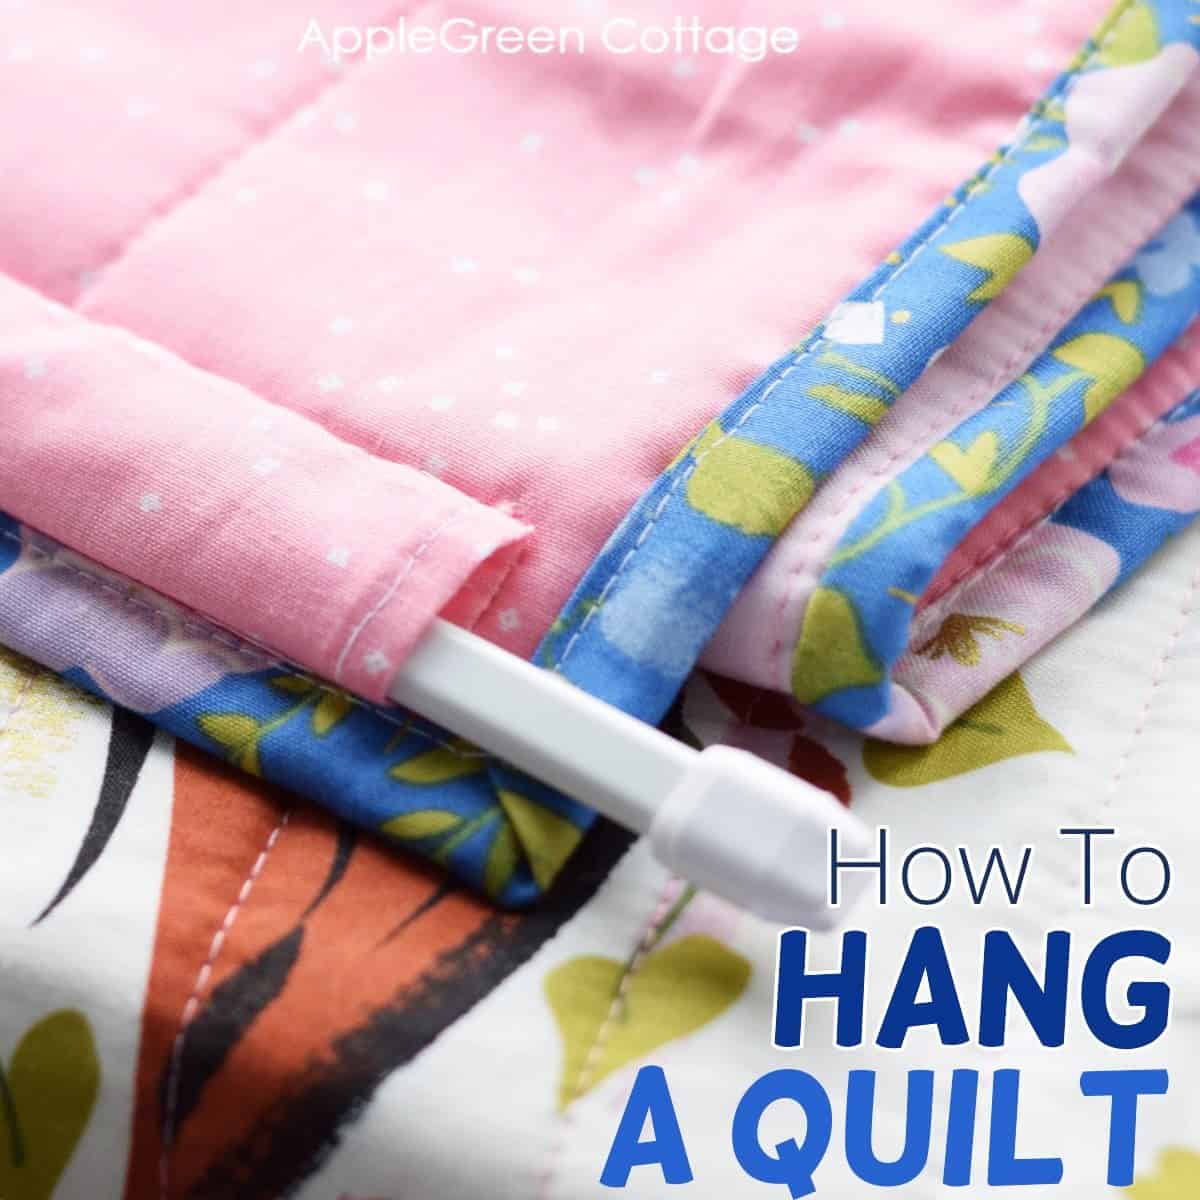
The most common way to hang a quilt is a quilt sleeve. That is, sewing a simple hanging sleeve along the back width of the quilt. I've added a step-by-step tutorial on how to create a quilt sleeve for your quilt below.
To put it simply, you sew a tube-like fabric sleeve to the back top edge of your quilt, and use it to insert a rod through that sleeve. Finally, the rod is attached to the wall using nails, screws, or eye screws. Once in place, a sleeve is not visible. This is the most elegant way to hang a quilt. Scroll down for a step-by-step tutorial.
2 - Add Corner Hangers

A second-most popular method to hang your quilt is creating quilt hanging corner pockets at the back of your quilt. These simple and effective triangular pockets are uncomplicated to sew but are better suitable for smaller quilts as opposed to large, heavy-weight quilts.
In short, you add four triangular pockets at the quilt's corners, then insert dowels at the top and bottom to hang the quilt and help it hang flat. I tend to skip the bottom two corners, it's often enough to simply make the top two, and only add one hanging dowel there. Hanging triangles are easy to insert - you add them when you bind the quilt, without any hand sewing.
More Ways To Hang A Quilt
Quilt sleeve and corner hangers being the most common way to hang a quilt, let's explore other options too. So, how to hang a quilt on the wall without sewing a sleeve or corner hanging pockets?
3 - Frame Your Quilt
Like, literally: put it into a frame, like a painting. I do this from time to time with miniature patchwork, and these make adorable gifts. See how to frame a quilt or patchwork to admire for years to come.
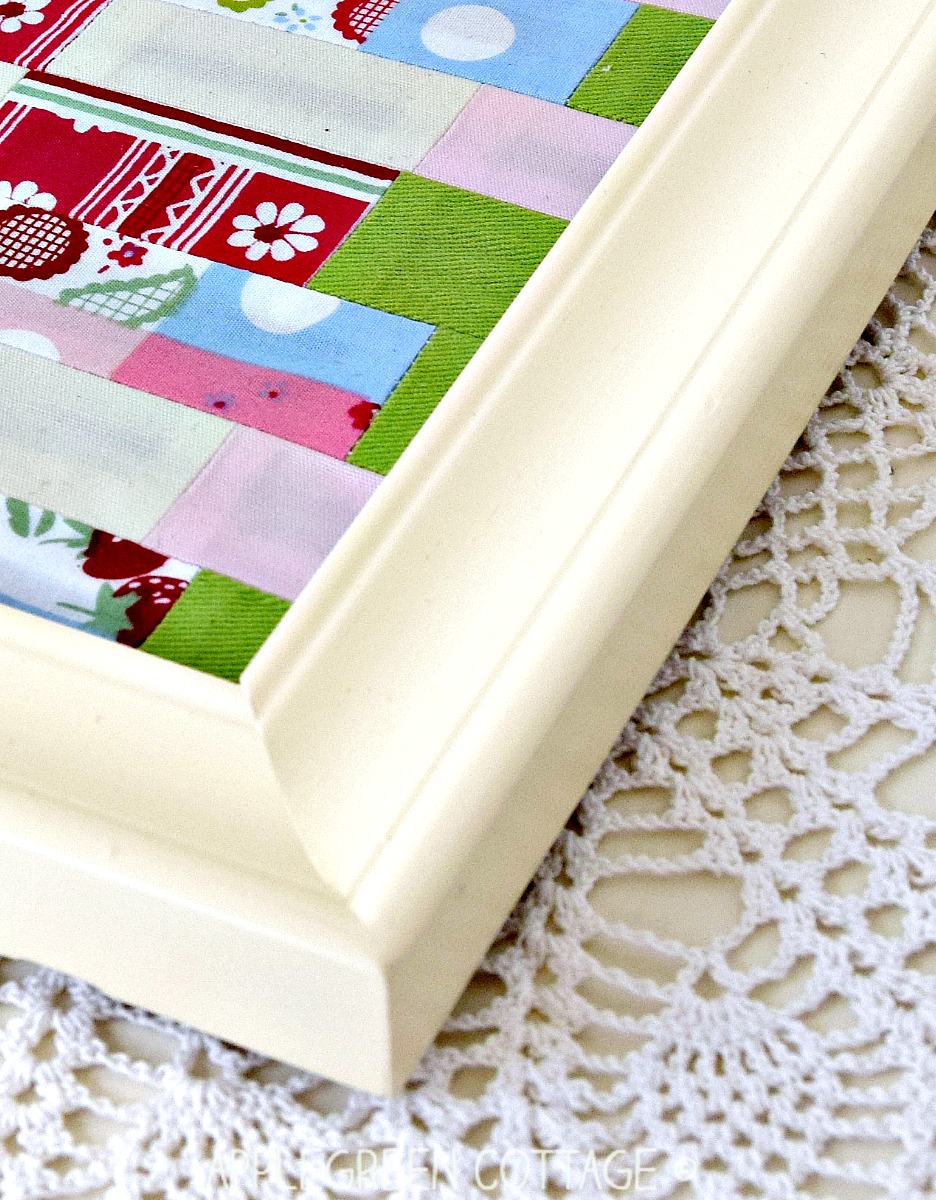
It's best suited for mini quilts like these. Yes you can even frame mug rugs, how adorable!
4 - Use Quilt Hanger Clamps
Another way to hang a small-to-mid-size quilt is using specialized Quilt Hanger Clamps. Quilt clamps are constructed to work with a wide variety of hangings including quilts, fiber art, rugs, and tapestries.
They work great with smaller quilts and are great for when you don't want to sew a sleeve onto the back of your quilt. These are small wooden hangers you attach to the wall in a straight line, then insert the quilt top into the opening, and finally tighten the clamp with a screw. You will need to space clamps evenly across the top edge of your hanging, every 10 or so inches apart. They work great for when you want to swap out your quilts often, but one major downside is they remain visible all the time. Also, you will need extra clamps if your piece is very heavy or large.
Is your quilt rather small? Two additional solutions!
5 - Add Tabs To Hang A Quilt
You could also create hanging tabs and attach them to the top of your quilt to hang on a dowel - like this advent calendar I made a while ago. A smart and easy solution for small wall hangings.
6 - Self-adhesive command strips
Sometimes, you might want to keep your walls free of nails or screws. In this case, choose self-adhesive command strips, or even removable hooks from 3M.
If you're asking yourself how to hang a quilt with command strips, first keep in mind you'll need quite a few of these to make sure they bear the weight of your quilt reliably, and to prevent any saggy parts.
There are even more options, nails, push-pins, and the DIY galore. But let me show you the most common way to hang a quilt, that is by sewing a quilt hanging sleeve:
Tutorial - How To Make a Hanging Sleeve For A Quilt
I'll show you how to sew a simple quilt hanging sleeve that will house a dowel rod, or a thin rectangular wooden rod - or what I love most, an adjustable thin white-coated metal rod (that's so lightweight!) I can buy in bulk and keep ready for any width of a quilt.
NOTE: Most quilt shows require a standard 4" hanging sleeve for a quilt. I'm not sending a quilt to a show any time soon, but will definitely want to display it proudly on my home wall. Or, sometimes in a special case, hang it on a door to cover a French door window. The principle is the same, just the sleeve size will vary.
Before you start adding the quilt sleeve
Firstly, your quilt should be already quilted, squared up (here's how to square up a quilt) and still without any binding, so the edges will be straightened and raw.
Secondly, you need to have your hanging rod. Its' size will determine the size of your quilt sleeve.
What type of hanging rod will you use?
I knew exactly how I wanted to hang my quilt: the sleeve had to fit my slim hanging rod for window curtains. I used a stick-on curtain rod for French windows as I was hanging my quilt onto a large French door window.
Chances are you'll be hanging your quilt on a wall, in this case, you'd better use a thin rectangular wooden rod. You'll attach it to the wall using nails, screws, or eye screws. Usually, you'll need a wider sleeve, cut a piece 8 ½" wide.
Cutting directions:
Please note that you can sew the quilt sleeve after you've finished it, or - this is how I make it: at the same time as you sew on the binding.
Sewing your quilt sleeve simultaneously with the binding will mean you only need to sew one handstitching line instead of two.
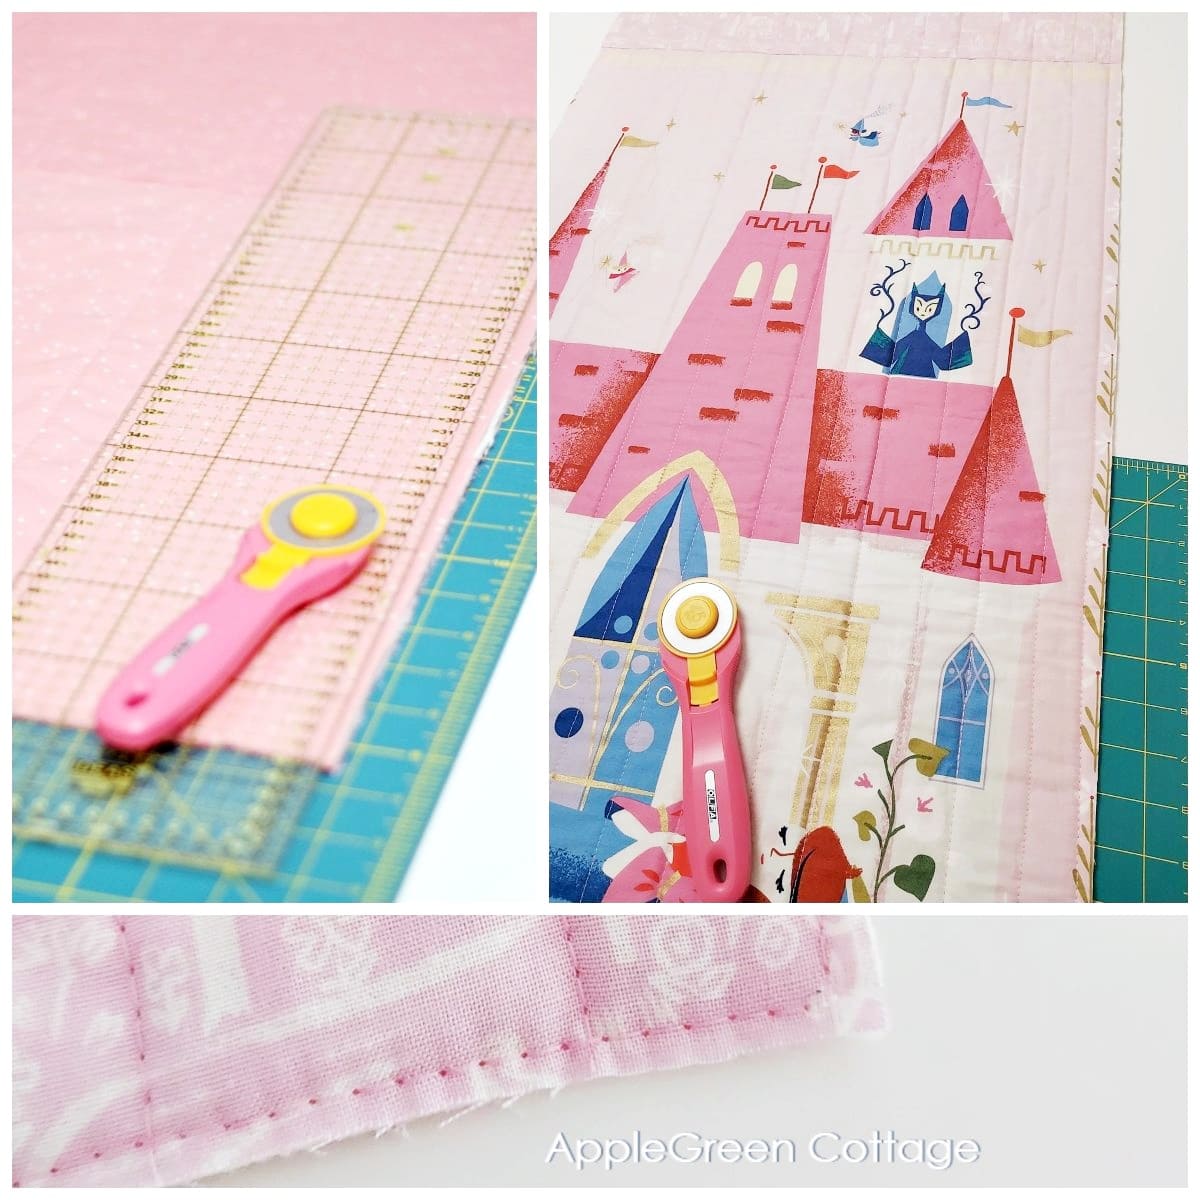
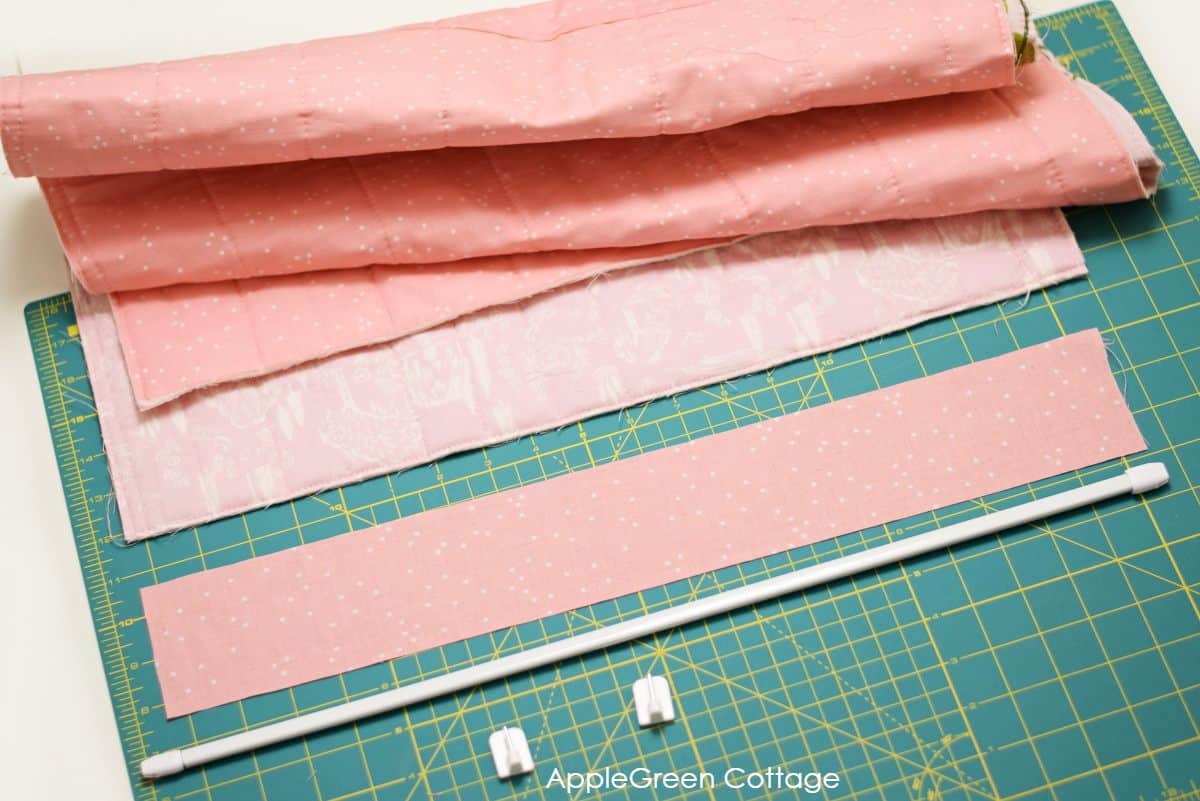
Step 1 - Cut Fabric
Measure the width of your quilt unfinished (squared up) quilt. Then cut your quilt sleeve piece the same length as your quilt's width.
NOTE on quilt sleeve's width: the width of your fabric strip will depend on the thickness of the hanging rod. The standard width is 8 ½" for quilt market shows. I used a thin, adjustable rod with a small ⅜" or 1cm diameter, so I opted for merely a 3" width.
I cut a 20" by 3" fabric strip.
To explain, I only needed a narrow, one-inch sleeve for my slim curtain rod for French windows ).
Step 2 - Make a double hem
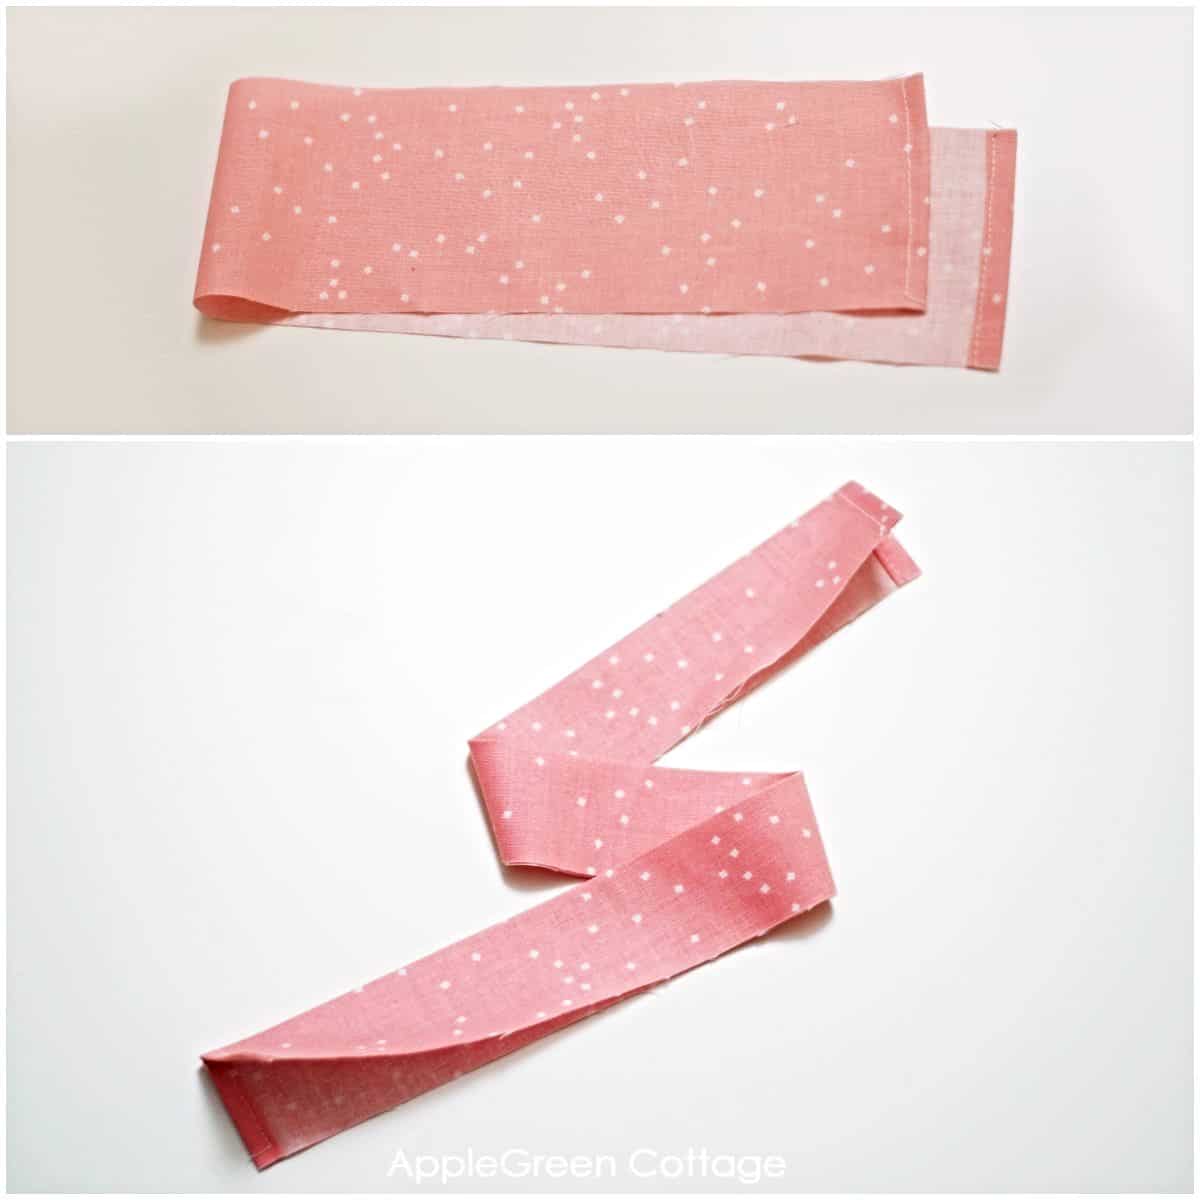
Turn the fabric piece under on each short side to create a double-fold hem. Then fold the strip in half with the wrong sides together.
Step 3 - Baste The Quilt Sleeve To The Back
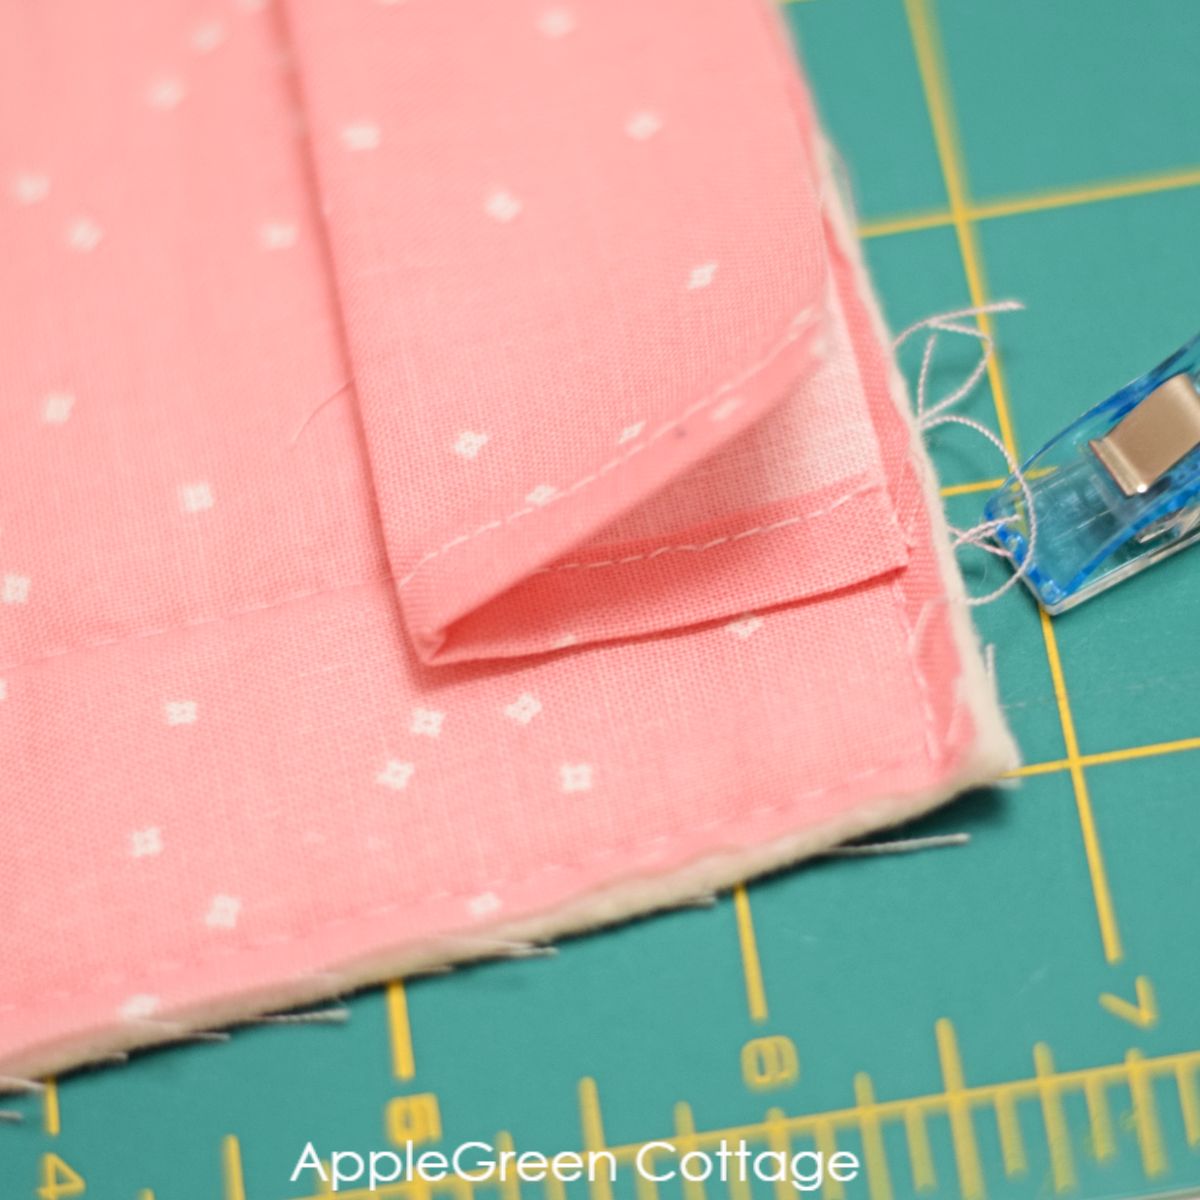
Place on the back of your quilt, with raw edges aligned along the raw top quilt edge.
Align the strip with the raw edges to the top edge of your quilt sandwich. Baste stitch in place.
Step 4 - Add Binding
Then add binding, using your favorite method. (Seriously, it looks like nearly every quilter has their own favorite binding method!) Mine is this one.
And this is the easiest binding method I often use too: the easiest way, plus steps to join pieces, cut and everything else.
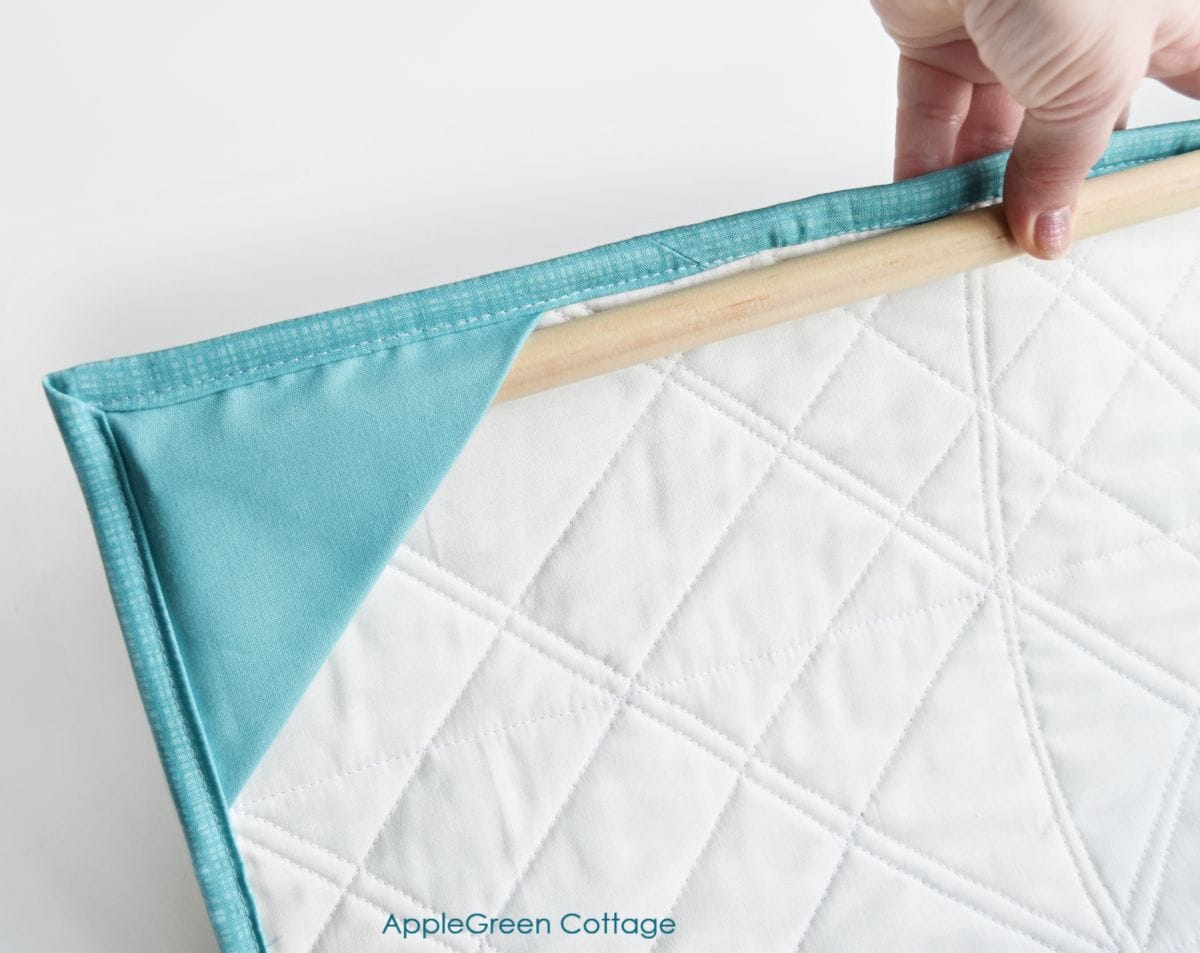
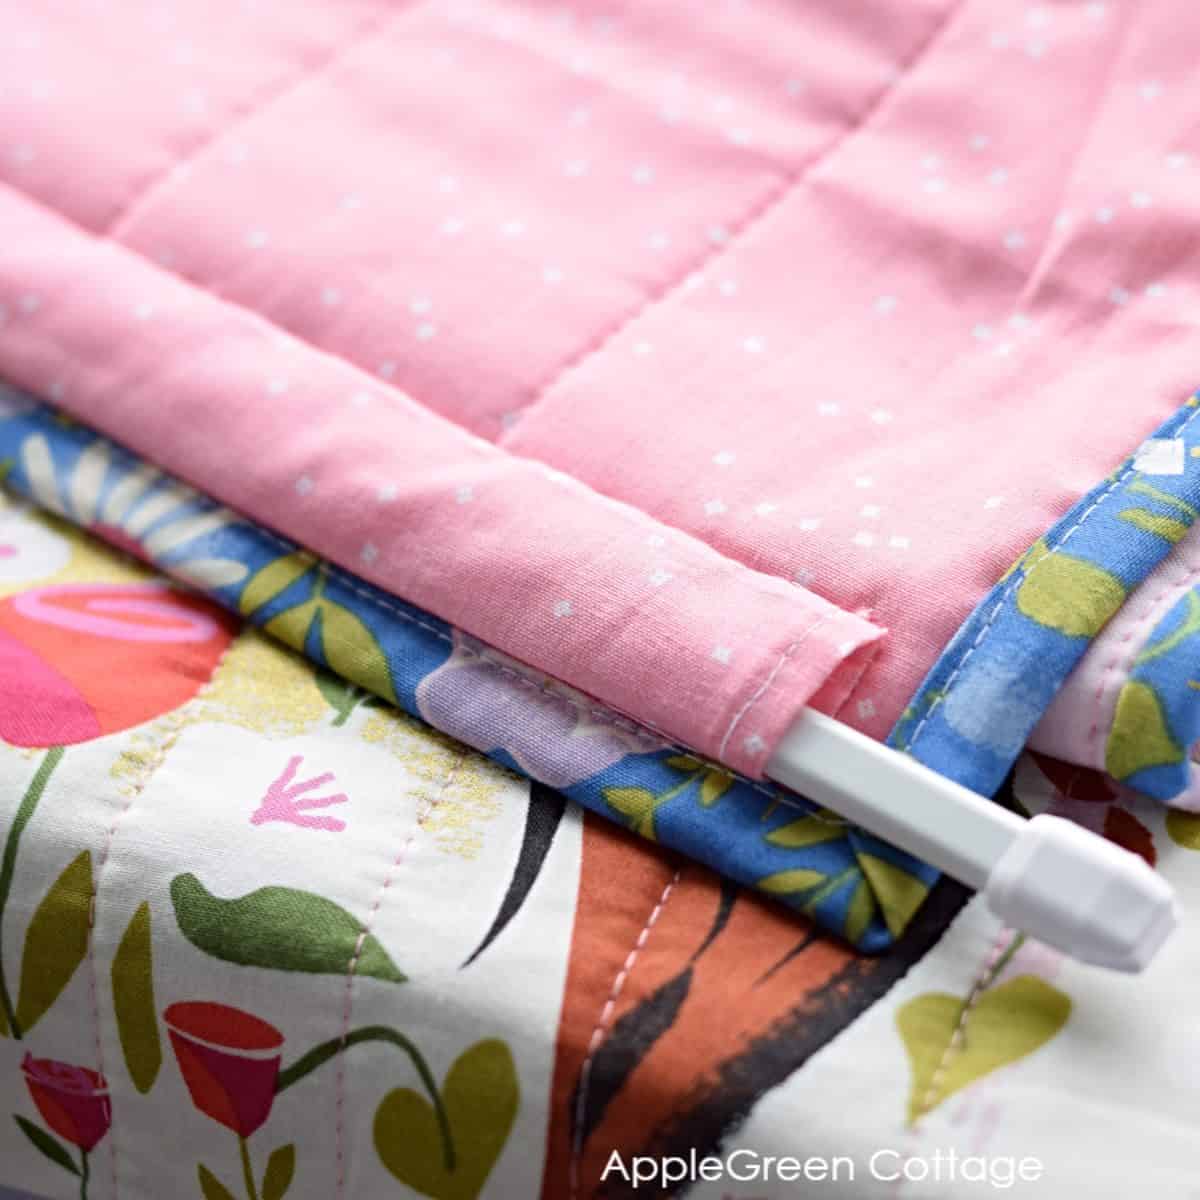
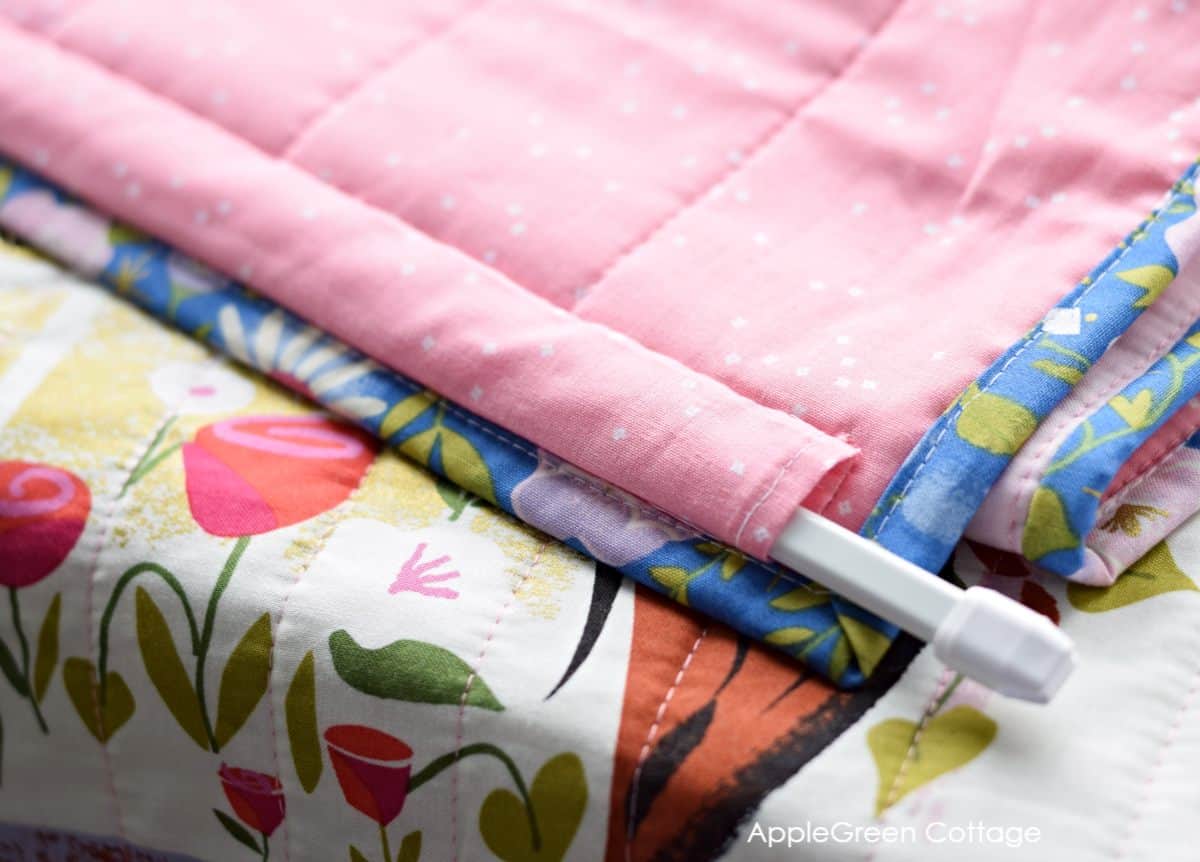
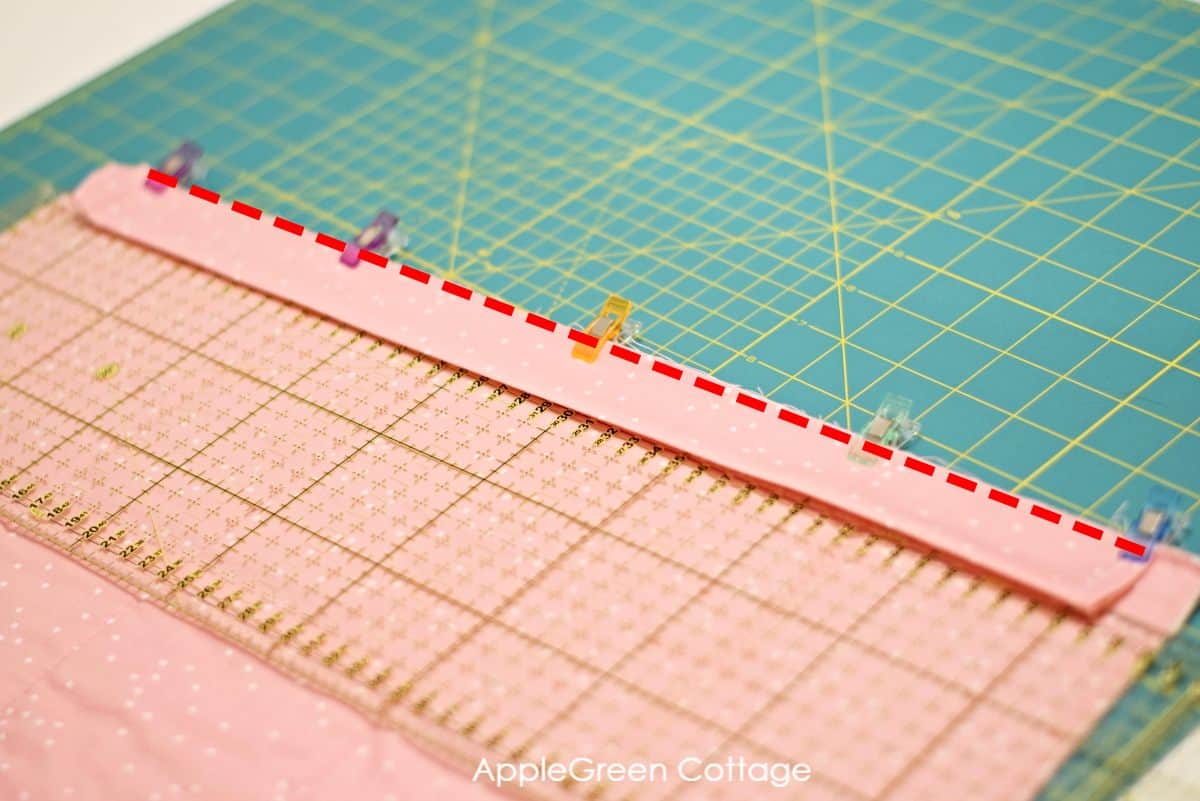
Step 5 - Attach The Bottom Edge Of the Quilt Sleeve
So now we have to attach the bottom edge of the sleeve to the backing and batting layers. Whipstitch the lower edge of the sleeve to the quilt.
Do not stitch into the front side of your quilt.
To prevent the rod from tugging on the quilt front, you'll create a little elevation on the quilt sleeve.
This is how: pull a little bit of the sleeve's edge towards the top, and stitch along the bottom ¼" into the back of the sleeve. Like this:
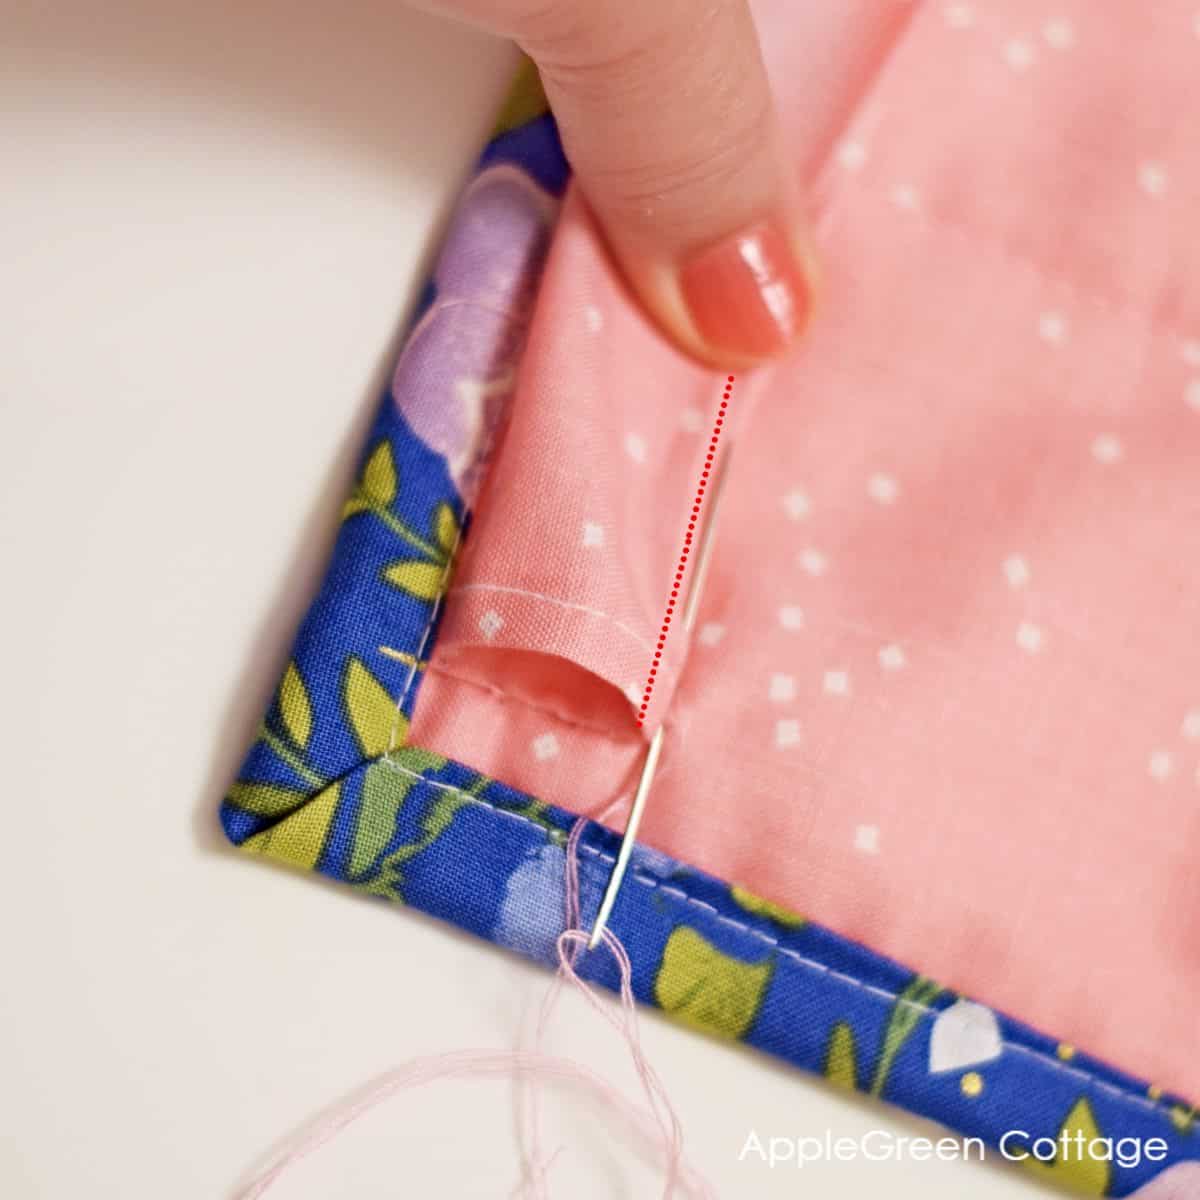
The fold is marked by the dotted red line above. Stitch right out the fold, just a quarter of an inch to the back. This way you'll create a little 'tunnel'.
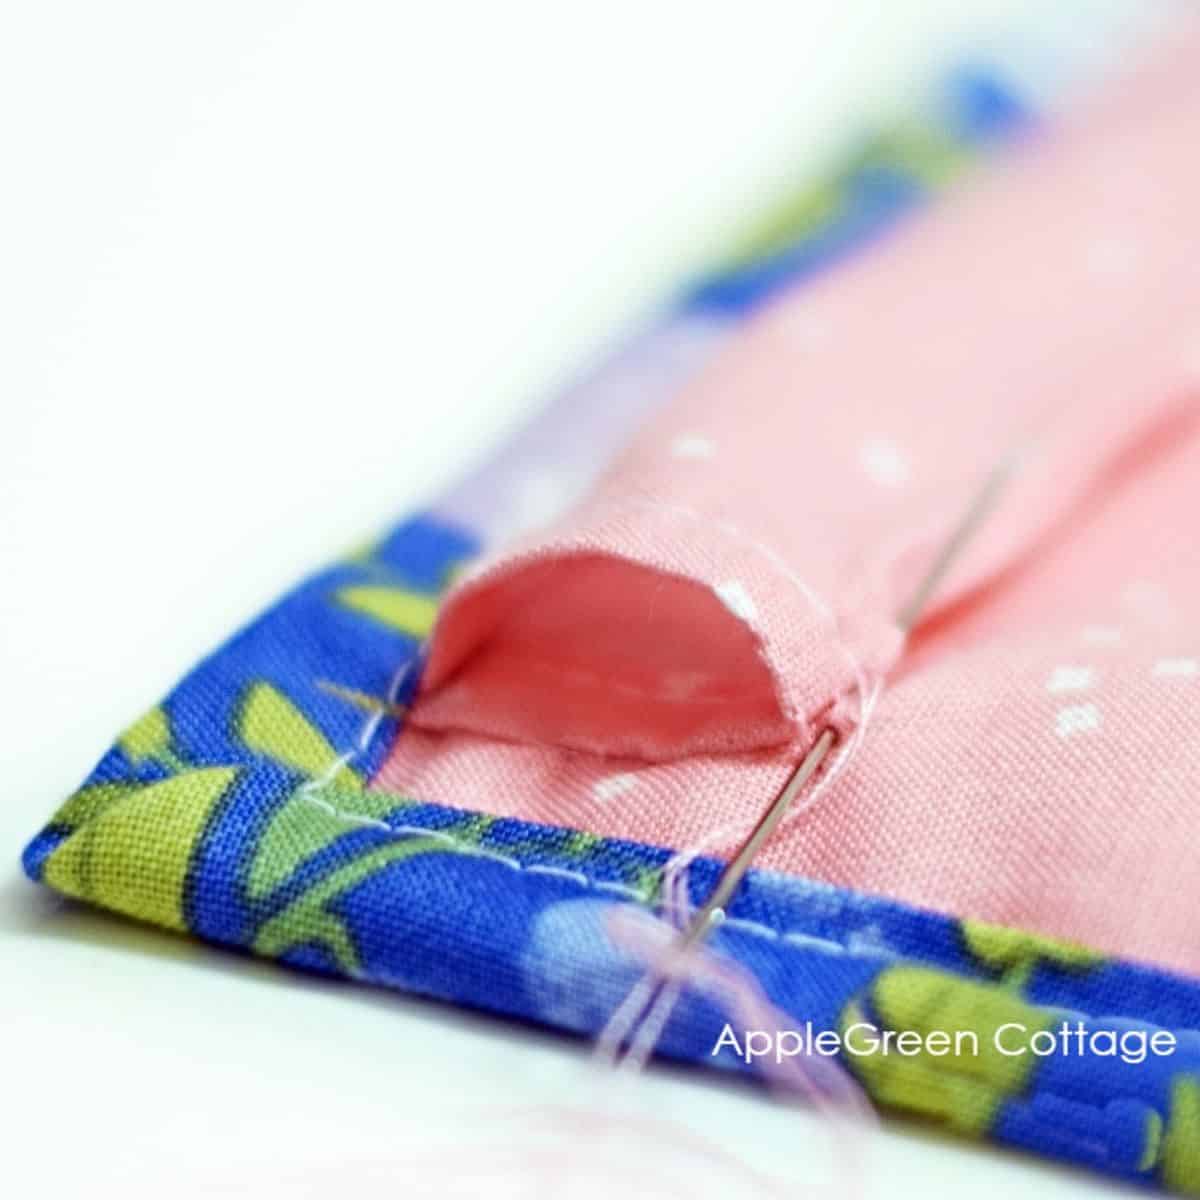
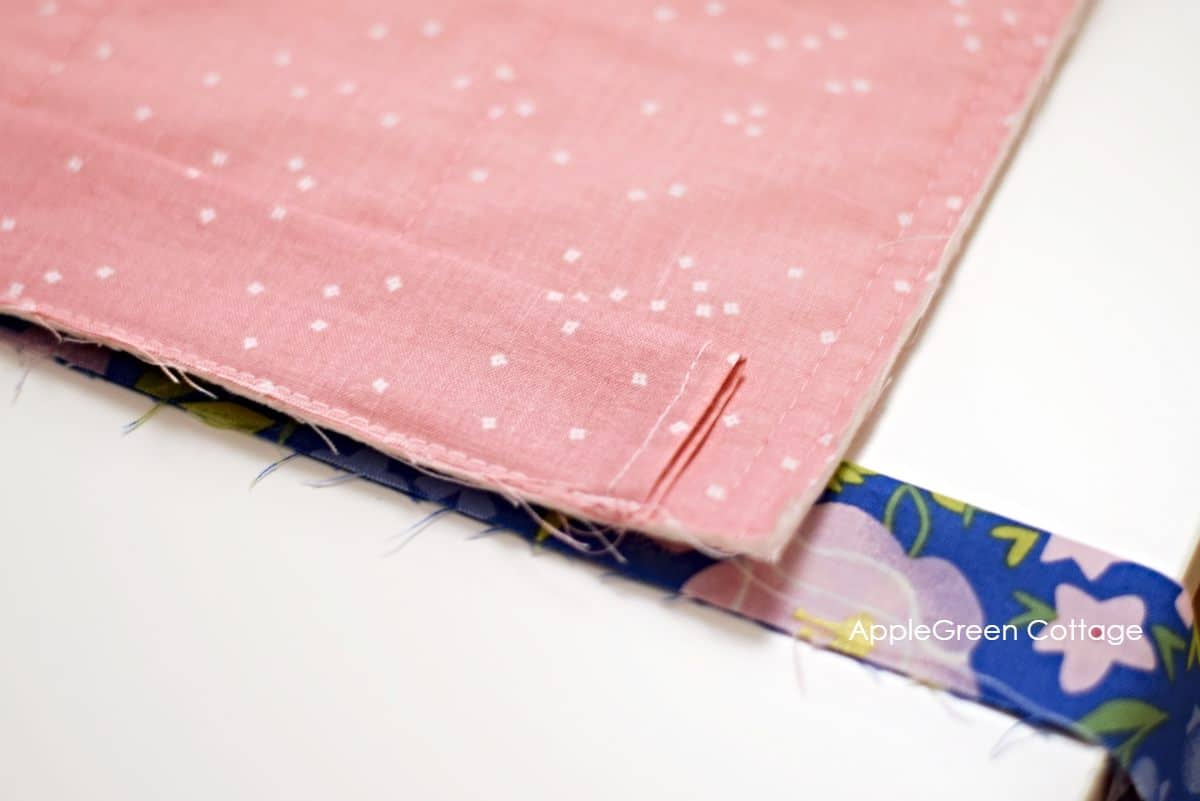
Go across and stitch this whole sleeve down.
Again, when stitching the quilt sleeve, make sure that your thread is not coming through to the front. The stitches should not be visible on the front.
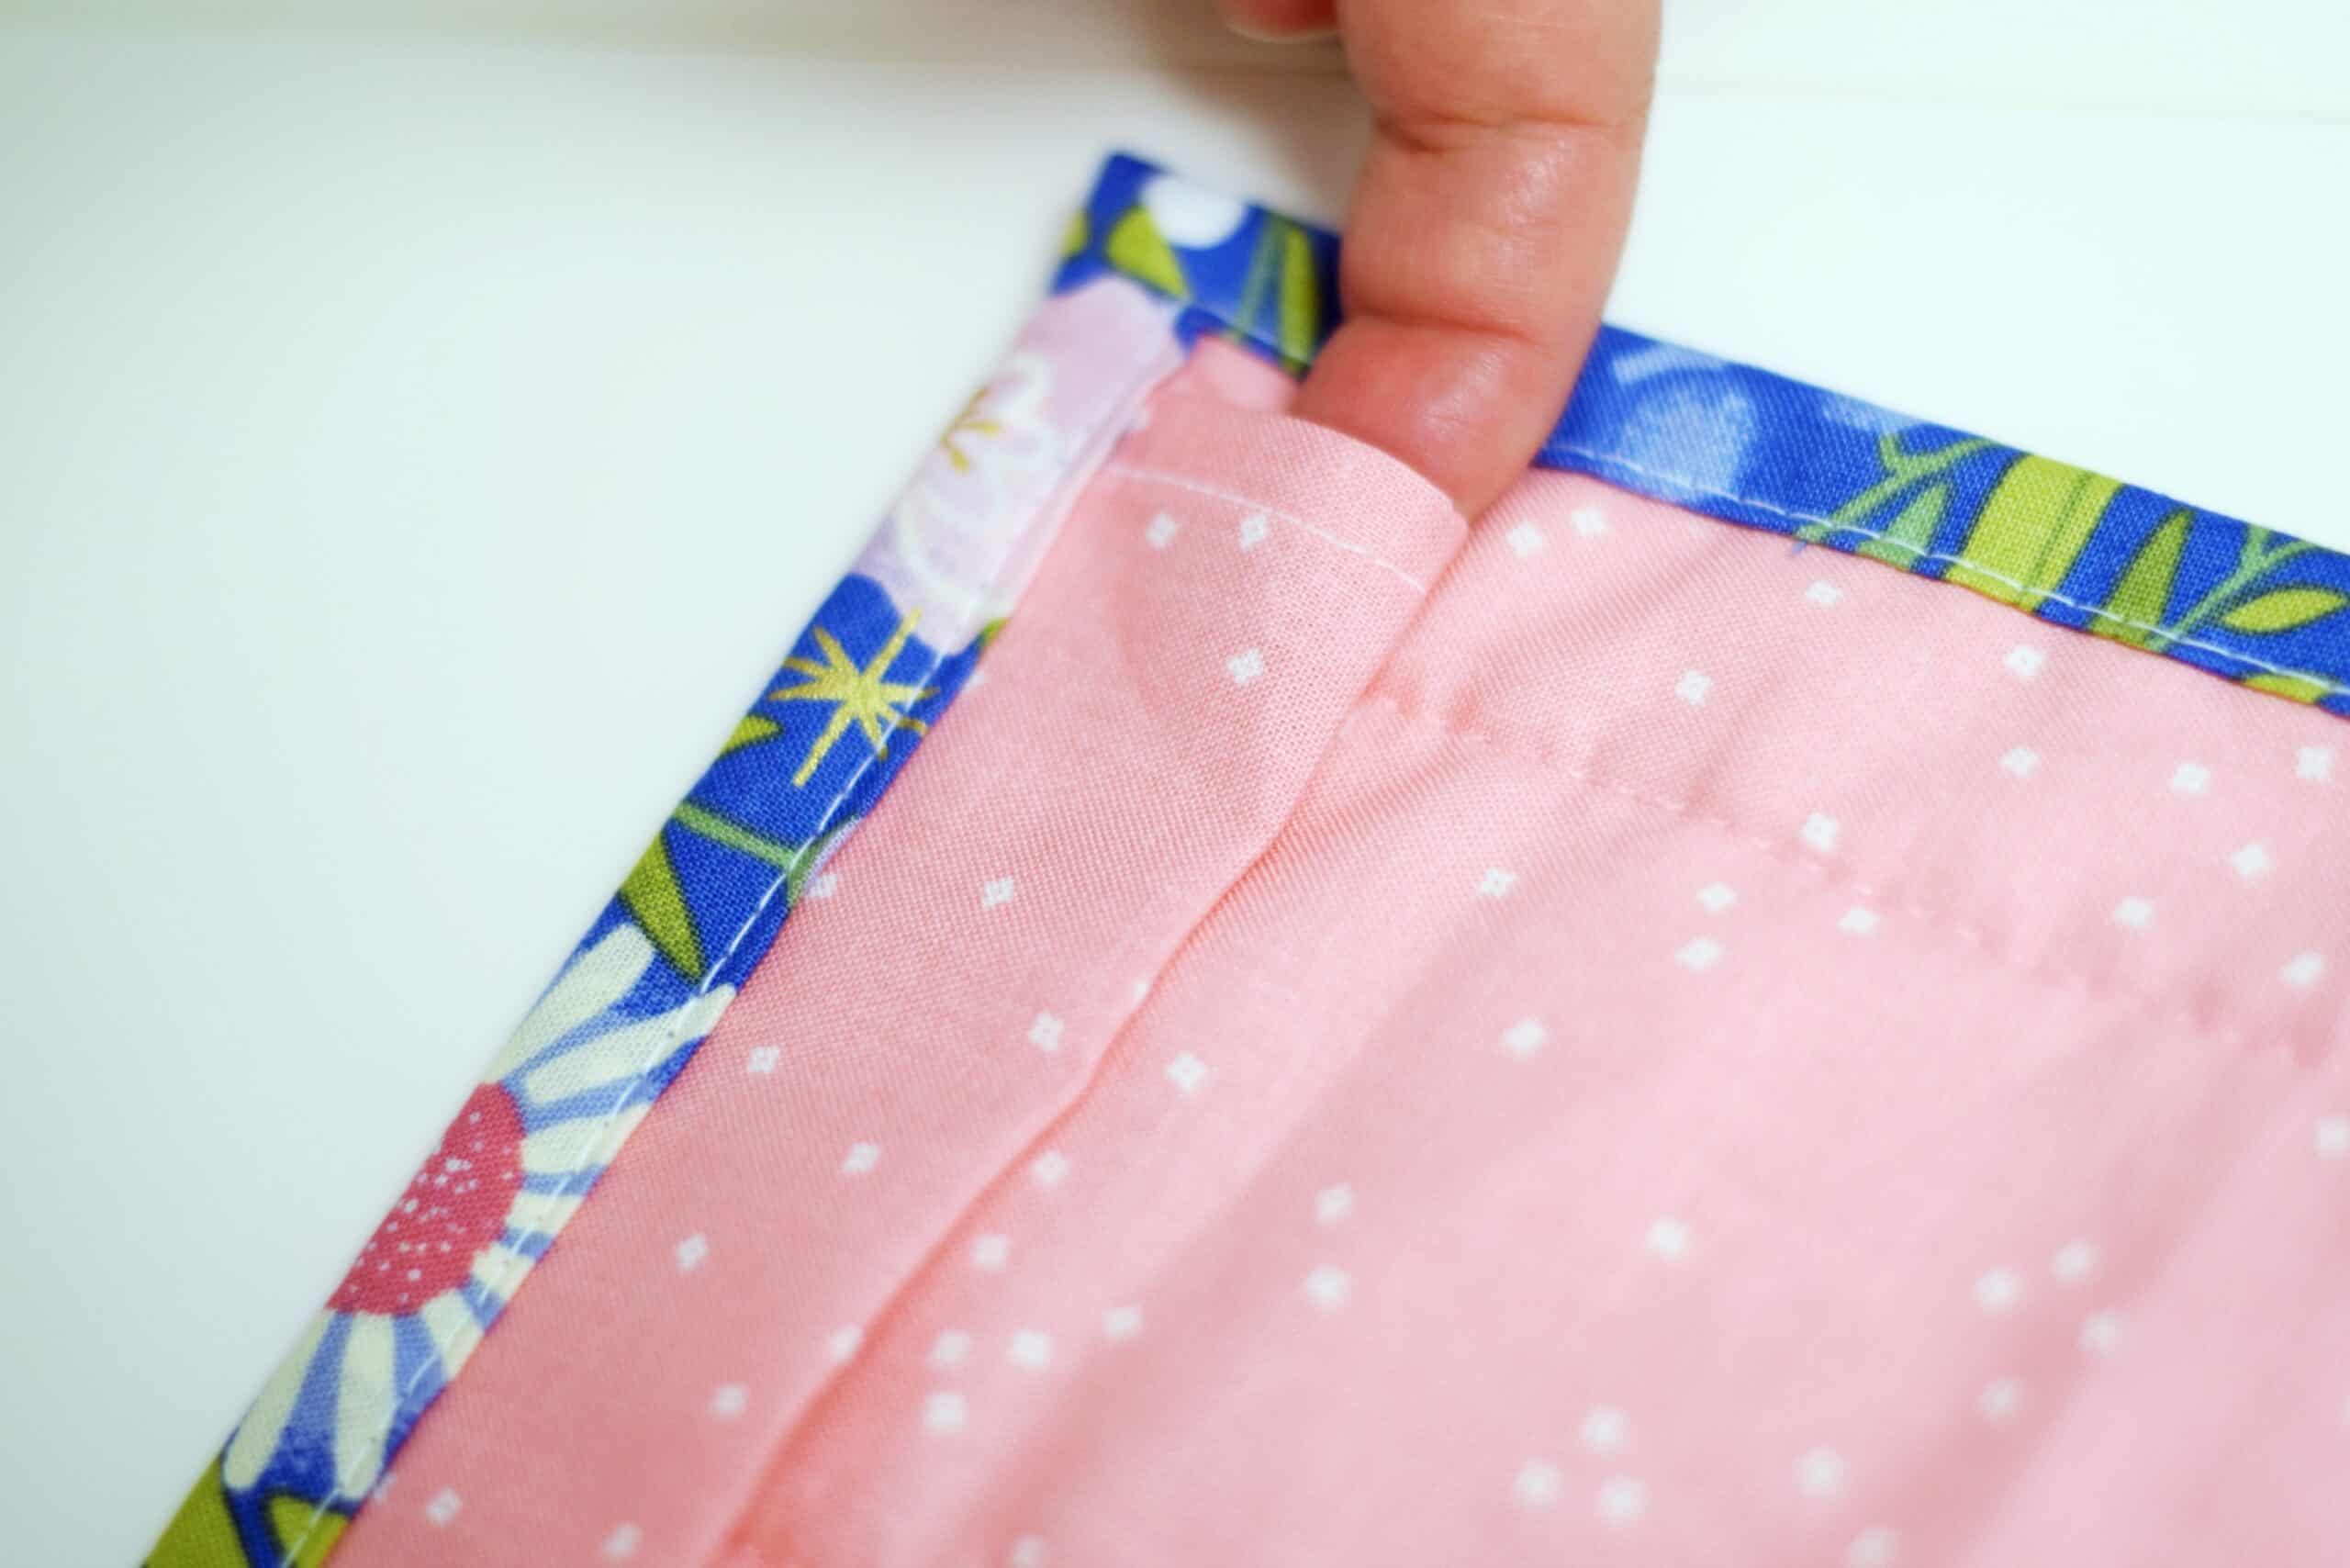
This is the finished narrow sleeve I made on this panel quilt - take a look for more photos!
Tutorial - How To Make Quilt Corner Hanging Pockets
Here, this is a simple corner pocket method I love using for mini quilts. Make and add corner hangers to the back of mini quilts. Simple to do and they work great! All you need is two small squares of your fabric.
Let's use a 5" size here to show you how it works.
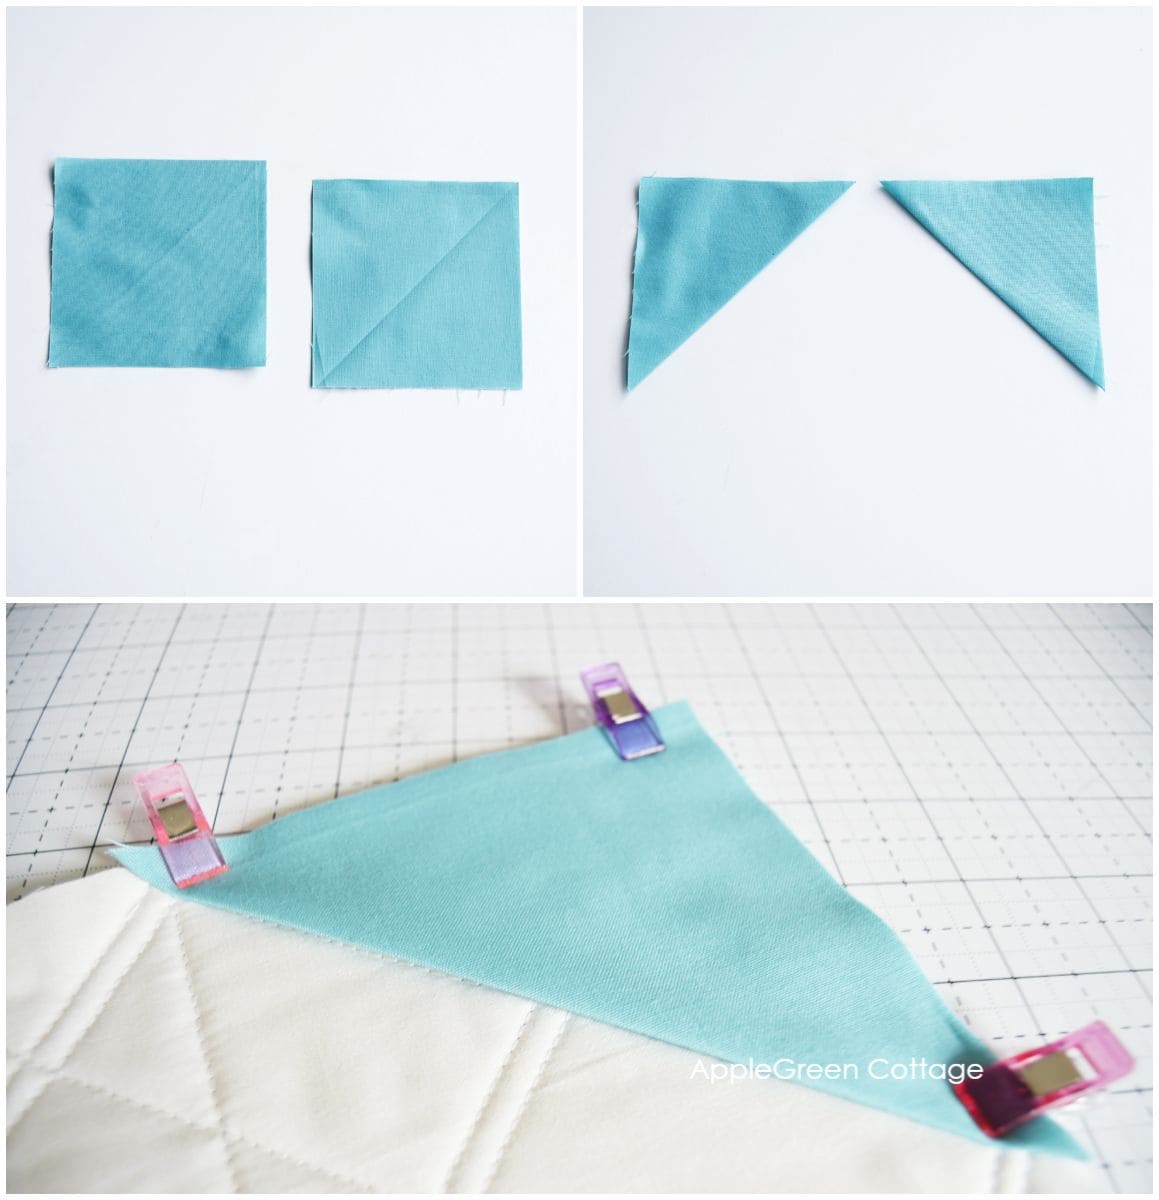
- Cut two 5" squares and press each square with the wrong sides together, diagonally. You'll create two triangles.
- Flip your unbound but squared-up quilt so the back side is up. Place the triangles at the 2 top corners of the quilt and pin in place.
- Baste in place.
- Now you can start binding your quilt. The corner hangers will be sewn in.
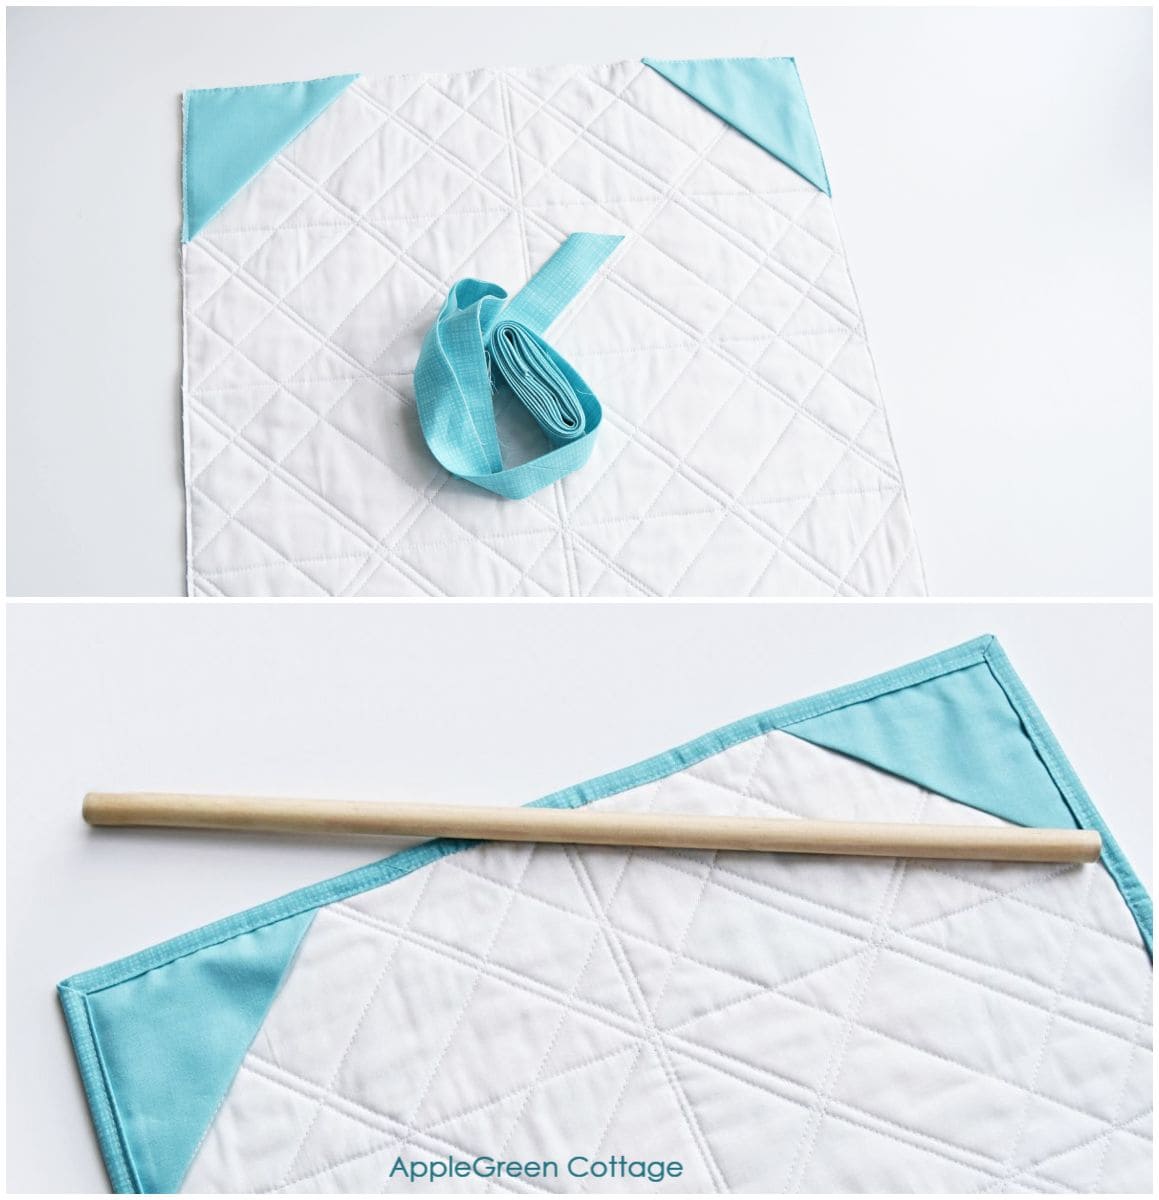
Now you'll only need a dowel, the same length as your quilt. You'll simply hang the dowel on two nails or two command hooks that you attach to the wall.
My Best Tips to Get A Quilt Hang Flat On The Wall
1 - Carefully square up your quilt sandwich after you've quilted the layers. Make all the edges as straight as you can, and all the corners at 90 degrees. Ensure your quilt is squared up nicely BEFORE you start adding the binding. I've tried to ignore this on a mini quilt. I had left a few corners ohm, not really square. And it did NOT go well. I ended up with a wavy little thing that did no good to my eyes. Be better than me. 🙂
2 - If you've already finished your quilt and it does not hang flat, use the sleeve tutorial above to hand-sew another quilt sleeve to the bottom of your quilt and insert a thin rectangular wooden rod. The rod weight will be distributed along the bottom edge of your quilt and straighten it up.
Related Projects
Want more quilting? Check out this huge baby quilt patterns list, it's new.
Randomize Quilt Pattern
Love modern quilts but want something simple - and NO tricky points to match? →THIS.
Save this tutorial for later to Pinterest using THIS link or using the image below:

I hope this little tip helps! As always, I'd love to see if you've made a quilt sleeve using this tutorial. Also take a look at my favorite quilting tools I use. Please post a picture to Instagram and tag me @applegreencottage or #applegreencottage - so I can take a look!
Sew This Handy Storage Tote!
Check out this pretty ALLina project tote pattern in our shop - for all your storage needs!


Barbra says
Thank you. Your visual tutorial with text has removed the mystery for me on how to make a hanging quilt sleeve.
Joan says
Thank you for the most complete instructions. Very well thought out and the photos are very helpful. One more thing - have a friend help. Many quilts don't feel heavy until you are trying to lift and straighten them! And it's always fun to have company!
Damjana says
So true, Joan!