
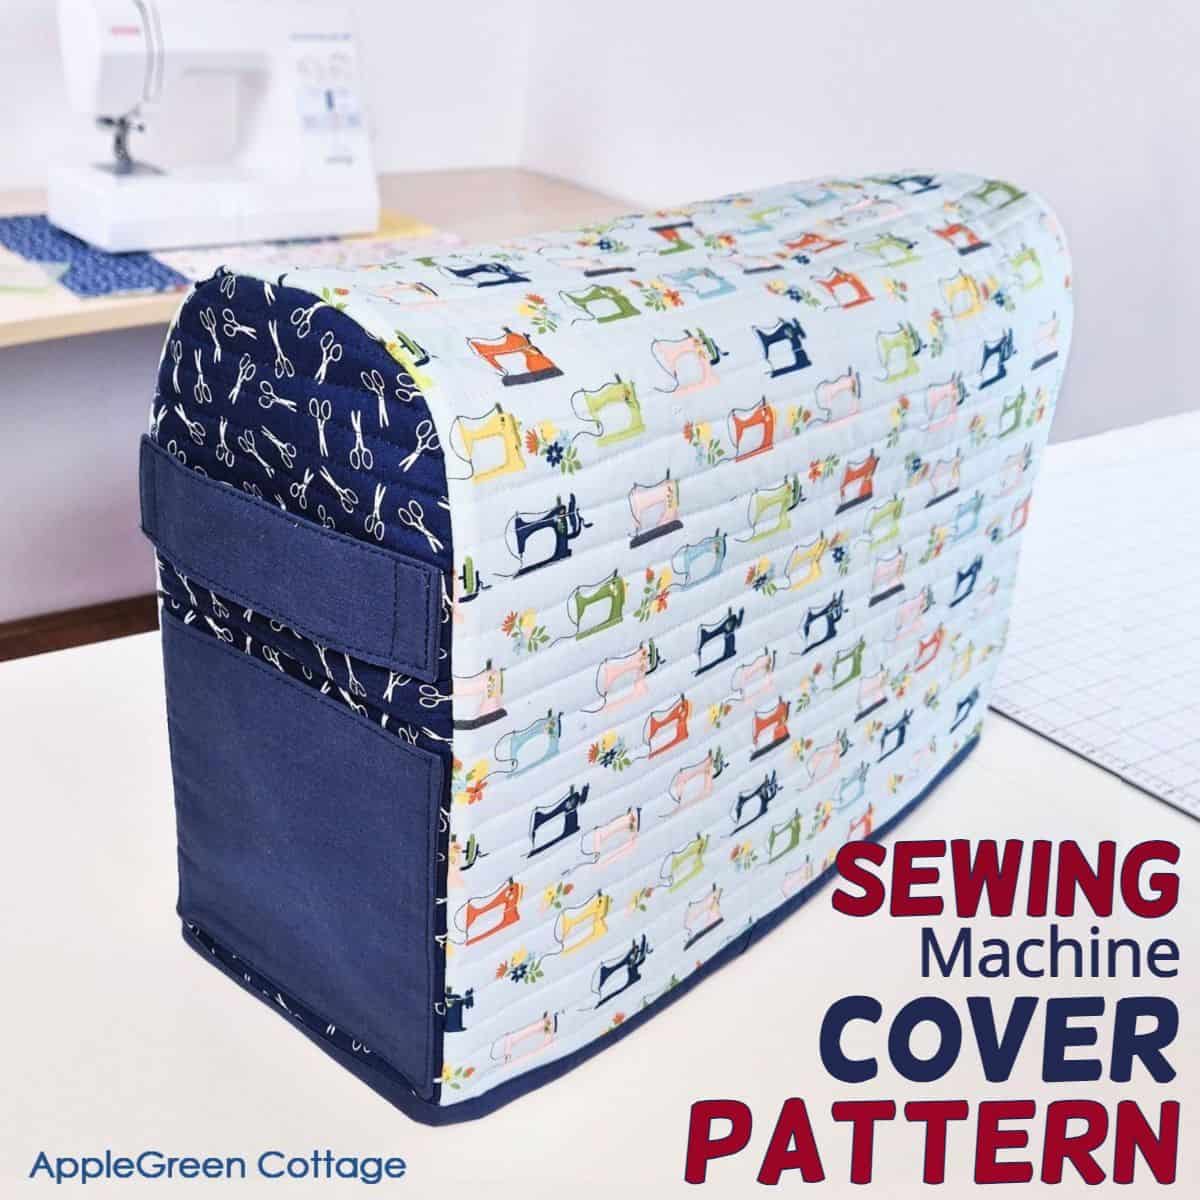
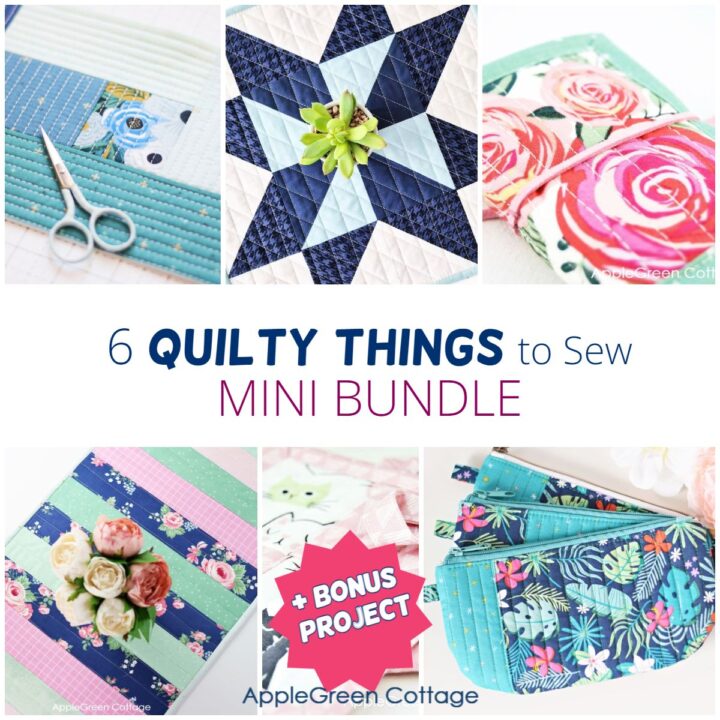
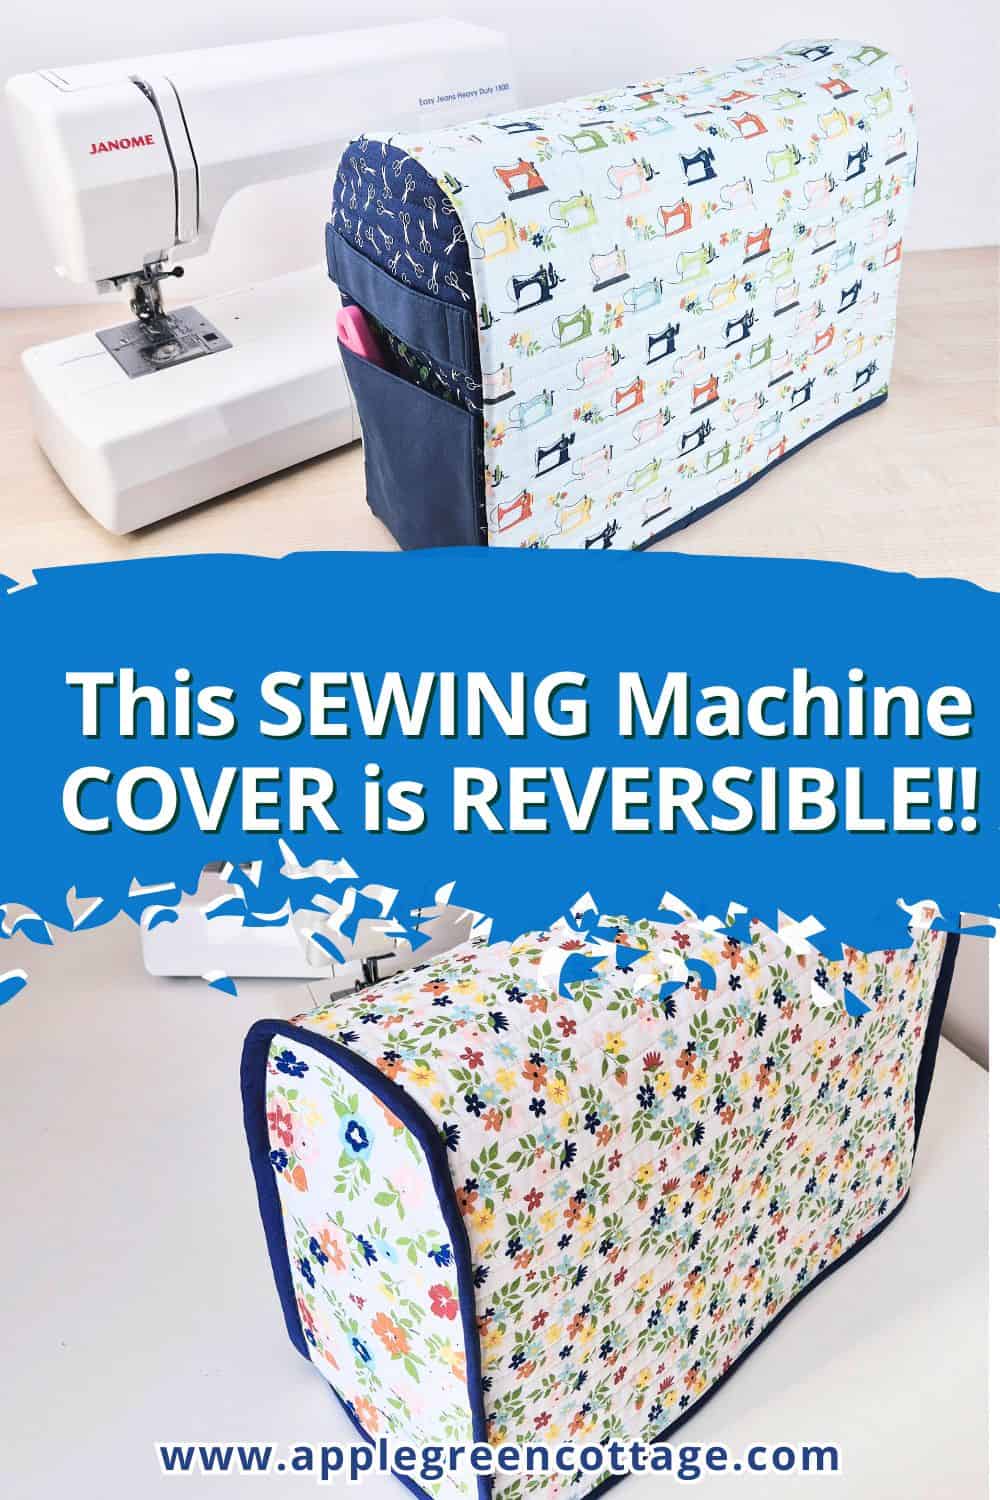
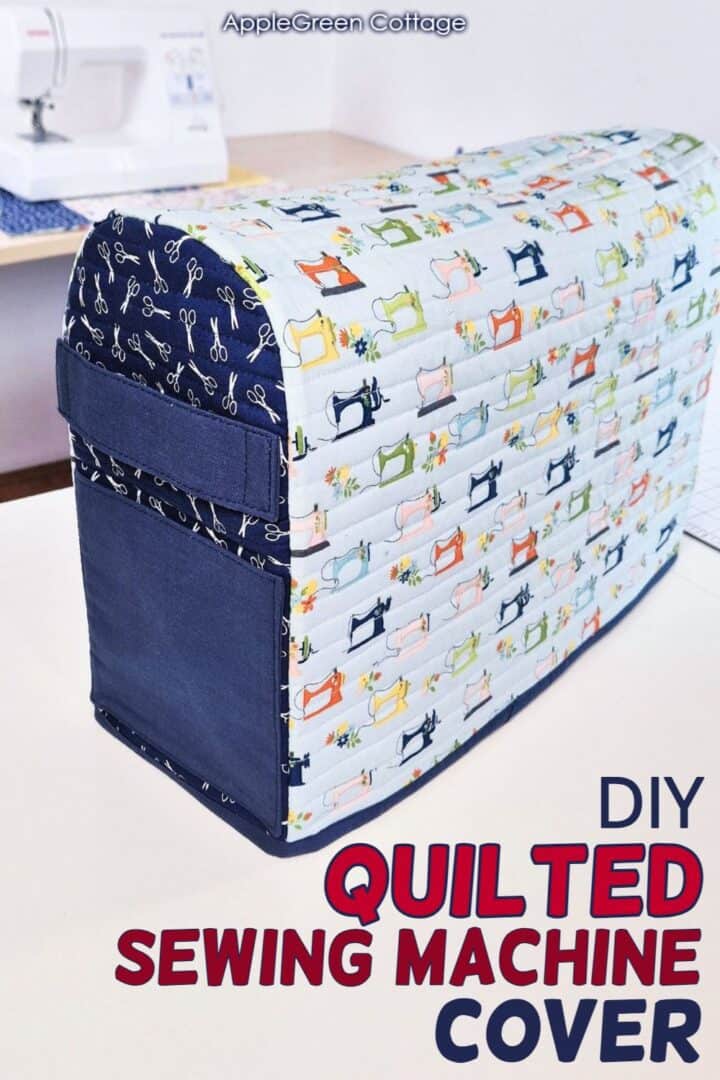
Sew an easy sewing machine cover to protect your machine from dust and make your sewing space prettier.
Get your free sewing machine cover pattern in 3 sizes: small for the basic, regular-sized machines, medium for slightly larger mid-range sewing machines, and large for those big straight-stitch (semi-industrial) bagmaking and quilting machines.
EXTRA BONUS: not a quilter? I have you'covered! At the bottom of this post, I also added a simplified single-layer machine dust cover tutorial version if you don't want a quilted sewing machine cover, make sure to check it out too.
Prefer an ad-free printer-friendly option of the whole tutorial+pattern? See the optional PDF file in our shop.

Less searching. More sewing.
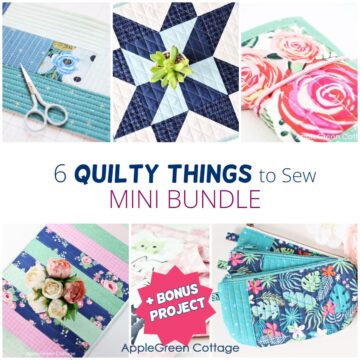
Keep 100+ printable AGC tutorials ready to print, save, and sew anytime.
Are you here for even more sewing projects for the home? Check out this large storage caddy pattern or the huge market tote pattern that can double as a storage box in your hallway or living area. Pretty and practical!
Table Of Contents
- Why you'll love this sewing machine dust cover pattern
- Finished Size
- Which Sewing Machine Cover Size Fits My Machine Model?
- Supplies
- Feature Video
- How To Make a Sewing Machine Cover Tutorial
- Top Tip
- Make a Matching Sewing Machine Mat!
- Helpful Tips and Popular Questions
- Variations - Make It Easier - A simple Sewing Machine Dust Cover
- Related
- Want a printable copy of the whole tutorial?
Why you'll love this sewing machine dust cover pattern
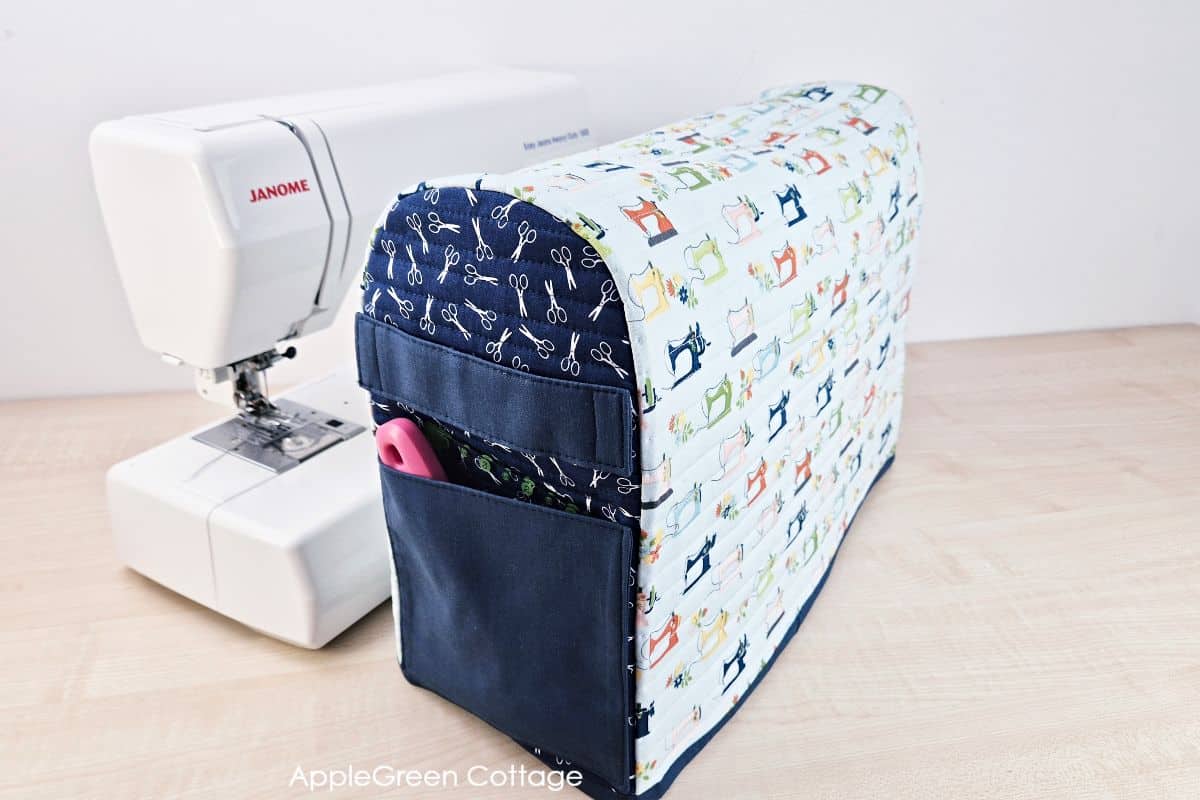
- the optional side pocket and handles are designed to stay out of the binding seams - less bulk!
- if you use bias binding, you'll make a reversible sewing machine cover!
- see how to sew a sewing machine cover with directional prints!
- 3 pattern sizes, but you can go beyond that: find out how to enlarge the machine cover for even wider sewing machines!
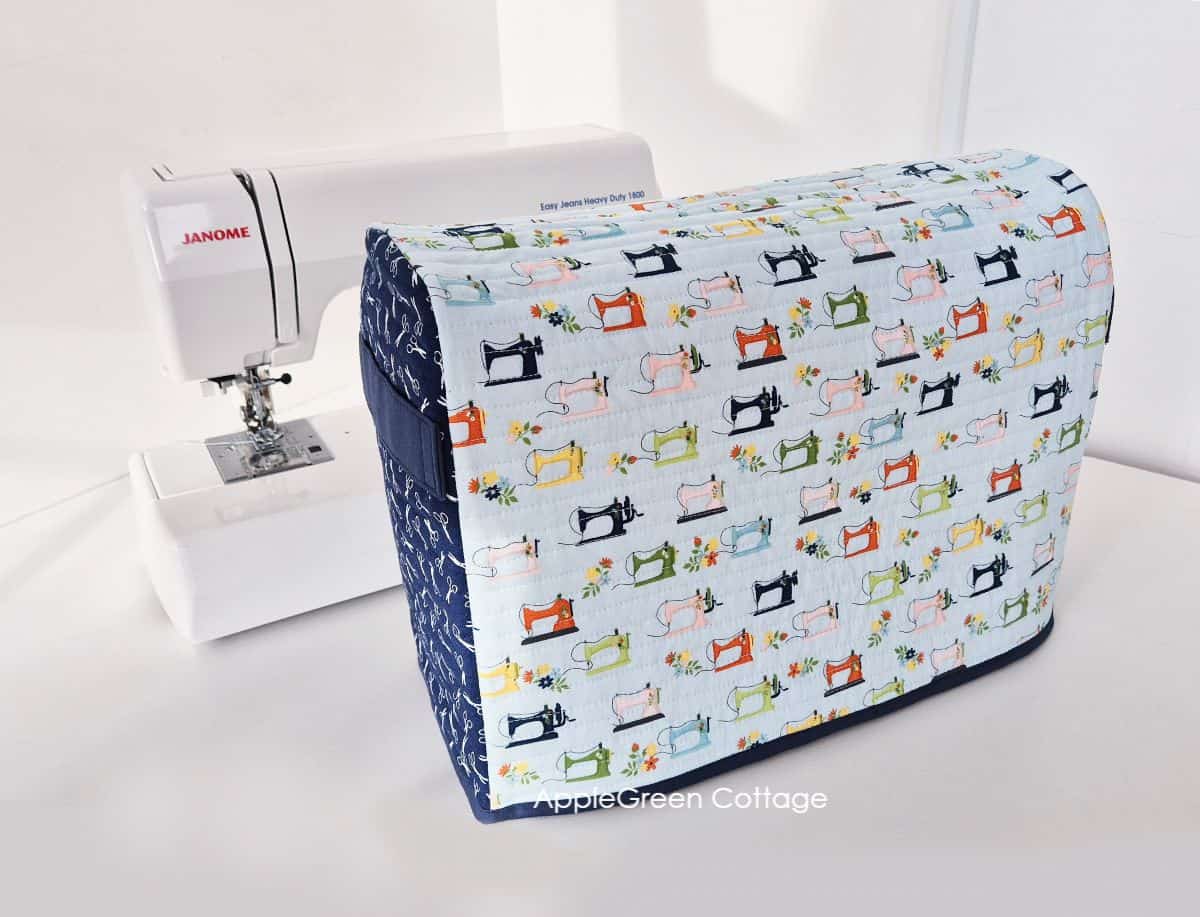
Sewing machines are a big investment and it's important to protect them. A custom dust cover will do just that, AND make your sewing corner prettier!
Finished Size
The machine cover sewing pattern comes in 3 convenient sizes: two for domestic sewing machines, and the third one is a semi-industrial sewing machine cover pattern size.
- SMALL for machines up to 16" wide, 12" tall, 6" deep
- LARGER domestic machines up to 17 ½" wide, 12" tall, 7 ½" deep
- LARGE semi-industrial up to 20 ½" wide, 14" tall, 9" deep
If you have an even larger machine, feel free to adjust the sizing further.
📍Make sure you first measure your sewing machine before getting started.
Which Sewing Machine Cover Size Fits My Machine Model?
SMALL machine cover size pattern - for Brother XR3774 (15.3"W x 12"H x 5.8"D - wide table not included in dimensions), Brother XM2701 (15.3"W x 12.01"H x 5.86"D), Janome 2222 (15.2"W x 11.6"H x 6"D), Brother CS7000i (16"W x 11.4"H x 6.7"D - wide table not included in dimensions)
LARGER domestic machine cover pattern - for Singer HD (4432,4423,4452), Janome HD3, Janome HD1800, Janome Sewist 725S (16"W x 11.9"H x 7"D)
LARGE semi-industrial sewing machine cover pattern - for Janome HD9, Juki TL-2010Q (same as Juki TL-2000Qi, and all the Juki TLs, in case you have a different model), also Juki HZL-F400/F600 (17.5"W x 11.4"H x 8.2"D)
Supplies
Shop my personal favorite sewing supplies on Amazon HERE.
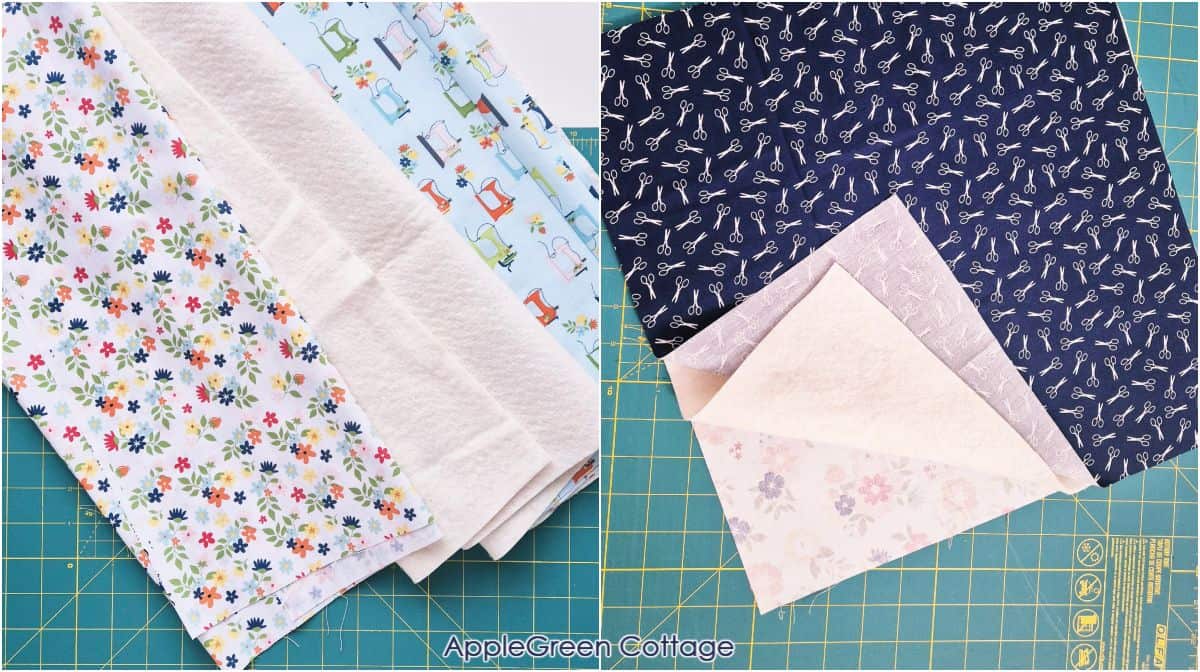
- 1 yard of Exterior Fabric altogether (I used 2 different prints)
- 1 yard of Lining Fabric
- 1 yard of batting
- for optional side pocket and handles: a fat quarter of fabric plus lightweight interfacing (see this guide on interfacing)
- 2 yards 2 ½" quilt binding (straight-grain binding) - for the bottom edge
- if binding the inner seams: you'll need 2 yards of a ½" (13 mm) double-fold bias tape (NOTE: equals 1" (25 mm) single-fold seam binding!)
- the usual: sewing machine, thread
- scissors, a rotary cutter and a cutting mat
- SprayNBond or Odif 505 for spray-basting
- free pattern for email list subscribers
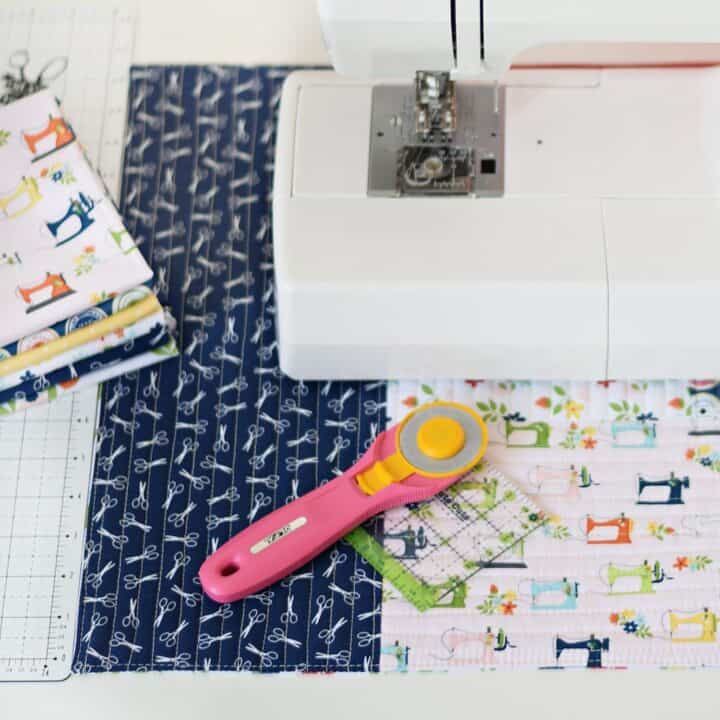
These are the prints I used from the Sew Much Fun collection by Echo Park Paper, I chose vintage sewing machines print for Main Exterior, and scissors print for Exterior Sides. I also made a pretty sewing mat (↓↓), using this gayg tutorial.

Feature Video
See this gorgeous quilted sewing machine cover in action! Watch this quick 30-second video for a closer look and inspiration!
How To Make a Sewing Machine Cover Tutorial
Step 1 - Get the free pattern
Join our mailing list and get the pattern emailed to you:
Prefer an ad-free printer-friendly option of the whole tutorial+pattern? See the optional PDF file in our shop.
How To Print this PDF file
For best results, download the PDF to a desktop or laptop, open it in Adobe Reader, and print at 100% size. (I recommend not printing directly from a browser window or from mobile, it could cause issues.)
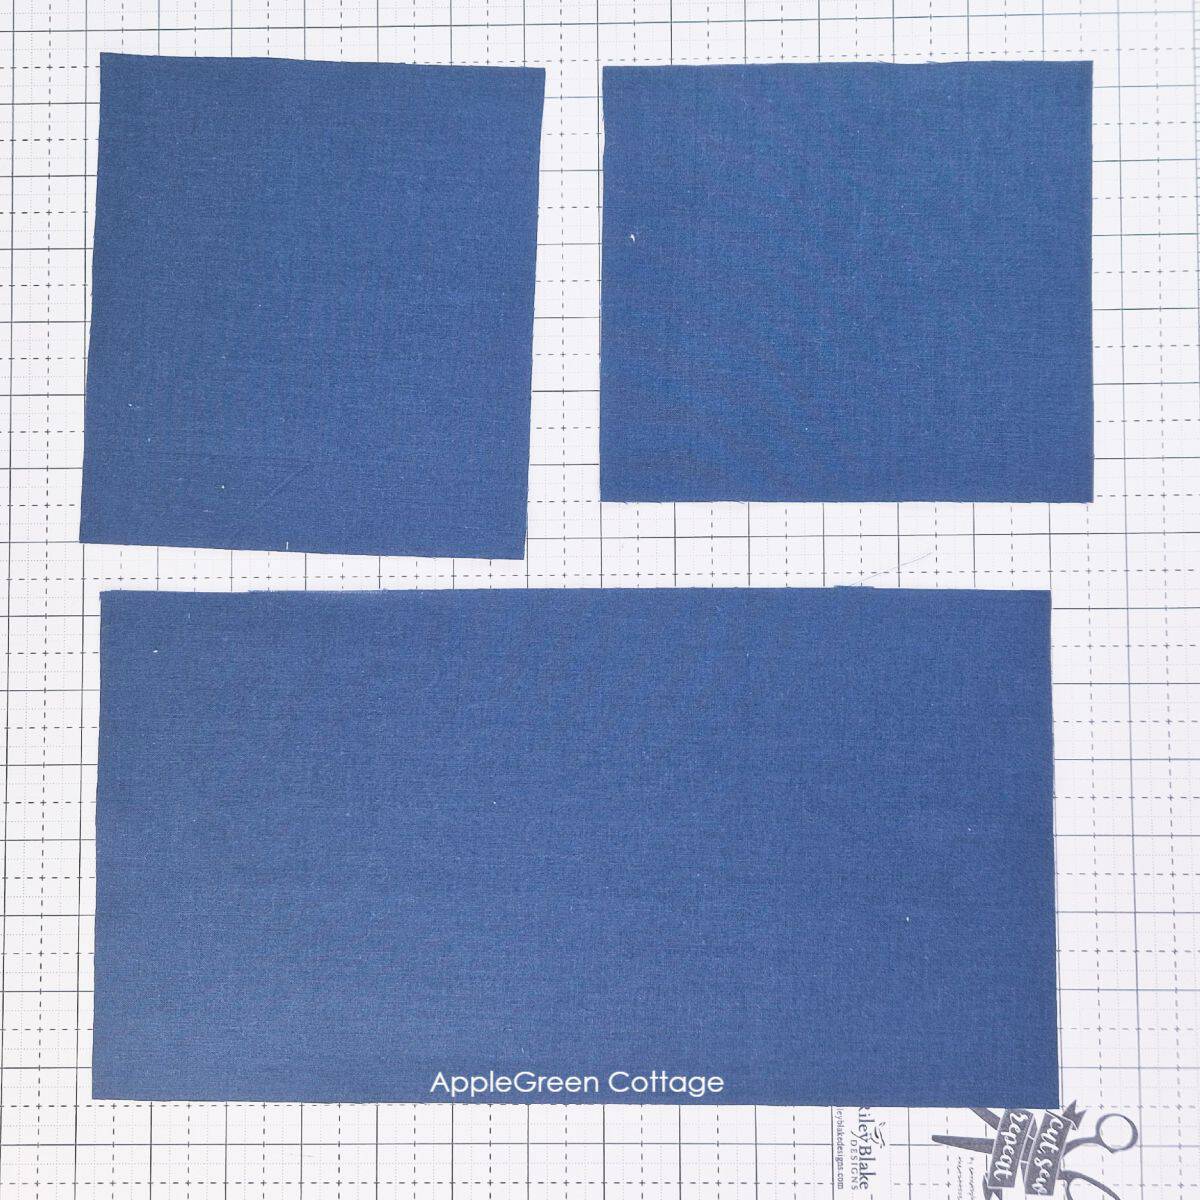
Step 2 - Cut the Main And Side Fabrics to quilt
For the MAIN Piece, cut the Exterior Fabric, batting, and Lining Fabric in these sizes (width x height):
- SMALL domestic: 20" x 32" (width x height)
- LARGER domestic: 21" x 33" (width x height)
- LARGE Semi-industrial: 24" x 37" (width x height)
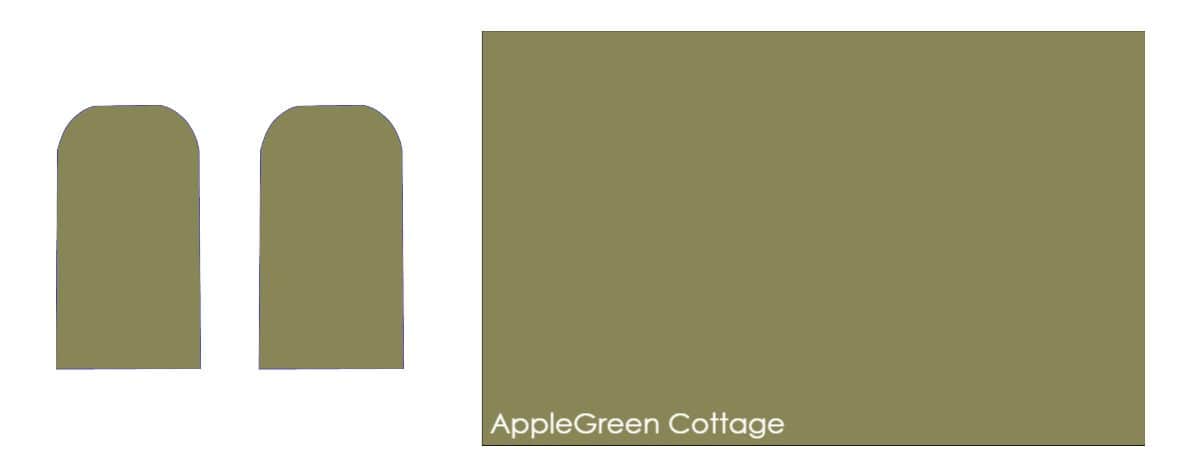
For the SIDE pieces, cut one of each: Exterior Fabric, batting, and Lining Fabric, in these sizes (width x height):
- SMALL domestic: 16" x 15" (width x height)
- LARGER domestic: 20" x 15"
- LARGE Semi-industrial: 22" x 16"
Sizing - Have a wider machine?
Have an even wider machine? Simple. Just extend the width of your Main piece, this is the only dimension that determines the width of your sewing machine cover.
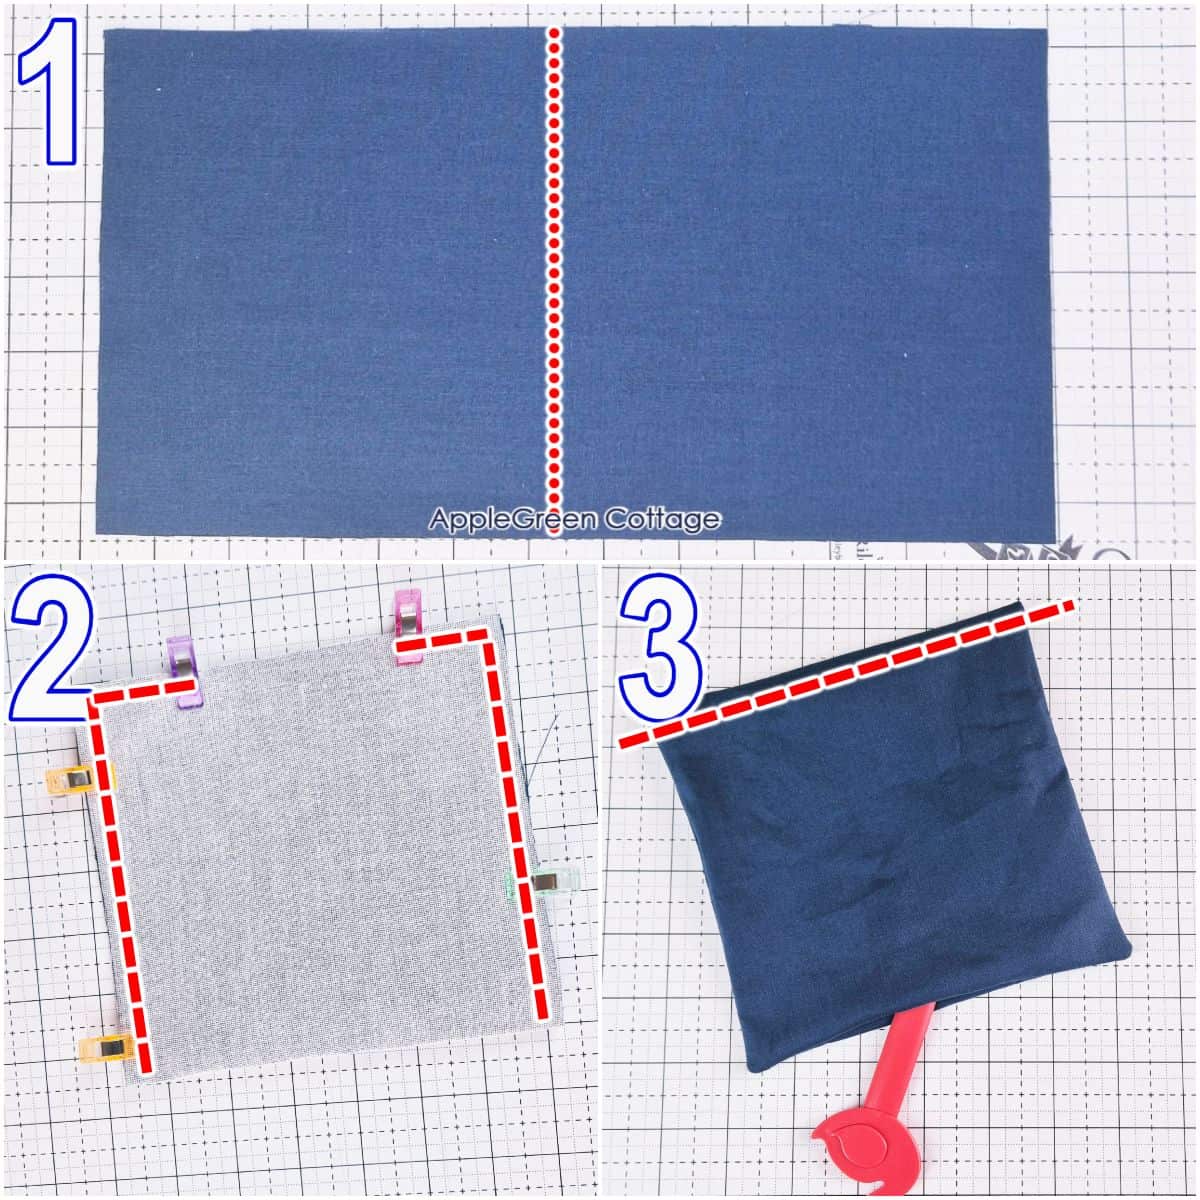
Step 3 - Option for Directional Prints
Before we make a quilt sandwich from both pieces, pause! Is your Exterior MAIN Piece fabric a directional print? If so, you don't want it to be upside-down on one side, do you? Now to make it right, you'll cut the piece in half, rotate one half and sew everything back together, so the pieces are facing away from each other. Like this:
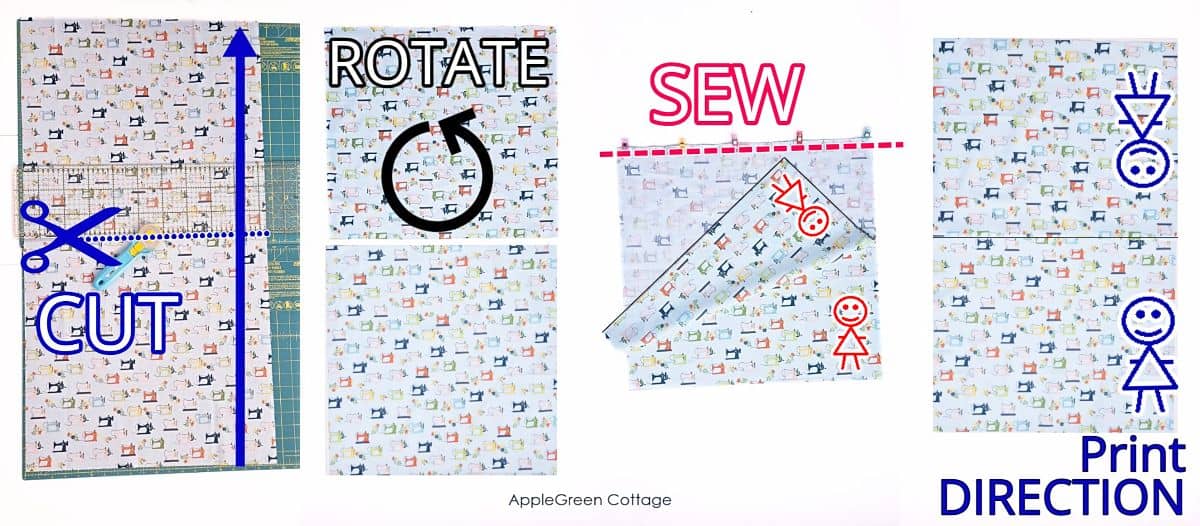
- Cut the Fabric: lay your directional fabric on a cutting mat and make a straight cut horizontally across the fabric, as indicated in the first image. The dotted line represents where to cut.
- Rotate the upper piece by 180 degrees (second image).
- Sew: flip the top piece down so the two fabric pieces are right sides together, clip and sew using a ¼" seam allowance (3rd image)
- Unfold the fabric and press the seam flat for a neat finish.
Use a ¼" seam allowance. Altogether you'll lose half an inch in height with that, but this was already taken into account for the project.
Step 4 - Quilt the fabric
Now, make a quilt sandwich, first for the Main piece:
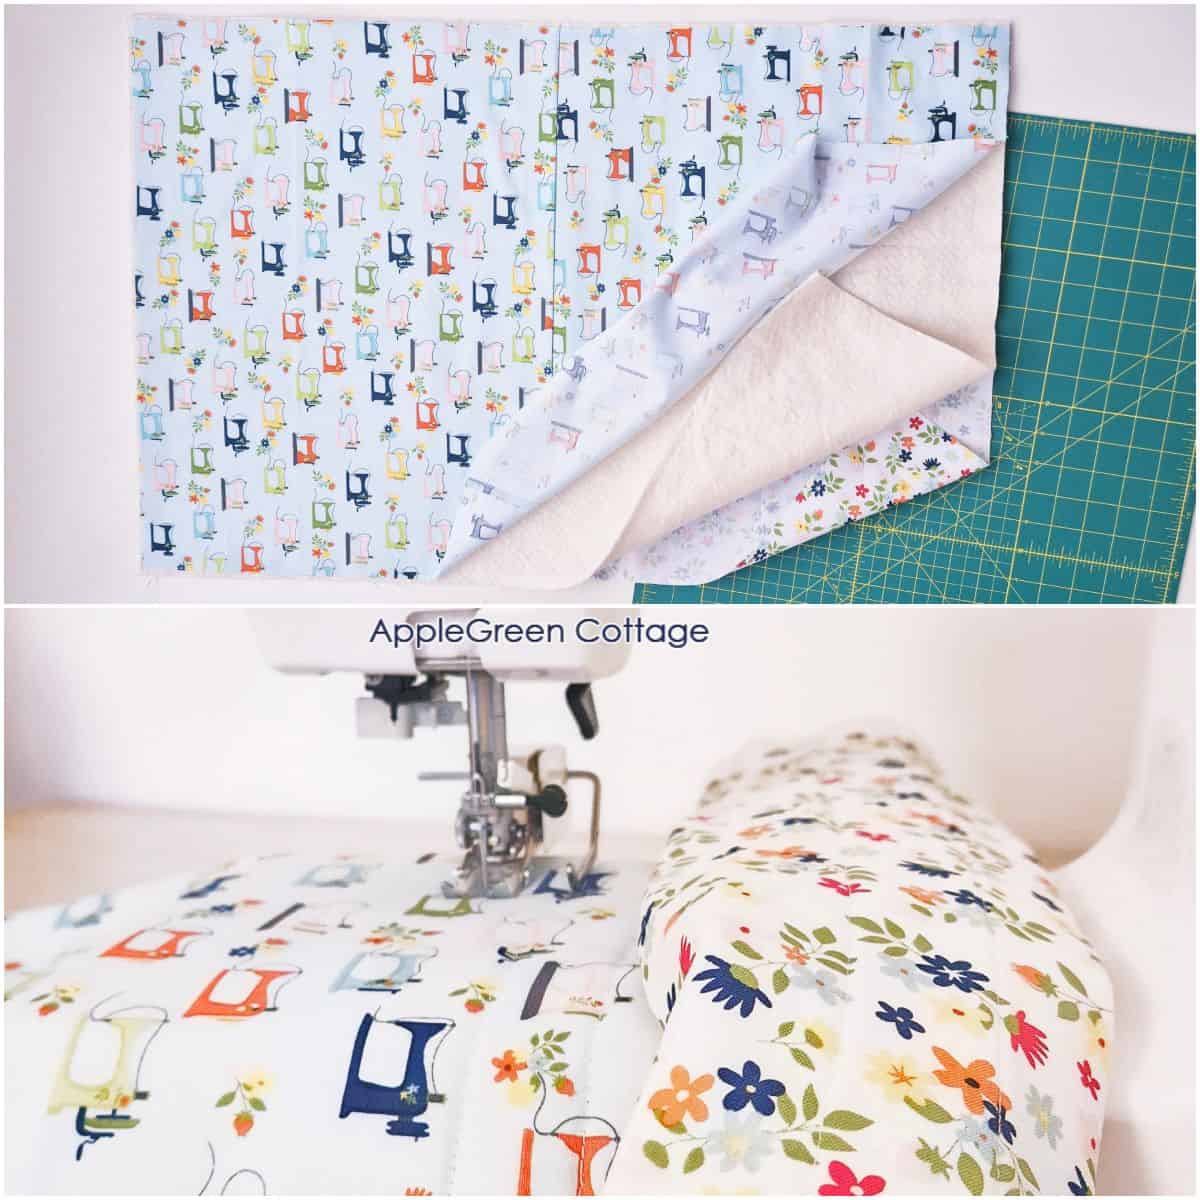
- place the backing with the right side down, lay batting over it, and on top, place your Exterior Main fabric with the right side up.
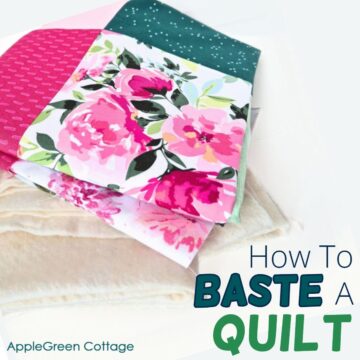
- Spray-baste these layers together using SprayNBond or Odif 505.
- Use your chosen quilt design to quilt the piece, my choice was straight-line quilting. Since my fabric is directional, it now has a seam right in the middle, and this seam was my starting point. I quilted an inch apart first, and then added a second line between, ending up in quilting lines being ½" apart. Nice and clean. And easy!
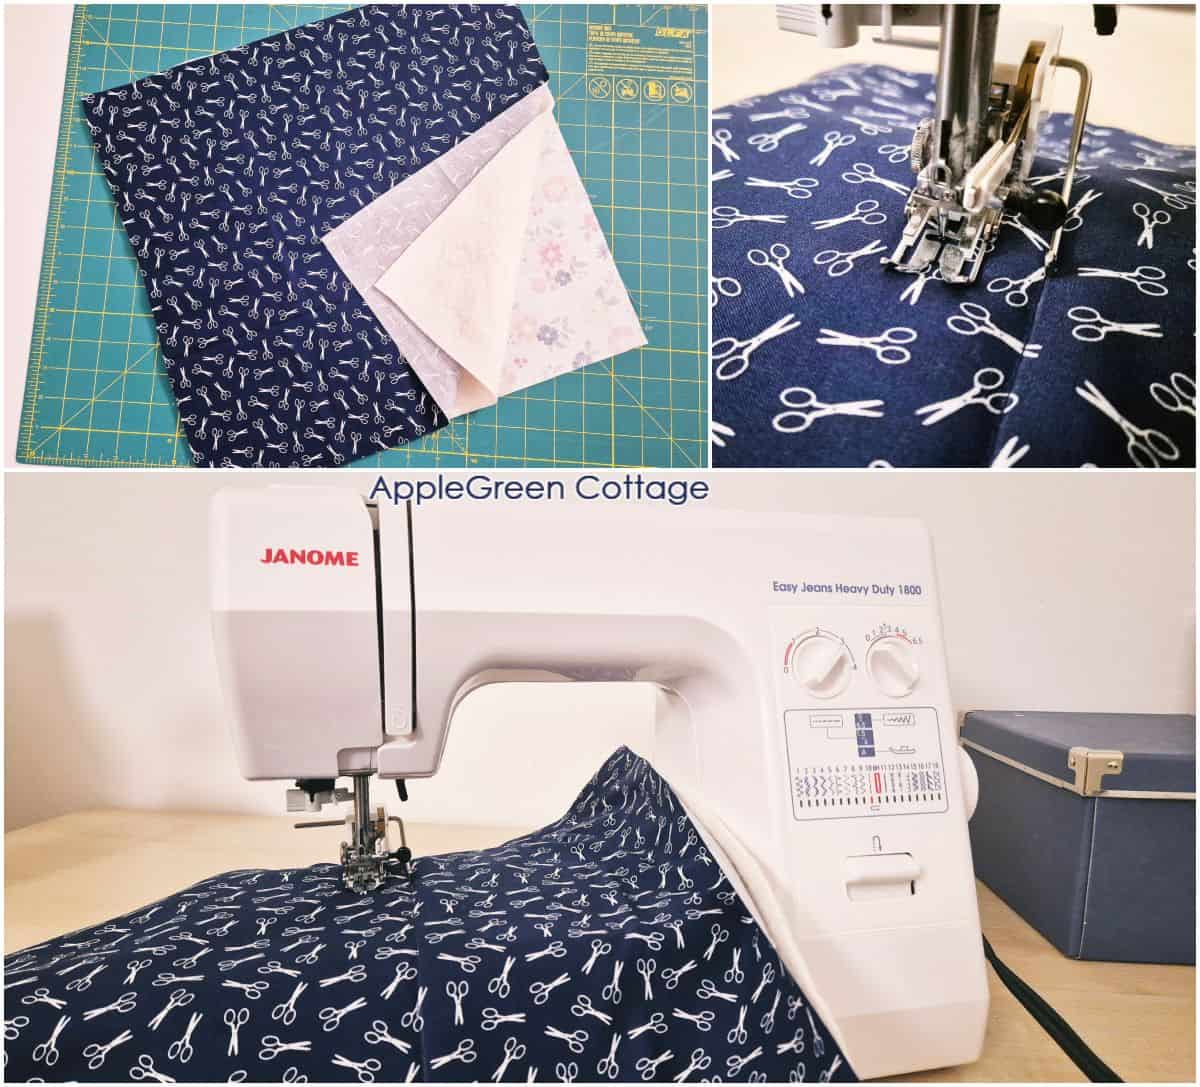
And now make one quilt sandwich for the 2 Side pieces too. Stack, spray-baste, and quilt the layers together just like you did with the Main Piece above.
Step 5 - Cut the quilted fabric pieces
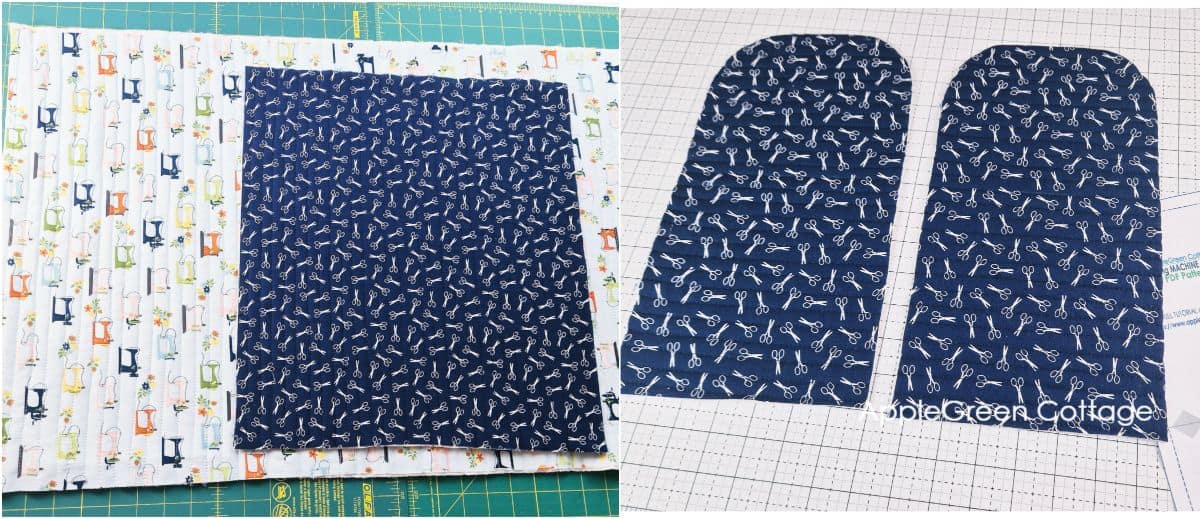
Once you've finished quilting, use the printed PDF pattern to cut
- from the smaller quilt sandwich: two SIDE pieces in one of the 3 sizes you chose (here: navy scissors print)
- from the larger quilt sandwich: trim the edges to get one Main Piece (no pattern piece - just a rectangle)
- for the small domestic machine cover, cut 17 ½" x 29" (width x height)
- for the larger domestic machine cover, cut 19" x 30 ½" (width x height)
- for the semi-industrial, cut 22" x 34" (width x height)
Top Tip - Have an even wider machine?
Have an even wider machine? In Step 2, you extended the width of your Quilted Main piece, this is the only dimension that determines the width of your sewing machine cover. Cut accordingly wider.
Step 6 - Optional - Cutting Directions for Side Pocket and Handles
If you want side handles (no pattern piece), cut two handle pieces from Exterior Fabric 6 ¾" wide x 6" tall. You can interface them with light-weight interfacing.
If you want a side pocket (no pattern piece), you'll also need a piece of Main or Accent Fabric 6 ¾" x 12 ¾". Interface it with light-weight interfacing.
Step 7 - Optional - Create and Attach the Side Handles
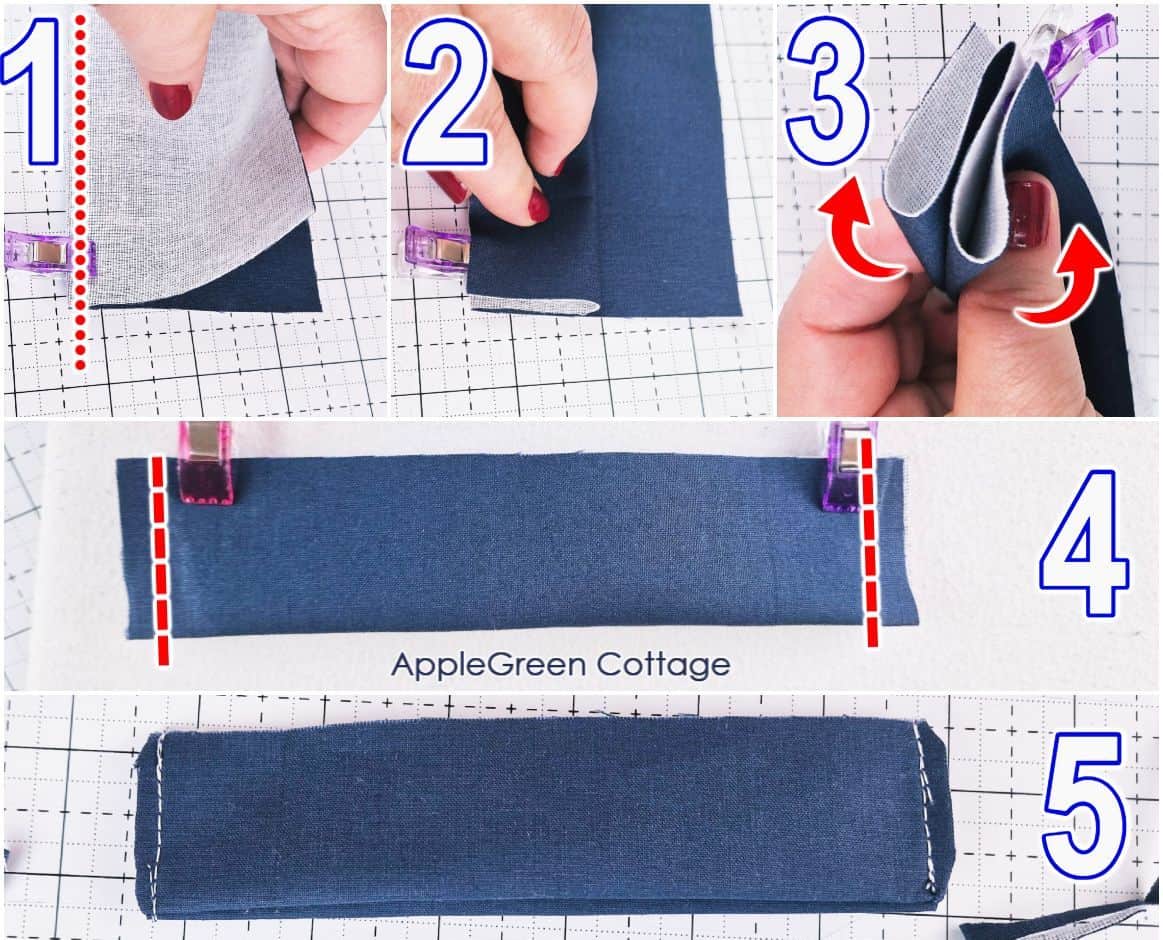
Take the 2 handle fabric pieces and finish the handle ends:
- Fold the handle ends in half along the center with the right sides together.
- Fold one long raw edge back to meet the center fold with wrong sides together.
- Fold the other long raw edge back. The end resembles the letter 'W'.
- Pin and stitch over the short ends using a ⅜" seam allowance.
- Trim the corners on the seam allowance.
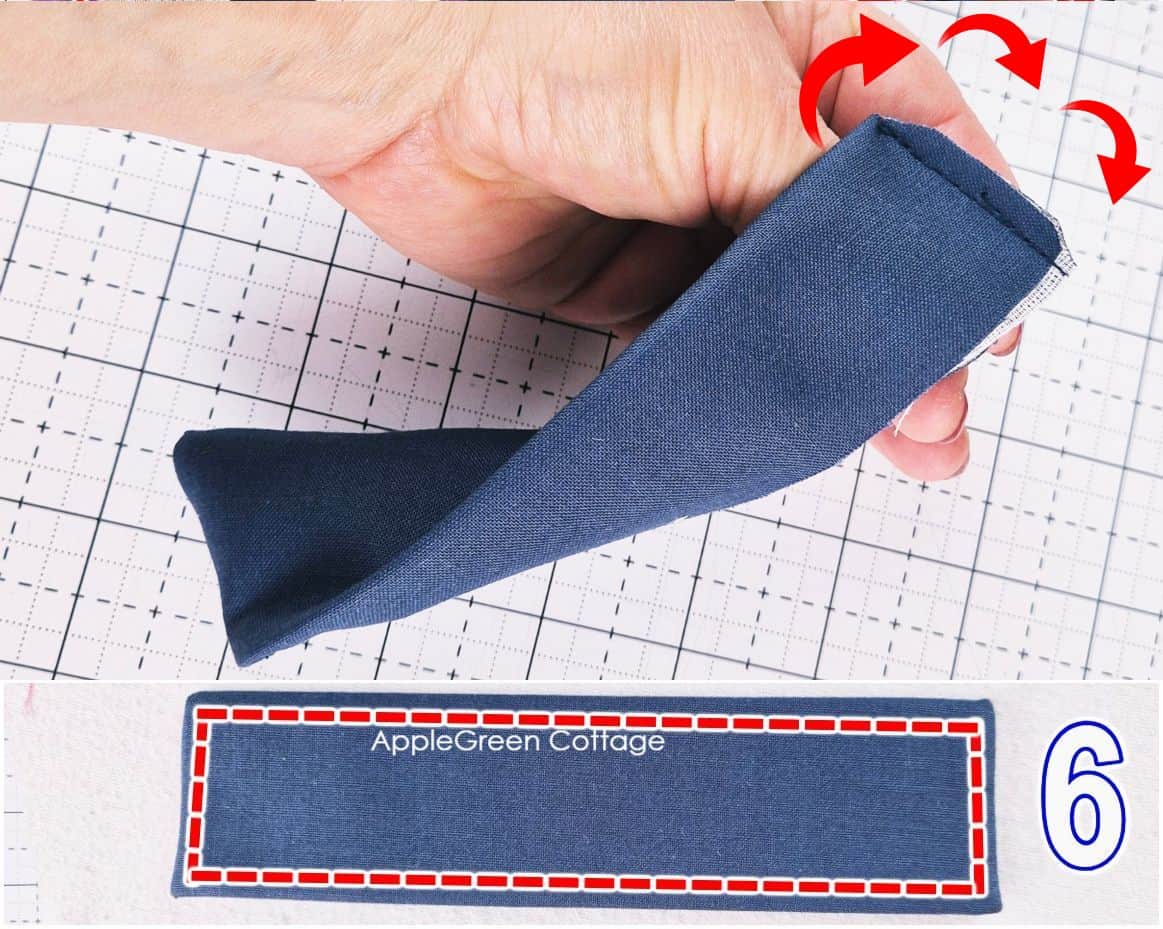
6. Turn it right-side-out to hide the raw seam and topstitch around.
Repeat for the other handle.
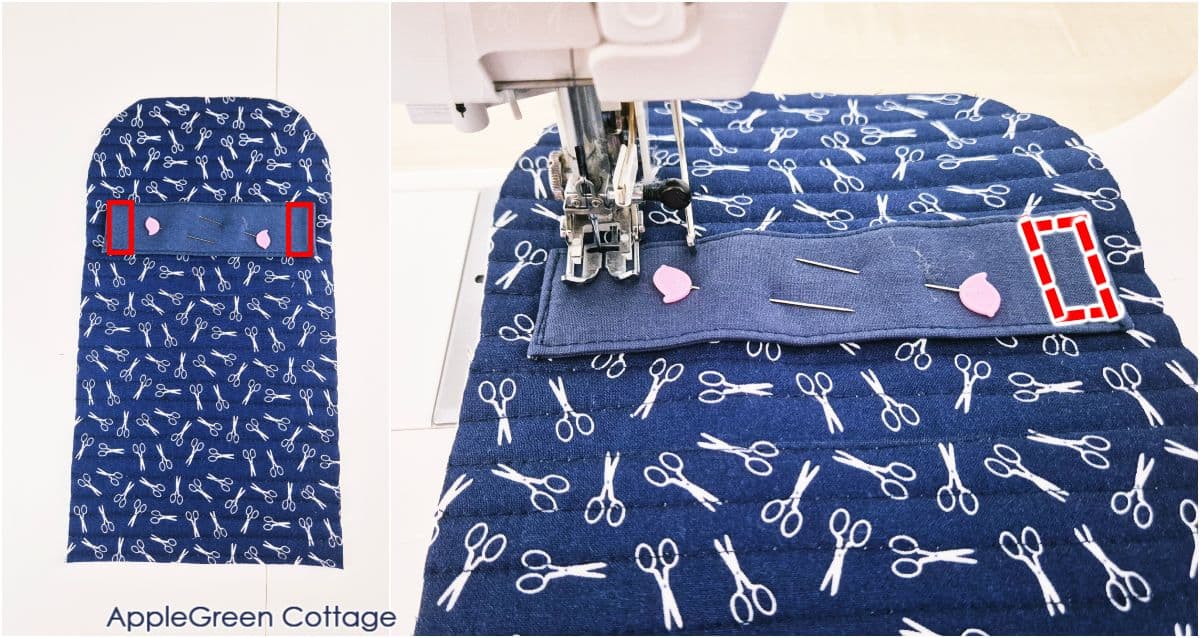
Attach the handles: lay down one Side piece with the right side up. Align and center the handle at 8" or 9" from the bottom of the Side Piece (see the 2 blue notches on the Side pattern piece for help with placement).
Pin in place, then stitch both handle ends to the Side Piece, creating a half-an-inch wide rectangle on each end to reinforce the seam.
Repeat with the other Side Piece and Side Handle.
Step 8 - Create and attach the (Optional) Side Pocket
- Fold the pocket fabric with the right sides together.
- Sew around, using a ⅜" seam allowance and leaving a 3" gap for turning.
- Trim the corners and turn right side out, then edgestitch along the top (folded) edge opposite the turning hole. (The turning hole remains open.)
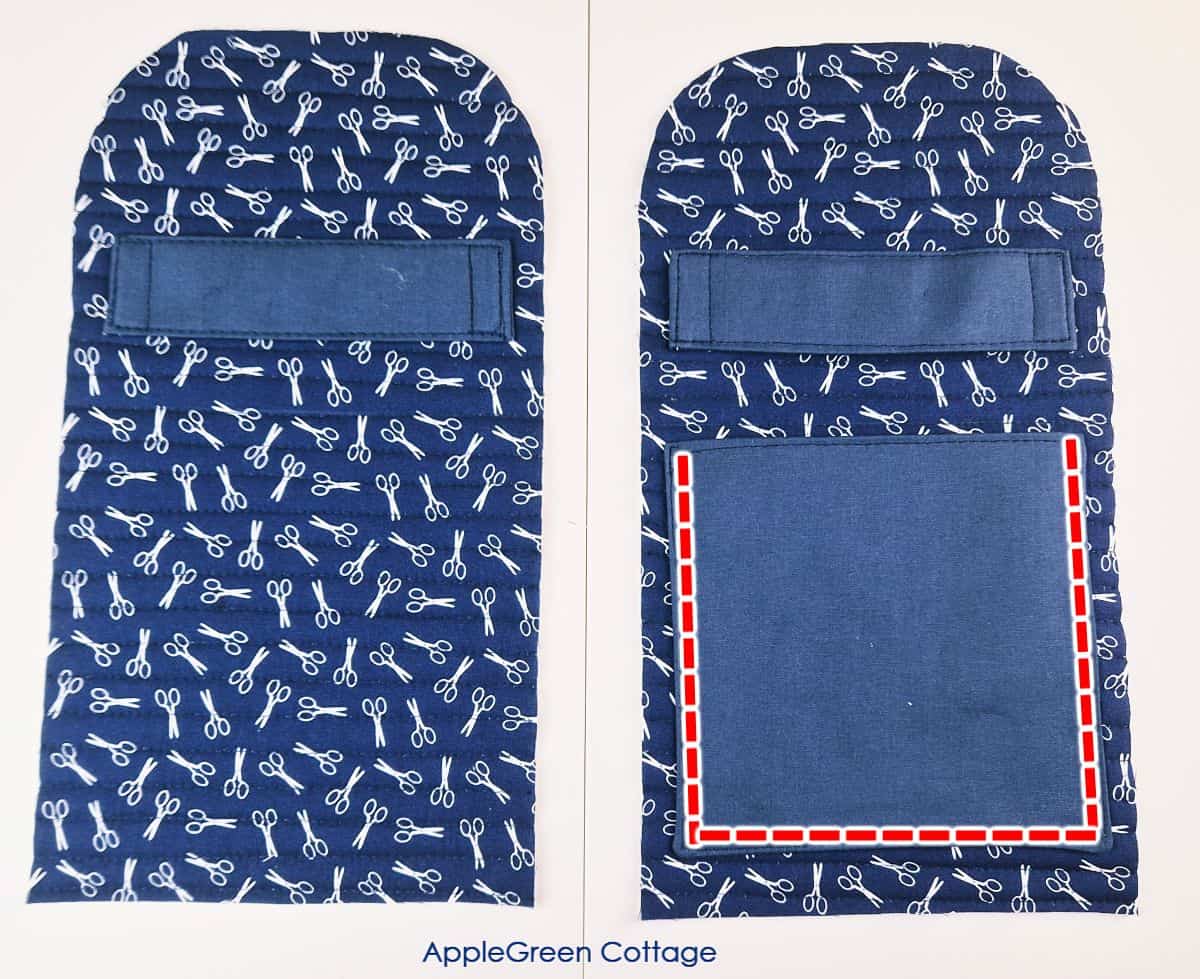
Now the only thing to do is attach the pocket on one of the two quilted Side Pieces: place it about an inch above the bottom raw edge of the Side Piece, centered horizontally, and stitch in place. Secure the seam at the beginning and end. This will also close the turning hole. Pocket done!
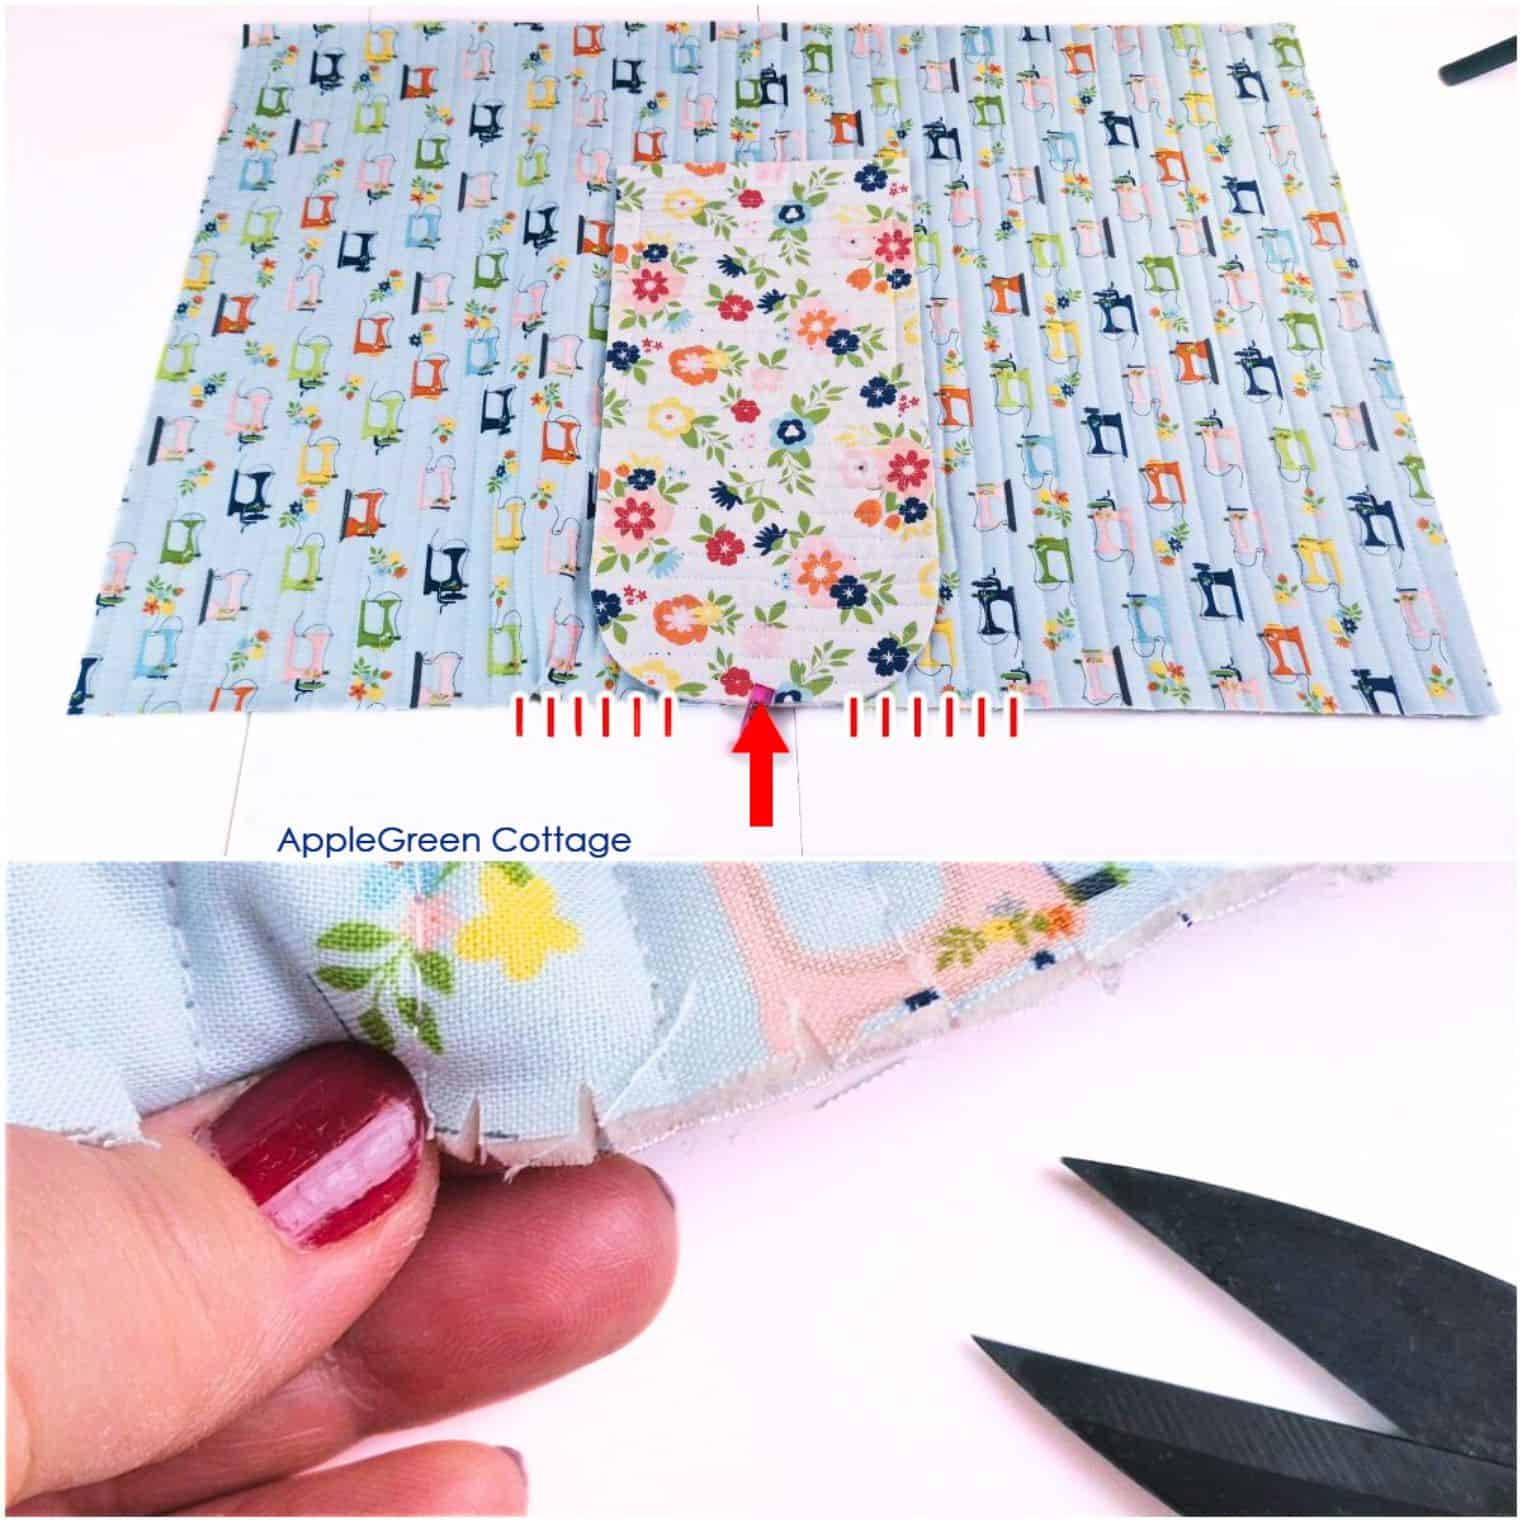
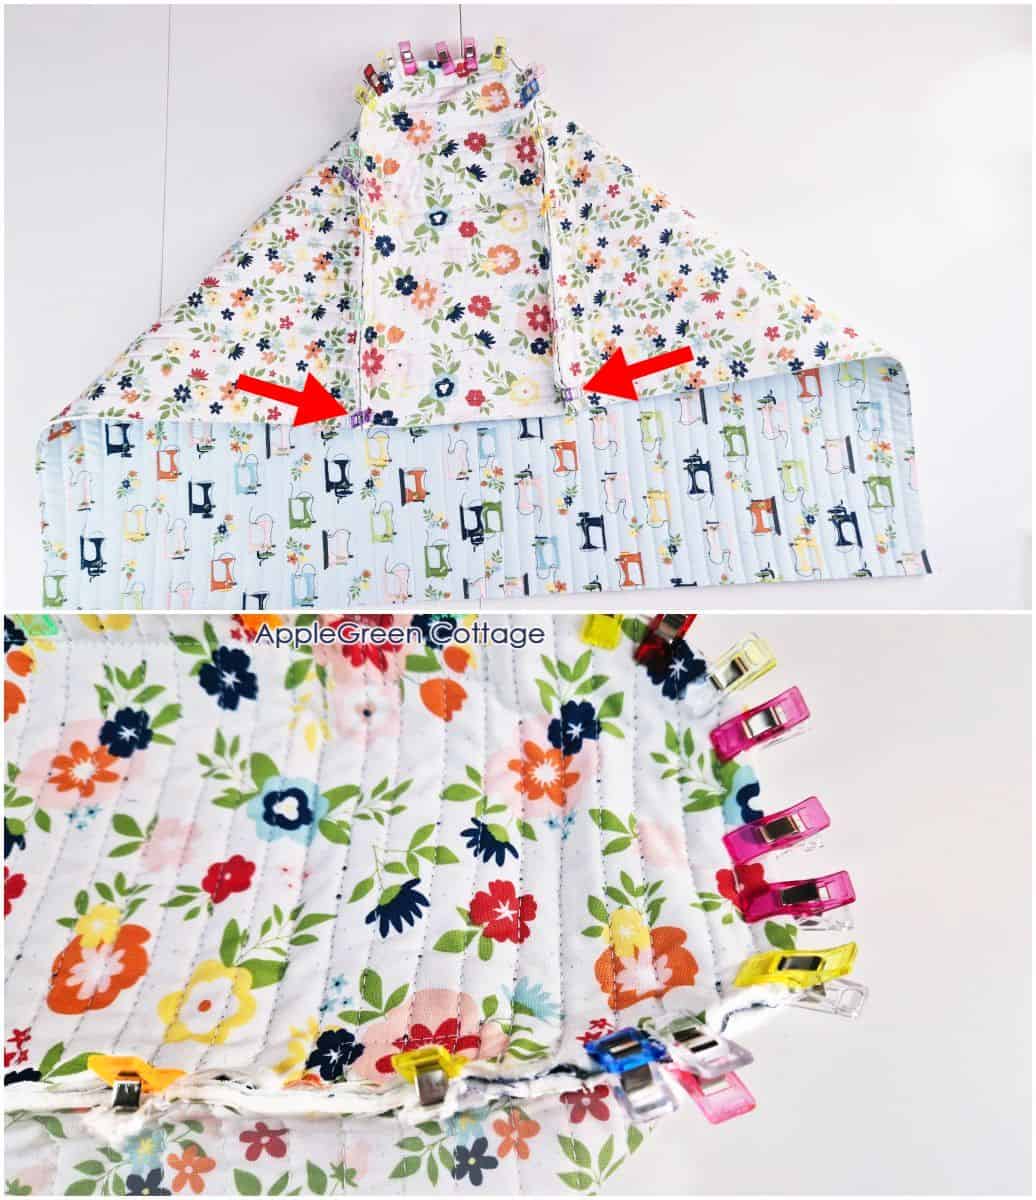
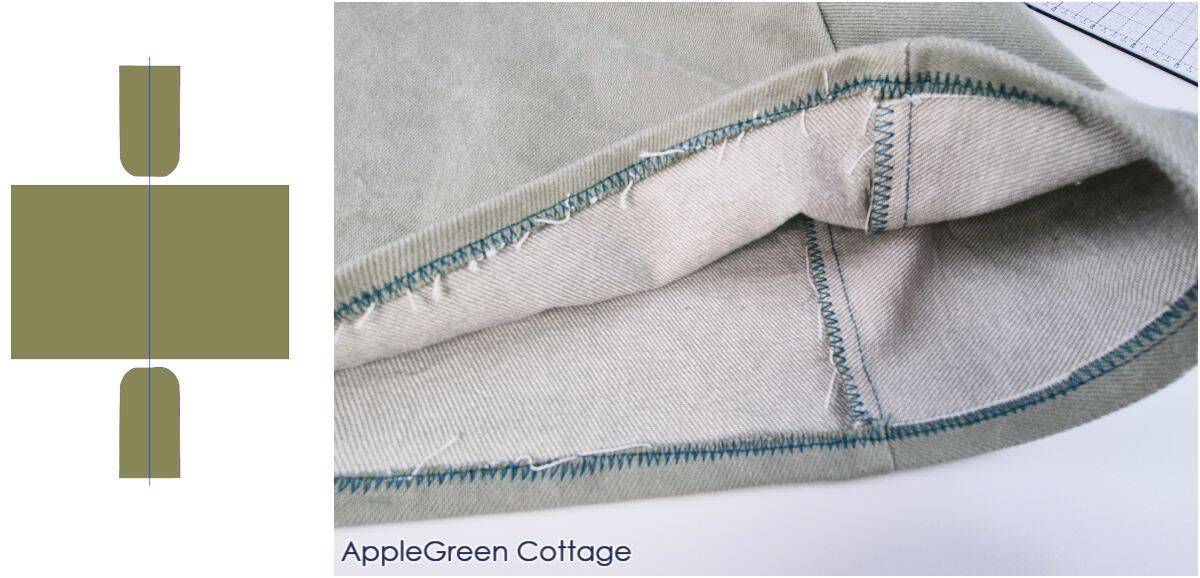
Step 9 - Mark the Midpoints on Pieces
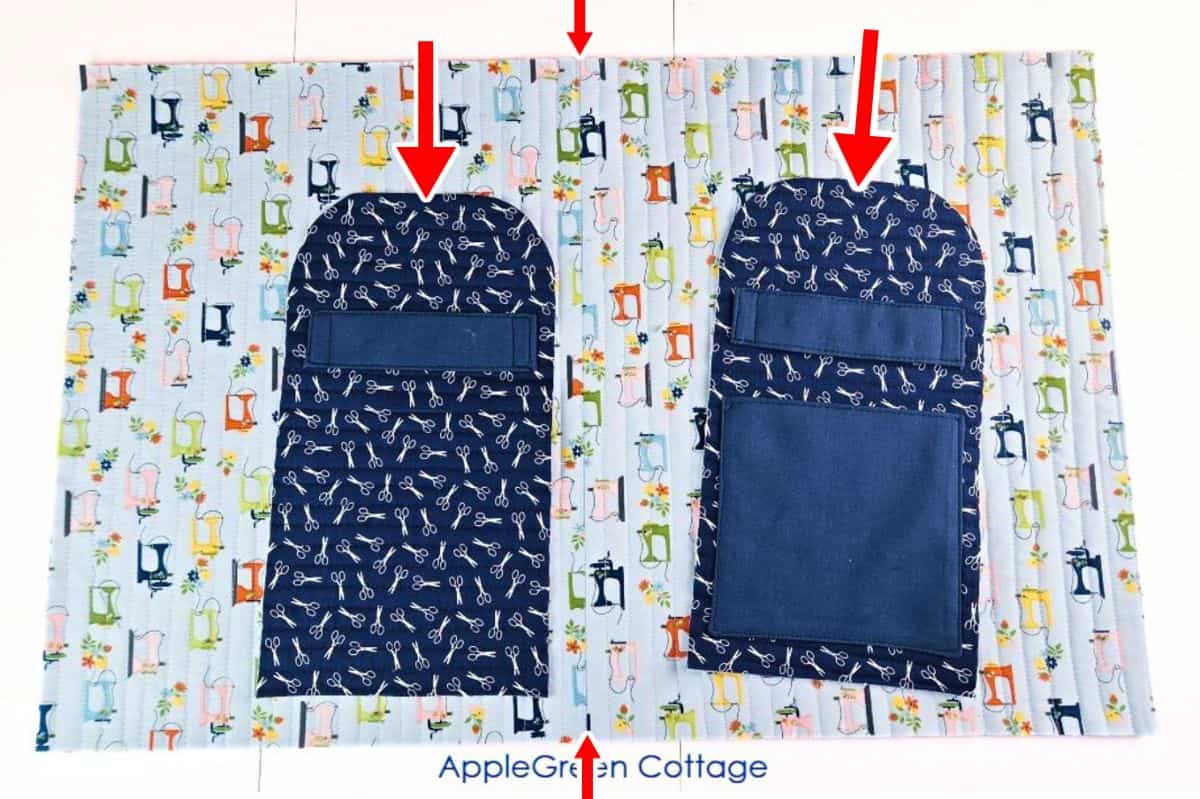
Mark the midpoints on all 3 fabric pieces, as marked by the 4 red arrows in the photo above:
- fold the Side Pieces in half vertically and snip a tiny notch or make a mark on the TOP crease within the seam allowance;
- on the Main Piece, mark the two midpoints at the middle of the long edges.
This tutorial is also part of Printable Tutorials BUNDLE
100 PDF tutorials now, and growing!
Step 10 - Clip one Side Piece to the Main
Now we'll assemble the 3 pieces: the Main Piece and two Sides:
- Lay down the Main Piece with the exterior side up, and the long edge along the bottom. - Place one Side piece on it (Side piece's Lining facing up!)
- Line up the midpoint on the Main with the midpoint mark on your Side piece. Clip them together.
- Make tiny notches into the Main Piece at the portion where the curved Side Piece meets the Main Piece (see Tip below)
- Next, clip the ends together too.
- Clip the remaining portion of the raw edge:
Top Tip - Easing the seam
Ease the MAIN piece on corners: cut tiny snips into the seam allowance of the MAIN piece on the curved corners, no deeper than ¼" into the seam allowance. You can keep them ¼" or ½" apart. The snips will allow the Main piece to spread out so that it's easier to sew.
Step 11 - Sew the Side to the Main Piece
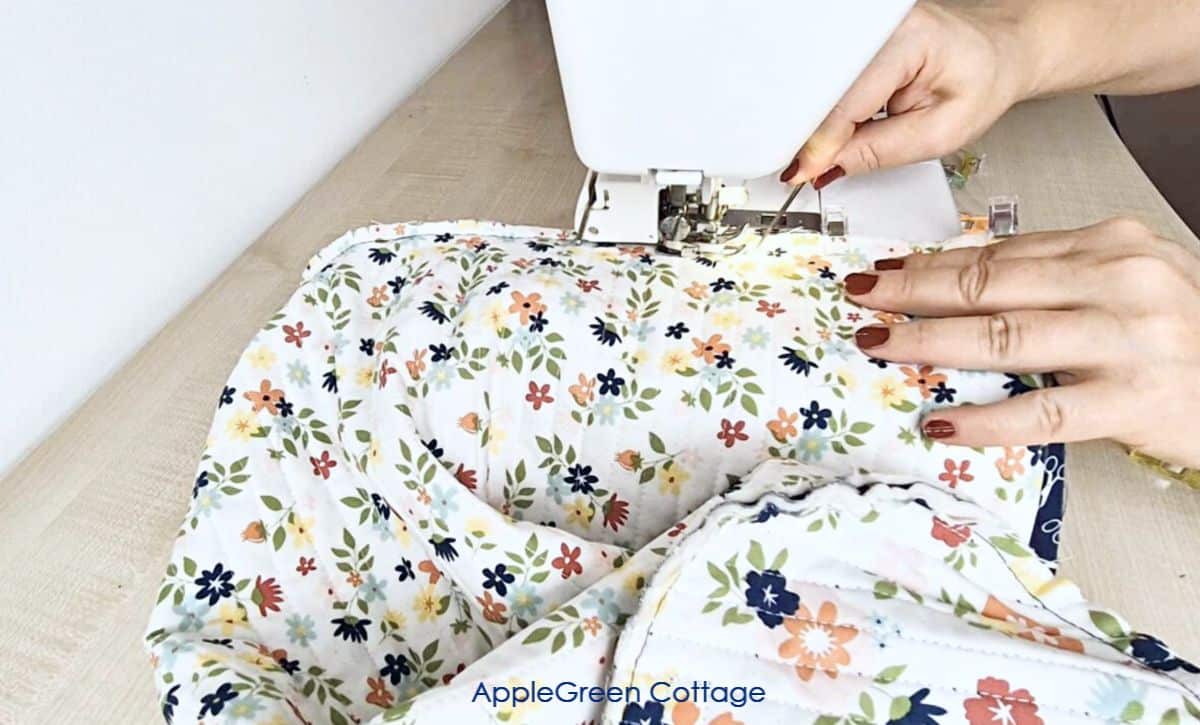
With the Main Piece up, slowly sew along the clipped edge at a ⅜" seam allowance. Secure stitches at the beginning and end.

TIP: A stiletto tool is very helpful in this. It will hold the layers in place as they go under the needle.
Step 12 - Sew the other Side to the Main Piece
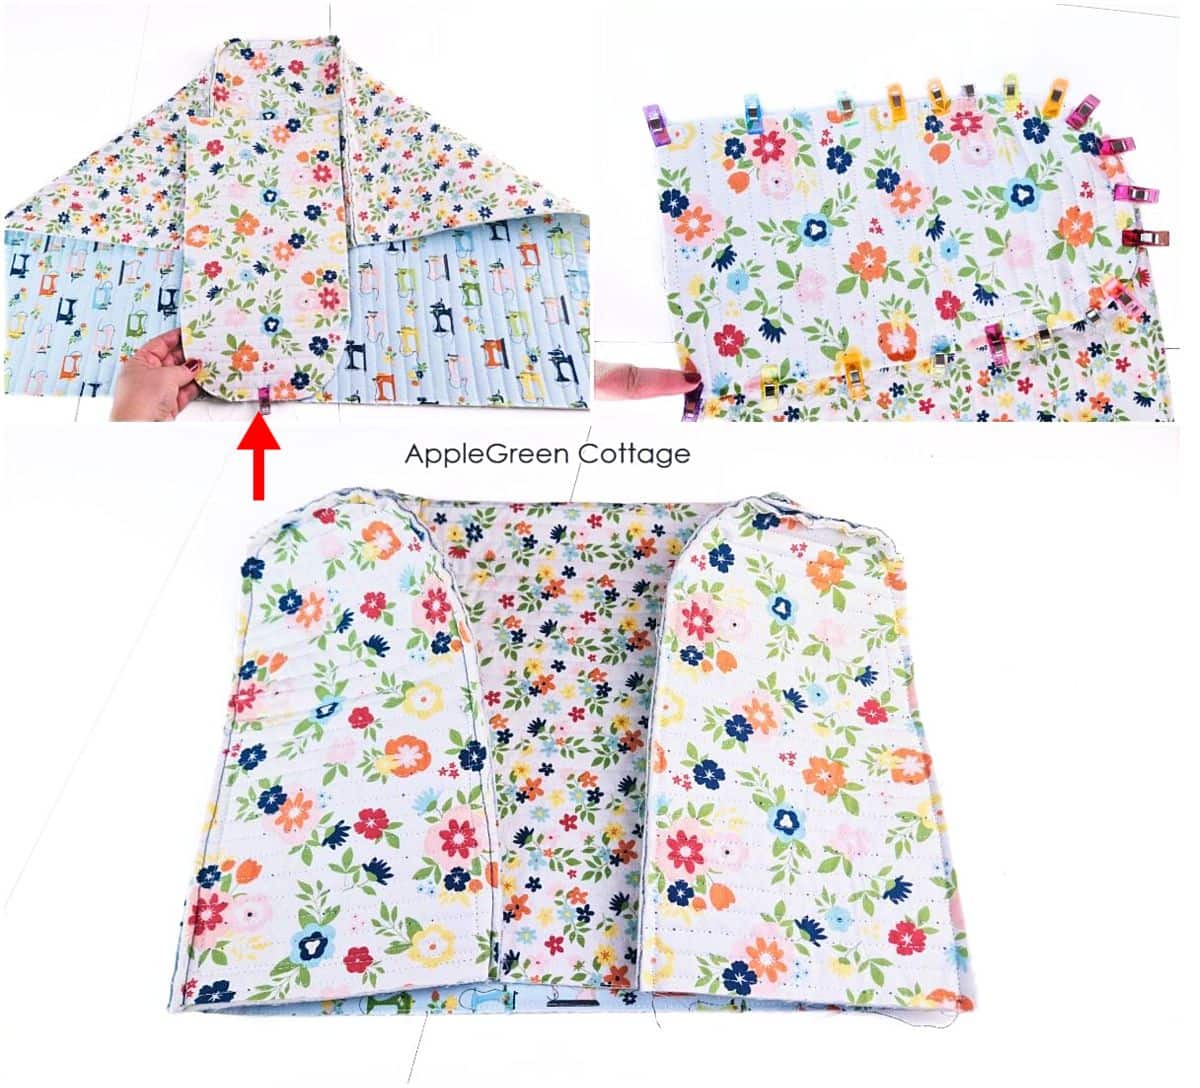
Repeat with the other Side Piece and the other side of the Main piece: align the midpoint mark, pin or clip while easing the seamline, and finally sew using a ⅜" seam allowance.
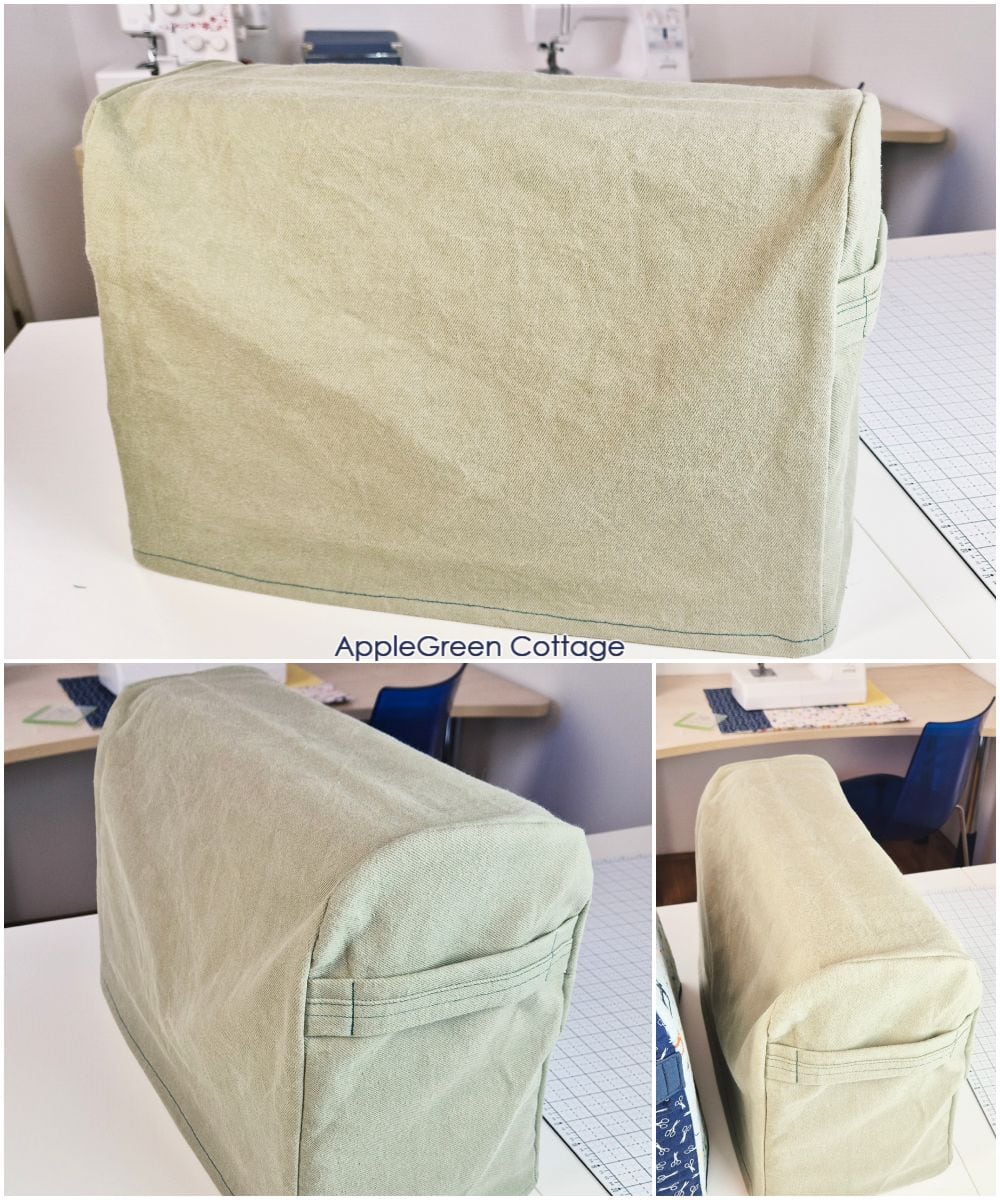
Step 13 - Finish the raw edges inside
Either use bias tape to bind the inner edges or finish the two inner raw edges using a zigzag stitch:
(INSIDER TIP: Zigzag is way easier if you're not used to sewing bags with gussets. Also, nobody will ever see the inside of your machine dust cover if you don't need a reversible one. 🙂
If you want a reversible sewing machine cover, see a tutorial on how to sew bias tape to the inside seams, or see these photos for a quick recap: ↓
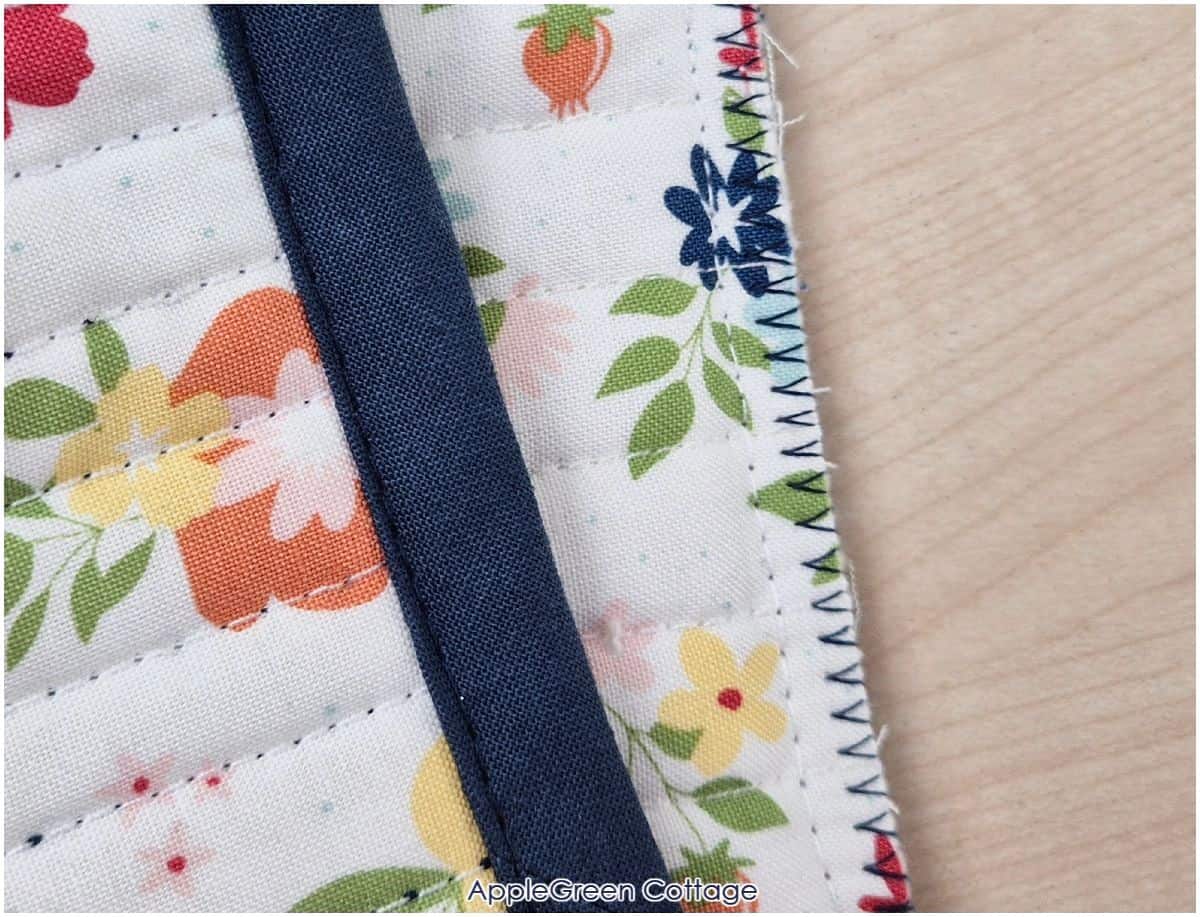
Add Bias Binding Tape to the inside raw edges
Tip: Want to make your own bias binding tape?
With just a fat quarter of quilting cotton, you can make several yards of half-inch wide double-fold binding. See here how to make bias tape from fabric that YOU choose!
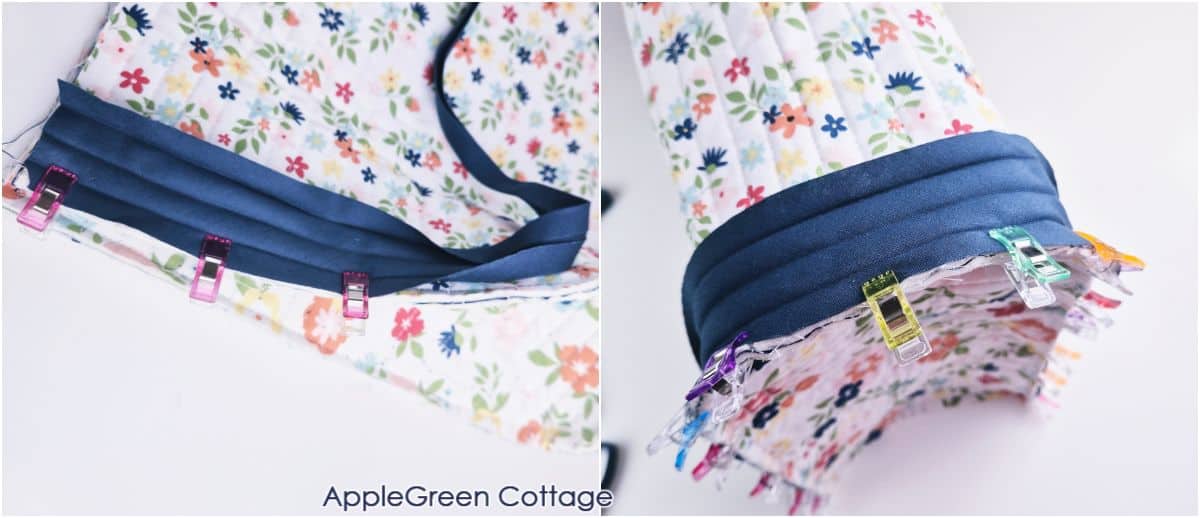
- Cut twice 1 yard of a 2" wide bias tape.
- Switch the thread: top thread should match the binding color, bobbin thread should match Lining color.
- Unfold the bias tape and place it on the raw edge (bottom) of the Main Piece. The binding and the Main Piece Lining's fabric must be placed with the right sides together.
- Clip the bias tape all around the raw Main Piece edge.
- Once you come to the other side, cut off excess bias binding tape.
- With the Main Piece Lining facing up, sew the bias tape on, using a scant ⅜" seam allowance (just a bit under ⅜").
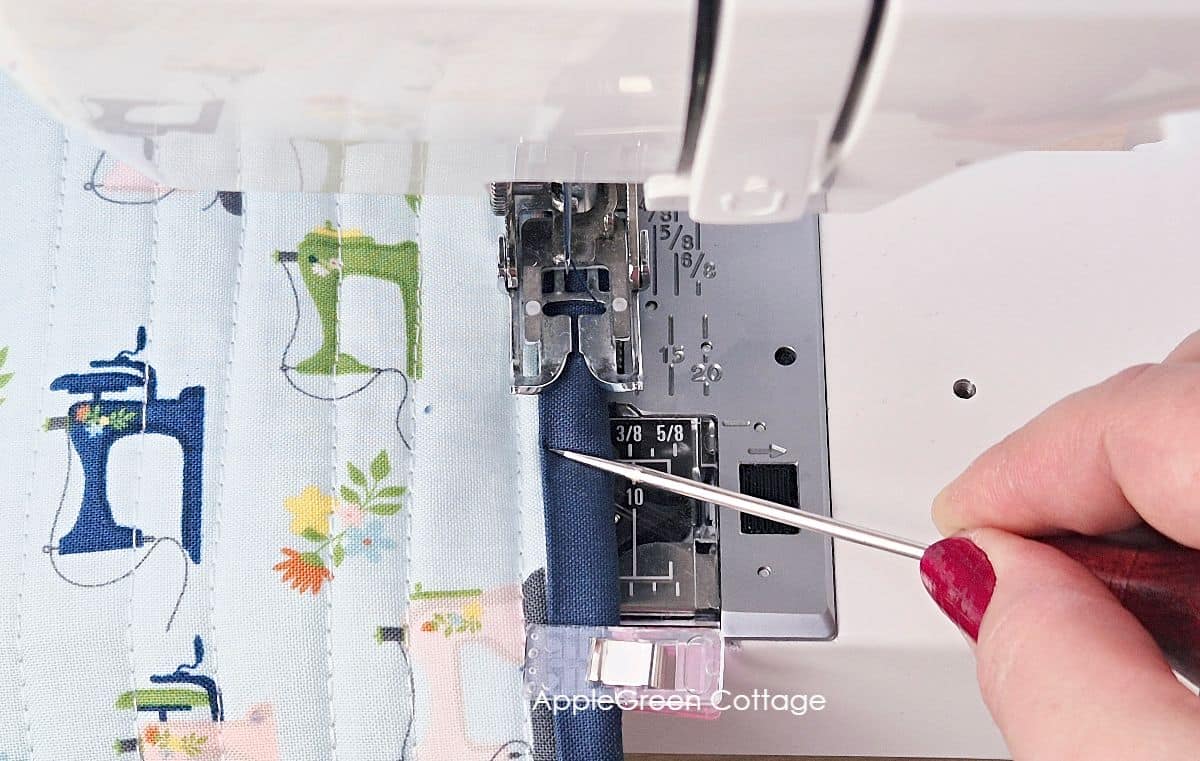
TIP: Use a stiletto tool to keep the binding in place and tuck it under the machine foot where needed.
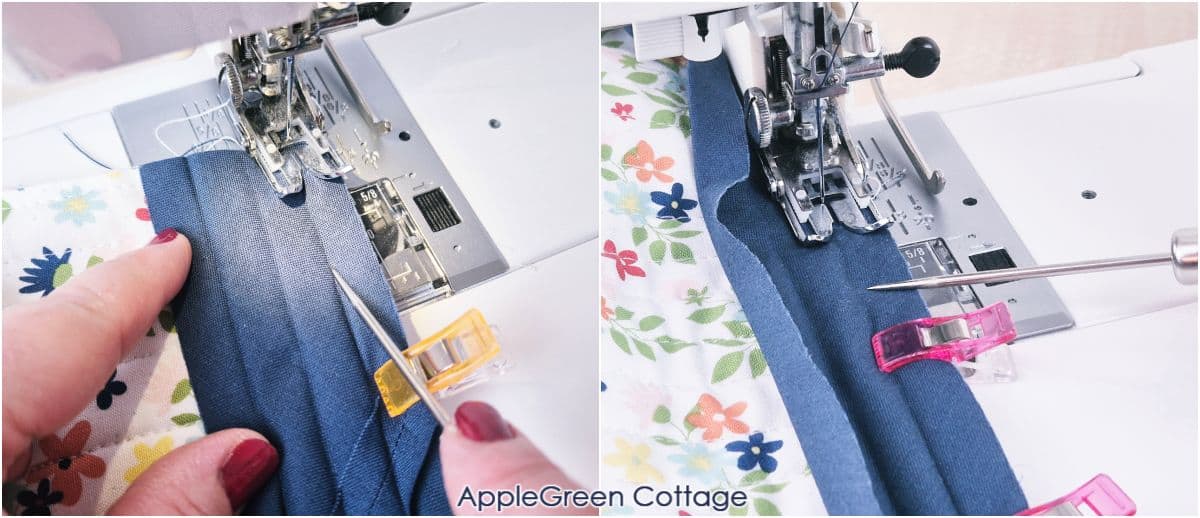
Finish the other side of seam binding:

- Fold the bias tape over and wrap it over top of the other raw edge of the Main Piece. It should cover up most of the stitching. Clip in place.
- With the Side Piece placed upwards, sew the folded-over bias tape in place, stitching very close to the binding edge.
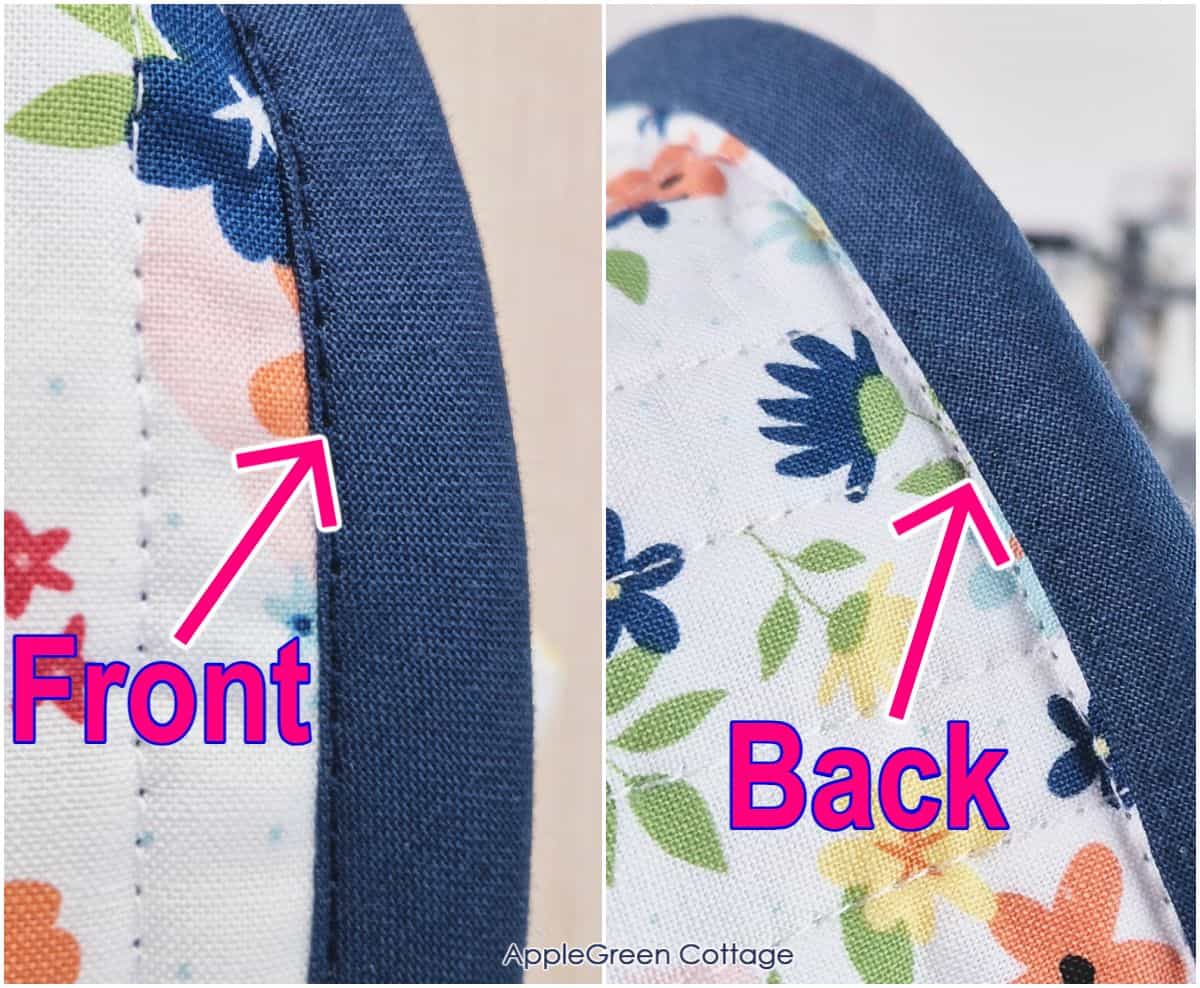
This is the finished seam: the top sewing thread in the color of the binding, and the bobbin thread in Lining color. Nice!
Repeat on the other inner raw edge:
ALTERNATIVES: If you're a quilter, you might not be used to this, but I'll share a 'secret' from the bagmaking world: a faster and officially wrong way to attach bias tape (and not as neat) is to simply tuck it onto the raw edge, clip, and sew it on with one single seam, using a ¼" seam allowance. One seam will get both sides. Just sayin', in case you're in a hurry, and have made your share of bound seams on bags.
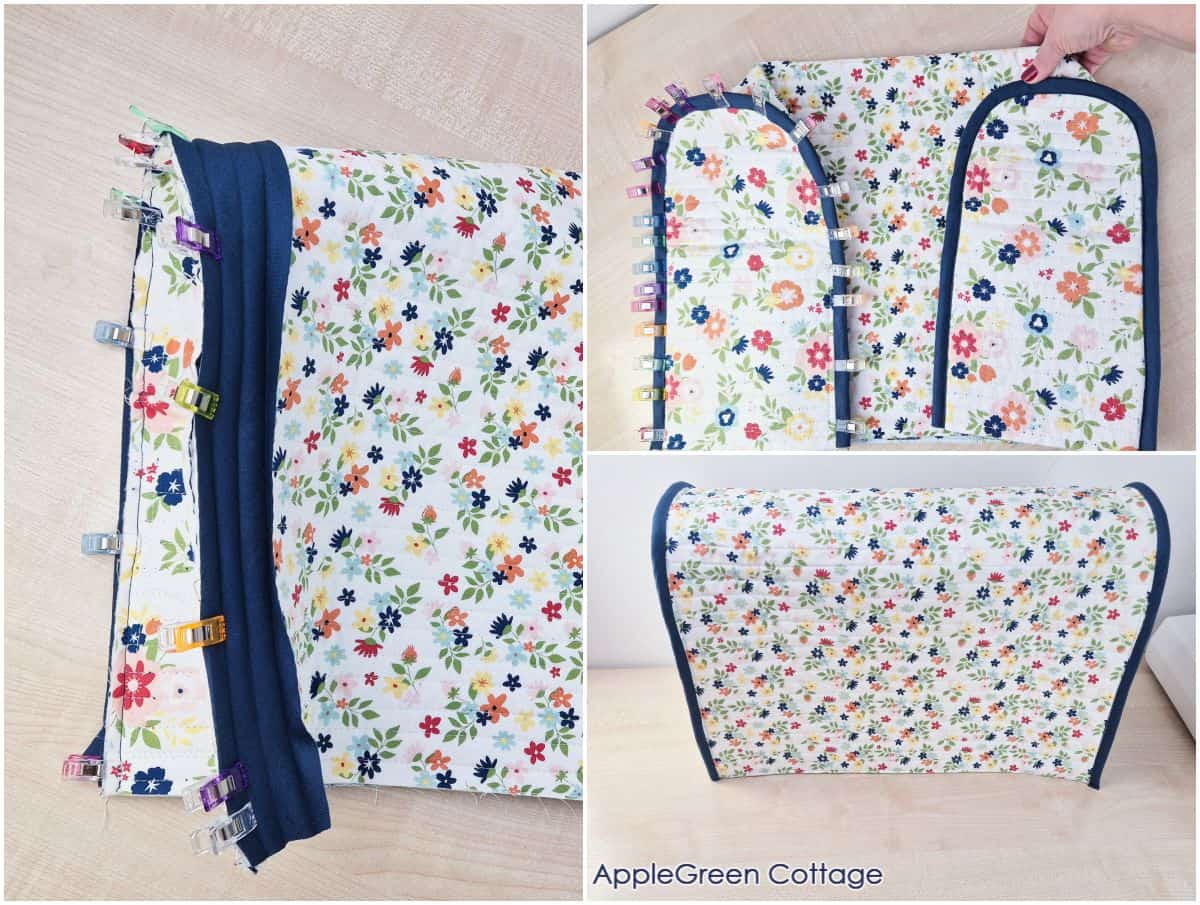
Step 14 - Bind the Bottom Edge
Use the 2 ½" wide (straight-grain) quilt binding to finish the bottom edge of your sewing machine cover - when folded, it's 1 ¼" wide. I used straight grain binding on the bottom edge because there are no curves here. Also, the double layer makes the bottom edge more durable.
Quilt Binding Tip
Here's how to sew quilt binding (straighT-grain binding) if it's new to you. It's faster to cut than bias binding.
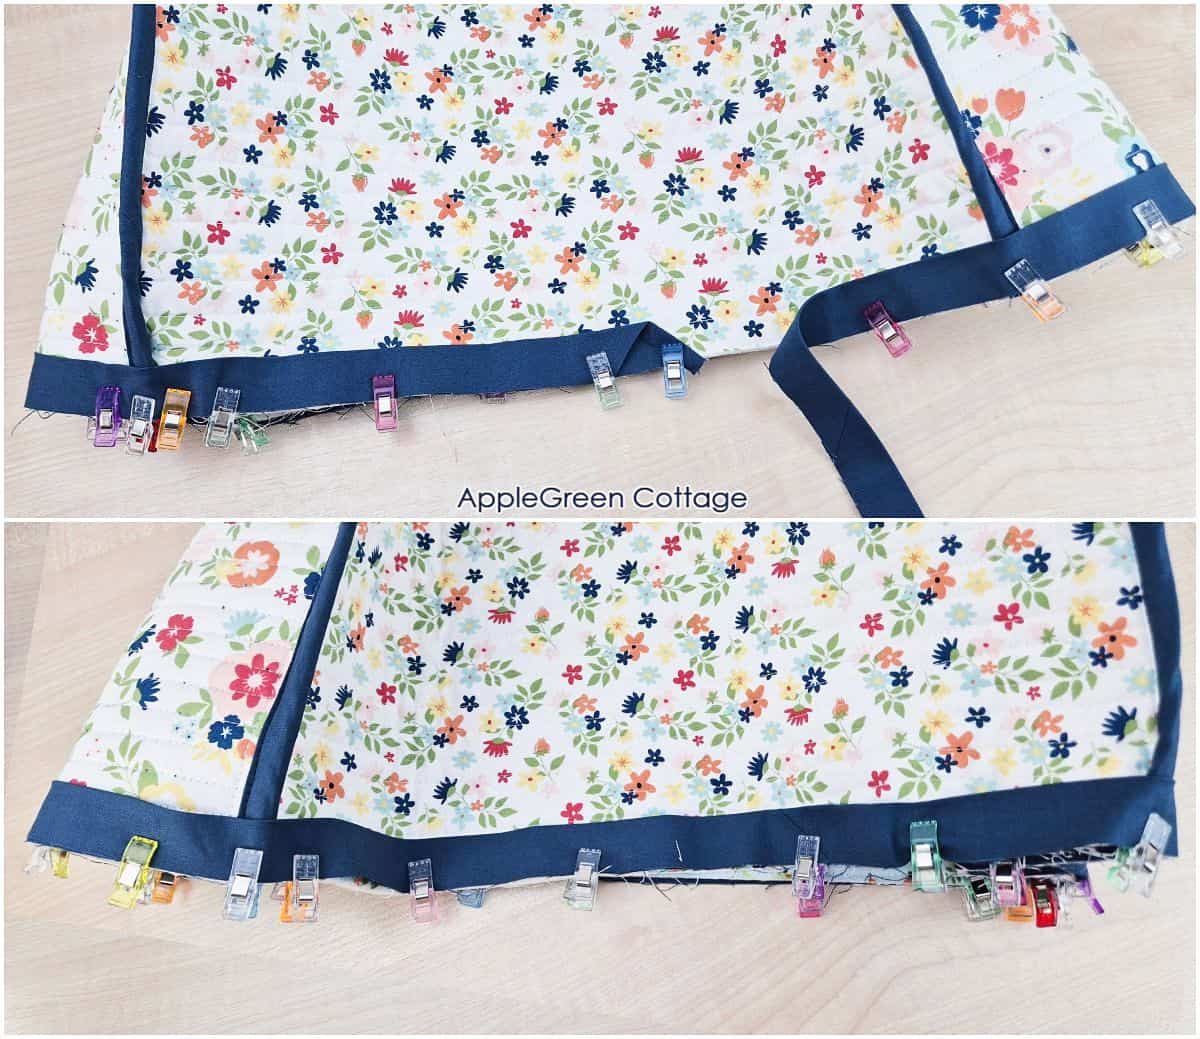
Here's a quick how-to: with the Lining still on the outside, clip quilt binding around the entire bottom edge. (I use this binding hack to make the joining seam super simple!) Sew just ¼" away from the raw edge to attach the binding.
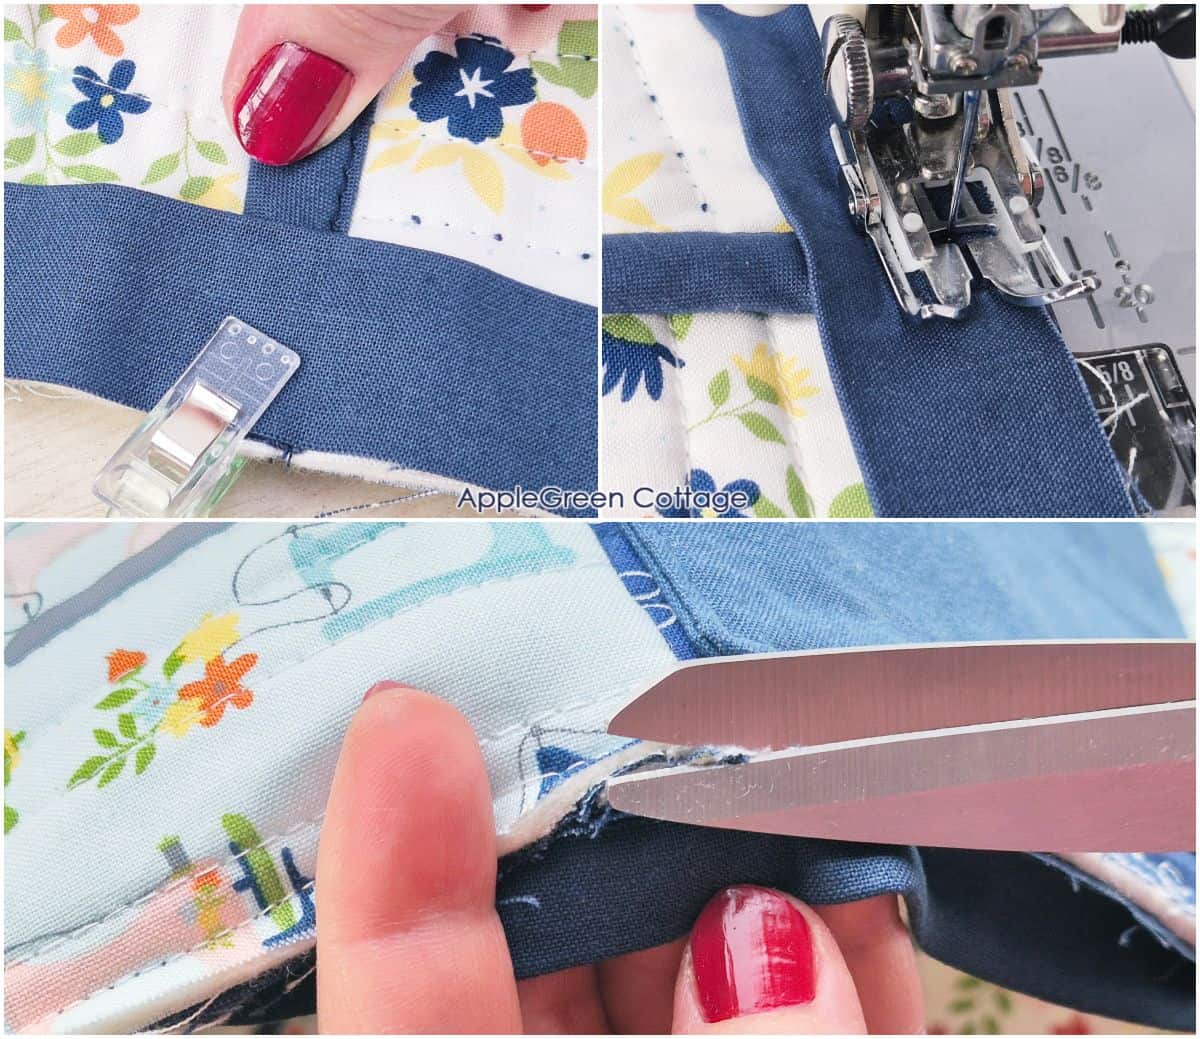
↑ Bonus TIP:
Here's how to reduce bulk at the spots where you had bias tape: I flip the bulky binding to one side and clip it flat, sew over it slowly, and once sewn, snip off a few bits of the excess in the seam allowance.
Fold over the quilt binding to the exterior sewing machine cover side. Clip in place and sew in place from the outer side.
Again, using the top thread in binding color and the bobbin thread in the Lining color will make the seam less visible and neater. This is a great way to hide an occasionally uneven stitching line, I do it all the time!
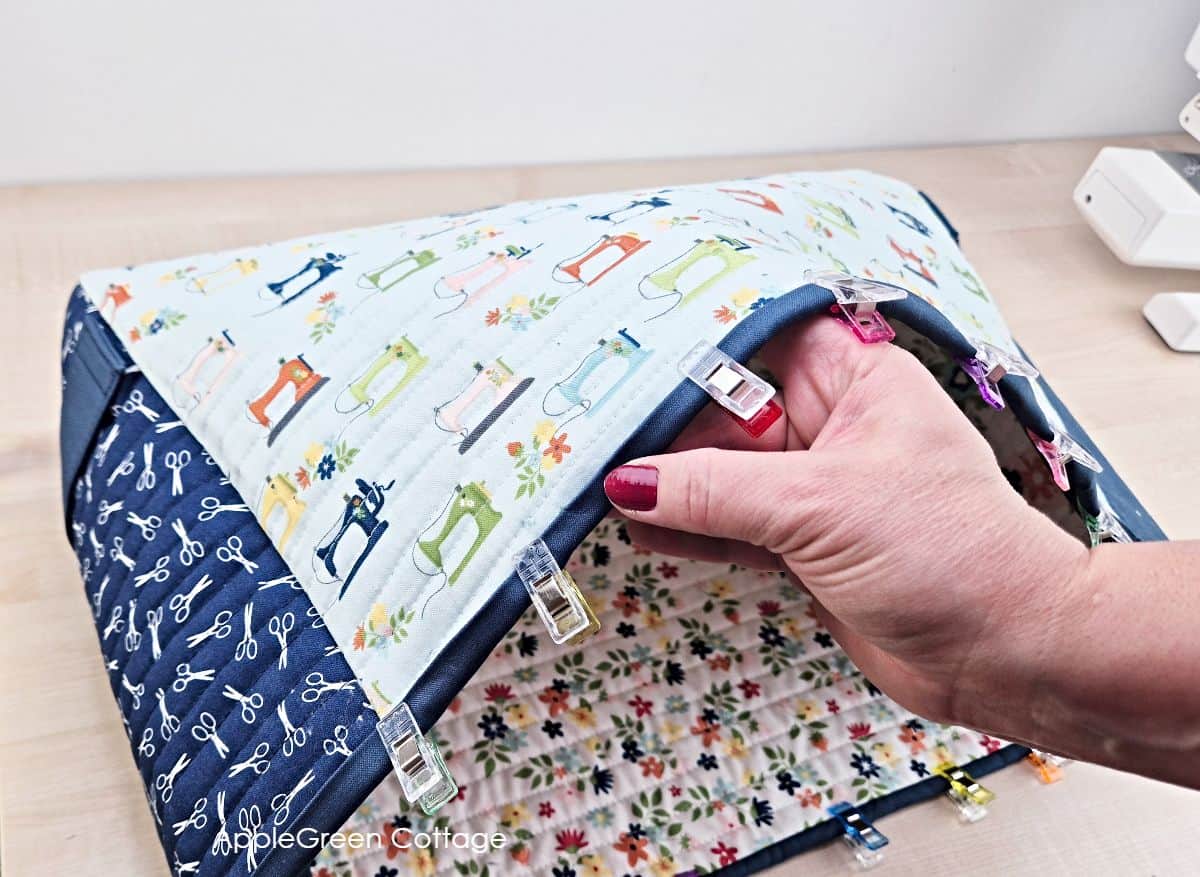
Finished, congrats! If you don't mind occasionally hiding the handles and the optional pocket, you can choose which side of your sewing machine dust cover to showcase. I find the lining side so pretty with these flowers!
6 Quilty Ideas +BONUS
Love a quick quilty win? Don't miss THESE!
Make a Matching Sewing Machine Mat!
Sewing Inspiration
Would you want to make a simple sewing machine mat to go with your sewing machine cover? It's easy!
See this mug rug tutorial at Applegreen Cottage. To increase the size, simply double the cutting dimensions from the tutorial - and feel free to add an extra inch here and there, on outer edges.
This machine mat turned out the perfect size for me: 23″ by 17″.
Now, as promised, a list of tips and ideas to make it easier for you. Feel free to comment below if you have a question and I'l try to answer it here:
Helpful Tips and Popular Questions
Simple. Switch the thread when sewing the binding: the top thread in your sewing machine should match the binding color, bobbin thread should match Lining color.
Even thoguh you'll mostly use a yard and a half of fabric, set aside 2 yards, one for exterior and one for the lining layer. Don't forget about the batting - you'll just need one layer of batting, a yard will be more than enough.
To measure your sewing machine for a cover, measure the length from one side to the other along the longest side, the height from the base to the highest point, and the width from the front to the back, including any knobs or protrusions.
Variations - Make It Easier - A simple Sewing Machine Dust Cover
If you don't quilt and don't mind a slouchy cover, here's a super quick way to sew a sewing machine dust cover, using the same pattern as above. It does not stand on its own, and it's just about the function, not the looks.
But it is an easy sewing machine cover and will sew up faster than a quilted one. This is how to whip it up:
How to sew a cover for sewing machine - Simplified Steps
1 - Use my free pattern to cut three fabric pieces from canvas or duck or some other home-decor-weight fabric: one Main and two Side Pieces.
2 - Once cut, sew the Side Pieces to the Main Piece, using the tutorial Steps 9-12 above.
3 - Finish the inner seams with a zigzag stitch.
4 - Finish the bottom edge by first sewing a zigzag stitch around, and then turning the edge under by ⅜". Press the fold and topstitch all the way around. Super simple, not fancy, but it does keep dust away from your sewing machine.
I couldn't help but fold some fabric to create impro handles. They are different, and the tutorial above has a better way to add handles - see Step 7.
Let me know if you'd like a separate, full-fledged tutorial on this simplified sewing machine cover too.
Related
Looking for other projects like this? Try these:


Conclusion
If you enjoyed this pattern for a sewing machine cover, share it, like it, or tell your friends about it. Use the hashtag #applegreencottage when you post a photo of your machine dust cover - so I can take a look!
Want a printable copy of the whole tutorial?
Want a printable copy of the whole tutorial?
Prefer a full, ad-free and printer-optimized Printable Tutorial with both instructions AND pattern included? ↓↓
This tutorial is also part of Printable Tutorials BUNDLE
100 PDF tutorials now, and growing!
And if you want to create even more, check out all the free sewing patterns here at AppleGreen Cottage. Or visit our new FREE sewing-for-home email series:

Join the FREE 7-part email course and make 6 beautiful items for your home! You'll love it!

Jen says
As with ALL your patterns and tutorials...this was phenomenal! I don't love quilting, so I sewing the interior and exterior separately and then put them together like a market tote and left a section at the bottom to turn it all right side out and then top stitched the bottom. It turned out perfect! I also used deco-bond fusible interfacing on the interior pieces to give it more structure. LOVE!
Damjana Jakos says
Jen, you’re so creative! That’s a great way to go if you want to skip the quilting part – honestly, that’s a very pro approach you described. Love it!
Michelle Shiloh says
Thanks for the sewing maching cover pattern and instructions! Just finished and I love it!
Damjana Jakos says
Michelle, that’s wonderful to hear - so happy you love it!
Daria Wampler says
I can't wait to make this sewing machine cover for my 3 machines. I hate using the hard covers to cover them or just putting a towel over them to keep the dust out. Thank you for sharing this project with us.
Damjana Jakos says
Daria, I totally get that - fabric covers are such a nicer solution. I’m glad this project came at the right time, and I hope you enjoy sewing covers for all three machines!
Roxy Bauman says
My machine has a carrying handle on the top. Have you any suggestions as to how I might adapt this pattern to accommodate? TIA
Roxy
Damjana Jakos says
Roxy hi, a great question. You'd have to create a narrow opening in the center of the main piece before you attach the sides of the machine cover. Measure the width/length of your machine handle and cut a slit into the middle of the main piece just 2" longer than the handle. Then, I'd use quilt binding to cover the raw edges, starting to apply quilt binding on the lining side of the Main piece. Then flip and stitch from the outer side to fix the binding in place. I hope this helps. Happy sewing, Damjana
Roxy Bauman says
Thank you! I’ll give it a shot.
Louise says
Where do I download the free simple patttern?
Louise
Damjana Jakos says
Hi Louise, the simplified version uses the same pattern listed in Step 1 of the main machine cover tutorial—only the sewing and assembly steps are easier. Enjoy, Damjana