
Super practical and cute! Sew an easy diy jewelry organizer using my latest pattern that's free for all newsletter subscribers. No more searching for your earrings and a matching necklace - and no more tangled mess!

Prefer an ad-free printer-friendly option of the whole tutorial+pattern? See the → optional PDF file in our shop.
If you like diy organizing, you'll love these free patterns, too:
- Small Hanging Basket pattern
- 17 Amazing Diy Storage IDEAS
- This Free Pattern is PERFECT for your desk or kitchen counter
- Or try our new, popular SewPretty HOME series:

Join the FREE 7-part email course and make 6 beautiful items for your home! You'll love it!
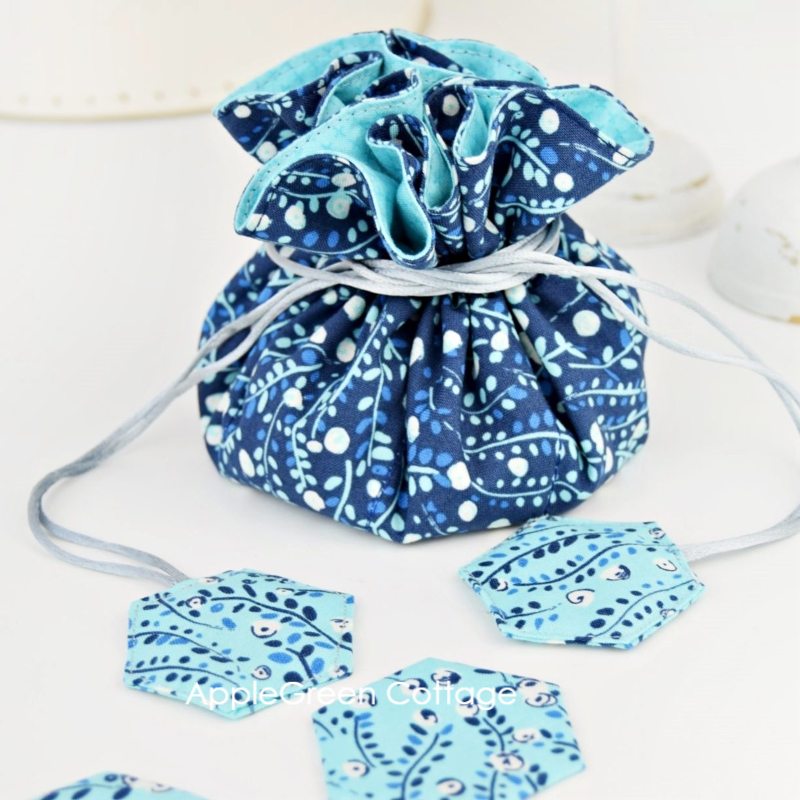
Diy Travel Jewelry Organizer
Table Of Contents
I have a confession to make: I hardly ever take my jewelry with me on vacation. Why? Because I always get a tangled mess trying to keep them in my old cosmetic pouch. While I have a pretty much well-working solution for necklace storage in my home (THIS super simple necklace hanger - works perfectly!), I honestly needed a sound travel-proof jewelry storage solution.
Now I'm showing off what I made, and showing you how to make a jewelry organizer for necklaces and earrings. You know, just in case you need one. Or know someone who'd love this cute circular pouch as a gift.
Now back to sewing your new, homemade diy jewelry holder. So, how do you make a travel jewelry pouch?
What Fabric to Use for a Jewelry Organizer
You know I love quilting cotton. Not just because it's available in all the prints and colors I can imagine, but also because it's not stretchy, it's lightweight and durable enough for travel.

But canvas, linen, or microfiber work great too, as they are all sturdy and breathable. Worried about humidity? Go for a water-resistant fabric!
And how much fabric do you need? You only need two fat quarters of fabric and 2 yards of cord.
Features
- a padded center storage area to stash larger pieces of jewelry, such as watches and bracelets,
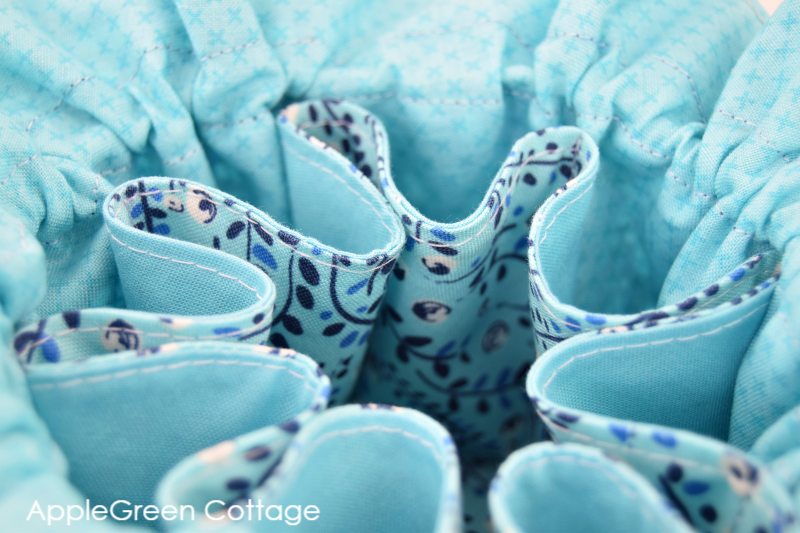
- eight inner pockets provide convenient storage for rings and smaller items
- the satin cord cinches the top closed and prevents tangling
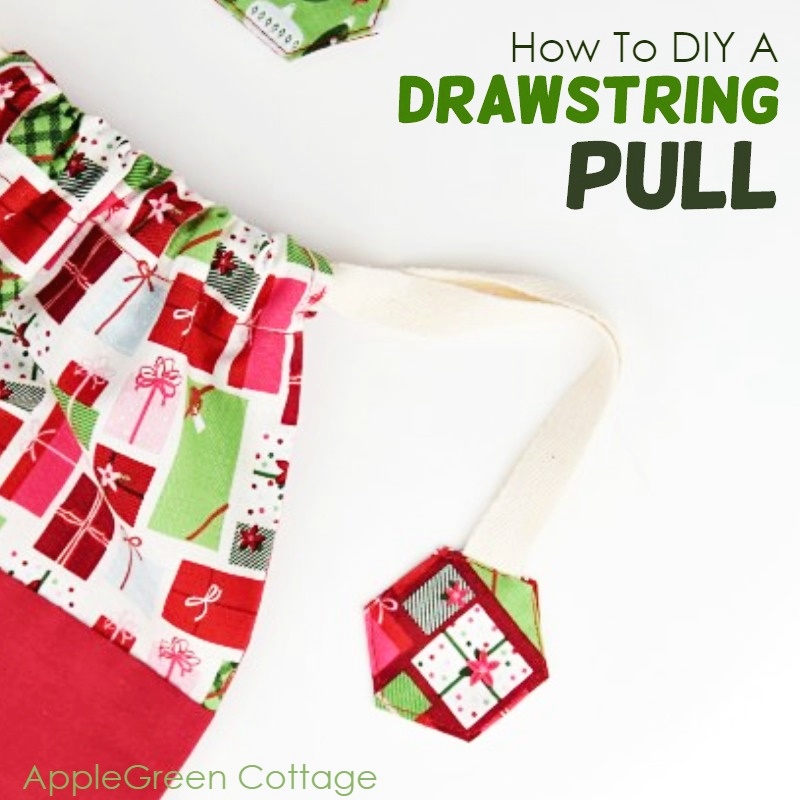
- cuteness factor plus easier closure: hexie pulls! (Get the free EPP hexie templates here)
Oh, and this is what the inside looks like when you pull on those drawstrings! Beautiful tiny pockets just pop out from a previously flat piece of fabric:
Finished Size
What I also love about this diy jewelry holder is the size. So handy - it's something like a 5" ball, you can safely throw it into your purse and carry it anywhere with you!
Finished size: closed 5" x 5" x 6" (13 x 13 x 15 cm), open flat: 12" (30cm)

But first, I'd like to mention that this pattern has been tested by my trusted pattern testers, so make sure to check out their beautiful jewelry organizers too - some of their photos are in the shop.

Now, let me give you a full supplies list so you've got everything ready to start:
Supplies
- two fat quarters of quilting fabric
- a 3" scrap piece of fusible fleece
- 2.2 yards or 2 meters of ⅛"-width (3mm) satin cording
- sewing machine or needle, pins or sewing clips,
- iron, scissors, or rotary cutter plus cutting mat (I use this one by Olfa)
- the free template
Shop my personal favorite sewing supplies on Amazon HERE.
Diy Jewelry Organizer - Sewing Steps
Step 1 - Get the pattern
Join our mailing list and get the jewelry organizer pattern emailed to you:
Prefer an ad-free printer-friendly option of the whole tutorial+pattern? See the → optional PDF file in our shop.
Step 2 - Print the pattern and Cut The Fabric
Print it out at no scaling (=100% size) and tape the paper pieces where necessary. Then cut out the fabric pieces:
- 2 large circles (Pattern Piece #1)
- 2 smaller circles (Pattern Piece #2)
- 1 piece of fusible fleece (Pattern Piece #3)
- 4 squares the size of 3" (7.5 cm) for hexies (optional, no pattern piece)

Step 3 - Make 2 buttonholes
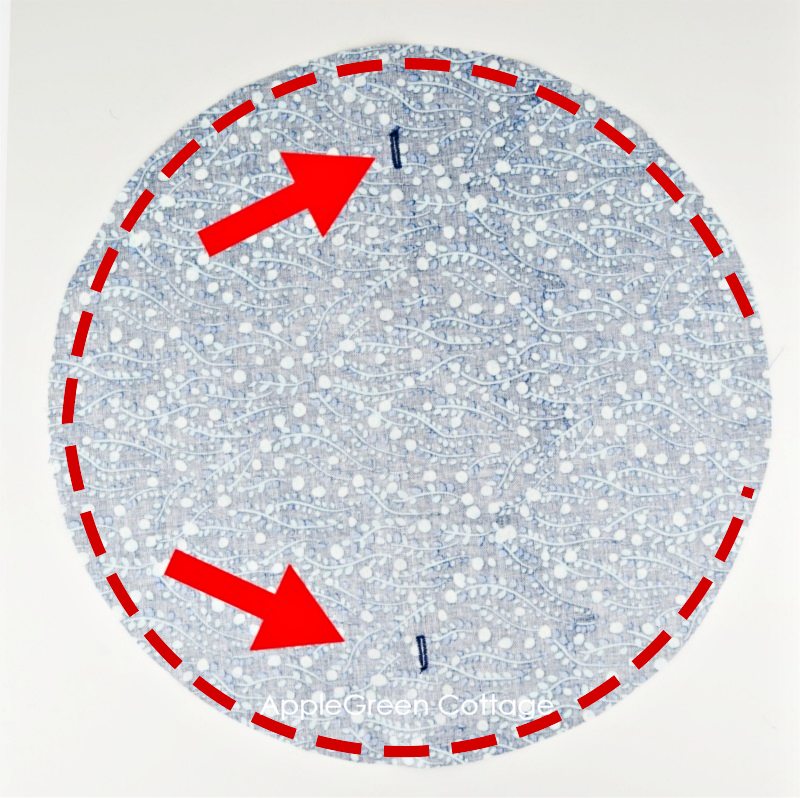
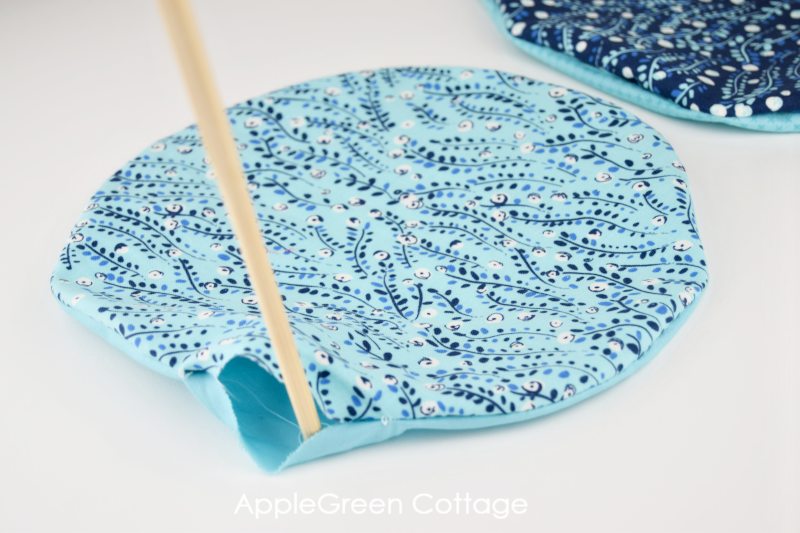
Once you've cut out the 2 large circle pieces (from pattern piece #1), grab the one that's planned to become the outer and make 2 buttonholes on opposite sides of the circle, each the size of half an inch, and placed between 1 ¾" and 2 ¼" (4.5 and 5.7cm) away from the outer edge. See image below:

Use a buttonhole foot if you have one, it makes it so easy to sew buttonholes! Also, a useful tip: when you've finished sewing the buttonhole and you're ready to cut the slit using your seam ripper, place a pin to the spot where the slit should end - this way, you won't cut too far! See photo below:

BONUS TIP: Alternative To Buttonholes
If you aren't a fan of sewing buttonholes you'll love what Ulrike (find her on Etsy here) suggested when pattern testing: use 2 grommets instead - here's how to add grommets the easy way. Eyelets are an option too.
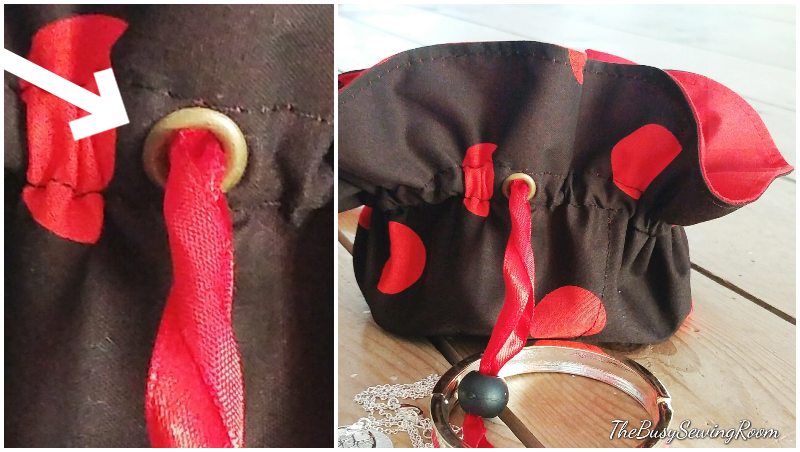
Please note:
- before starting, fuse a 1" square piece of strong interfacing on the back side of the fabric where a grommet or an eyelet will be installed
- grommet's or eyelet's outer diameter must be a bit smaller than ½", or it won't fit into the channel.
- Caution when sewing: make sure the needle never runs into the grommet/eyelet, or it will break!
Step 4 - sew the large piece
We're still with pattern piece #1 - Now it's time to stitch the two large circles together: Place the two large circle pieces RST and stitch around using a ¼" (7mm) seam allowance and make sure to leave a 2" (5cm) gap for turning. The arrows in the photo below show where the two buttonholes are placed. (SAME POSITION FOR EYELETS, NOT PICTURED)
Step 5 - Turn Right side out
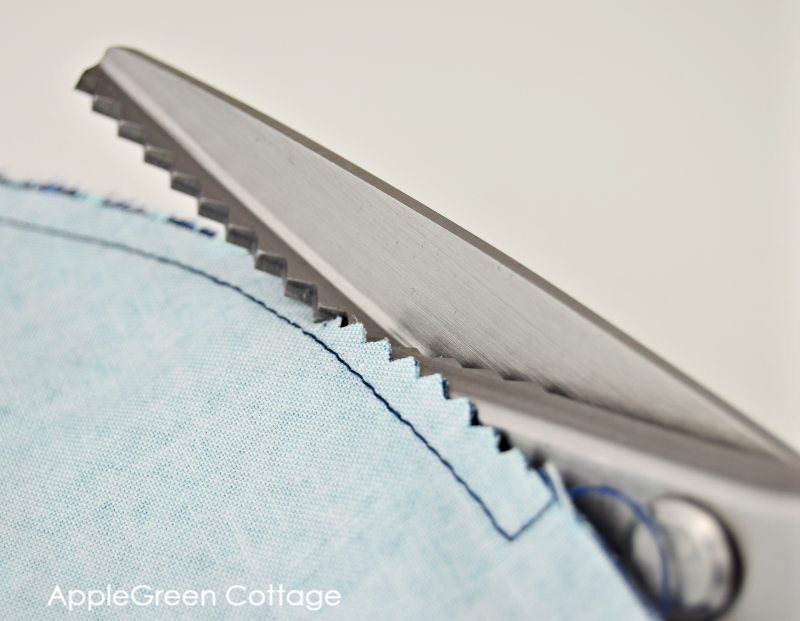
Use pinking shears to trim the edges or make small notches all around the circle for easier turning. (I really, really love using pinking shears here, it goes so much faster!) Do not trim on the gap for turning.
Step 6 - Edgestitch around
Once turned right-side-out, press and then edgestitch all the way around. The seam will also close the gap for turning.
Step 7 - Make Pockets
Start working on pattern piece #2, the Pocket. First, apply the small 3-inch circle of fusible fleece (#3) to the backside of what you want to become the pocket lining (not visible!).
Step 8 - Stitch The Pocket Circles
Place the two pocket pieces RST and stitch around using a ¼" (7mm) seam allowance and make sure to leave a 2" (5cm) gap for turning.
Step 9 - Turn right Side out
Press to set the seam and trim the edge using pinking shears (do not trim on the gap for turning), turn right-side-out, press and edgestitch, just like you did with the larger circles.
TIP: Pressing makes the edge stitching so much easier!
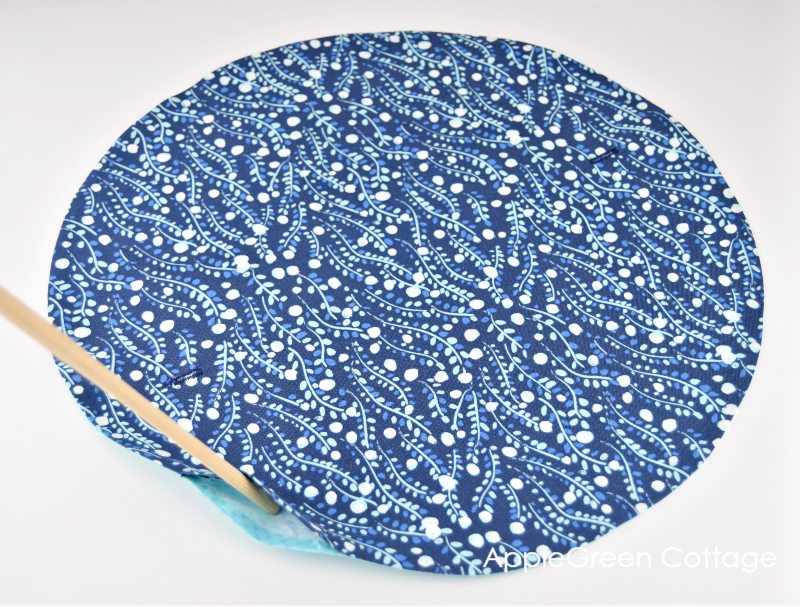
Step 10 - Trace And Sew Slip Pockets
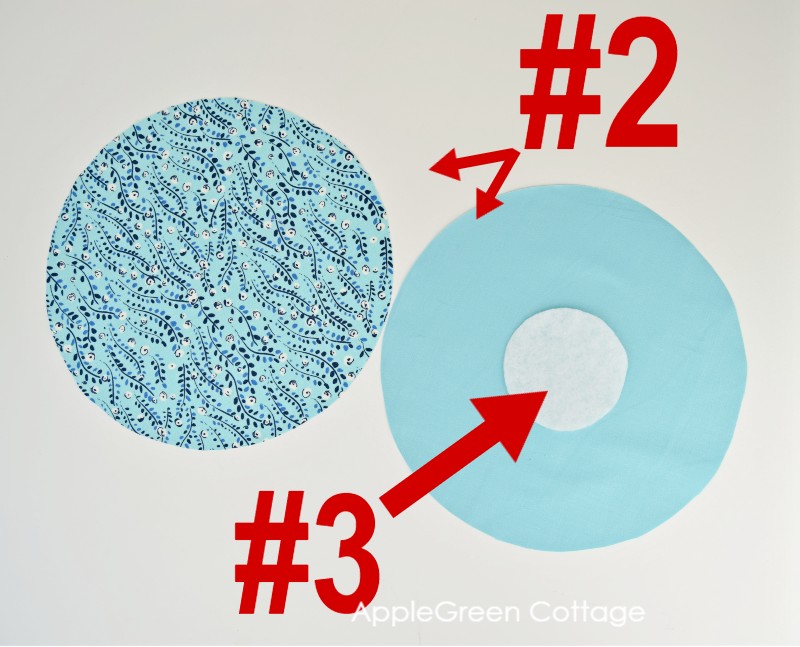
- Use pattern pieces #3 and #2 to trace the central 3" circle and the dividers onto the sewn pocket piece (#2).
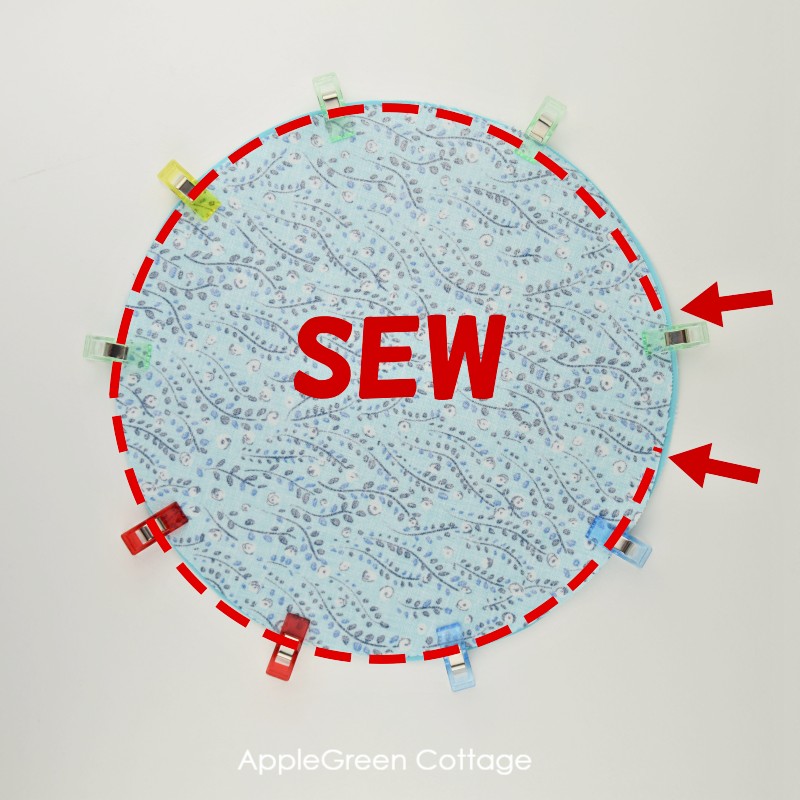
- Center the pocket circle on the large (shell) circle, like this: large circle (#1) with LINING facing UP and the pocket circle (#2) with the LINING facing DOWN. (In other words, the inside of the larger circle and the inside of the smaller circle should be touching.)
- Topstitch through ALL the layers - both the small center circle and all straight pocket dividers, as marked by the blue lines in the photo below:

Step 11 - Make A Casing For the Cording
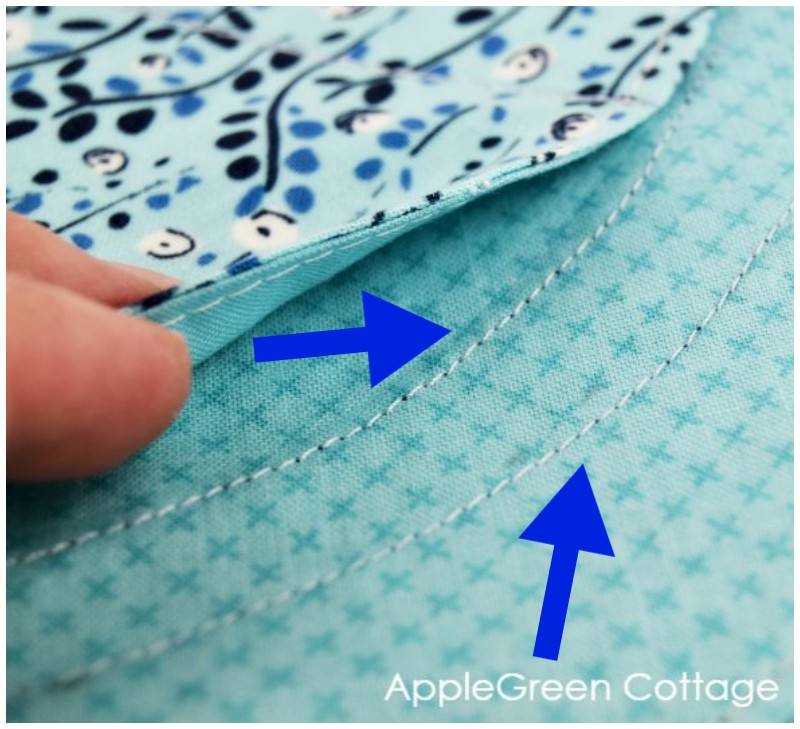
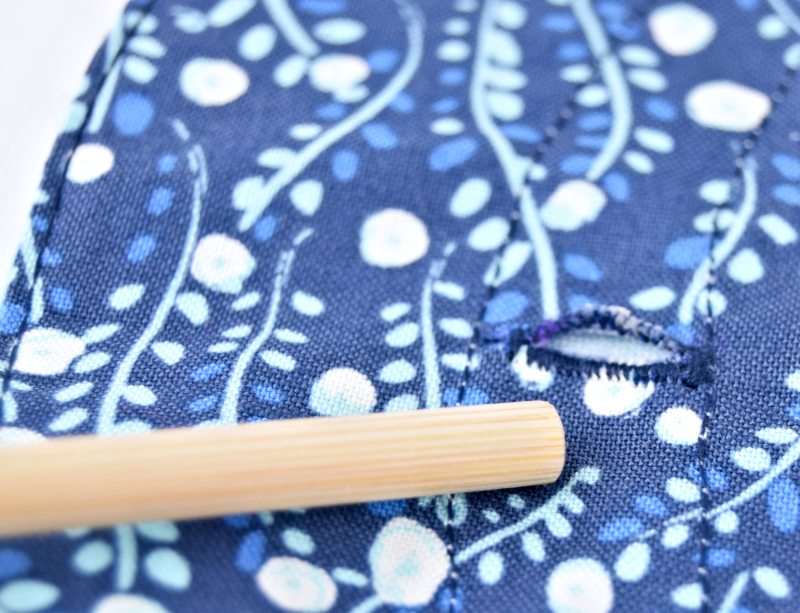
Remember the two buttonholes you made when starting the project? These are on the outer side of the large circle. Now, we'll make the casing - two circular seams that will align with the buttonholes - see the two red circles in the below photo.
- The buttonholes will end up between the two seams, and these seams will just barely touch the edges of the buttonholes.
- The INNER LINE of stitching will be super close to the edge of the smaller circle - just make sure not to stitch over it. If you love measuring, it should be exactly 2" (5.1cm) away from the finished edge of the large circle. This is the place where the buttonhole edge is.
- The OUTER LINE of stitching should be ½" (1.3cm) away from the inner line. Measuring from the outer edge, it's 1 ½" (3.8cm) from the large circle's outer edge.

IMPORTANT: the two seams should be ½" (1.3cm) apart, as the drawstring casing needs to be exactly this width. Here's a detailed view of the two casing lines on the inner side of the jewelry pouch pattern:
...and on the outside. The two stitching lines 'encase' the buttonholes, and voila! the drawstring casing is finalized.
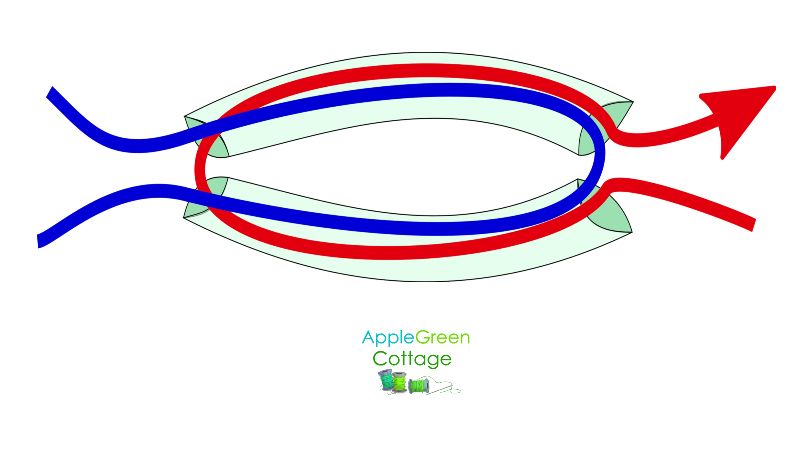
Step 12 - Insert the cording
Now we'll need to insert the two 40" (1m) satin cords into the casing. Here's how:
- Attach your first cord to a safety pin and guide it through one buttonhole opening all the way around. Yep, you've read that right, both cord tails will peek out from the SAME buttonhole.
- Guide the other cord through the other buttonhole, all the way around. See below:
Step 13 - Add Drawstring Pulls
Tie off a knot on each end of the drawstring. You've finished your very own travel jewelry case - unless you want your drawstring pulls to be extra cute. I added two cute hexie pulls to make this drawstring jewelry bag even easier to use. Perfect!

Here is how to baste the hexies, my latest tutorial.
If you want a detailed step-by-step on how to insert these pretty hexie pulls, I've got you covered, too:
Check out the detailed how-to for adding hexie drawstring pulls - TUTORIAL HERE.
And, finished! You've just made a beautiful diy jewelry organizer. Congrats!
Make sure to check out the photos in the shop too, there are more beautiful jewelry organizers sewn by pattern testers!
Safely store all your jewelry in separate pockets while traveling to prevent tangling in this adorable pouch! Perfect for carrying cosmetics too, and adding a stylish touch to your overnight travel routine. One of the best diy jewelry organizer ideas if you ask me!
If you love keeping your home organized and tidy, these diy cord holders will keep your life free of tangled wire cords. Works every single time!
How Do I Get the Diy Jewelry Organizer pattern for FREE?
Get it for free when you join our free mailing list:
WANT A PRINTABLE COPY OF THE WHOLE TUTORIAL?
Prefer an ad-free printer-friendly option of the whole tutorial+pattern? See the → optional PDF file in our shop.

This tutorial is also part of Printable Tutorials BUNDLE
100 PDF tutorials now, and growing!
Stay Organized in Style!
Keep your essentials neat and tidy with the SILA Duo Pouch.


Sherry says
These things are great! Stuff will never fall out of them and they are so easy to grab and go when pre-loaded with your favorite jewelry.
Katelynn says
Made this as a bday gift for my friend, it was easy and really pretty!
Nancy DeVelde says
I love your patterns!
Joyce says
So much cuter than I thought it would be. So much so that when I shared pictures with family they all wanted one. I would recommend the interfacing on one of each sized circles. It really does make a difference. Makes it look very professional..This is a very easy to follow tutorial, a beginner sewer will have not problem following the very well written tutorial. Thank you for offering this sewing pattern.
Malène says
Thank you so much for this very nice purse which will be a nice gift for christmas
Lisa says
This is so beautiful, Damjana! I am always blown away by your attention to detail! Love it!
Damjana says
Lisa,
thank you so much, dear friend! <3 Sending hugs (e-hugs are a thing, right? 🙂
Damjana
vlatka says
Hello Damjana,
I was preparing myself in making this beautiful and useful pouch for some time...and finaly made it. It is indeed very good looking and to a none-sewer an extremely precious item. Thank you sooo much for sharing.
Greetings from Croatia
Dani P says
Made some as a gift for sons' girlfriends for when they travel.
Easy, beautiful, useful.
I showed it around my sewing class and gave everyone the link. Everyone was impressed.
Used colored twine I had at home that matched the fabrics. Not the really scratchy type, but a silkier one. I think it came from a dollar store.
Thanks!
Damjana says
Dani that's so kind of you, thank you!
Rose4 says
Outstanding use of fabric ! Loving this so much , can hardly wait to make it 👍🏼Love your creativity 💕
Cherease says
Thank you so much! What an awesome bag for jewelry! Can't wait to try it. Thanks again! ~Cherease
Momo G says
You are so right, and yours is beautiful! I made these as gifts years ago with silver cloth as the lining. It prevents tarnish of silver jewelry and other metals. I store my silver necklaces in an extra silver cloth pouch with pockets for silverware that I have had for over 50 years. No tarnish ever happens! 😀 It can be bought by the yard. It is a nice, very soft flannel that is treated to protect fine silver, and perfect for jewelry. Look for Pacific Silver Cloth or Hagerty. It is expensive, but it is 58 inches wide and goes a long way in small projects. You can line a drawer with it, too. It is always seen inside silver chests because it works so well. I guarantee: a jewelry pouch made with it will become a cherished heirloom! (Great bridal shower gift she won’t receive duplicates of!). You’re welcome. Love, Grandma, LOL! 😆
Damjana says
Barbara hi,
this is an awesome idea! Thank you for dropping by, happy to hear from you. xoxo,
Dawn says
Great idea! One way to make it even better would be to use cross stitch fabric (aida cloth) so that you can secure your ear rings directly on the fabric so they don't fall out if the bag gets turned upside down.
Damjana says
Dawn hi,
what a great idea! I think I have some of the aida cloth somewhere at the bottom of my stash...I'm terrible with cross-stitch so this might be a way better use of it!