
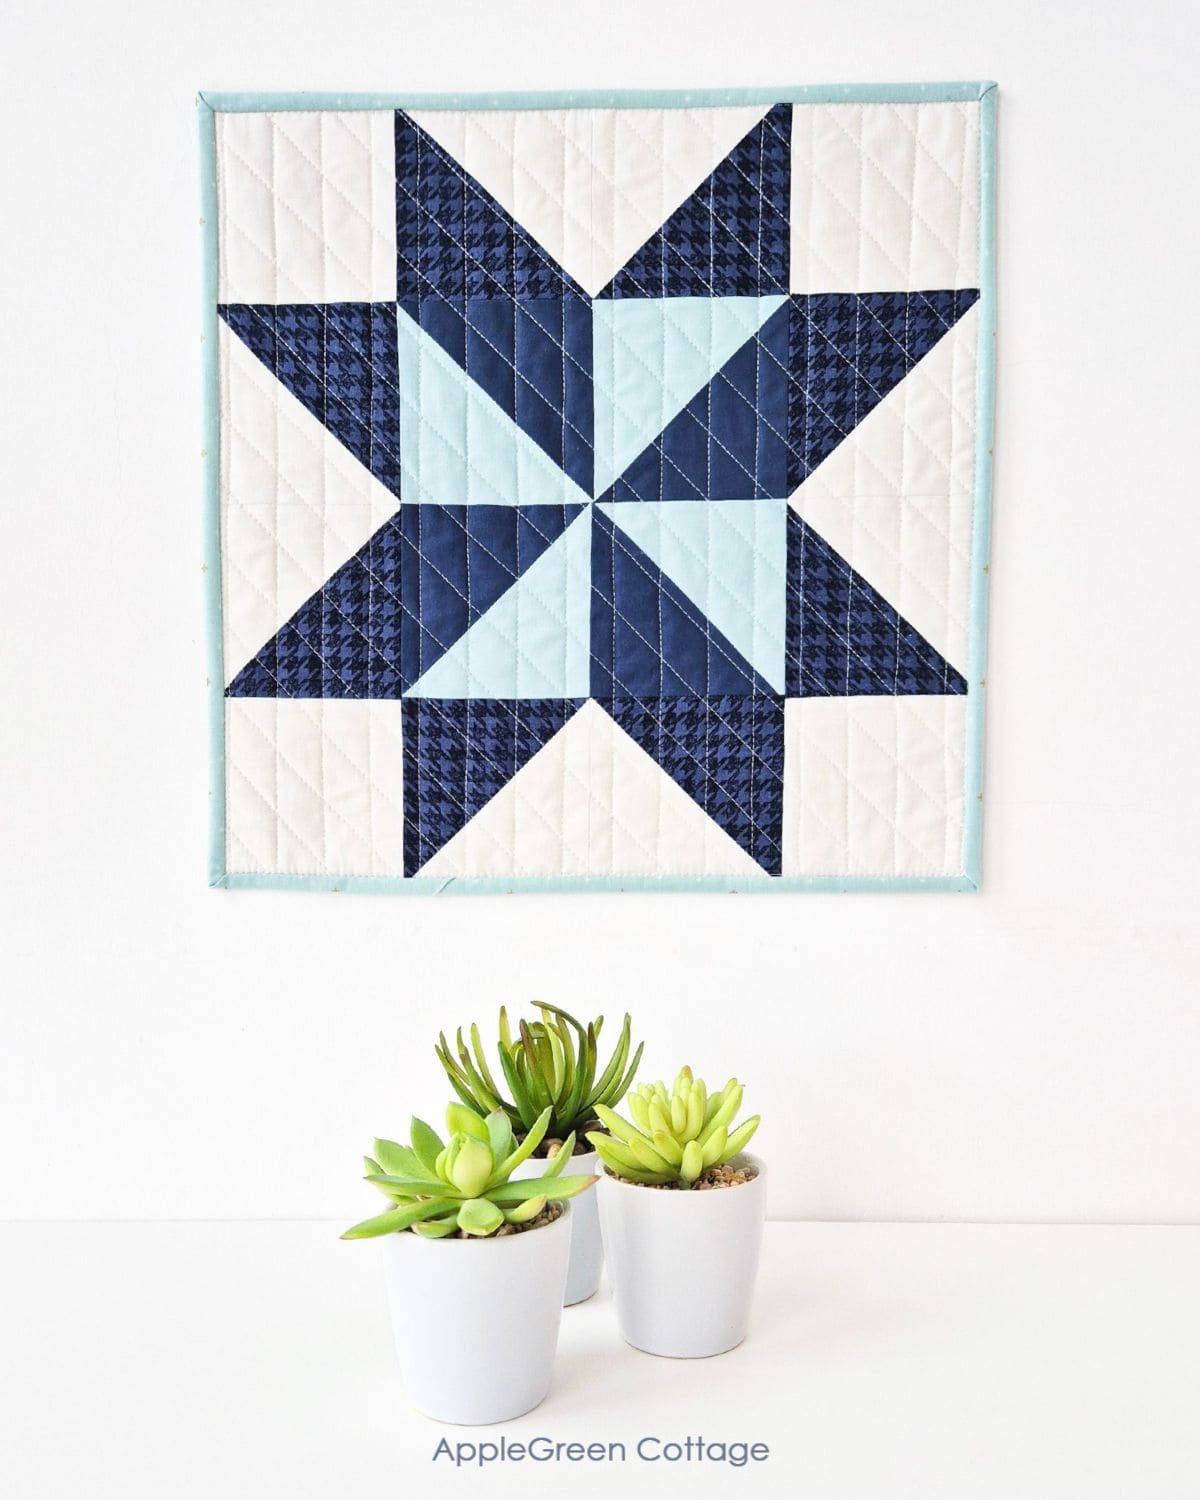
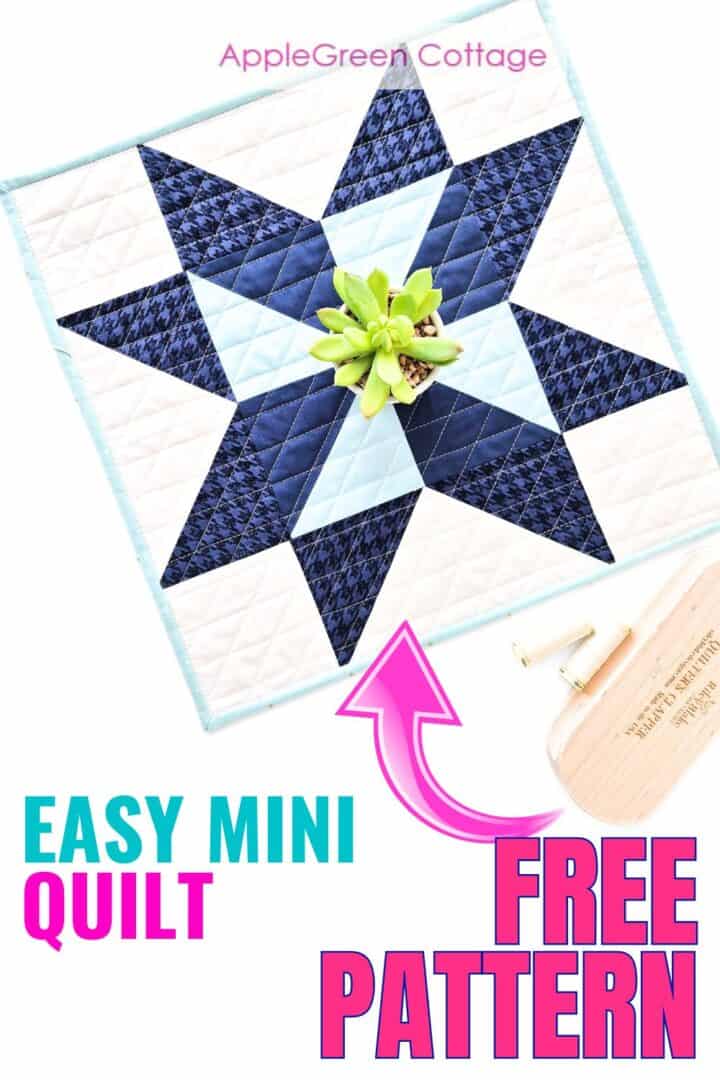
See how to make a mini quilt using my free pinwheel star quilt pattern - an easy and free mini quilt pattern for beginners. ↓
This mini quilt is a simple eight-point star with a pinwheel block at its center. It comes together fast and looks stunning in any fabric combination.
Plus, grab the handy quilt planner page to make this project even easier! (+ use with all your future quilt projects!)

Want a printer-friendly option of the whole tutorial without ads? See the → optional PDF file in our shop.

This tutorial is also part of Printable Tutorials BUNDLE
90+ PDF tutorials now, and growing!
Table Of Contents
- Why you'll like the Pinwheel Star Mini Quilt
- Video
- Get Free Quilt Project Planner!
- Supplies
- How To Make A Pinwheel Star Mini Quilt TUTORIAL
- Make Math EASY - Get FREE Quilt Calculators!
- Related Projects
- The EASIEST Patchwork Quilt!
- Useful Tips For Beginner Quilters
- How to Press Seams On This Quilt
- Get FREE Quilt Project Planner!
- Want a printable copy of the whole quilt tutorial?
Why you'll like the Pinwheel Star Mini Quilt
First, it comes together fast and looks stunning in any fabric combo.
More importantly, it's beginner-friendly: the quilt is made from HSTs, with four forming the pinwheel. A great way to practice half-square triangles!
And, I make it easier! To make matching those center points easier, we'll skip the row-by-row method and start with the center - much more beginner-friendly!
We'll also make the blocks slightly larger and trim them down for a perfect fit - no stress if your seams aren't exactly ¼"! (But if you need them, here are the tips for perfect quarter inch seams in quilting.)
Randomize Quilt Pattern
Love modern quilts but want something simple - and NO tricky points to match? →THIS.
And don't worry, I'll guide you every step of the way: I also created a special pinwheel quilt block tutorial for you if you need even more images. I've got your back!
Video
Get Free Quilt Project Planner!
Before you begin, grab this free quilt project planner - I created it to help you stay organized and make tracking your quilt projects effortless! Get it now:
Supplies
Shop my personal favorite sewing supplies on Amazon HERE.
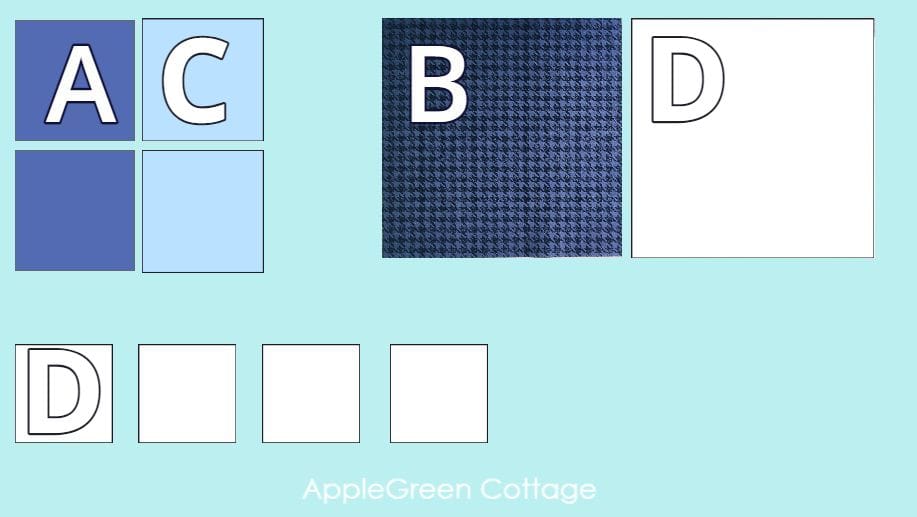
- 6" by 12" of Fabrics A and C (pinwheel)
- an 11" square of fabric B
- a fat eighth (11" by 20") of the background Fabric D (I used solid off-white)
- ¼ yard fabric for binding
- a fat quarter of fabric for backing
- a 19" square of batting
- a rotary cutter and a cutting mat
- the usual: sewing machine, thread, iron, pressing board (←I DIYed mine!)
- basting spray or safety pins
- a quilting ruler - see my favorite rulers here
TIP: a ¼" sewing machine foot is inexpensive and makes piecing so much more accurate (like this one on Amazon)
How To Make A Pinwheel Star Mini Quilt TUTORIAL
The pinwheel quilt block is a classic, made from HSTs. Since HSTs can be tricky, we'll cut them larger and trim them down for better accuracy. This "cut bigger, trim later" method makes sewing easier and helps me (and you!) get perfect points with less effort.
NOTE: we'll use the standard ¼" seam allowance on all seams. The finished size of the mini quilt is 16 ½" square.
Step 1 - Select your fabric
For this quilt, you'll need four fabrics - two darker (A, B) and two lighter (C, D).
- Darker fabrics (A, B): Pick deep, rich colors or prints to add depth and make the star shape stand out.
- Lighter fabrics (C, D): Choose soft, light hues or subtle prints to balance the look and let the dark fabrics pop.
While the A, B, and C will form the 'pinwheel star', D is your background.
Step 2 - Cut Your Fabric Squares
Cutting directions For Quilt Top:
For Pinwheel Block, cut two squares of Fabric A and two squares of Fabric C - all the same size, 5 ½"
For the half-square triangle blocks, cut one piece of Fabric B and 1 square of Fabric D - both the same size, 11"
For corners, cut four squares of Fabric D: all 4 ½"
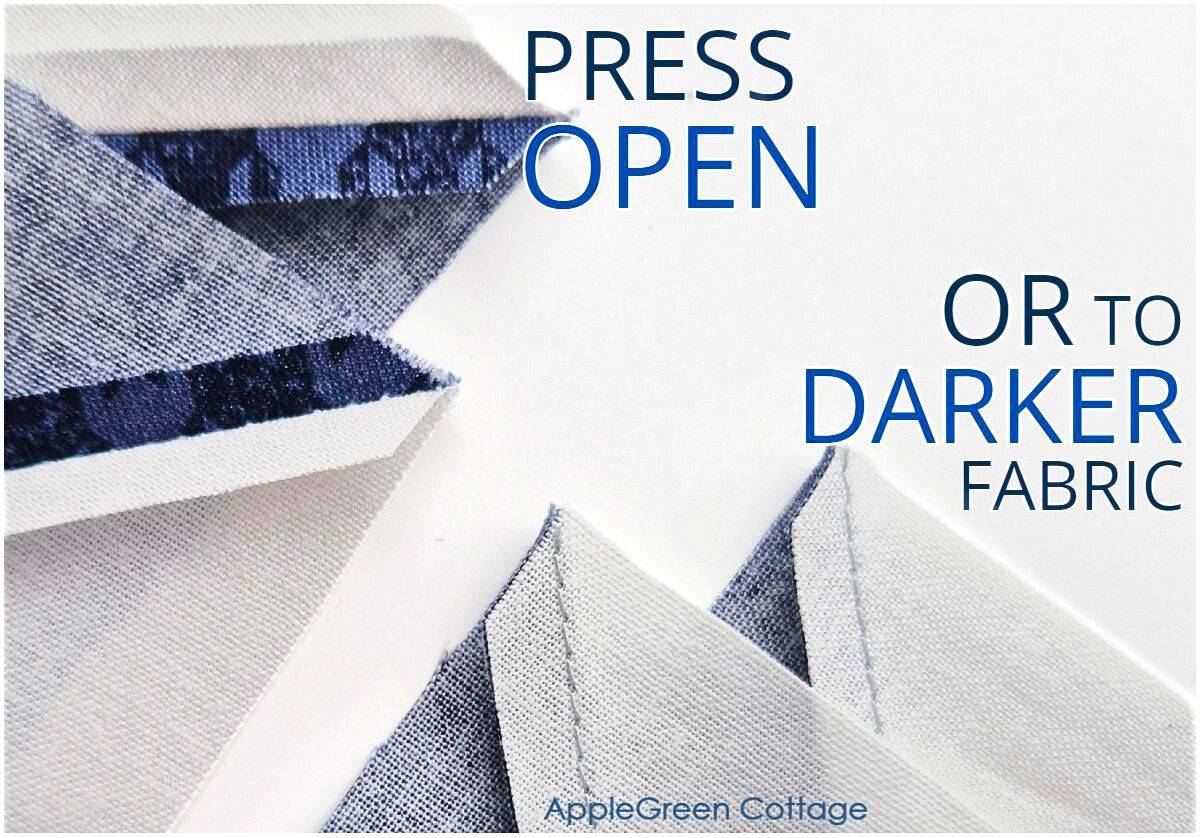
NOTE: In this tutorial, I pressed all my seams open to minimize bulk. I want my pinwheel block to lay as flat as possible. Check out the tips below this tutorial for more info on when to press open and when to press to the side.
Cutting directions For Quilt Batting, Backing, and Binding:
Cut a 19" square from batting and at least the same size from backing fabric.
Cut and make quilt Binding: you'll need to cut (two) 2 ½ wide strips from the width-of-fabric and sew it together to get approximately 80" or 2 yards of straight-grain binding.
Not really a fan of quilt math? Use out FREE Binding Calculator (plus 5 more free quilt calculators!) ↓↓↓
Make Math EASY - Get FREE Quilt Calculators!
Join our mailing list and get FREE Quilt Calculators - Make quilting math a breeze!
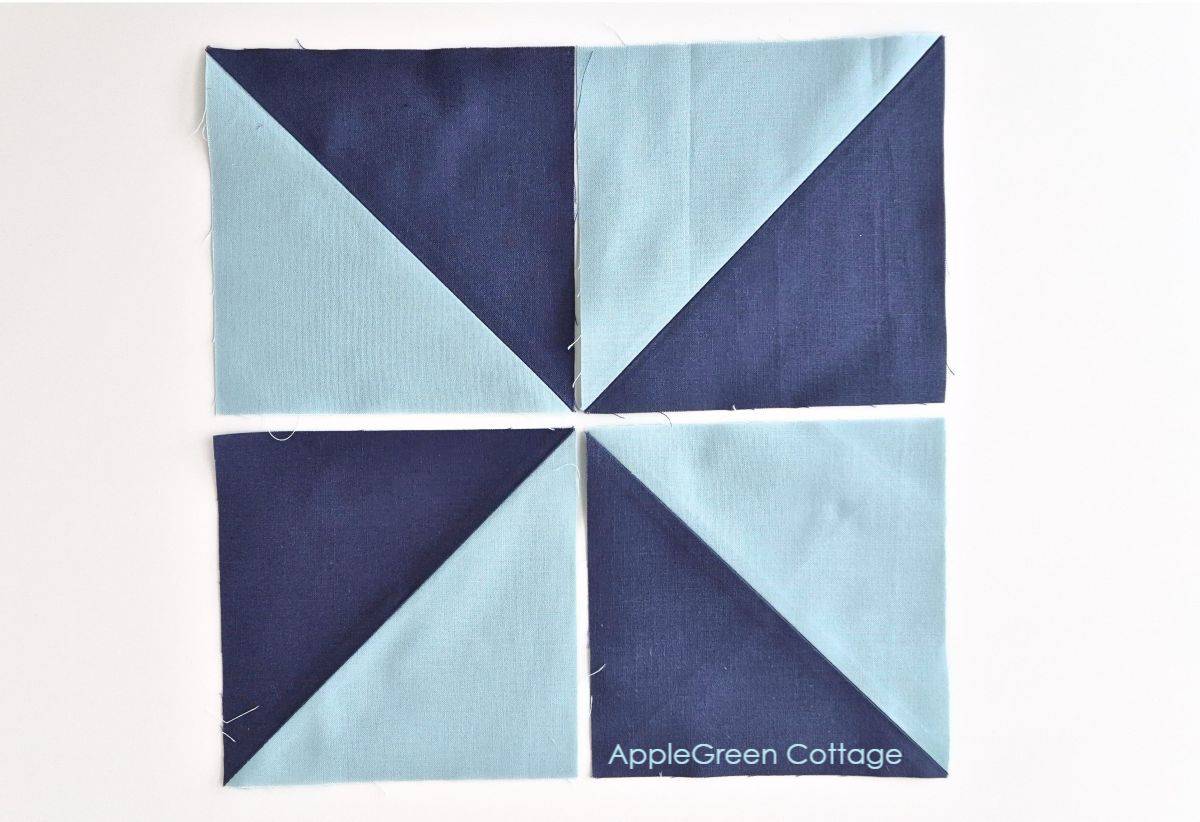
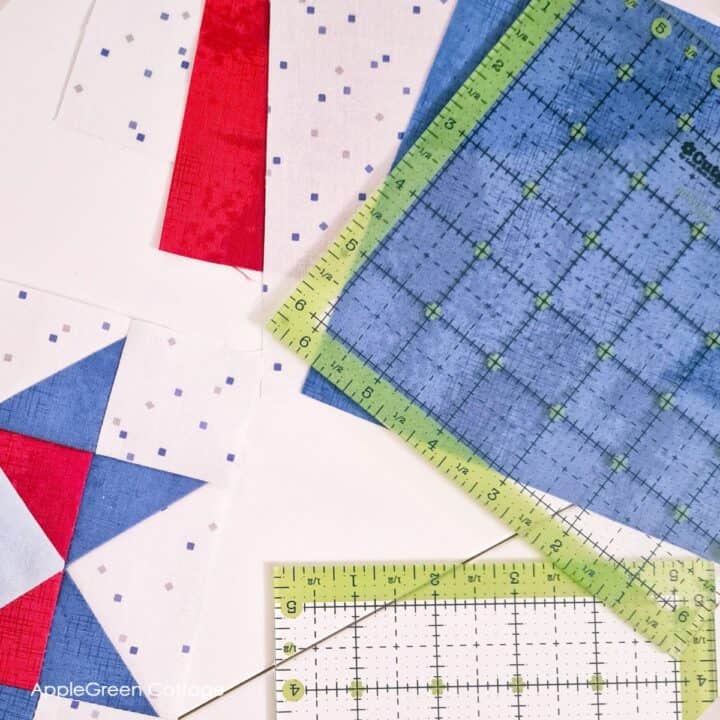
Step 3 - Create 4 Half-Square Triangles for the Pinwheel Block
Grab the four 5 ½" squares (A and C fabric). We'll first create HSTs in pairs: two at a time.
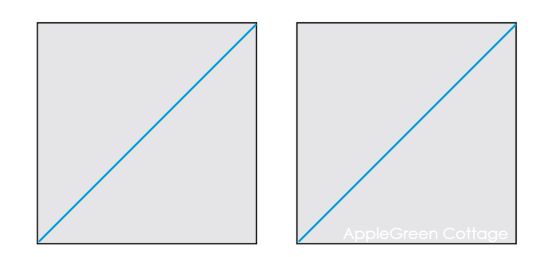
1- Start by drawing 2 lines: on the back of each of the Lighter 2 fabric pieces, draw a diagonal line from corner to corner. These will be your guides.
Place the first A+C pair of the squares with the right sides together and pin or clip. (To be honest, I pinned for the photographing, but I prefer sewing clips instead of pins in real life 🙂
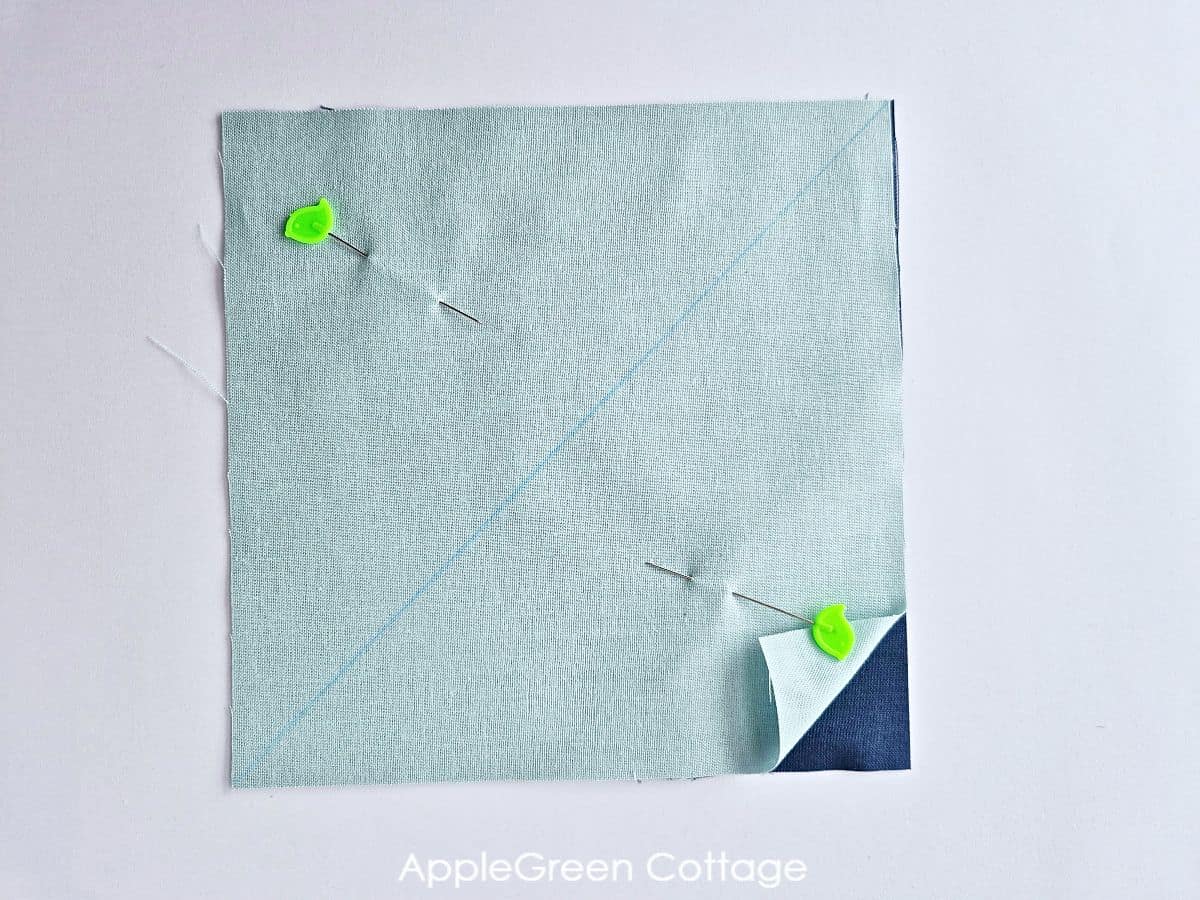
2 - Using a ¼" seam allowance, sew two parallel lines per piece - on each side of the drawn diagonal line.
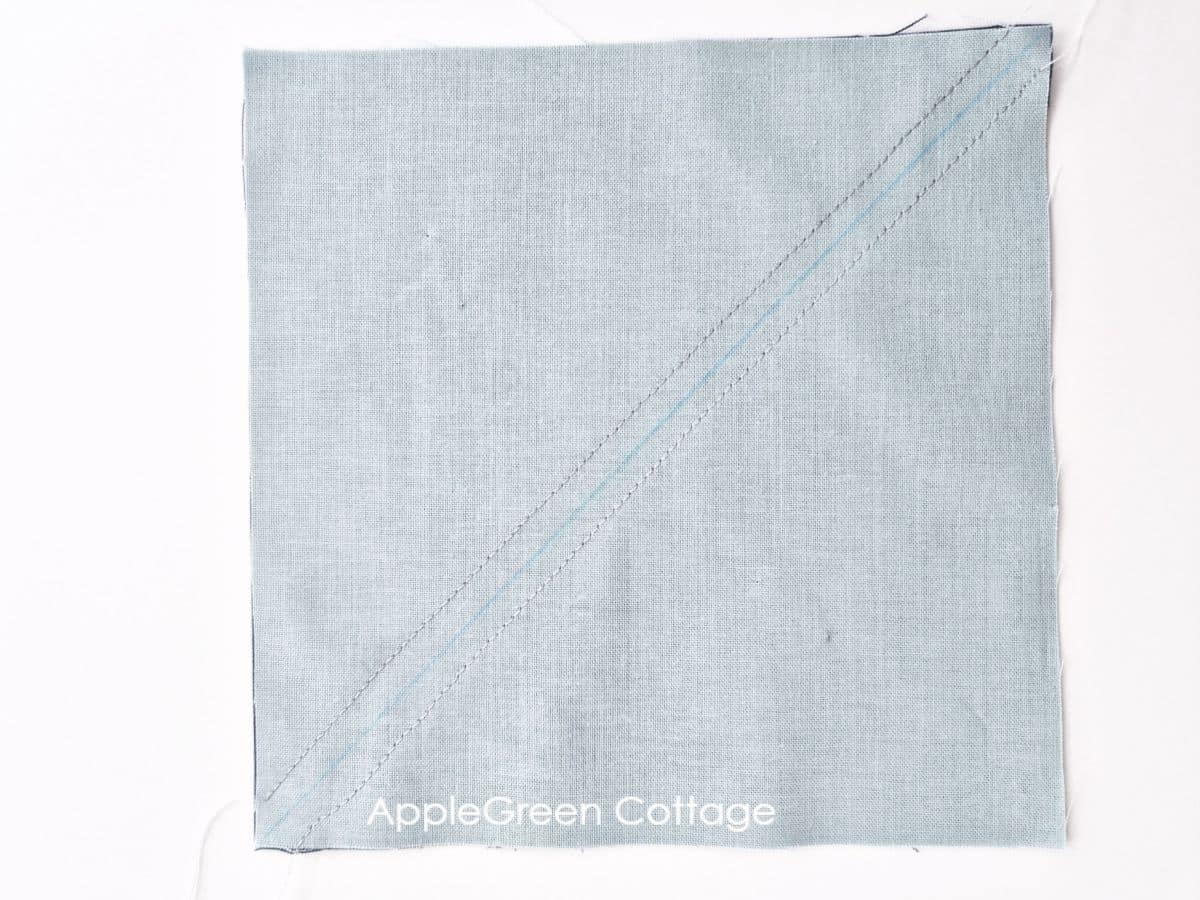
3 - Cut on the marked diagonal line. This will give you 2 HST units. Press seams open (for a flatter pinwheel block) and trim each block to 4 ½":
4 - Repeat with the second pair of A+C fabric squares to create 2 more HSTs:
Step 4 - Assemble The Pinwheel Block
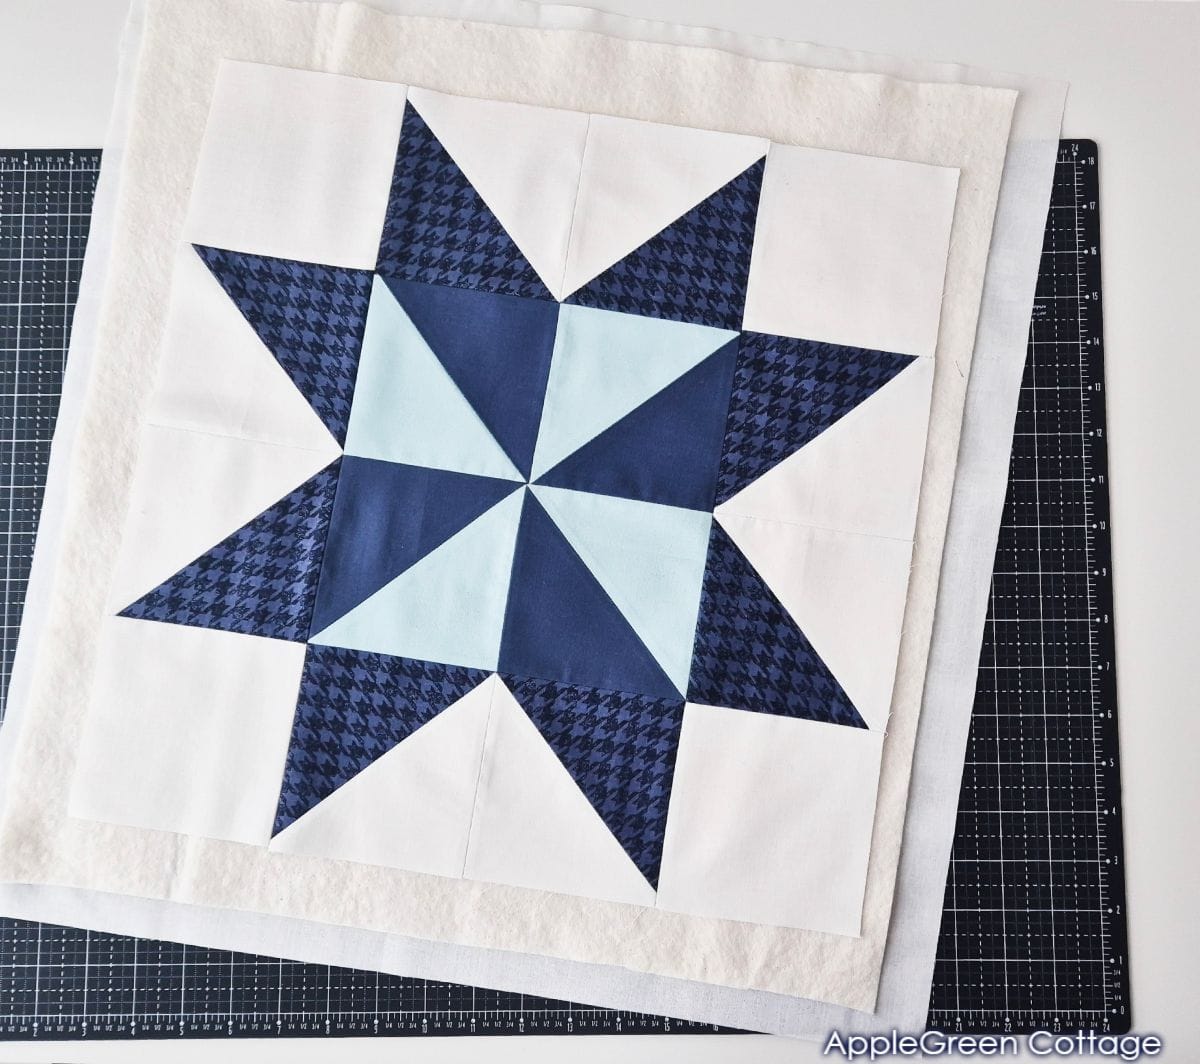
SIZE: The unfinished pinwheel block (i.e. before sewing it into the quilt) will be 8 ½" square. Once sewn into the mini quilt, it will measure 8" square.
1 - Arrange your HSTs into a pinwheel shape. It can spin clockwise or counter-clockwise - both work, just be consistent!
2 - Sew Pairs Together
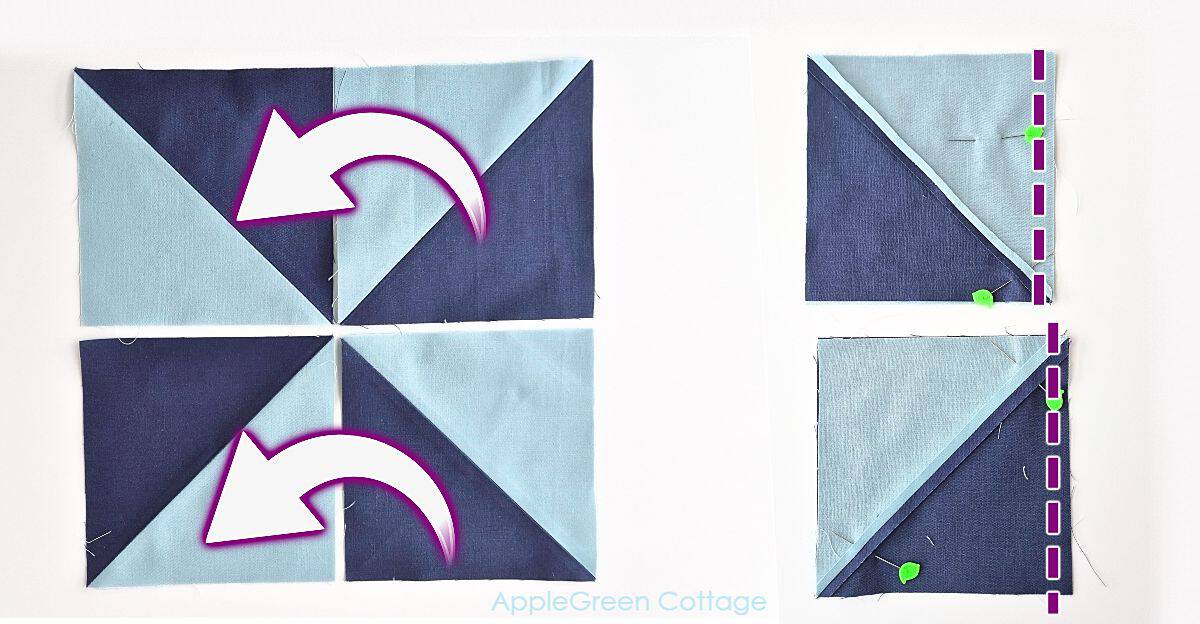
3 - Sew the top two HSTs together and the bottom two HSTs together. Press seams open again. You've got two rows now.
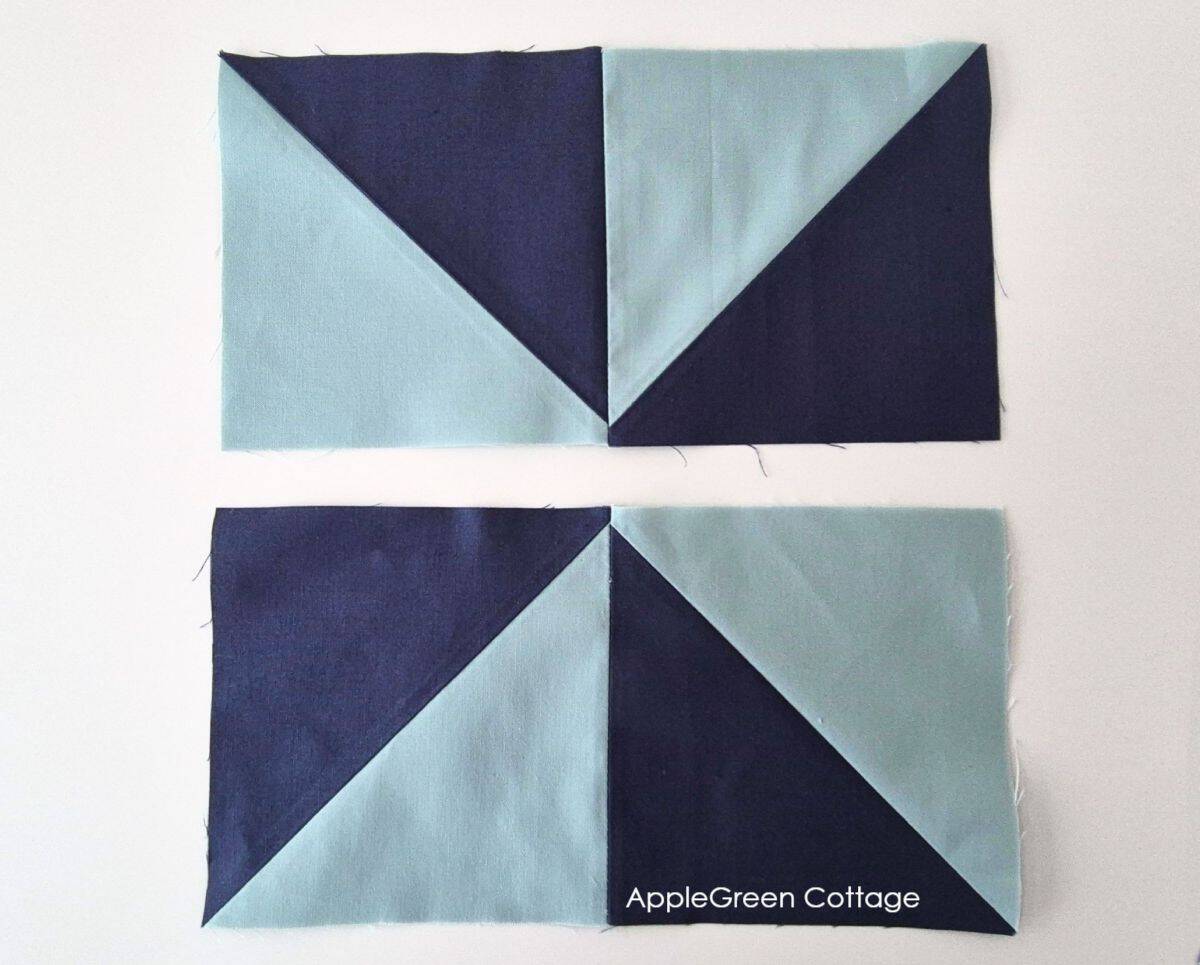
4 - Place the rows with right sides together, match the center seam and stitch them together.
TIP: Here's a good way to match the center: push a pin through both points where the final seam needs to go for a perfect pinwheel.
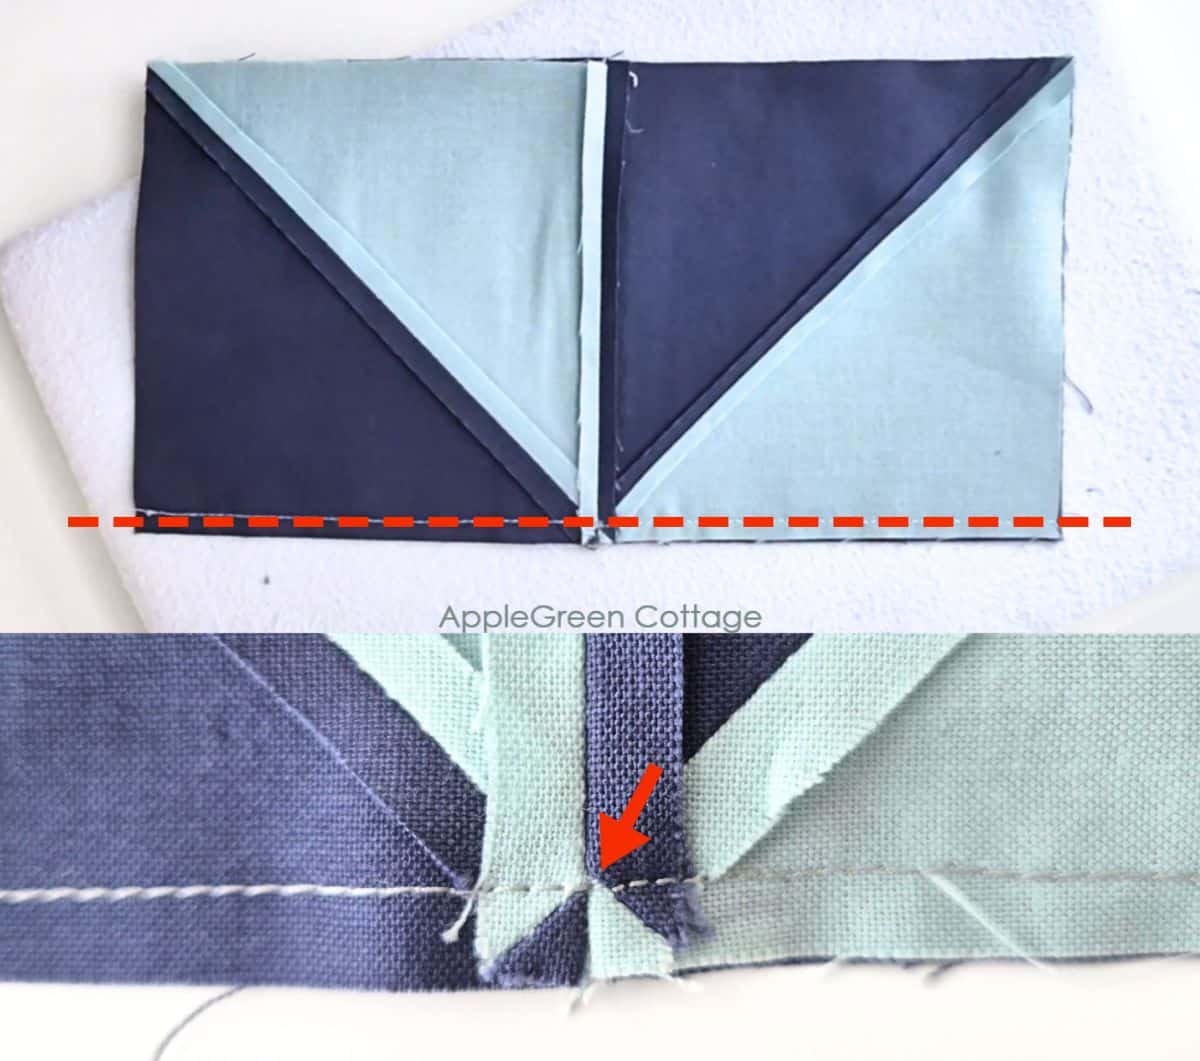
5 - Press the Final Seam Open
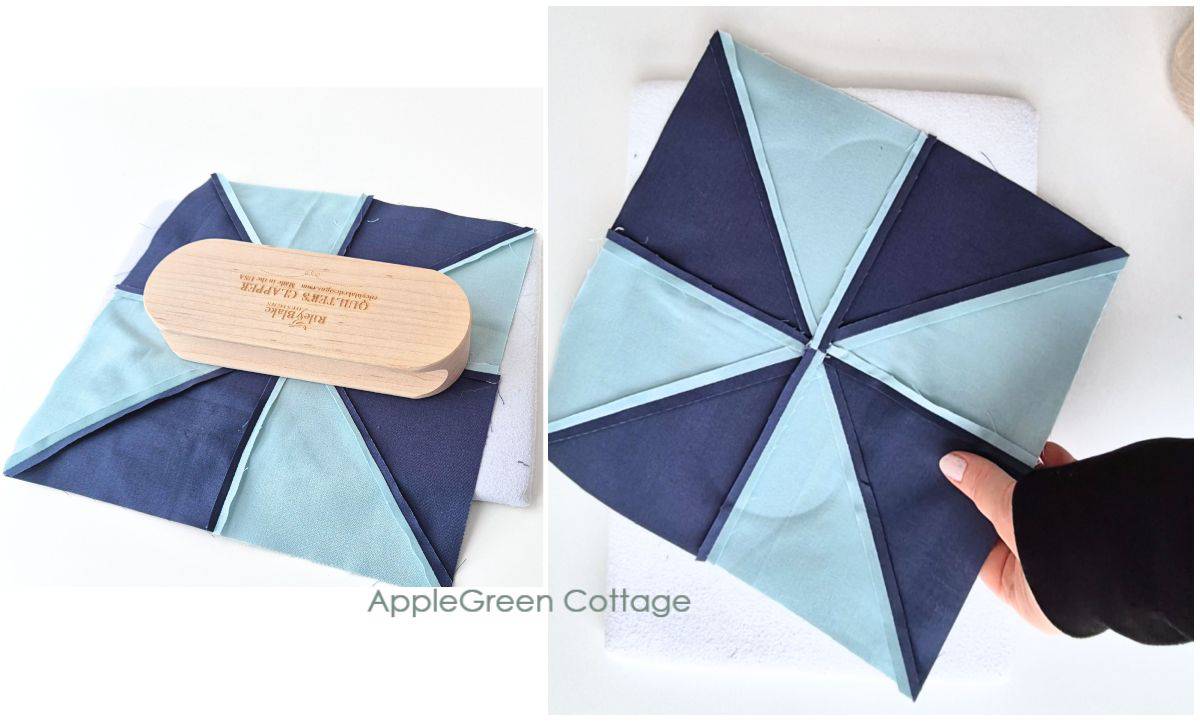
Unfold and press the seam open. (I pop my Quilter's Clapper on the center while the fabric is still hot after pressing, it works great!)
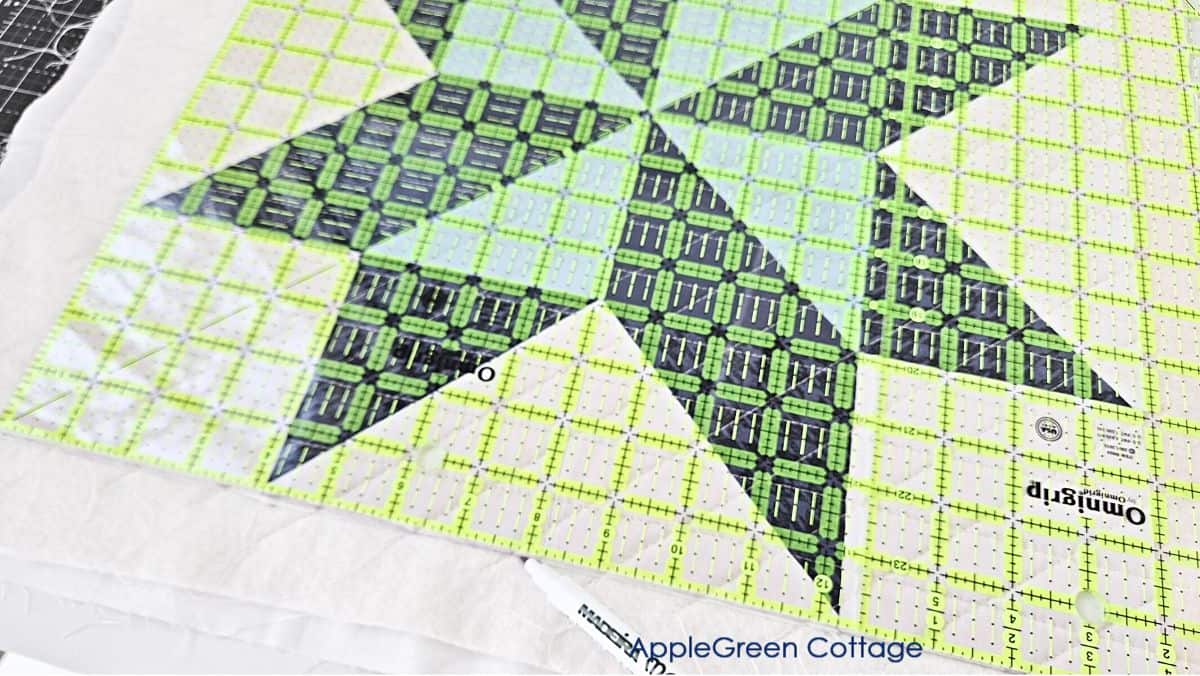
Using a ruler with a 45° diagonal line, check the size and trim if needed. Most times, you won't need to trim. The focal point of your quilt is ready!
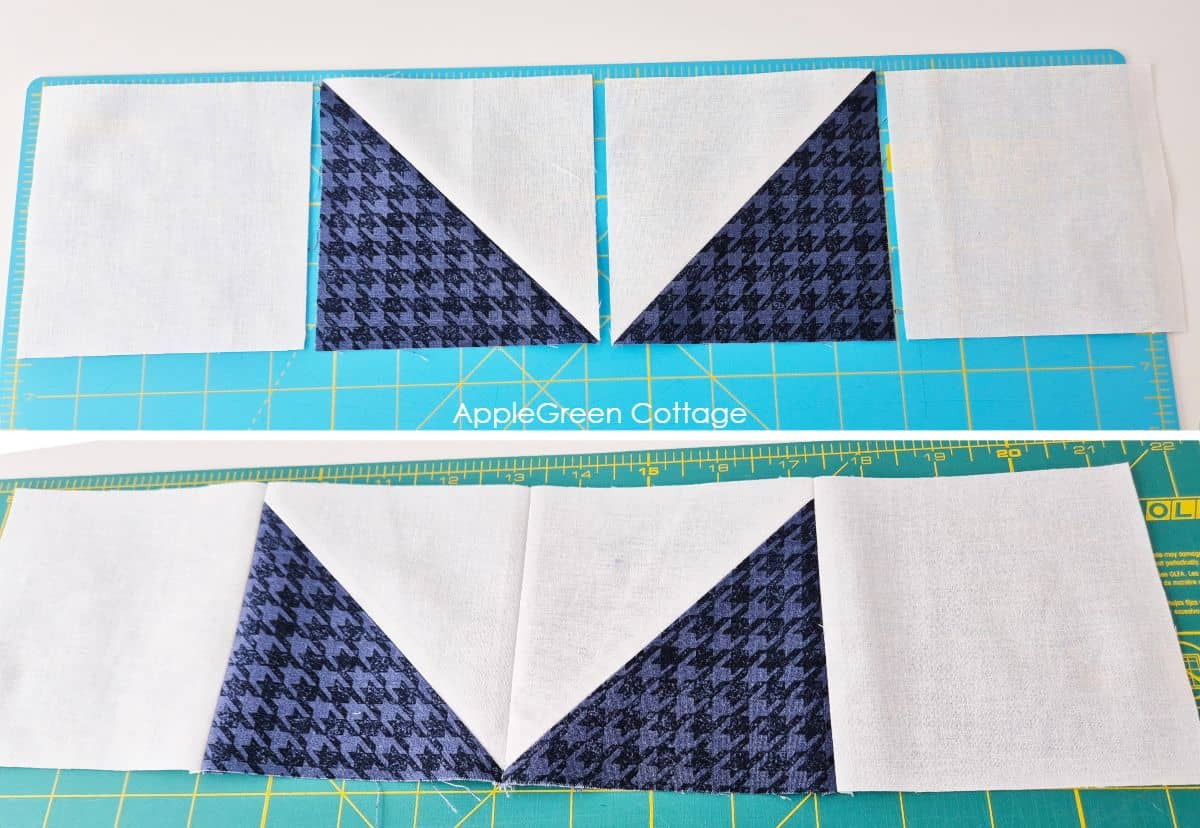
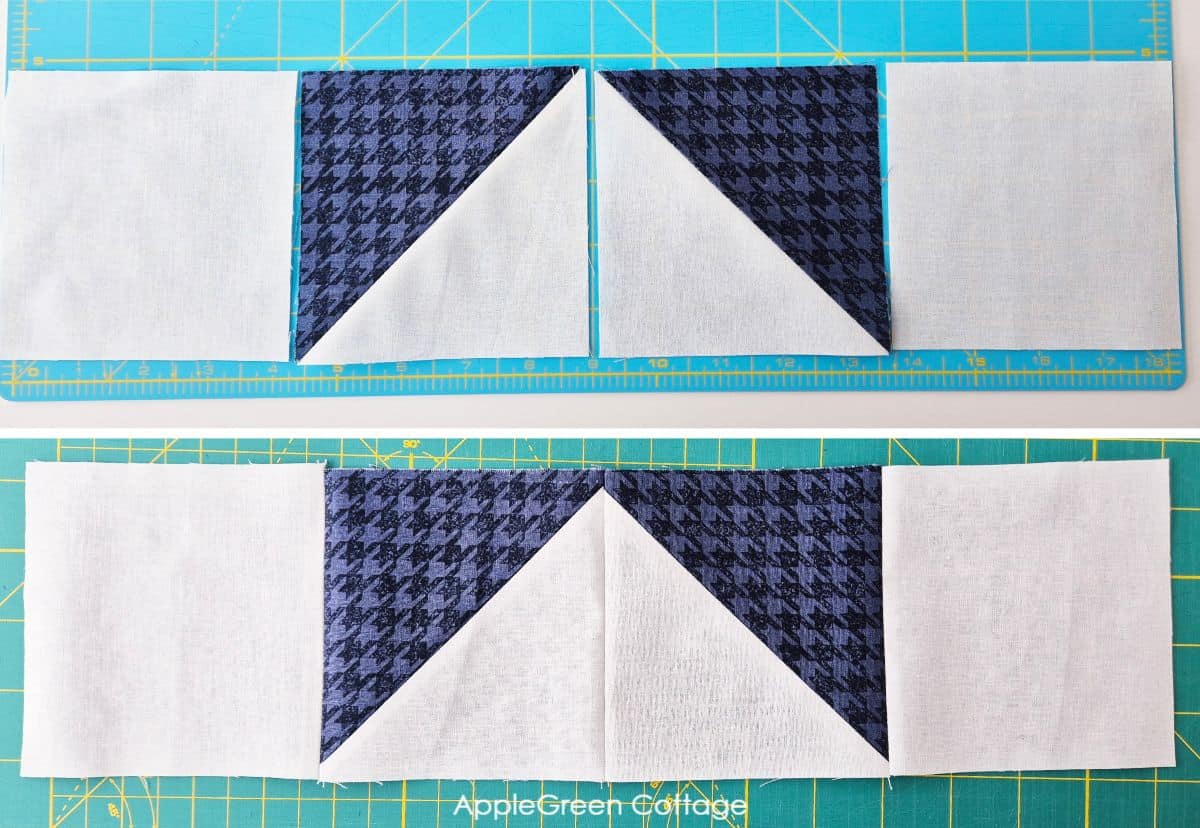
Step 5 - Create 8-At-A-Time HSTS
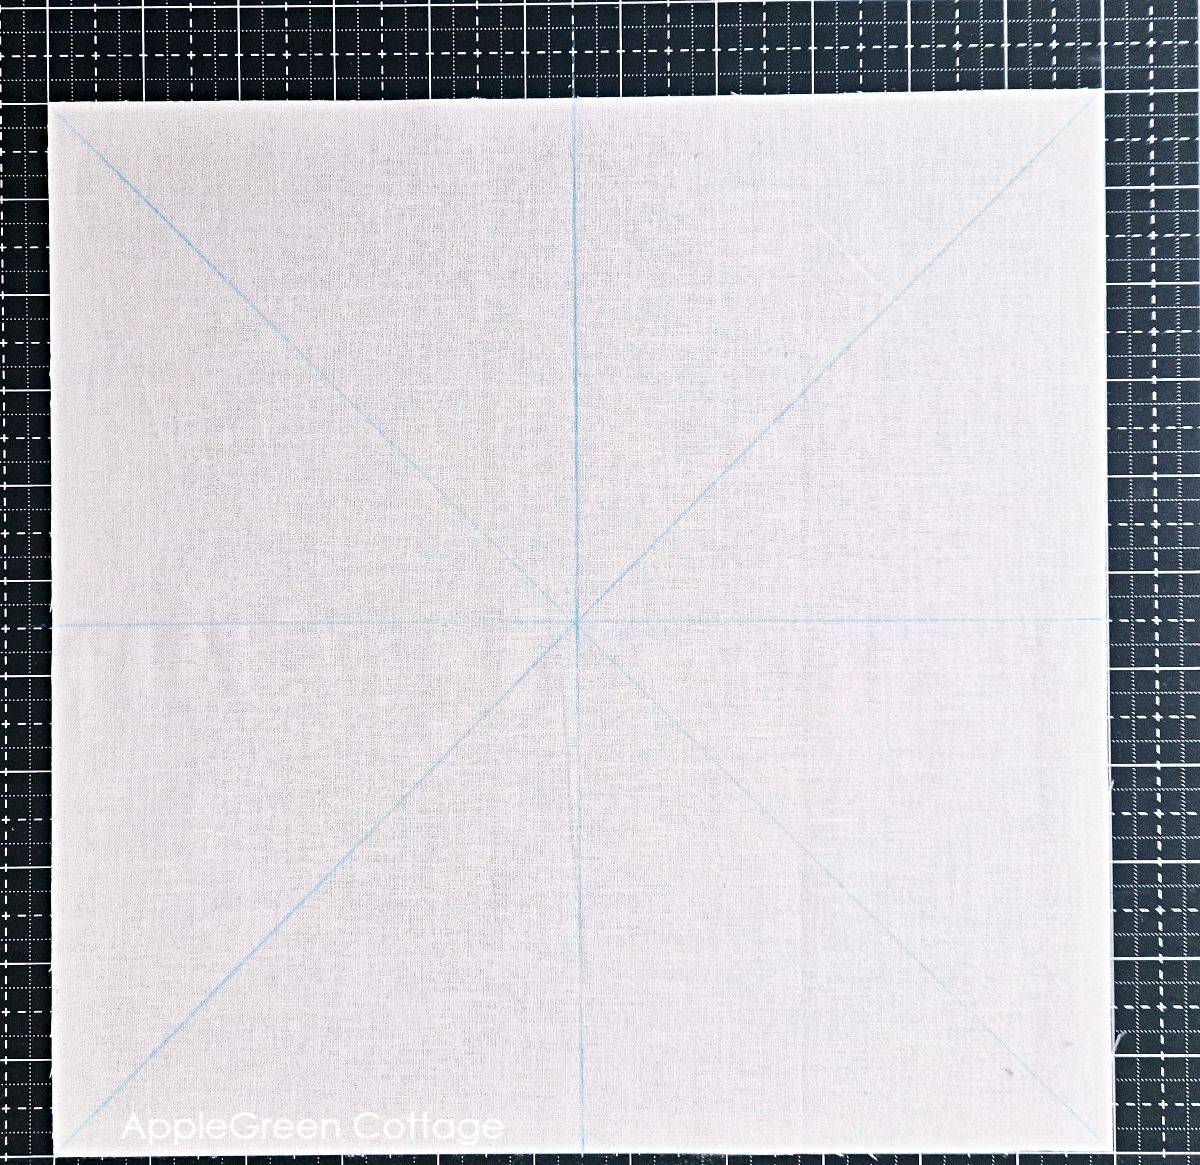
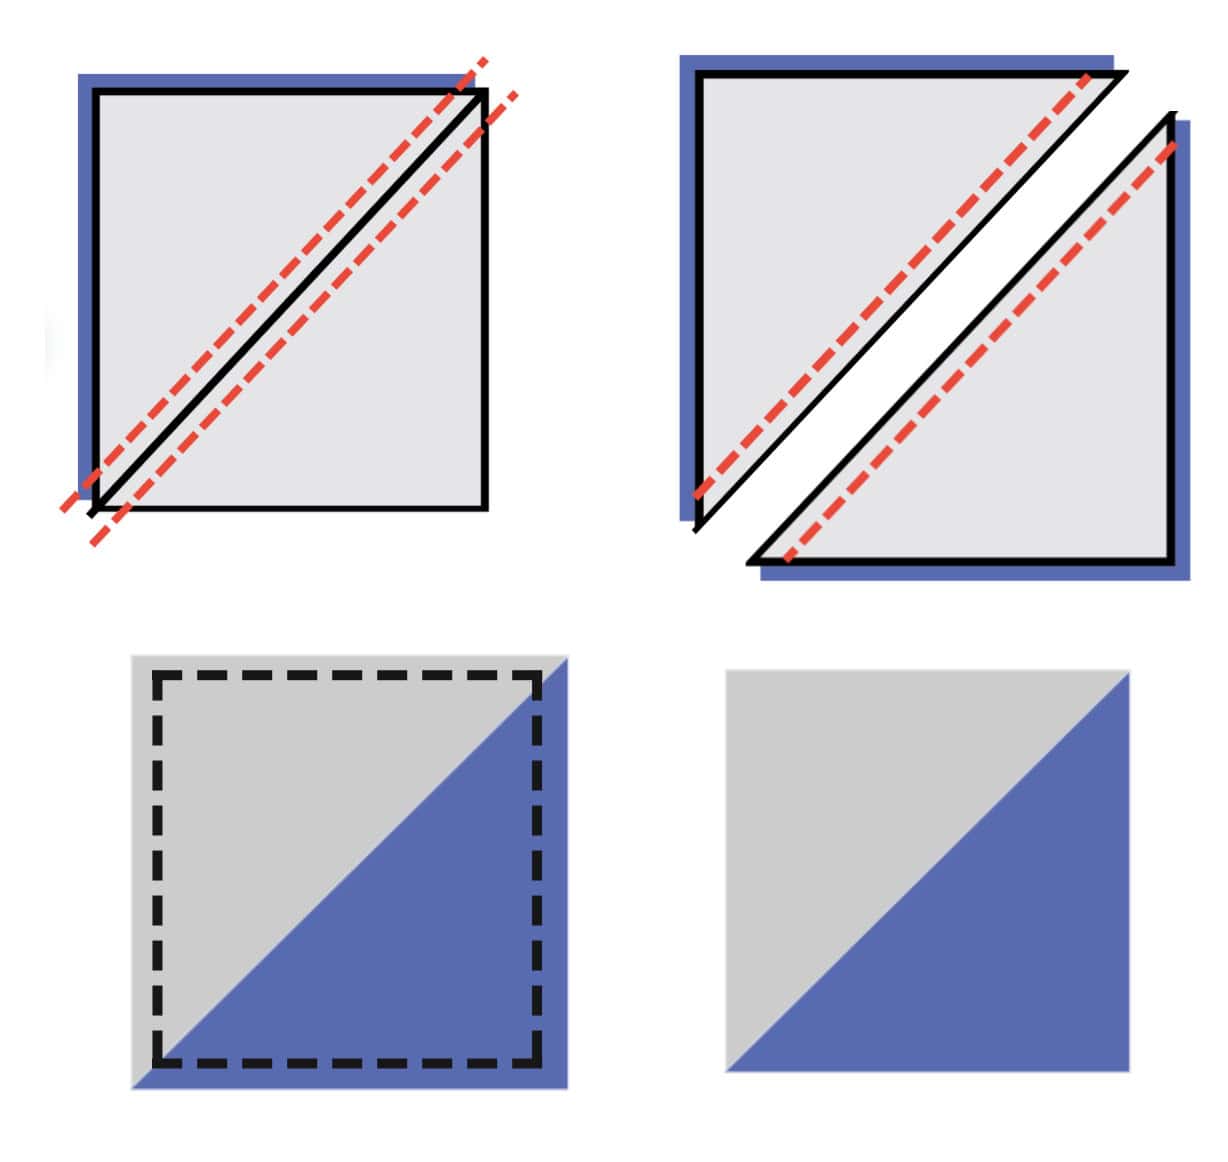
1 - Use the 11" B+D pieces. Draw 4 lines on the back of the lighter 11" fabric:
- 2 diagonal lines from corner to corner
- 1 vertical center line
- 1 horizontal center line

2- Place the two (B+D) squares with the right sides together and pin.
3 - Using a ¼" seam allowance, sew four parallel lines - one on each side of the drawn diagonal lines. Keep your seams consistent for accuracy.
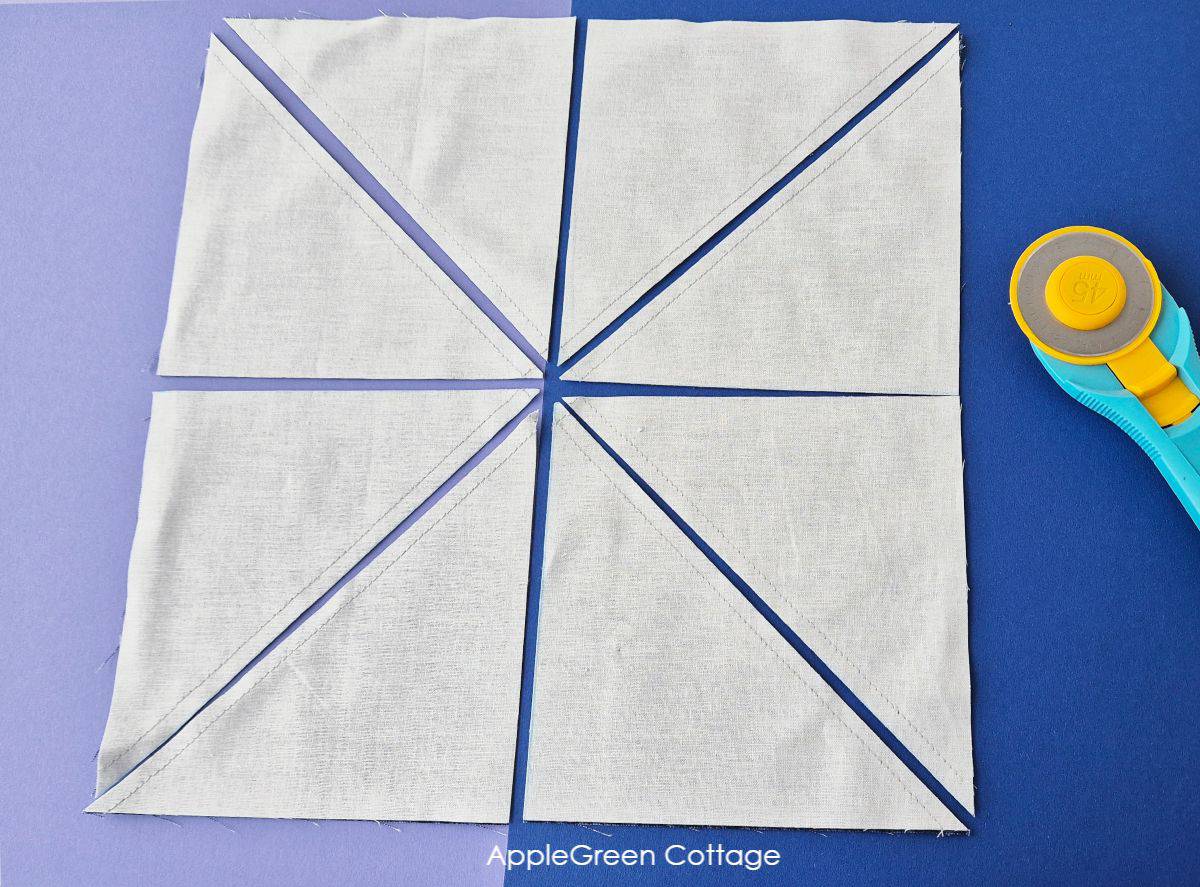
4 - Cut: With your rotary cutter and ruler, cut the square into eights as shown in the image above. You will cut in half vertically and horizontally, as well as along both diagonal guidelines.
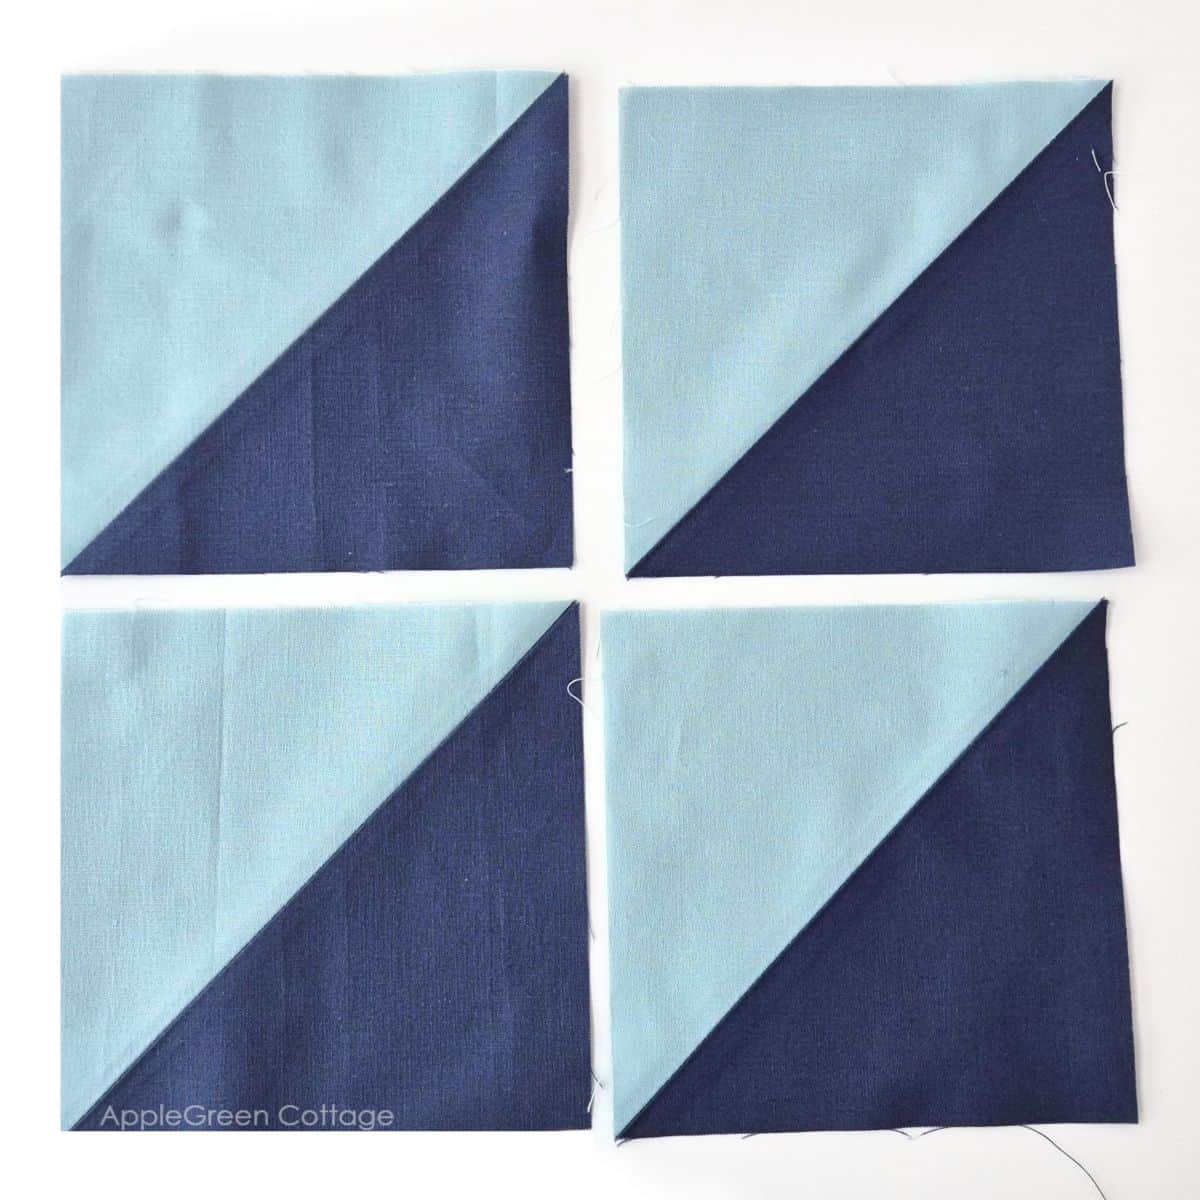
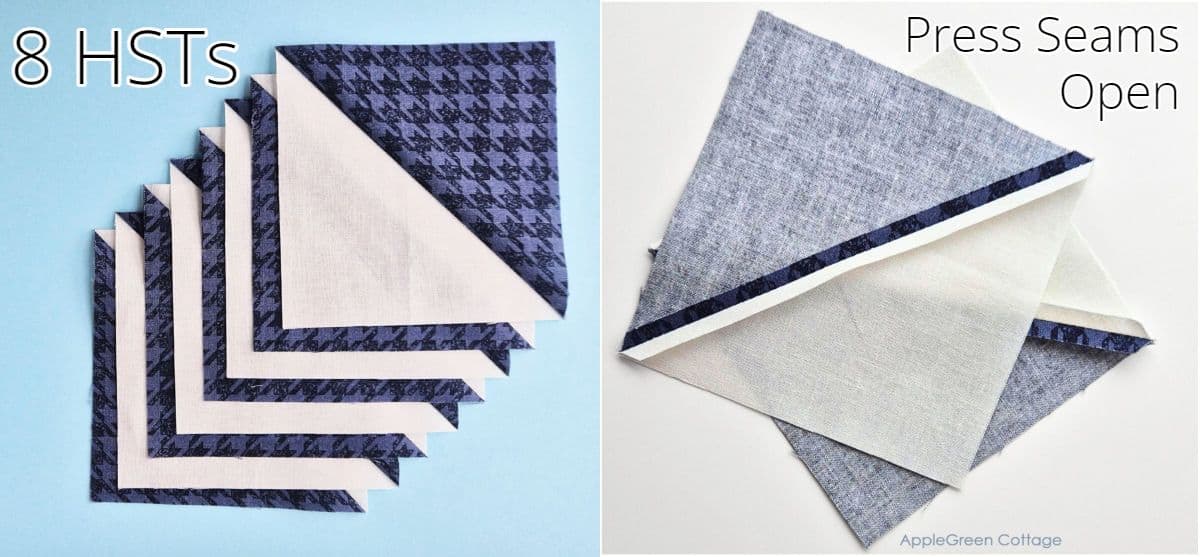
5 - Press the seams on all 8 HSTs open and trim them to 4 ¼".
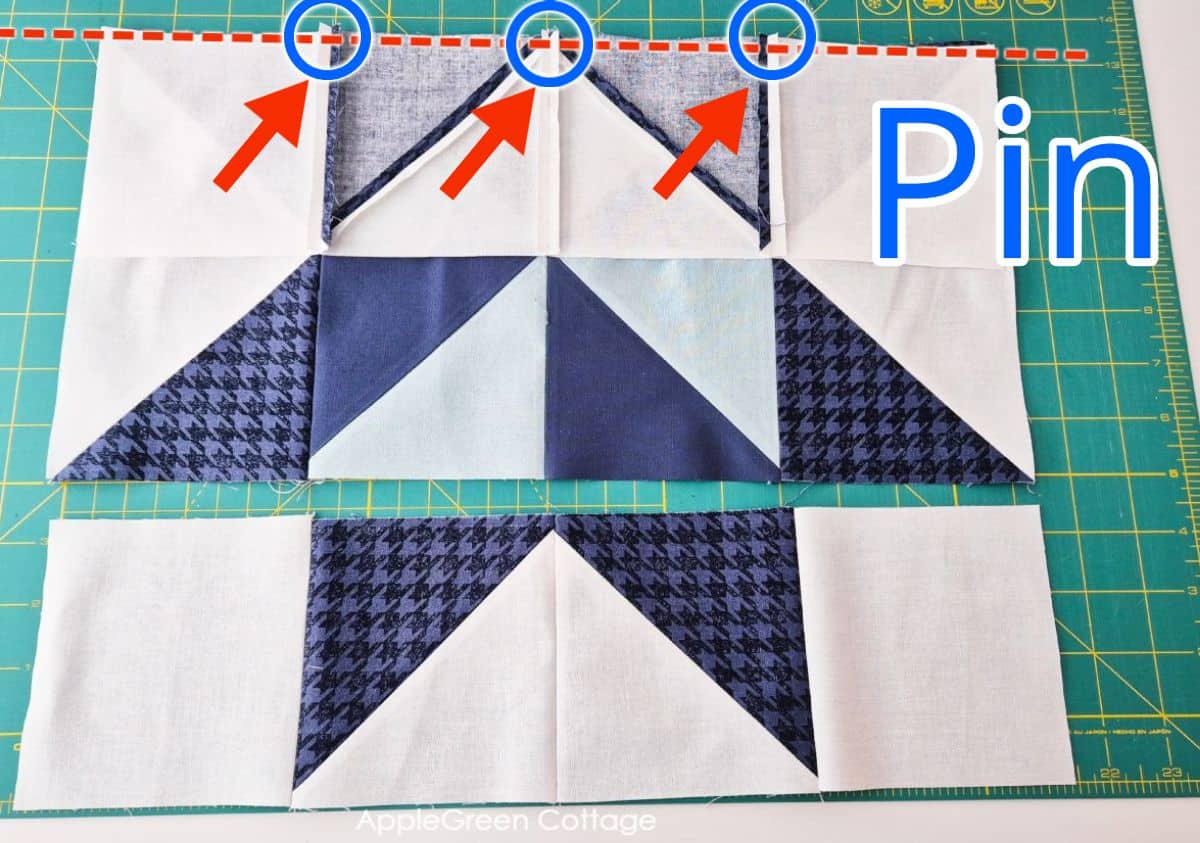
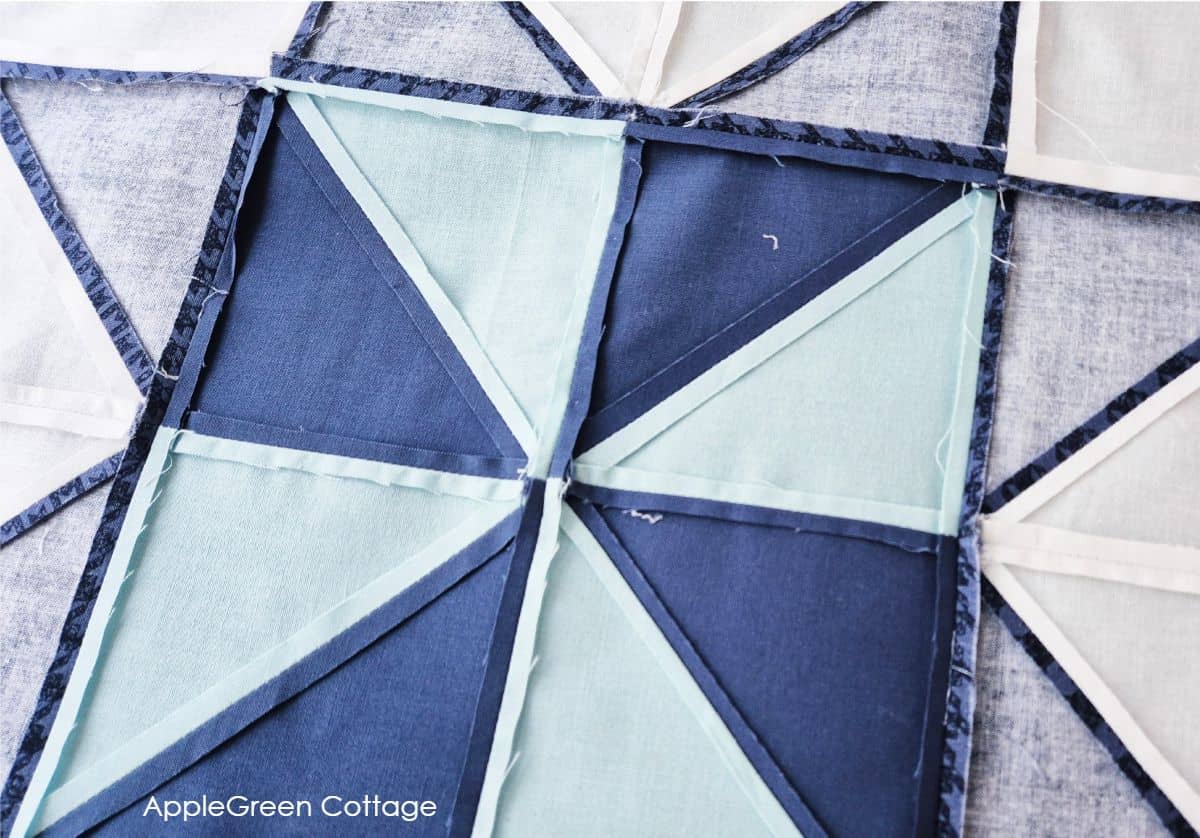
Step 6 - Lay Out Your Quilt Top
Arrange all blocks as seen in the image below:
- place the pinwheel block in the center (it's already smaller by ½" since its 4 units are already sewn together);
- 4 D-fabric squares are your corners;
- carefully arrange the remaining HSTs around the pinwheel, to form a star shape - mind the directions:
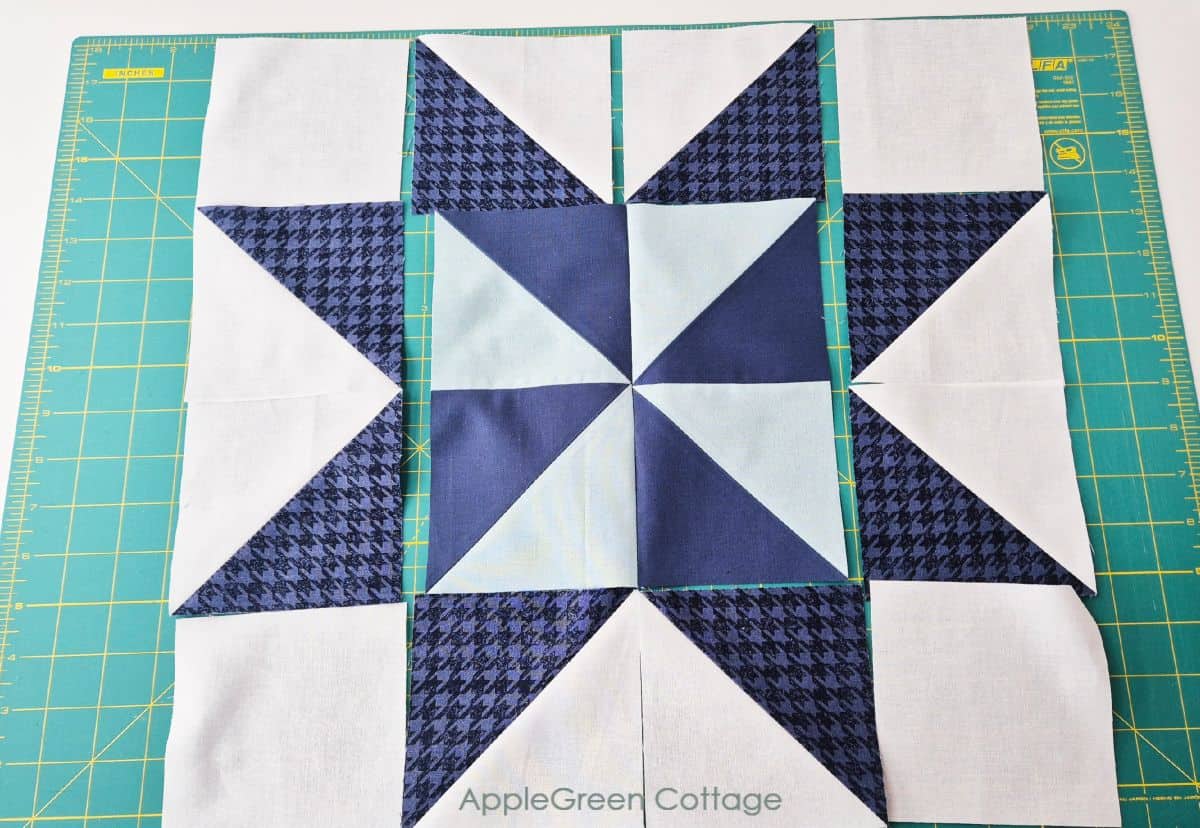
You'll get an eight-pointed star block: a pinwheel in the center, surrounded by 8 HST units, and 4 white corners.
Step 7 - Sew Rows
Top Row: Sew the 4 top-row blocks together using the standard ¼" seam allowance and press them open.
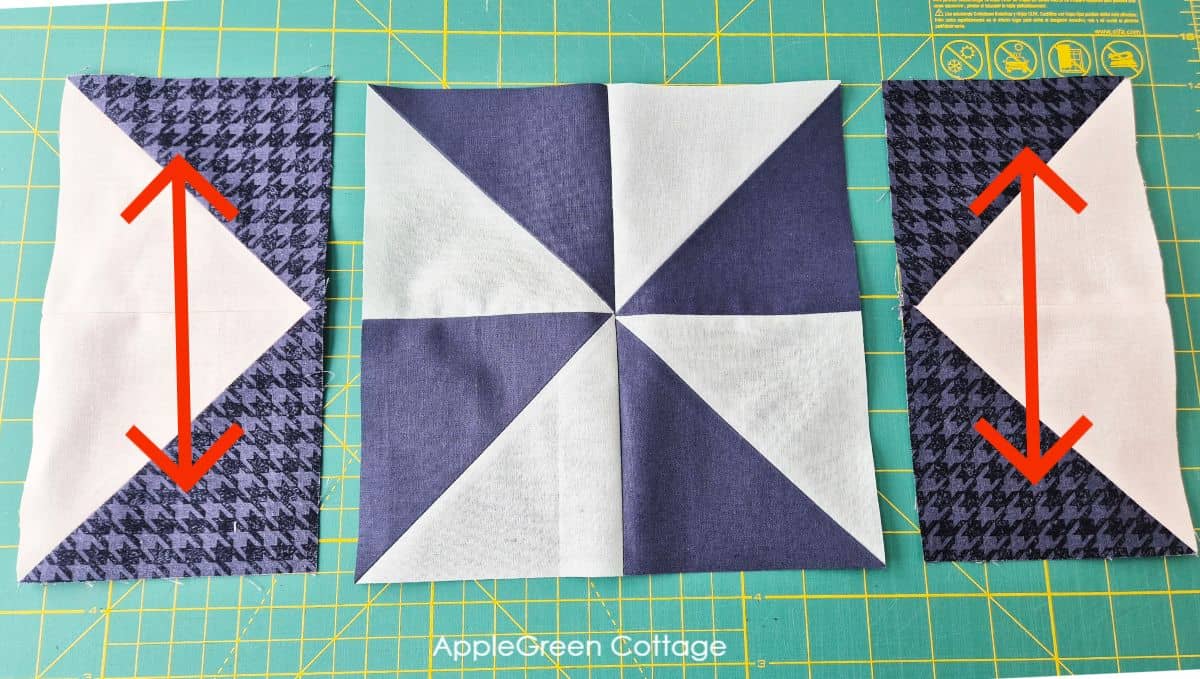
Center Section:
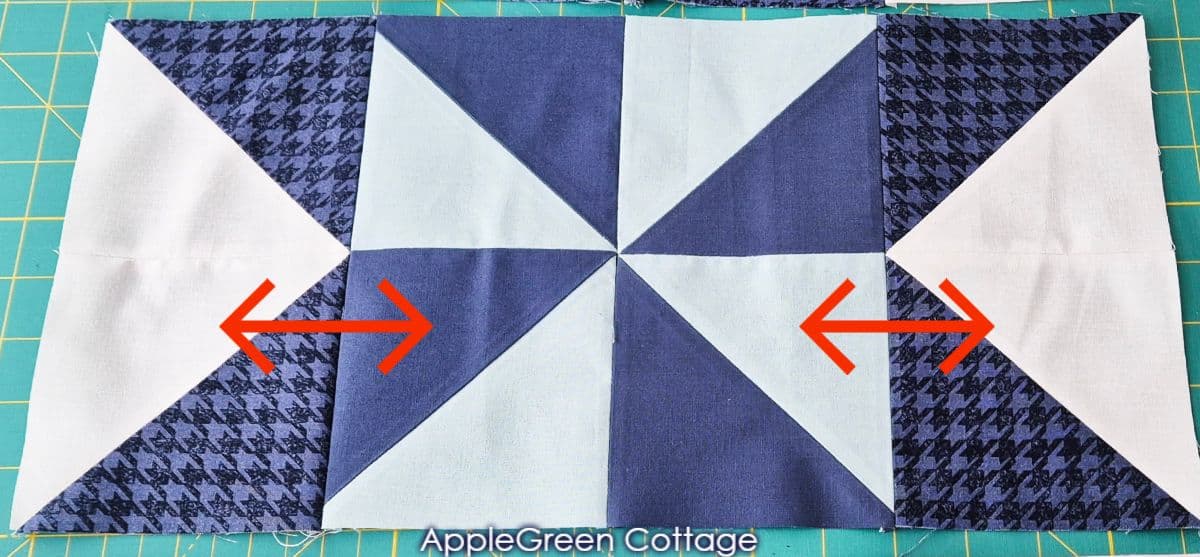
First, join the blocks on the right and the left side of the pinwheel. Mind the direction:
You get 3 sections - now join the left and the right section to the pinwheel block, with points oriented towards the center:
Bottom Row:
Sew the 4 bottom-row blocks together and press them open:
Step 8 - Finish Quilt Top
Now you have these 3 sections - join them and your quilt top is finished:

TIP: Now it's time to try your best getting those points pinned before sewing them together. Even if I don't like pins this is where they really help me get those spots together nicely. ↓↓
Step 9 - Add Batting and Backing
- Lay your backing with the right side down and
- place the batting on top of that.
- Then, place the pieced quilt top layer with the right side up.
Make sure to smooth out any wrinkles and spray-baste quilt layers together.
Randomize Quilt Pattern
Love modern quilts but want something simple - and NO tricky points to match? →THIS.
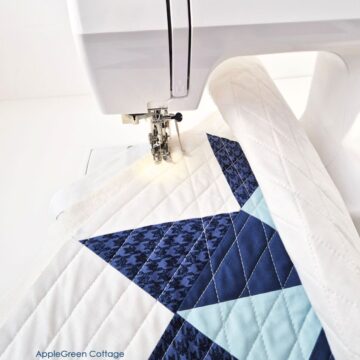
Step 10 - Time to quilt!
Use a walking foot to stitch through all three layers. My favorite, and the easiest technique is simply straight-line quilting. Starting in the center, I sewed vertical lines one inch apart and then again diagonally, to get a diamond grid.
For more easy quilting options, see my favorite 14 walking foot quilting designs.

TIP: When quilting, avoid stitching in the ditch (that is, exactly on the pieced seams) since the seams are pressed open.
Step 11 - Square Up
Square your quilt up to the 16 ½", making sure you don't cut off any points on your edges. New to quilting? → Here's how to square up a quilt.
If you want to use your mini quilt as a wall hanging, now's also the time to add quilt hanging corner pockets. I used two 5" squares for this, leftovers from a different project.
Step 12 - Add Quilt Binding
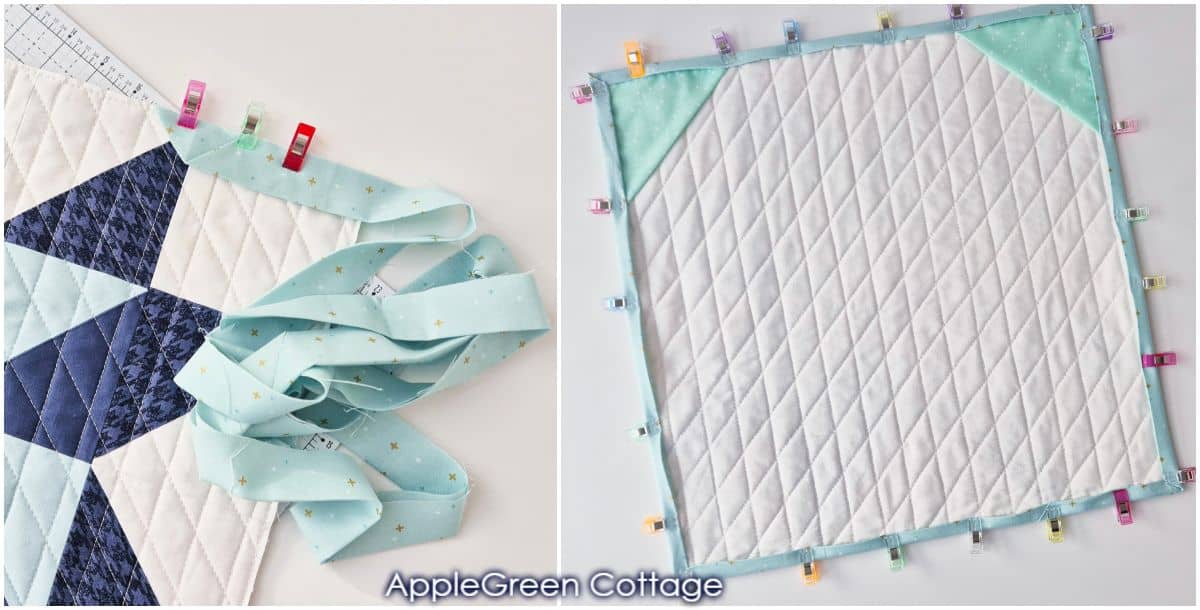
Attach binding. If you're entirely new to quilt binding, check out my easy quilt binding tutorial - I show you how to machine bind your quilt, and where to start (and why).
It can be easier for you to start attaching the binding at the back. Here I started machine binding on the front side of my quilt. Plus, I always use this clever binding hack!
Related Projects
6 Quilty Ideas +BONUS
Love a quick quilty win? Don't miss THESE!
Looking for other projects like this? Try these quilt blocks:


I hope you liked this mini quilt tutorial, as well as the tips to help you create your own mini quilt. Want more quilting patterns? See this beginner quilting patterns post.
The EASIEST Patchwork Quilt!
Here I'll also answer a few questions from our readers:
Useful Tips For Beginner Quilters
These simple tips will help you build confidence and skills:
How to Press Seams On This Quilt
For this pinwheel star mini quilt tutorial, I chose to press all the seams open to reduce bulk as much as possible:
But you're asking whether to press to the dark side, or to press seams open - both methods have their advantages! In general, pressing open is best for reducing bulk, while pressing to the darker side adds strength. And, it always depends on your personal preferences.
So when to press quilt block seams open vs. to the darker side? Here's a clear comparison to make it easier for you:
Pressing Seams to the Side
- Adds strength and durability
- Helps 'nest' seams together for easier piecing
- Faster to press
- BUT Can create bulk at seam intersections
- May cause fabric distortion in dense seam areas
Pressing Seams Open
- Reduces bulk at intersections, creating a flatter quilt
- Less distortion on seam intersections (gives me a cleaner finish!)
- Might not be so easy to match points (you'll have to pin)
- Can weaken the seam slightly since there's no extra fabric reinforcement (do not stitch in the ditch over these open seams!)
How to calculate the length of quilt binding?
When you want to figure out how much binding you need for a quilt, you'll need the exact measurements of your squared-up, unfinished quilt. You'll need at least 10 inches more than the perimeter of the project you're working on.
As an example, this mini quilt is 16 ½" square, so it's 16 ½" multiplied by 4 when we go around all corners of your quilt. Then add 10" to make sure you don't run out of your binding and to make sure the ends overlap.
Don't like quilt math? Use out FREE Binding Calculator (plus 5 more free quilt calculators!) ↓↓↓
What Ruler Is the best for trimming HSTs?
- Creative Grids Ruler - Non-slip grip and Turn-A-Round feature for precise ½" and 1" measurements, ideal for HSTs.
- Bloc-Loc HST Ruler - Locks into seams for perfect alignment and trimming without shifting.
- Quilter's Select Square Ruler - Non-slip surface and clear markings for precise trimming, especially for small HSTs.
- Deb Tucker's Tucker Trimmer - Versatile ruler with diagonal guides, great for precision piecing and triangle-based units.
- Omnigrip Square Ruler - Classic choice with bold gridlines and compact sizes, reliable for accurate HST trimming.
See my 4 Favorite Quilting Rulers!
Bonus Tip: Rotating Cutting Mat Will Make Trimming Quilt Blocks Easier
Pair your favorite ruler with a rotating cutting mat to make trimming even easier. Instead of lifting and repositioning your fabric, you can simply spin the mat, maintaining accuracy and saving time.
Get FREE Quilt Project Planner!
I hope you liked this pinwheel star mini quilt tutorial, and now have a lovely mini wall hanging embellishing your sewing corner. I can't wait to see what you create!
To make it even easier, I designed this free quilt project planner - it will make creating your quilts even easier to track. Get it now:
Sew This Handy Storage Tote!
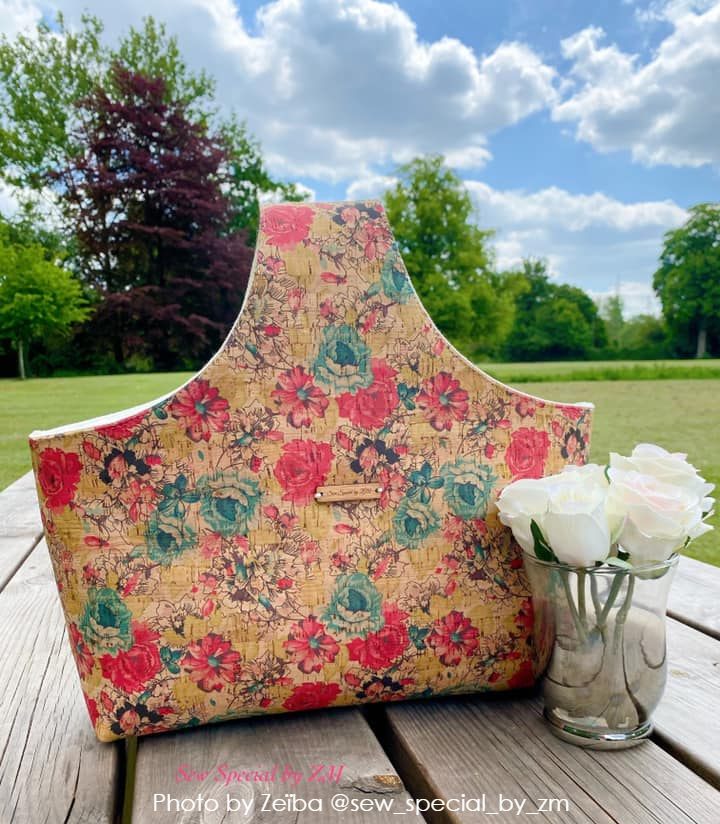
Check out this pretty ALLina project tote pattern in our shop - for all your storage needs!
Want a printable copy of the whole quilt tutorial?
Want a printer-friendly option of the whole tutorial without ads? See the → optional PDF file in our shop.
This tutorial is also part of Printable Tutorials BUNDLE
90+ PDF tutorials now, and growing!

Gin Jones says
Would it be possible to have the FINISHED SIZE for your quilt tutorials noted with the name, or at the top of the description? That information is what I look for first when choosing a quilt pattern. Thanks!!!