
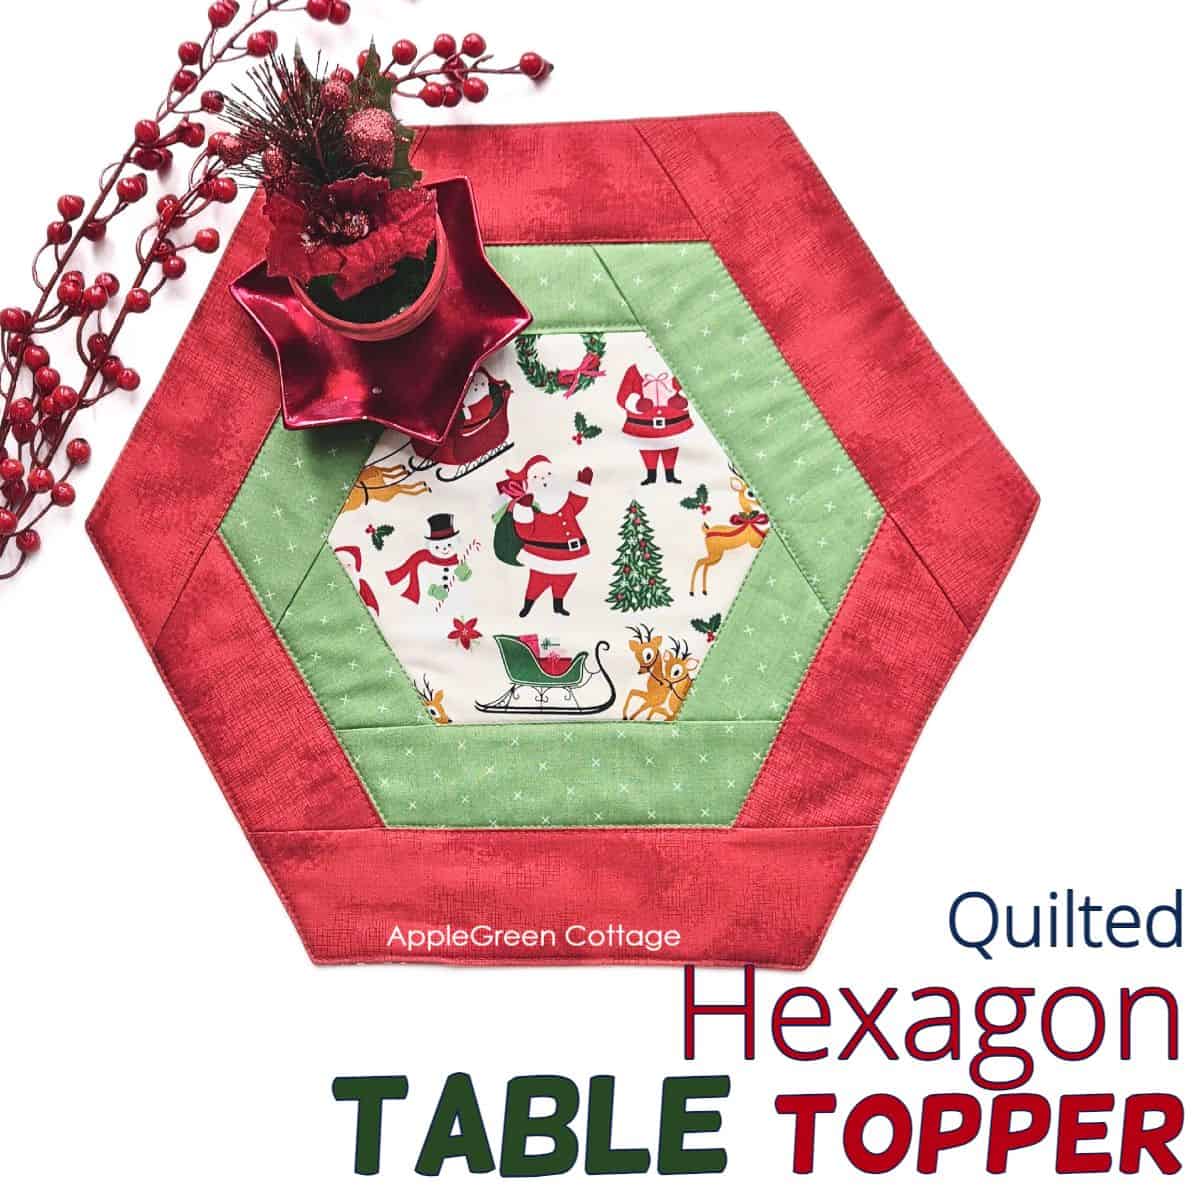
See how to sew an easy hexagon table topper for Christmas - it's reversible! Super easy and quick with our multi-sized, free quilted hexagon table topper pattern.
This Christmas table topper tutorial uses a multi-sized template to create a center of your Christmas table topper, and the size is entirely up to you. Keep it small or add layers to cover a huge holiday table with it. Yes it's that versatile!
Prefer a printable copy of the whole tutorial?
Prefer a full, ad-free and printer-optimized Printable Tutorial with both pattern AND instructions included? ↓↓

This tutorial is also part of Printable Tutorials BUNDLE
100 PDF tutorials now, and growing!
Table Of Contents
If you're here for holiday sewing, also check out this easy pointed-ends Christmas table runner tutorial, the Christmas quilted table runner pattern, or go full-in with sewing Christmas gifts for all your loved ones.
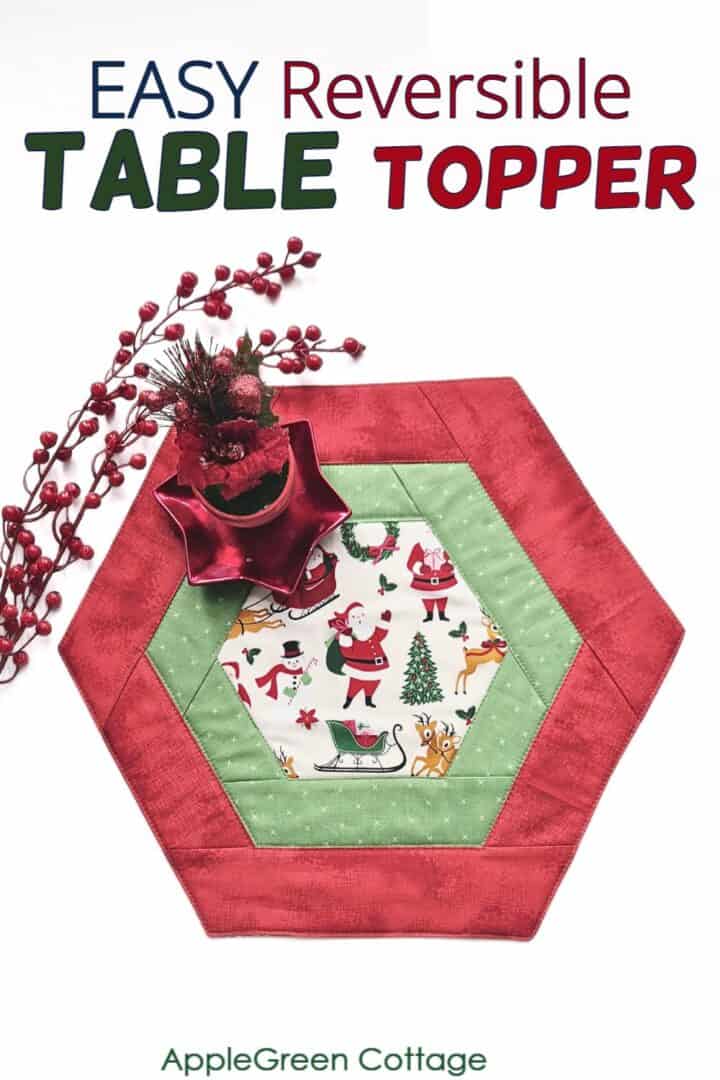
Pretty, reversible, and multi-purpose!
Here's why I love this hexagon table runner: it makes a beautiful, unique Christmas centerpiece, it's perfect for fussy cutting, easy to resize to fit your table, and - it's reversible! You can even make a set and turn them into festive placemats for your Christmas dinner.

This Christmas table topper pattern has a polished, professional look, yet it's incredibly easy to make - you won't even need to bind it. Plus, it's perfect for showcasing detailed fussy-cut designs!
Supplies
Shop my personal favorite sewing supplies on Amazon HERE.
I used quilting cotton and the standard, 80-20% cotton-poly batting for this project:
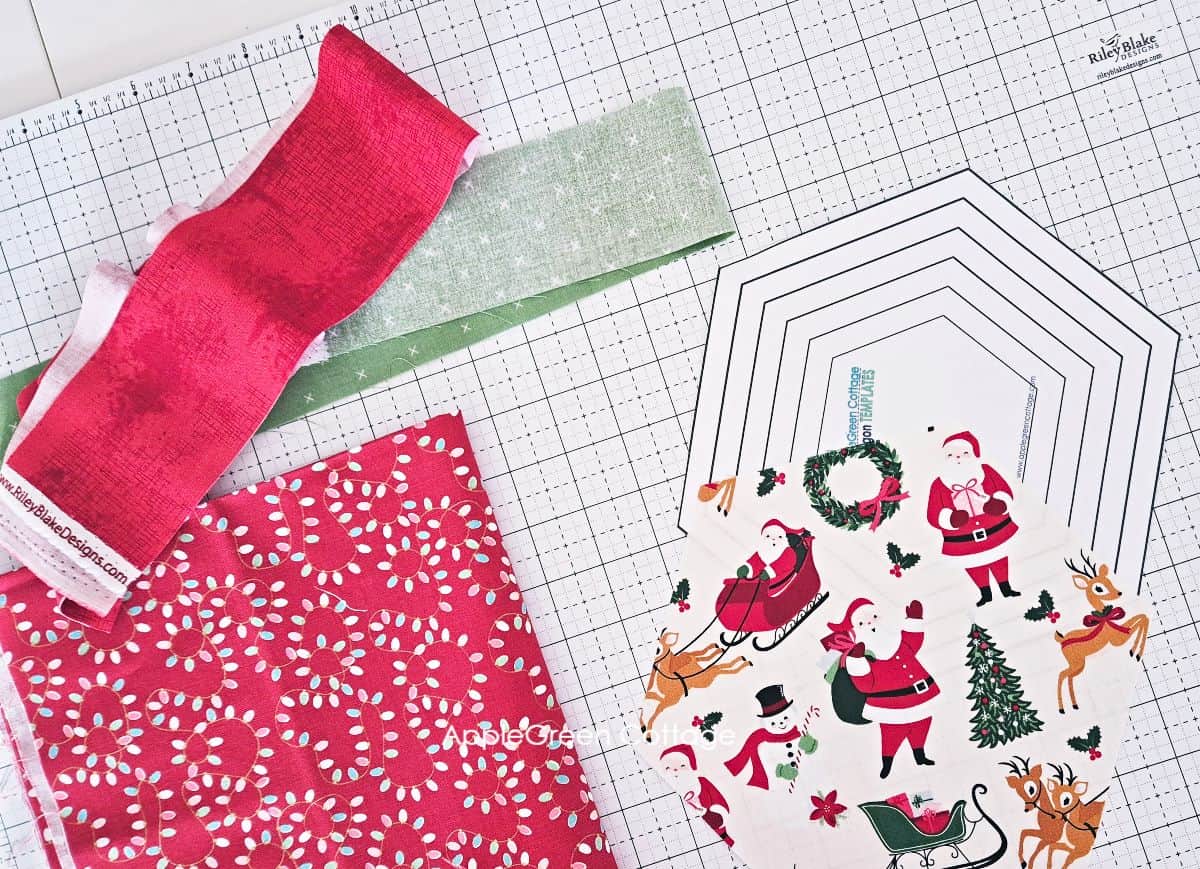
- Focal Fabric (Fabric A) a 9 by 8" piece (here: Santa print in creme)
- Fabric B 2 ½" strip, cut along the Width of Fabric (WOF - your fabric's width needs to be at least 42")
- Fabric C - two 3" strips, cut along the WOF (red)
- Backing Fabric - a fat quarter (here: red Christmas Lights print)
- Batting - same size as Backing Fabric
- a large quilting ruler, a rotary cutter, and a cutting mat
- the usual: sewing machine, thread
- free hexagon template in 6 sizes
What fabric to use for the hexagonal centerpiece?
The hexagon center will be the focal point of your table topper, making it an ideal spot for a striking fabric. Consider a scenic print or a high-volume holiday pattern - something bold and vibrant with rich colors or dense motifs that will draw attention. Busy prints with lively designs are perfect here!
What fabric to use for the surrounding strips?
For a coordinated look, go with non-directional blender prints or solid colors for the surrounding strips. These add a bit of texture without pulling attention away from the center.
The backing is entirely up to you. I used a cute red Christmas lights print I have had in my stash since I created this DIY advent calendar a few years ago.
Finished Size
The finished size of the table topper I made is 18" across (between the points) and 16" from top to bottom. I used the largest hexagon template and utilized a 2 ½" strip for the first border (green) and a 3" strip for the second border (red).
You can adjust the size to your needs, simply by adding more (or wider) borders.
What is the size of the hexagonal centerpiece?
The free hexagon template for the Focal Fabric piece includes 6 sizes from 4" to 9" across the diagonal and 3 ½" to 7 ¾" from top to bottom. The sizes enable you to adjust your Focal Fabric print size. Simply choose the largest size that fits your Focal Fabric print.
Sewing Video
Prefer watching over reading? Sit back, relax, and watch the video I made for you. Then get the template and start sewing.
How To Make a Hexagon Table Topper - STEPS
Step 1 - Print the template
Join our mailing list and get the free hexagon table topper template emailed to you:
Do you want a printable copy of the WHOLE tutorial? → See it HERE or get it in the huge-value BUNDLE!
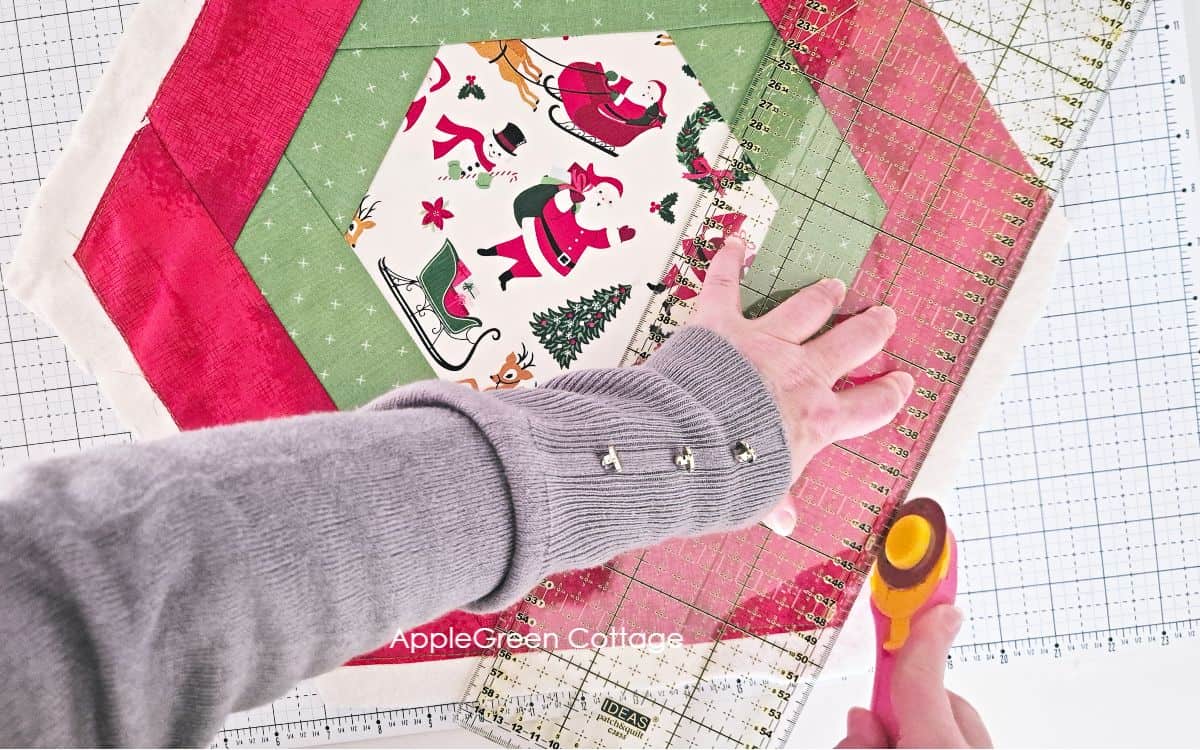
Step 2 - Cutting Directions
Press and cut the fabric pieces:
- use the template to cut a hexagonal shape from the Focal Fabric (Fabric A) - simply use the largest size that fits your fabric print.
- From Fabric B, cut one strip measuring 2 ½" wide along the Width of Fabric (WOF). You'll need at least 42" WOF.
- From Fabric C, cut two strips measuring 3" wide along the WOF.
Do not cut your batting and backing, you'll cut them later.
Now on to sewing. Want to know the only secret to creating these borders? It's repetition: we'll just keep adding 3 non-adjacent strips at a time. This way, our hexagon will keep growing. And you can either stop where I do, or keep adding to end up with a larger size.
Step 3 - Create the first border (green)
First cut your Fabric B strip in 6 pieces: three at least 5" long pieces, and three at least 9" long pieces. This will use up the entire 42". The strips can be longer if you have more fabric (i.e. more WOF).
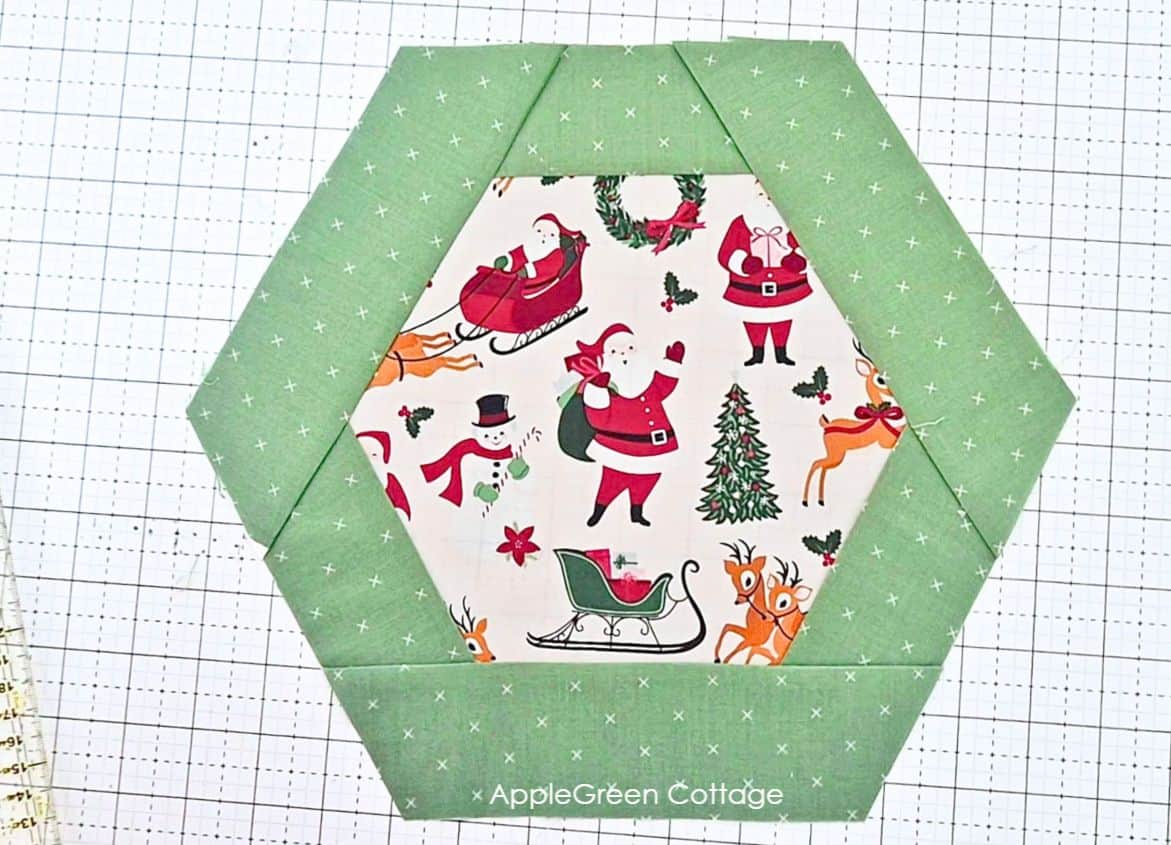
Start by laying down your hexagon with the right side up, with the motif facing you.
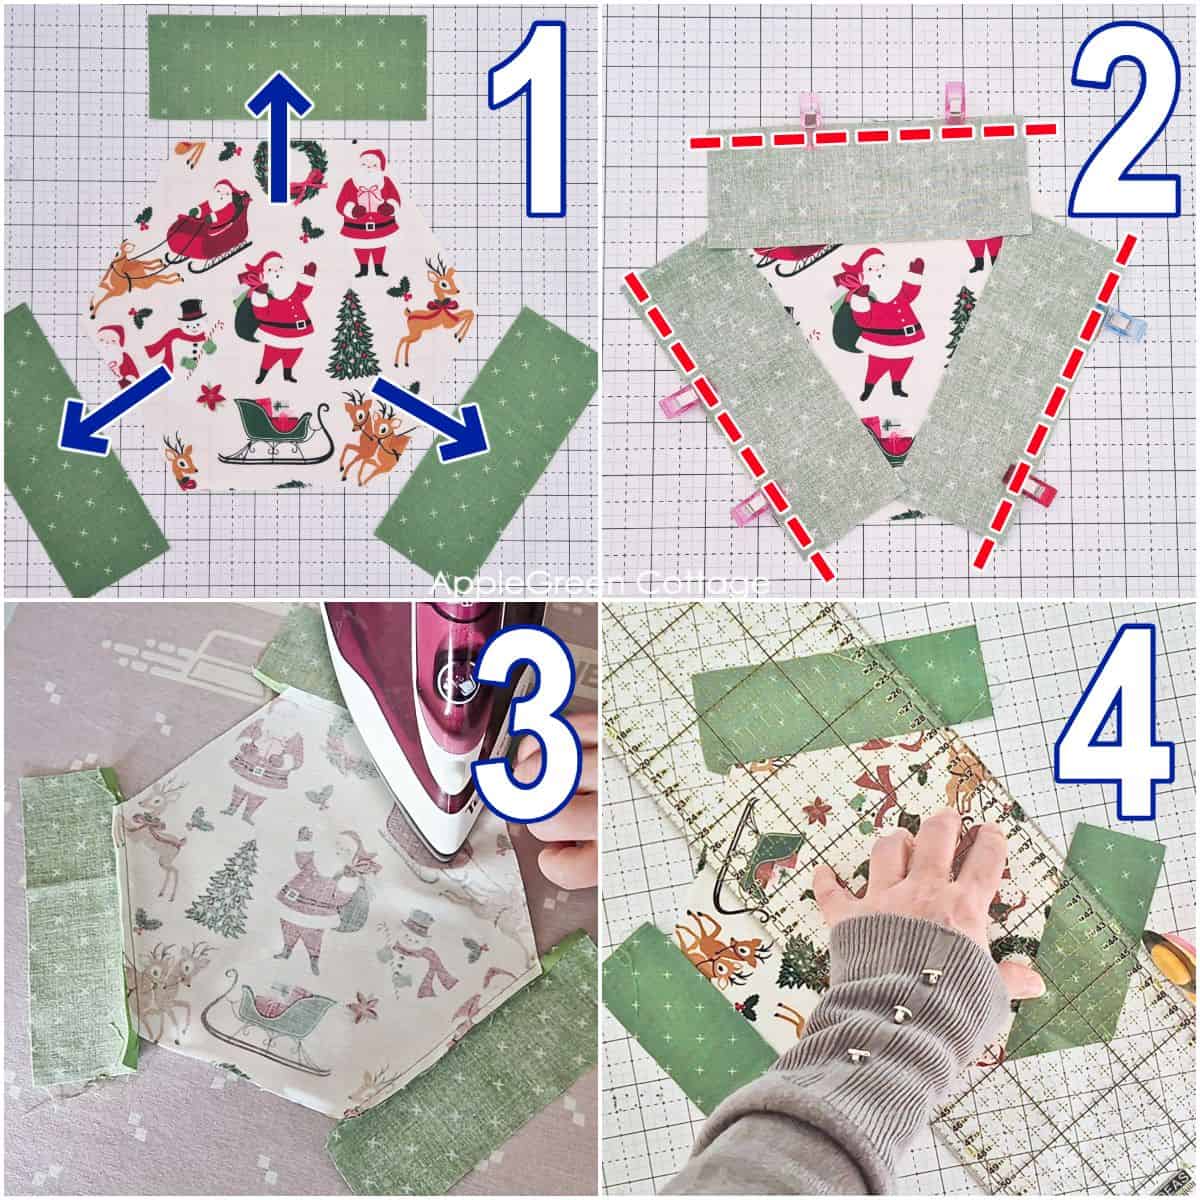
- Arrange the three short pieces: 1 along the top edge of the hexagon, and 2 along the 2 bottom sides, with the right side down.
- Sew the strips in place using a ¼" seam allowance.
- Press the seams away from the center.
- Cut off the excess strip ends to align with the original hexagon edge.
Top Tip For Directional Prints
If you're using directional prints for your strip fabrics (B and C), lay the strips face-down on the hexagon with the print direction pointing toward the center. After you sew and press the strips open, the print direction will be perfectly aligned, facing outward from the center of the hexagon.
This is what you have now, with the first border half-done:

Continue with the second part. Like before, lay down+pin 3 (non-adjacent) strips, sew them in place, press the seam allowance away from the center, and trim excess:
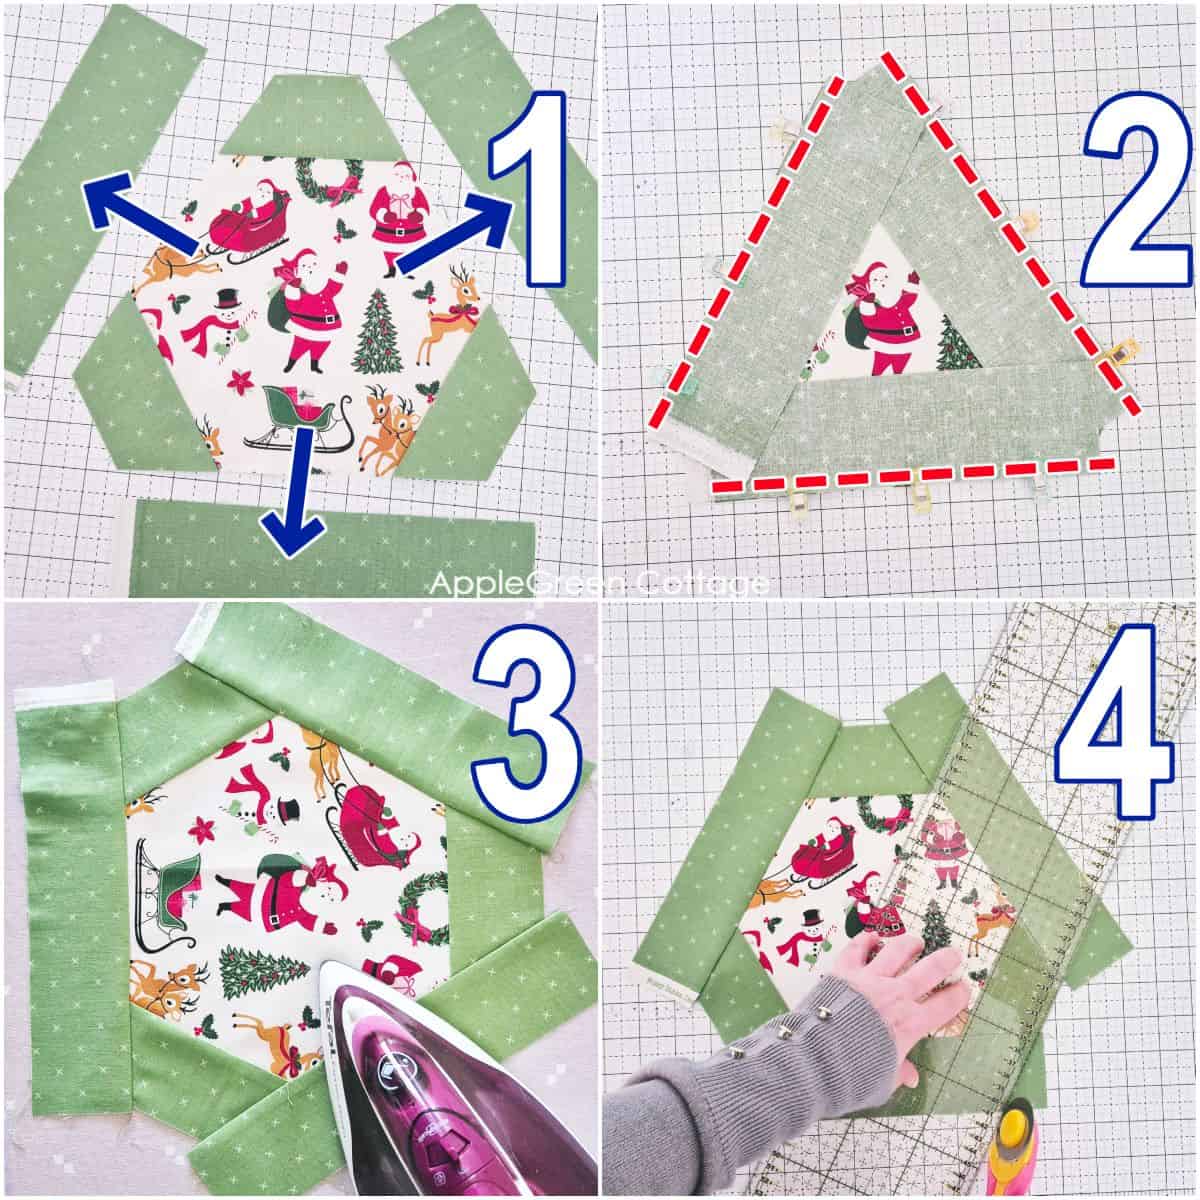
Great, now you have your first border finished:
Step 4 - Add the second border strip
First cut your Fabric C strip in 6 pieces: three at least 7" long pieces, and three at least 13" long pieces. The strips can be longer, this is the minimum for the hexagon size I used.
Lay down your hexagon with the right side up and the motif facing you.
We'll add the next border the same way as before: lay down+pin 3 SHORTER strips to non-adjacent edges, sew them in place, press away from center, trim excess:
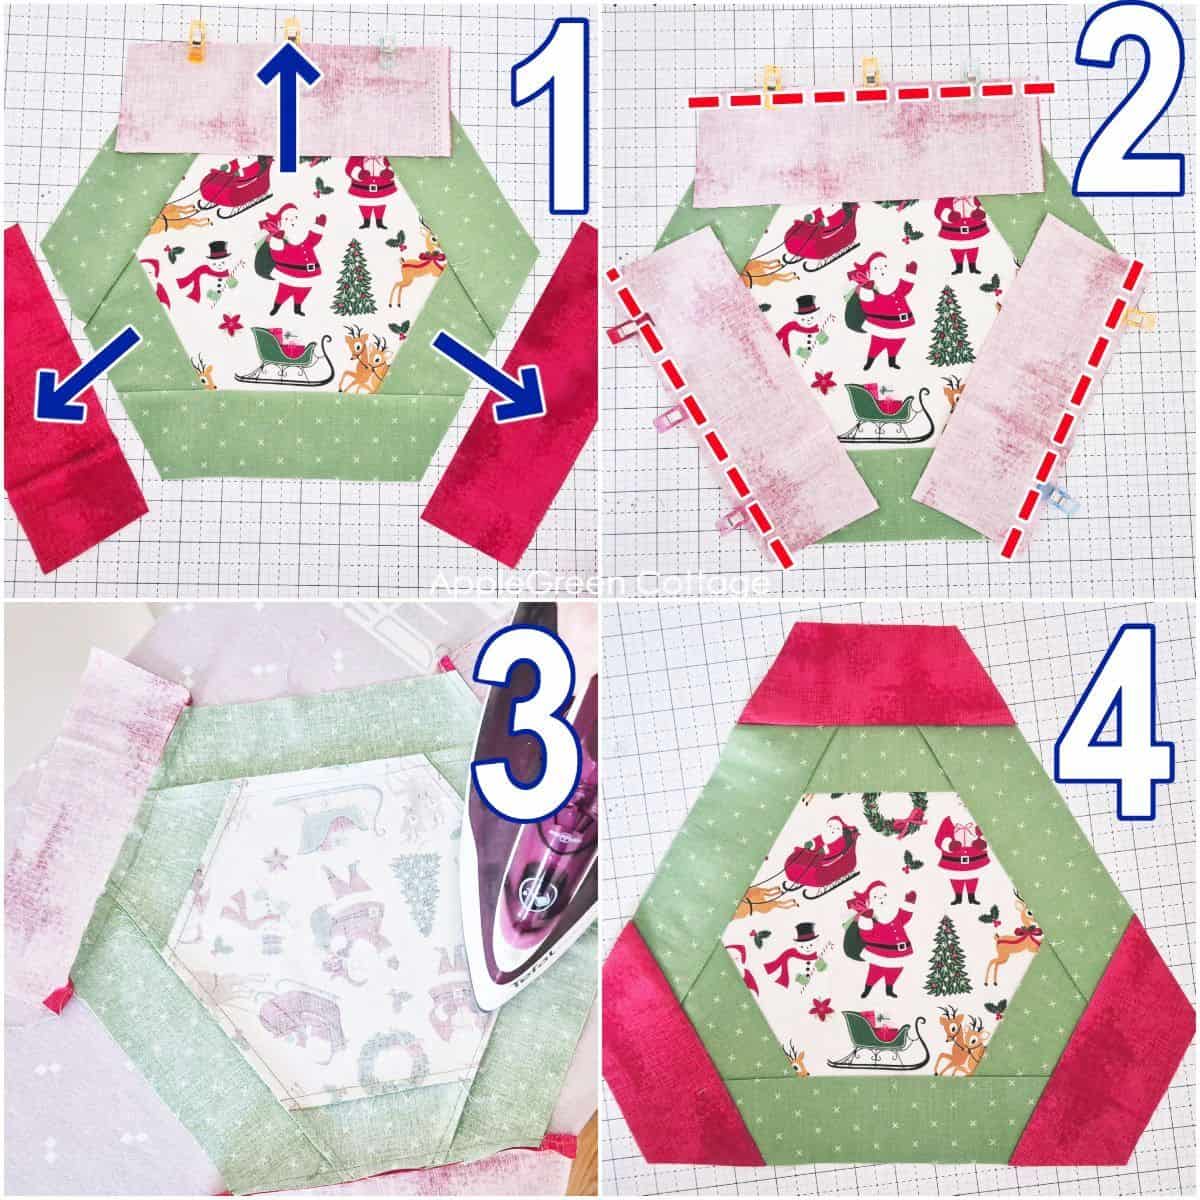
And the other batch of the red strips on the remaining (non-adjacent) edges:
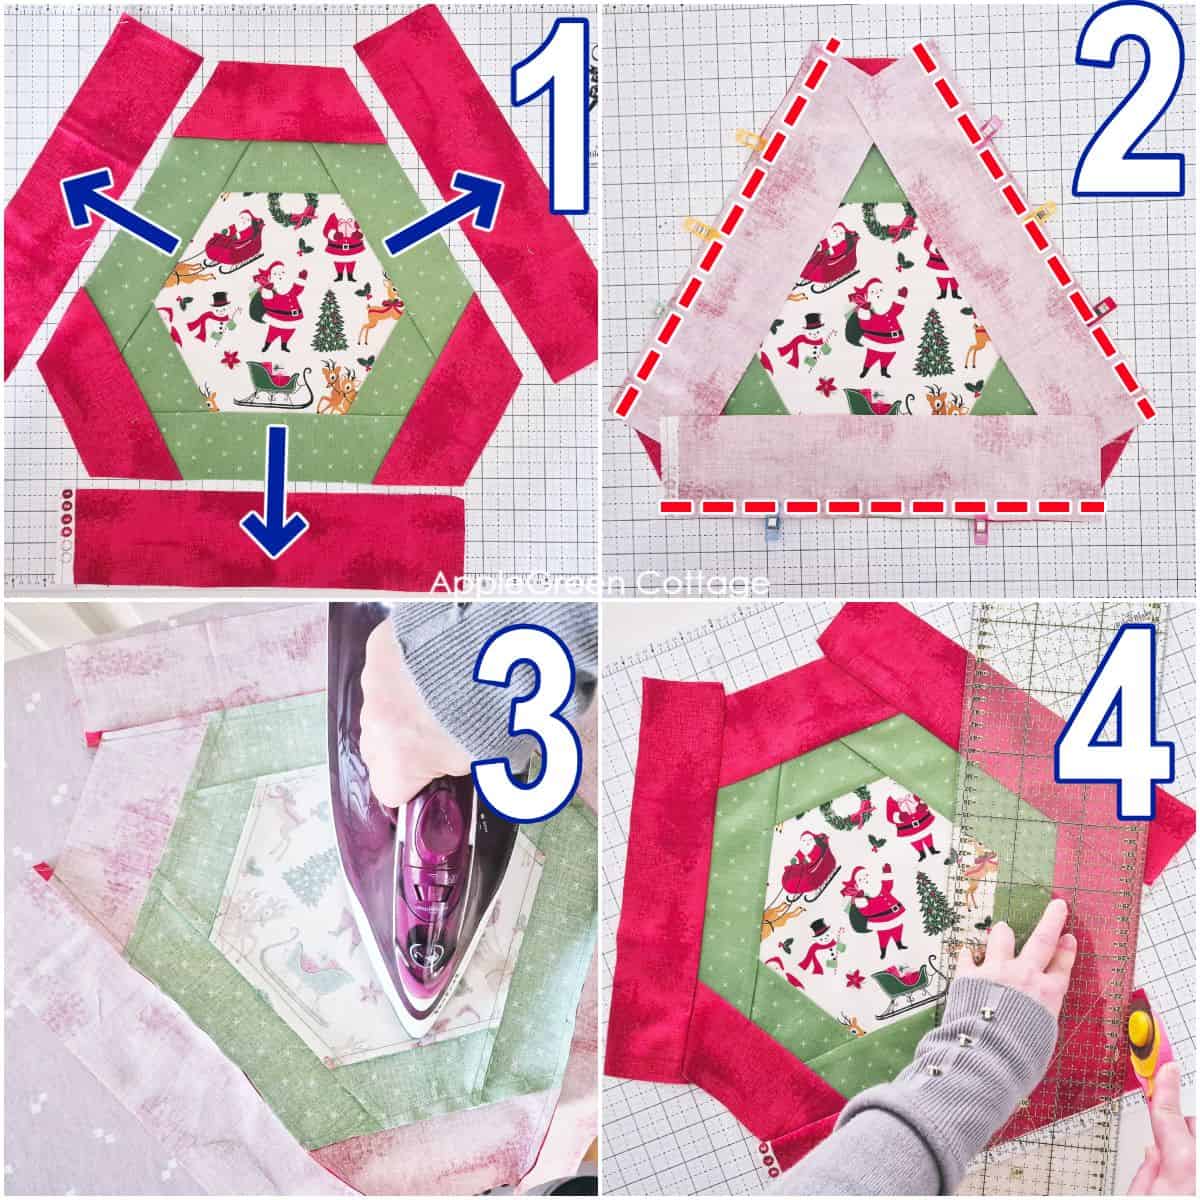
See, all we did was keep adding 3 non-adjacent strips at a time, and our table topper has grown to its current size. You can continue to make it even larger, or stop here with me. Which means we've completed the first part of the Christmas table topper tutorial, congrats!
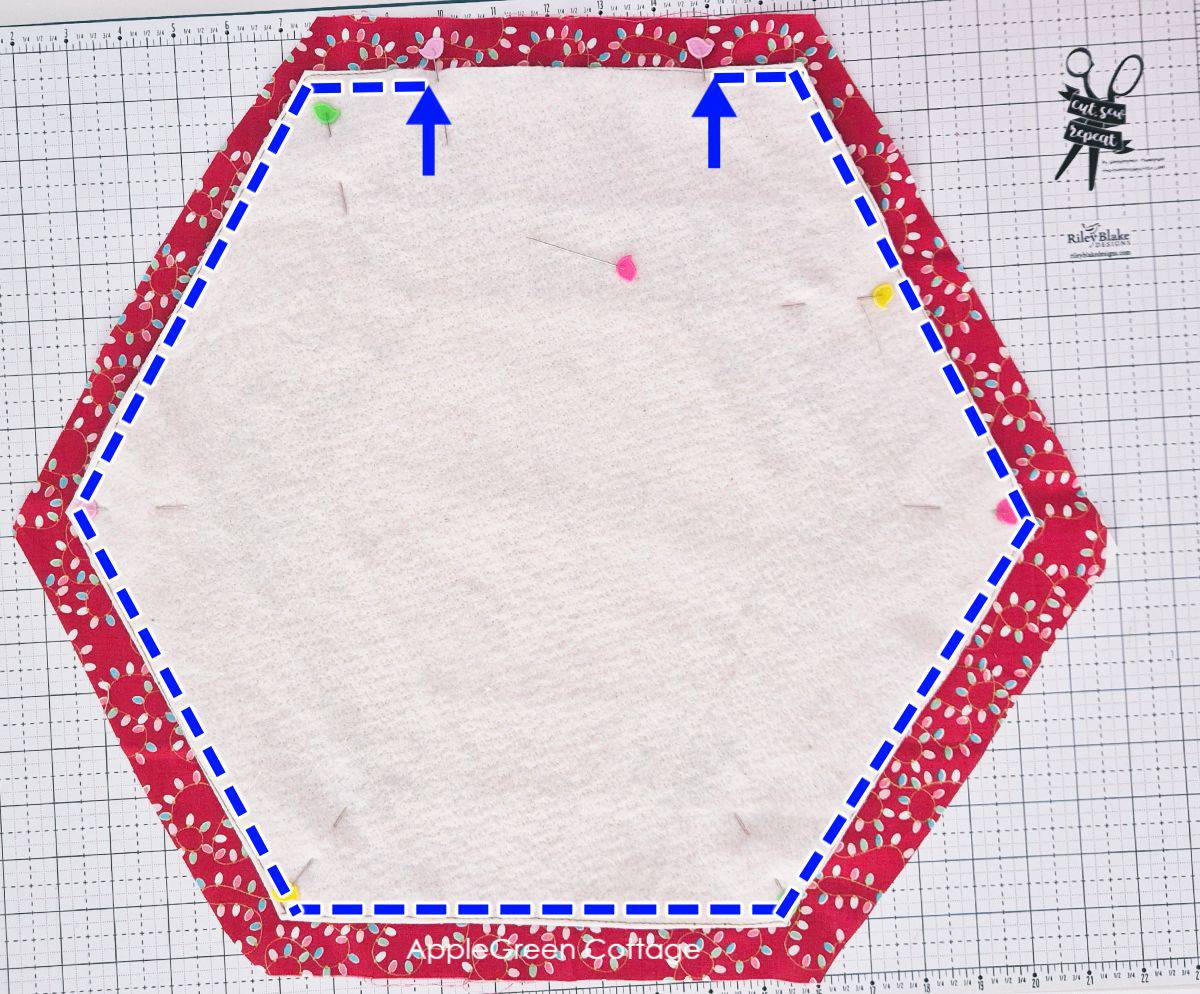
Step 5 - Add Batting
This is your beautiful quilt top when you add batting: just place it on your batting and cut around. I cut it just a bit larger than the quilt top:
Attach the piece onto the batting - I spray-basted it and then machine-basted around the quilt top just ⅛" away from the edge. Once you've done that, trim off the excess batting:
Step 6 - Add Backing
Time to add the backing to your table topper quilt! Press your backing fabric and cut roughly an inch around your sewn piece to get an approximate size.
Lay your backing with the right side up and place the quilt top on it with the batting facing you. Pin in place, then sew around, leaving a turning gap on one of the six edges of your hexagonal topper.
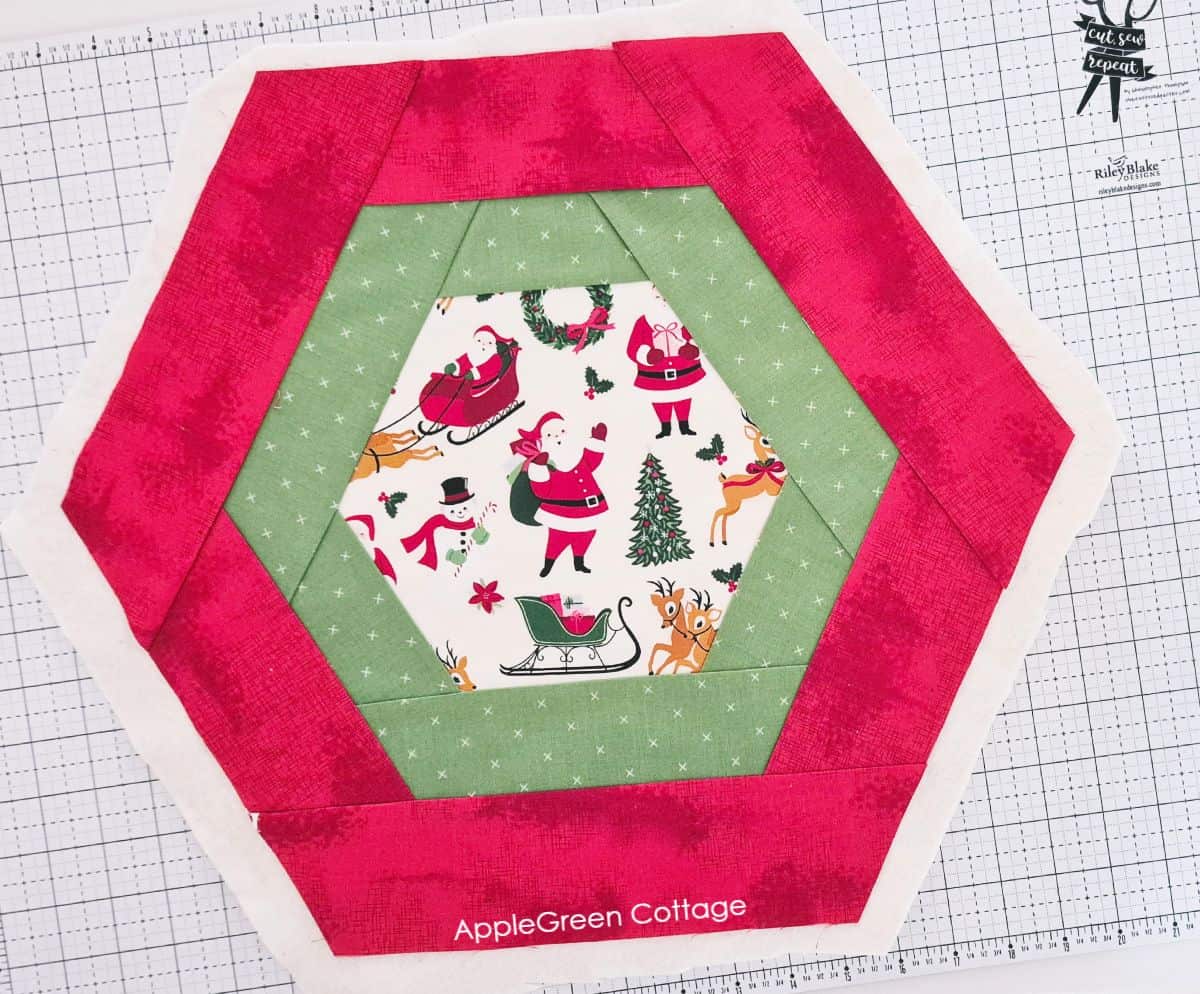
Step 7 - Turn Right-Side-Out, Press, and Quilt
Once sewn, trim off the excess backing fabric, except on the unsewn area - the turning hole.

Turn the table runner to the right side through the turning hole, poke the corners out using a non-sharp pointy item (chopstick or a point turner), and press well.
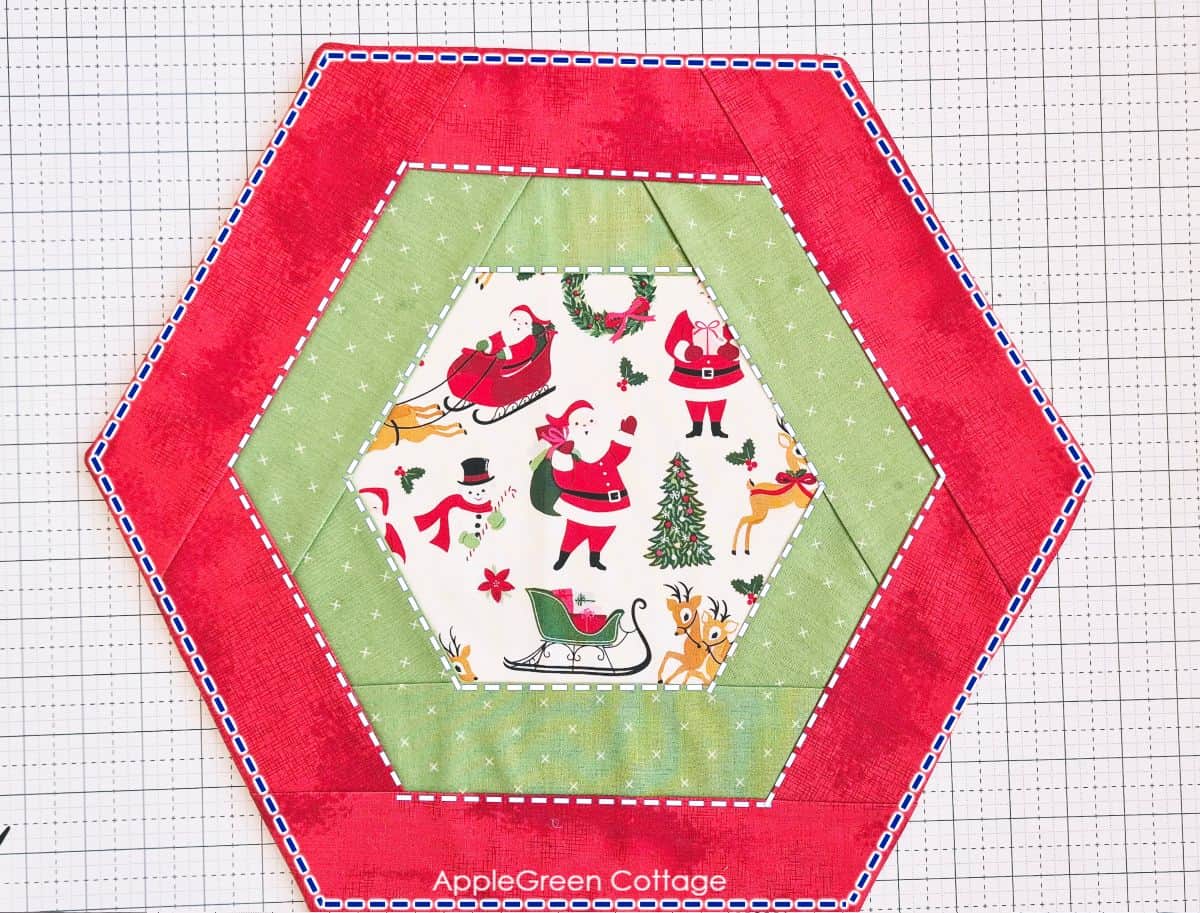
Close the turning hole. You can either hand-stitch it closed using this invisible hand-stitching tutorial or simply topstitch all around. This will close the gap too.
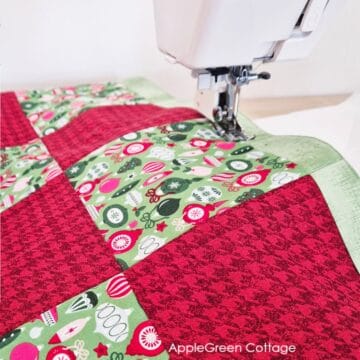
Now it's also the time to quilt along all or part of the piecing seams, as the image above shows. It keeps the backing nicely flat for future laundering - and, it looks nicer. Tadaaa - your table topper for the holidays is finished, congrats!
Make a Matching Decor Piece!
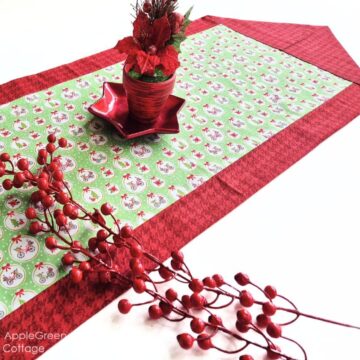
+1 Tutorial: Long Table Runner
Make a set with a longer table runner. so pretty!
Want more Christmas sewing? The hexie tabletop is part of this mini bundle:
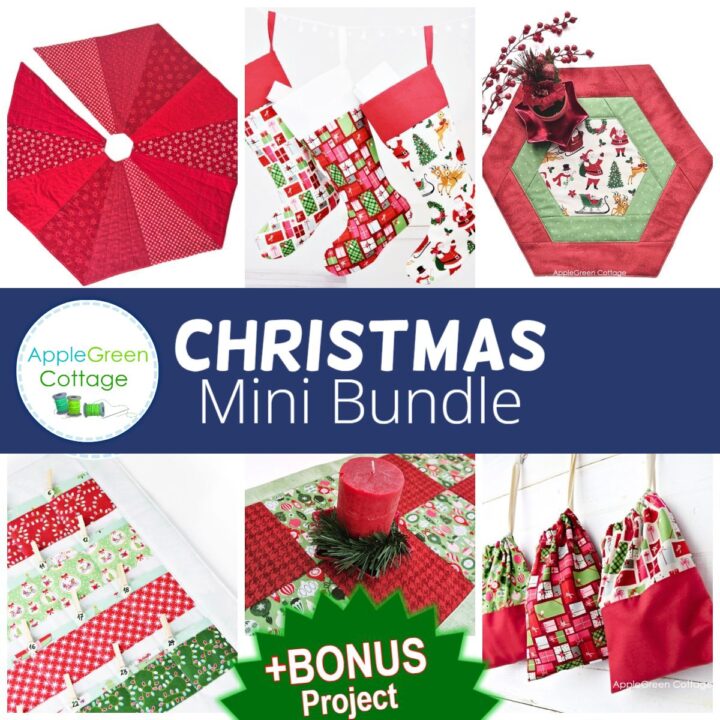
Sew For Christmas
Love sewing for holidays? See THIS!
Now, as promised, a list of tips and ideas to make it easier for you. I'll keep adding to it as questions arrive, so feel free to comment below and I'll do my best to help you out.
Helpful Tips
A good size for a hexagon table topper is 18 to 30 inches across. This works well for most tables, adding a focal point without overpowering the space. For smaller tables, try 15 to 18 inches, and for a bold look, go up to 36 inches.
You can easily adjust the size to fit your table by adding more strips, in sets of 6. For example, the tutorial creates a finished runner that's 18" across. To make it larger, simply keep adding the borders: first, add 3 non-adjacent strips and then 3 more. This creates an additional border around your hexagonally-shaped table topper, so it gets larger. - Also, see step 4 in our tutorial above.
Glad you asked! You can create three or five of these hexagon templates instead just one, and join them lengthwise into a long hexagon table runner quilt, and then add batting and backing - follow the tutorial above. Or, you can use English paper piecing to create a hexagon quilt with a lot of small hexies - use my printable hexagon templates in small sizes in the English paper piecing tutorial.
Related
Looking for other holiday home decor projects like this? Try these:

And if you want to create even more, check out all the free sewing patterns here at AppleGreen Cottage. Or visit our FREE sewing-for-home email series:

Join the FREE 7-part email course and make 6 beautiful items for your home! You'll love it!
Conclusion
I hope you enjoyed this tutorial. When you have your own project ready, post a photo to Instagram and tag me @applegreencottage or #applegreencottage - I'd love to see what you sew!
Also, Christmas table runner quilt patterns like this one make beautiful housewarming gifts. Maybe even add a set of easy potholders or a cute oven mitt, and place them all in this practical storage tote instead of wrapping it - it makes a wonderful, fully homemade holiday gift!
Want a printable copy of the whole tutorial?
Prefer a full, ad-free and printer-optimized Printable Tutorial with both pattern AND instructions included? ↓↓
This tutorial is also part of Printable Tutorials BUNDLE
100 PDF tutorials now, and growing!


Charlotte Claypoole says
I love the Hexagon center piece.
now if I wanted it bigger, should I make a bigger center?
was thinking if I added much to outside the center may look kinda small.
Thank you and you explained for even a beginner.
Damjana Jakos says
Charlotte hi, I'm glad you find the tutorial easy to understand. Also, a great question about the center. To be honest, this pattern is so versatile that it will work with eithere a larger (or smaller) hexagon center, but oyu can leave the center the same size and just keep adding strips of fabric around - or make these strips wider. Happy sewing!