
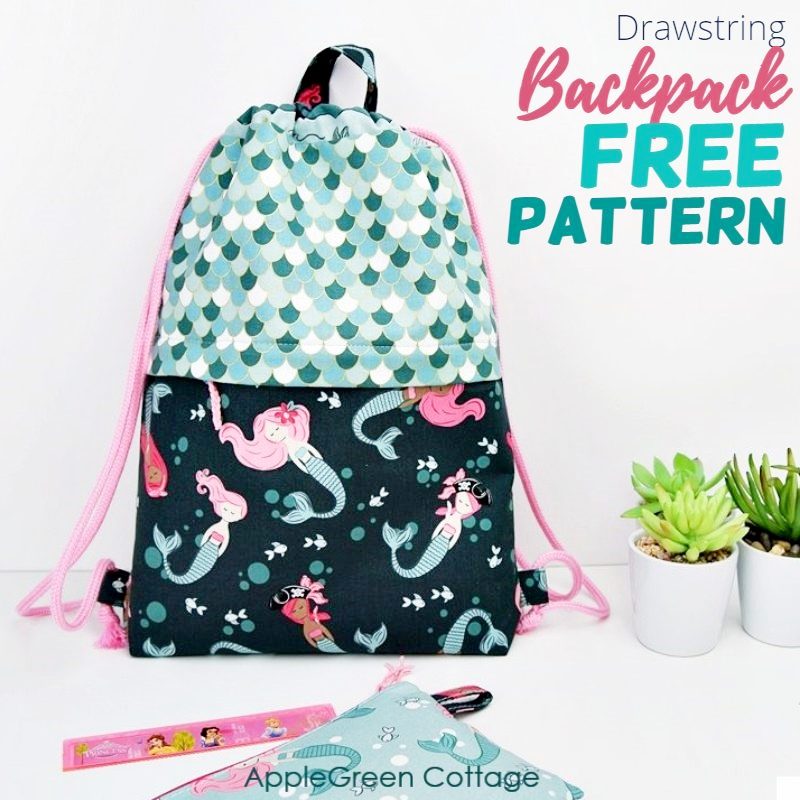
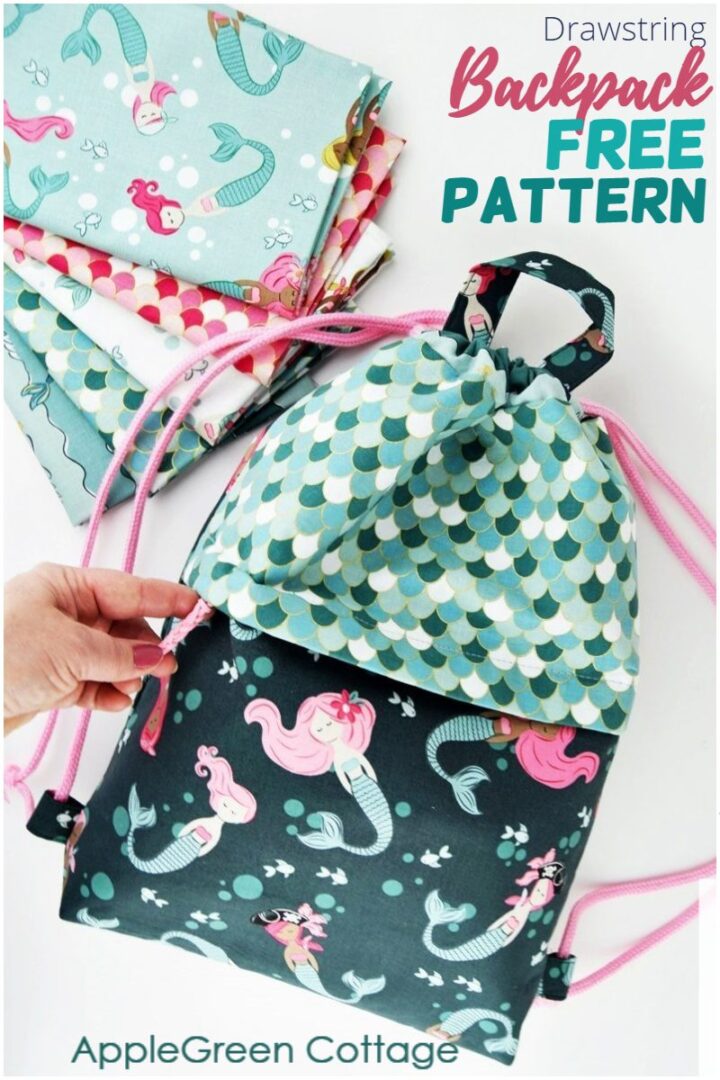
Make a cute diy backpack using this free drawstring backpack pattern and tutorial. See how to make a drawstring backpack that's easy but made in a professional way - with tweaks, all explained in easy and clear step-by-step photos. This backpack even has a zipper cover!
Are you here for even more bags? Check out my best tote bag pattern or jump right into the free bagmaking guide - tons of tips if you're new to sewing bags - or backpacks.

This tutorial is also part of Printable Tutorials BUNDLE
90+ PDF tutorials now, and growing!
Table Of Contents
Why You'll love this Backpack tutorial
First - I made this free backpack pattern work for everyone - no matter what your sewing skills. Yey! Second, it has tons of options. Choose among:
- a flat beginner-friendly option, or sew a flat-bottom drawstring backpack with boxed corners - stands upright!
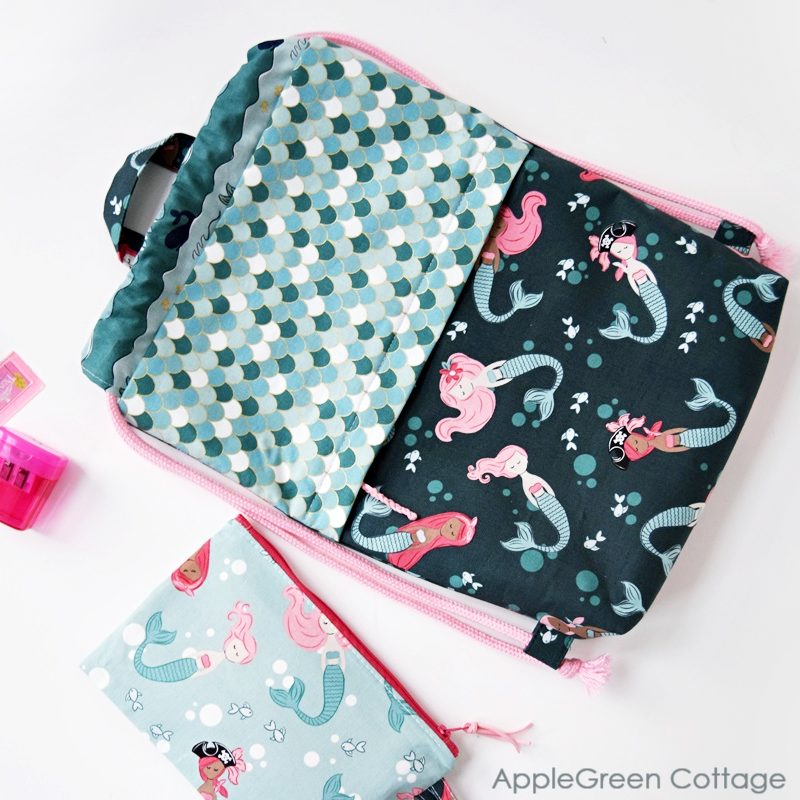
- Wide zipper pocket on the outside (easy yet classy!)
- Interior slip pocket with flap closure to keep valuables secure
- Small or large size - find the best fit below!
What Interfacing? - FREE Cheatsheet!
Not sure which interfacing to use? Start here:
Finished Size
Do you like the 'mommy and me' look? Well, these two will work great, the small drawstring backpack pattern is great for kids or for you when you don't need a lot to carry. And the large one will house a lot. Adult size, same features.
I also made the large version of this diy drawstring backpack a bit wider (not just proportionate to the small drawstring backpack!) so it's even easier to place bulkier items in it.
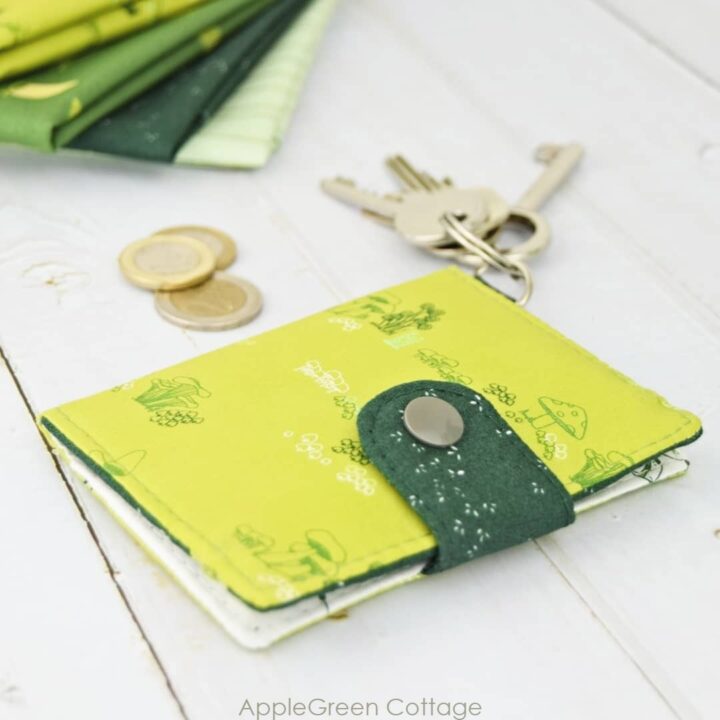
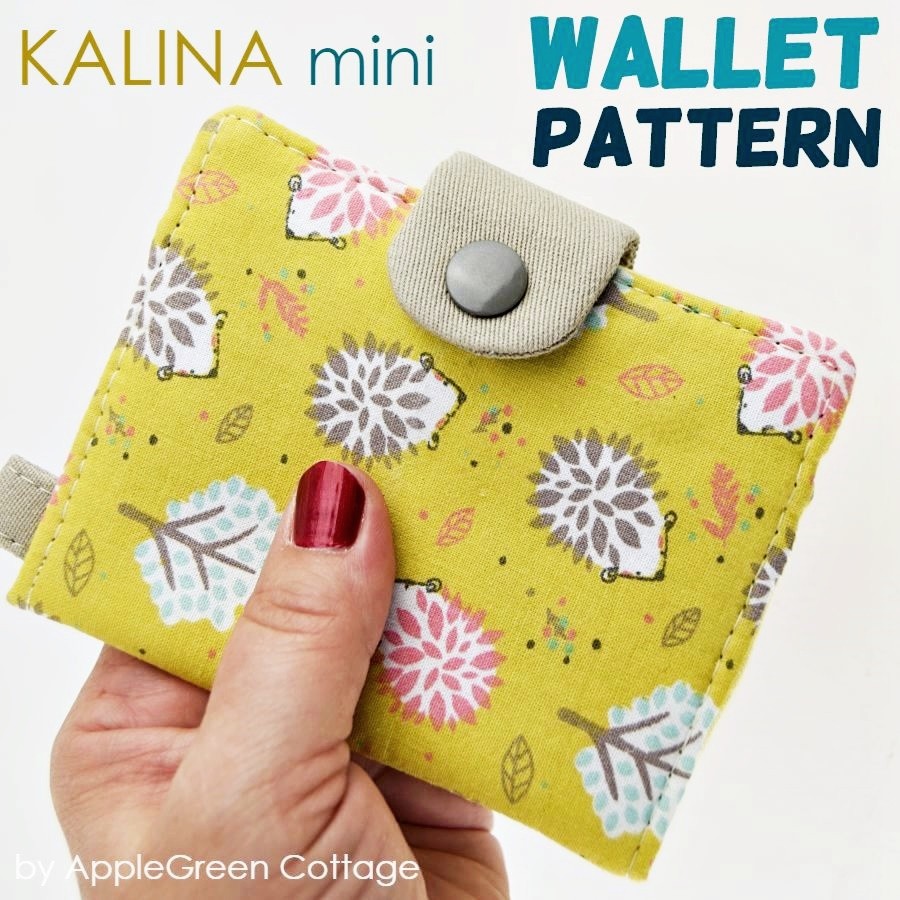
And the interior pocket is PERFECT for this mini wallet, make a set:
+Make a Set!
This backpack is perfect with the Kalina wallet pattern from our shop:
The finished sizes of the diy backpack are as follows:
- small drawstring backpack: 10" wide by 15" tall by 2" deep with boxed corners (25x38x5cm)
- large drawstring backpack 13" wide by 17" tall by 2" deep with boxed corners (33x43x5cm)
Supplies
Shop my personal favorite sewing supplies on Amazon HERE.
For the Small Backpack
- ½ yard of main fabric
- a fat quarter of accent fabric
- ½ yard of lining fabric
- half yard/meter of fusible fleece (45" bolt width) - or ¾ yard if you use 20" bolt width (for outer, tabs, and handle, optional pocket)
- two pieces of 55" (140cm) of round braided cotton cord (¼" or 6mm thick)
- a standard nylon coil zipper length of minimum 10" or 25 cm (zipper size #3, with 1" wide tape)
- optional: one KAM snap or a button for the pocket
For the Large BACKPACK
To make the large backpack, you'll need:
- ½ yard of main fabric
- a fat quarter of accent fabric
- 1 yard of lining fabric
- ¾ yard/meter of fusible fleece (45"/120cm bolt width) - or a yard if you use 20"/50cm bolt width (for outer, tabs, and handle)
- two pieces of 65" (165cm) of round braided cotton cord (¼" or 6mm thick)
- a standard nylon coil zipper length of minimum 12" or 31 cm (zipper size #3, with 1" wide tape)*
- optional: one KAM snap or a button for the pocket
*NOTE on zipper width: if using a zipper #5, i.e. one with the zipper tape width of 1 ¼" (3cm), you'll simply use a ⅜" (1cm) seam allowance instead of the indicated ¼" (6mm) when sewing the zipper, and it works too. The total resulting difference of ¼" will be compensated in Step 6. You don't need to calculate anything.
If you have a hard time finding the cotton cord in the color you want, switch it for a different thickness. Or, a reader has been so kind to let me know that she found ¼" cord at Joann's (in the US). It was called Cara's Cotton Craft Cord. Thank you, Nancy! <3
Cutting Directions
Small Backpack (width x height)
From the main fabric, cut
- 1 rectangle 13" x 10" (bottom part of front outer)
- one rectangle 13" x 16" (back outer)
- 1 strip 9" x 4" (for top handle)
- 2 anchor tabs 3" x 4"
- 1 rectangle 7" x 10" (for interior pocket)
- 1 rectangle 7" x 7" (for interior pocket flap)
From the accent fabric, cut:
- 1 rectangle 13" x 8 ½" (top part of front outer) = 33cm x 21.6cm
- 2 rectangles 12" x 4" (top casing)
- 2 zipper tabs 5" x 1 ¼" (You can go with longer than 5" fabric pieces and shorten them later)
From the lining fabric, cut:
- 2 rectangles 13" x 15 ¾"
- 1 rectangle 13" x 16 ½" (for zipper pocket)
From fusible fleece, cut:
- 1 rectangle 12" x 15" (for back outer)
- 1 rectangle 12" x 9 ¼" (for front outer - bottom part)
- one rectangle 12" x 5 ¾" (for front outer - top part) = 30.5cm x 14.6cm
- 1 strip 9" x 2" for top handle - alternative: 9" x 1" from f. fleece and same size strip from stiff woven interfacing for added stability
- 2 pieces 3" x 1" to strengthen anchor tabs (optional)
- 1 rectangle 6" x 4 ½" (OPTIONAL pocket)
- 1 rectangle 6" x 3" (OPTIONAL pocket flap)

LARGE BACKPACK (width x height)
From the main fabric, cut
- 1 rectangle 16" x 11" (bottom part of front outer)
- 1 rectangle 16" x 18" (back outer)
- one strip 9" x 4" (for top handle)
- 2 anchor tabs 3" x 4"
- 1 rectangle 7" x 10" (for interior pocket)
- 1 rectangle 7" x 7" (for interior pocket flap)
From the accent fabric, cut:
- 1 rectangle 16" x 9 ½" (top part of front outer) = 40.6cm x 24.1cm
- 2 rectangles 14" x 4" (top casing)
- 2 zipper tabs 5" x 1 ¼" (You can go with longer than 5" fabric pieces and shorten them later)
From the lining fabric, cut:
- 2 rectangles 16" x 17 ¾"
- 1 rectangle 16" x 17 ½" (for zipper pocket)
From fusible fleece, cut:
- 1 rectangle 15" x 17" (for back outer)
- 1 rectangle 15" x 10 ¼" (for front outer - bottom part)
- (one) 1 rectangle 15" x 6 ¾" (for front outer - top part) = 38.1cm x 17.2cm
- one strip 9" x 2" for top handle - alternative: 9" x 1" from f. fleece and same size strip from stiff woven interfacing for added stability
- 2 pieces 3" x 1" to strengthen anchor tabs (optional)
- 1 rectangle 6" x 4 ½" (OPTIONAL pocket)
- 1 rectangle 6" x 3" (OPTIONAL pocket flap)
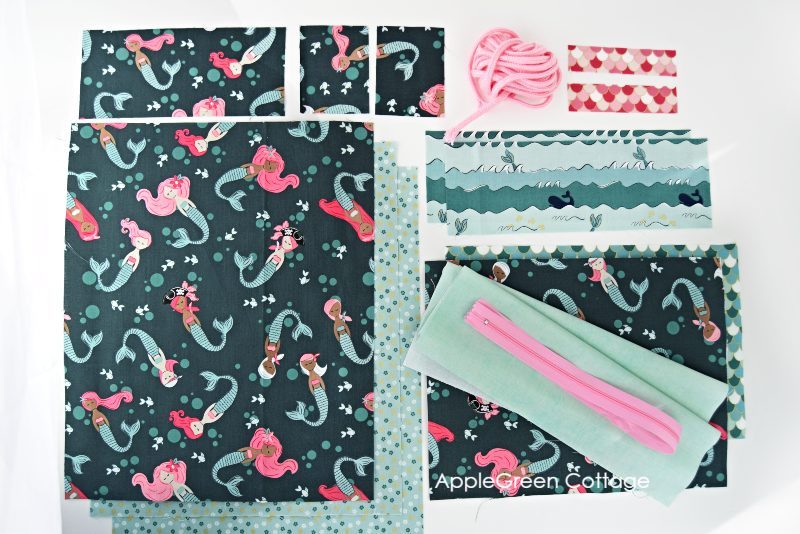
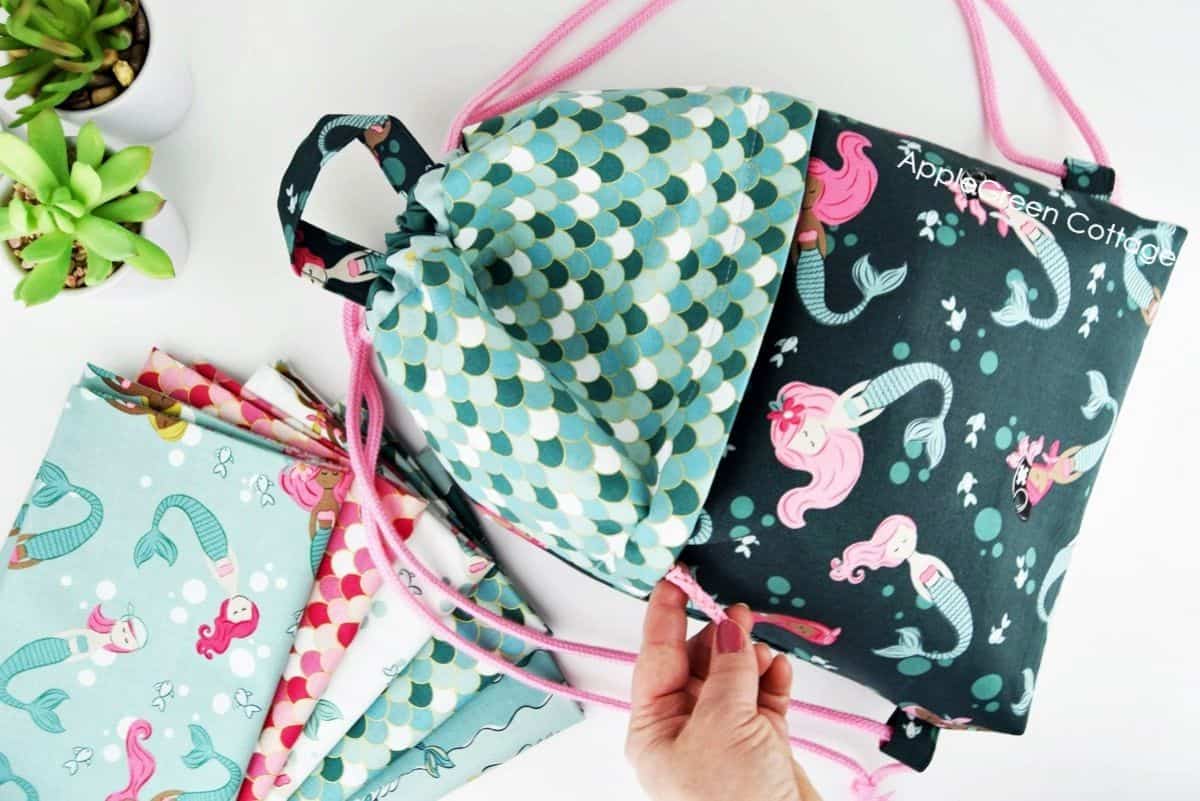
You can also use additional prints, for example, I used a fourth print for casings and a fifth print for zipper tabs. Totally up to you.
And I know I'll be getting questions about this adorable fabric - these are all prints from the new Ahoy Mermaids collection by Melissa Mortenson for Riley Blake Designs. I love the color palette filled with pinks, greens, and navy blue, and maybe my favorite combo is that of dark teal and seafoam green, with some gold sparkle mixed in. So playful! You can check out the entire line here, but I'm afraid it's sold out.
How To MAKE a drawstring Backpack tutorial
Here I'm making the small-size backpack. The seam allowance is ½" (1.3cm), except when sewing the zipper, where it's ¼" (0.6cm), as indicated in the tutorial. First, we'll prepare the small pieces, then sew the front pocket and assemble everything together, then box the corners (optional) and add drawstrings to complete your own backpack. Let's start by preparing the small pieces:
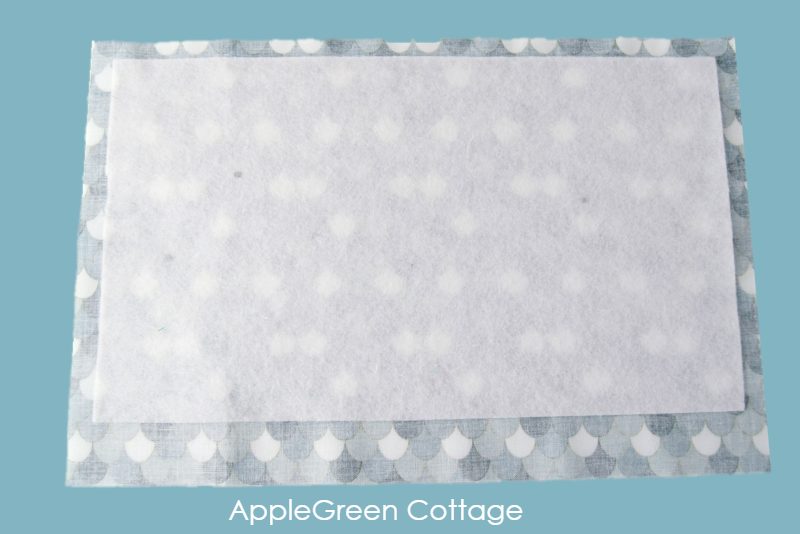
Step 1 - Add interfacing
Using the manufacturer's instructions, add fusible fleece to the back of the outer pieces:
- back outer
- front outer - bottom part
- front outer - top part**
- handle strap
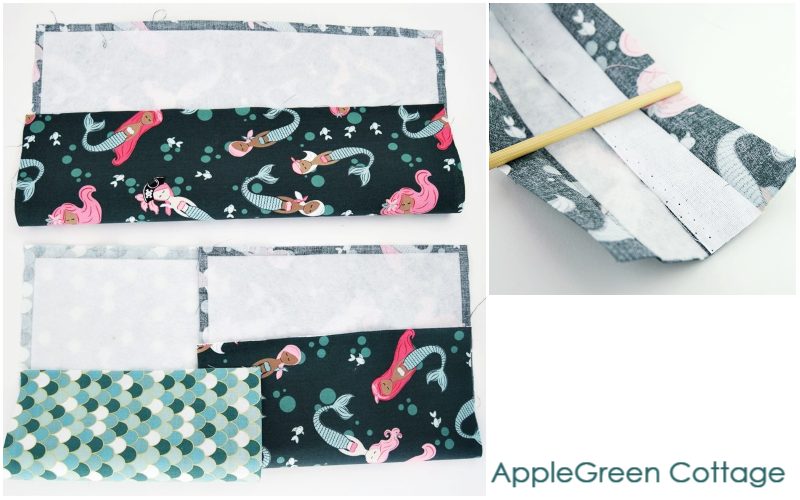
**Take care when fusing the front outer top part: align your fusible fleece along the top seam allowance edge and you'll notice that
- at the top, ½" (1.3cm) will be left uninterfaced, and more importantly:
- the bottom 2 ¼" (5.7cm) will be left uninterfaced - for a good reason:
Step 2 - MAke The Handle and Anchor Tabs
Use the two tab pieces, and the handle piece, and fold each of them this way:
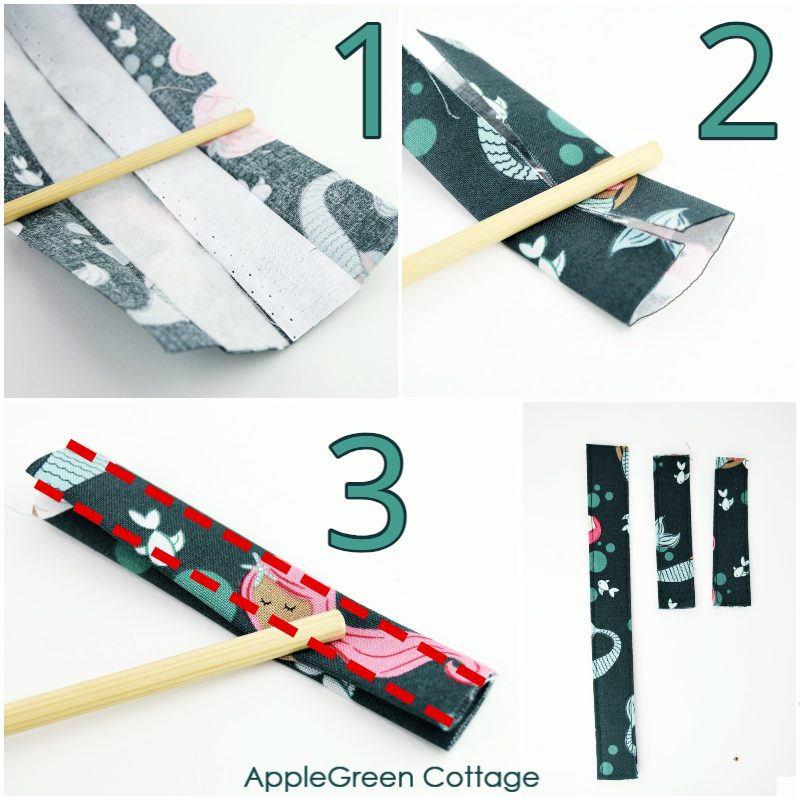
- Fold the strip lengthwise in half, press and unfold.
- Then fold the upper edge to the center crease and do the same with the lower edge.
- Fold again along the original center and press, then topstitch along the long edges.
Now you have 2 tabs (1" by 3") and one handle - all with unfinished ends. Just the long edges are finished. Set aside for now.
Step 3 - Make casing
Now take the two casing pieces (each 4" by 12" or 14") and hem the short sides, turning them under by ¼" twice and stitching in place. This is also called a double fold hem. You'll get this:
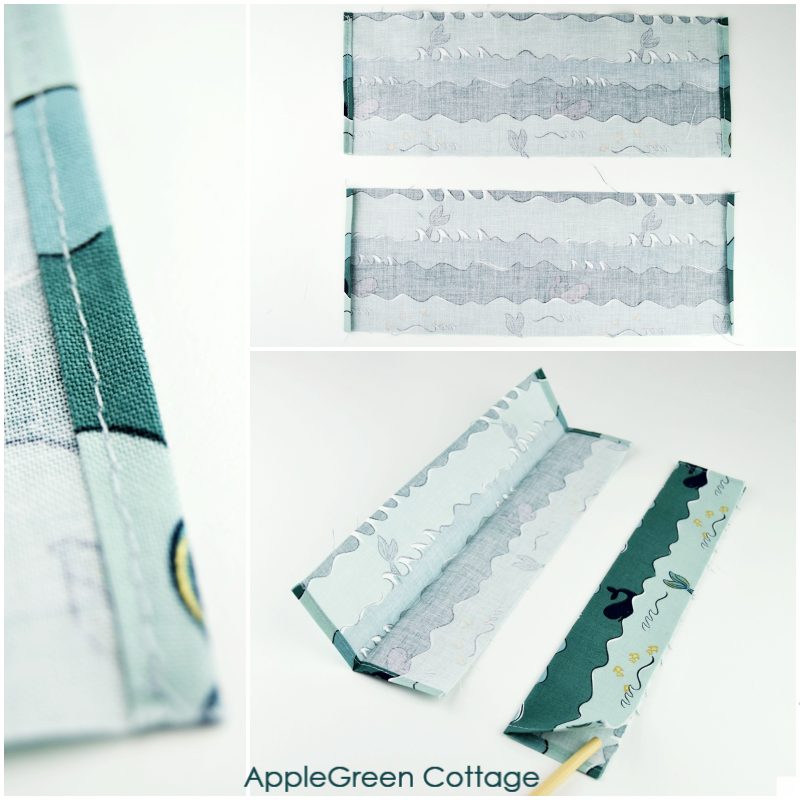
Fold them lengthwise wrong sides together and press.
Step 4 - Prepare the Zipper
First, cut your zipper to measure exactly 9" for the small backpack and 12" for the large backpack - this is the length you need to cut. Then you'll add zipper tabs to these pieces.

See here how to shorten a zipper with tabs to reduce bulk at the side seams. Neat and easy. The finished length of your tabbed zipper (including the fabric tabs on each side) will be 13" (small) and 16" (large backpack).
Step 5 - Sew The Front Zipper Pocket
First, let's see what pieces you need to make the front part of your drawstring backpack. This is where your outer zip pocket will be.
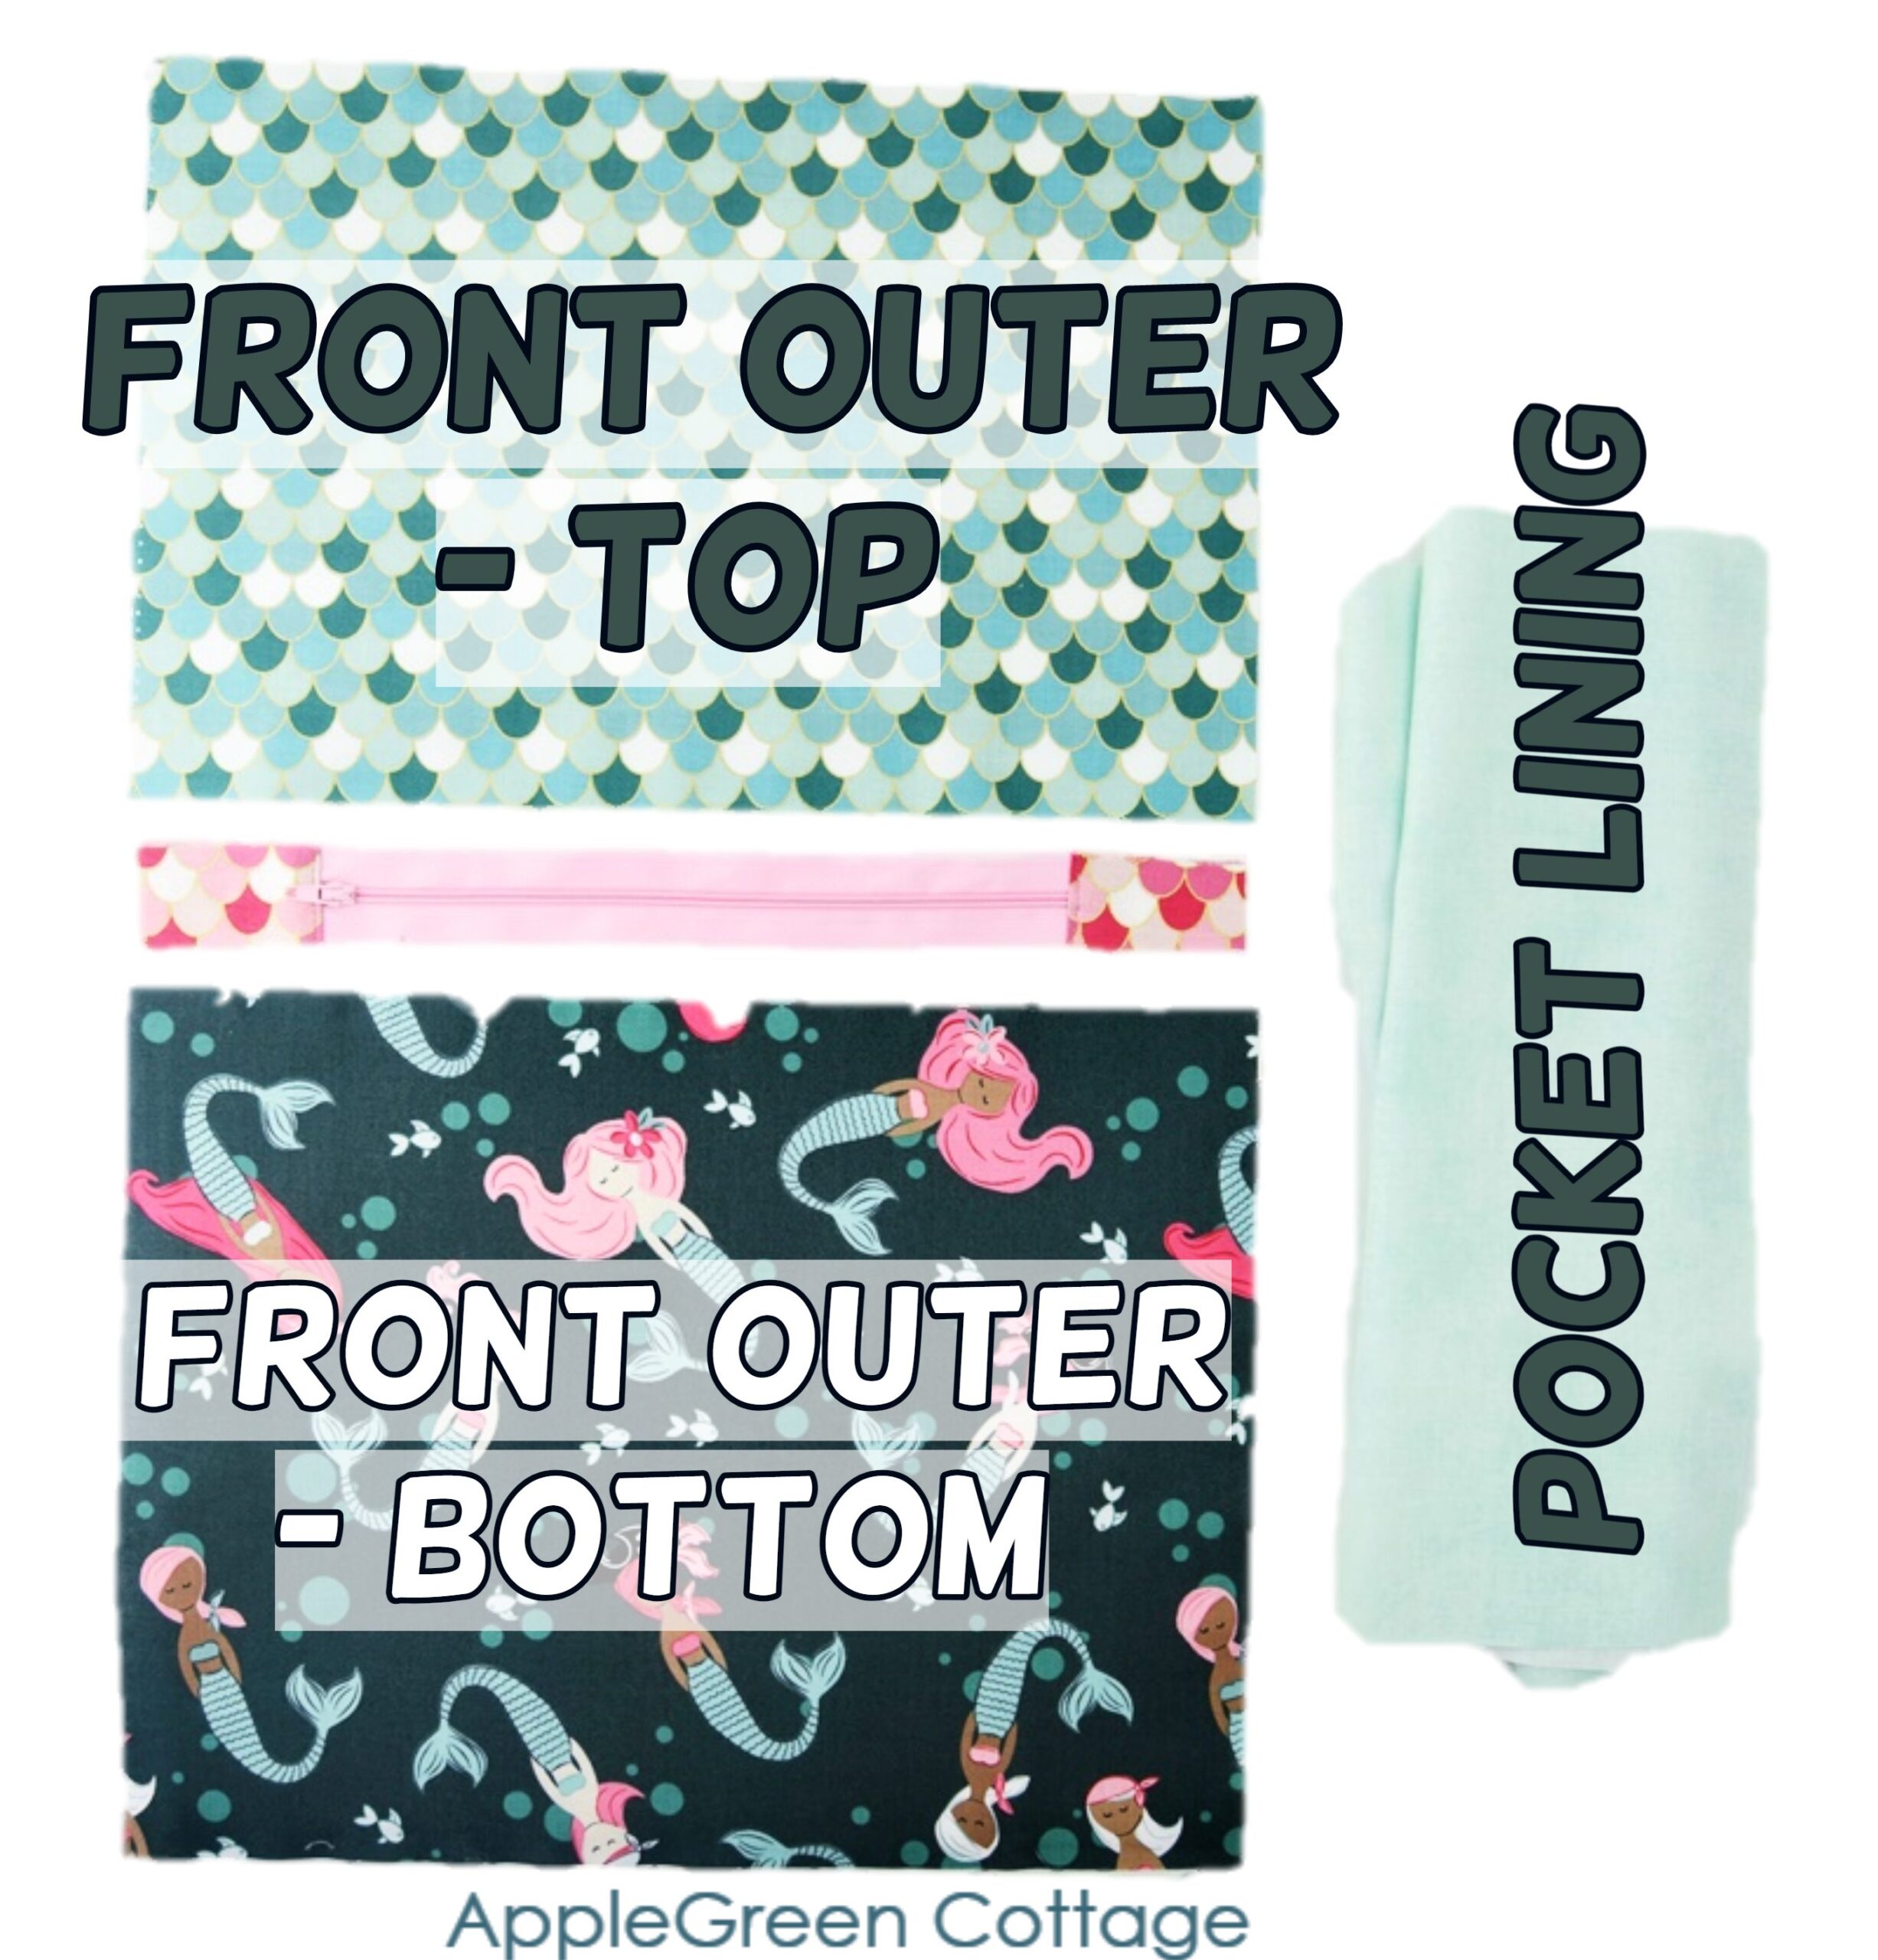
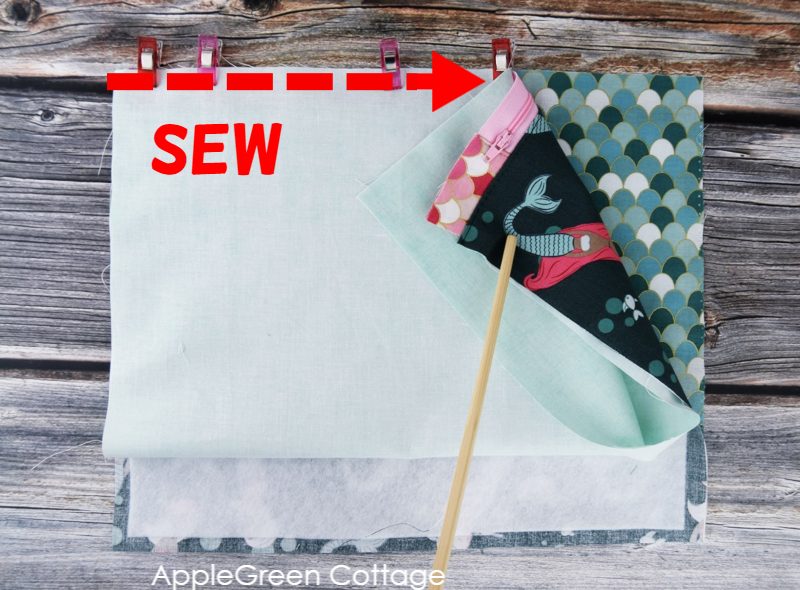
Lay down one Outer piece with right side up, then the zipper facing down (and the zipper pull on your left). Then lay the pouch lining on the zipper, aligning the top edges:
Sew through the three layers using a ¼″ (0.6 cm) seam allowance.
NOTE: if you have a zipper with tape width 2 ¼" (zipper #5), simply use the ⅜" (1 cm) seam allowance, and don't worry - the resulting difference will be taken care of (automagically) later 🙂
Then flip the whole thing so it's the right side of the fabric facing towards the outside, and topstitch along the zipper for a neat result.
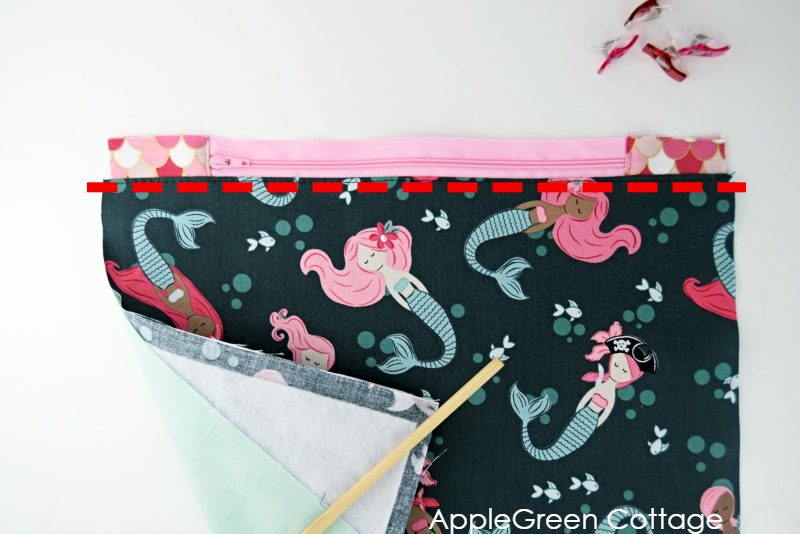
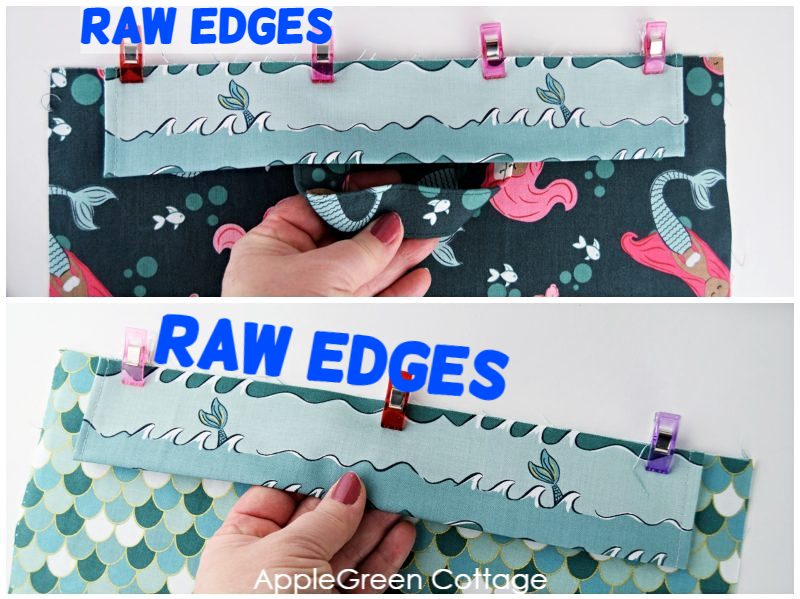
Now (IMPORTANT) place your
- Front Outer TOP piece (the blue scales print) with right side facing you, and the PRINT should be UPSIDE down. (Notice the scales upside down?)
- and on top of that, the sewn piece with the zipper facing down (pull on your right)
- and flip the remaining pocket lining upwards so it meets the top edge.
This is what you have now:
Using a ¼" (0.6 cm) seam allowance with zipper #3 or ⅜" (1 cm) seam allowance with zipper #5, sew along the top edge.
Zipper pocket completed.
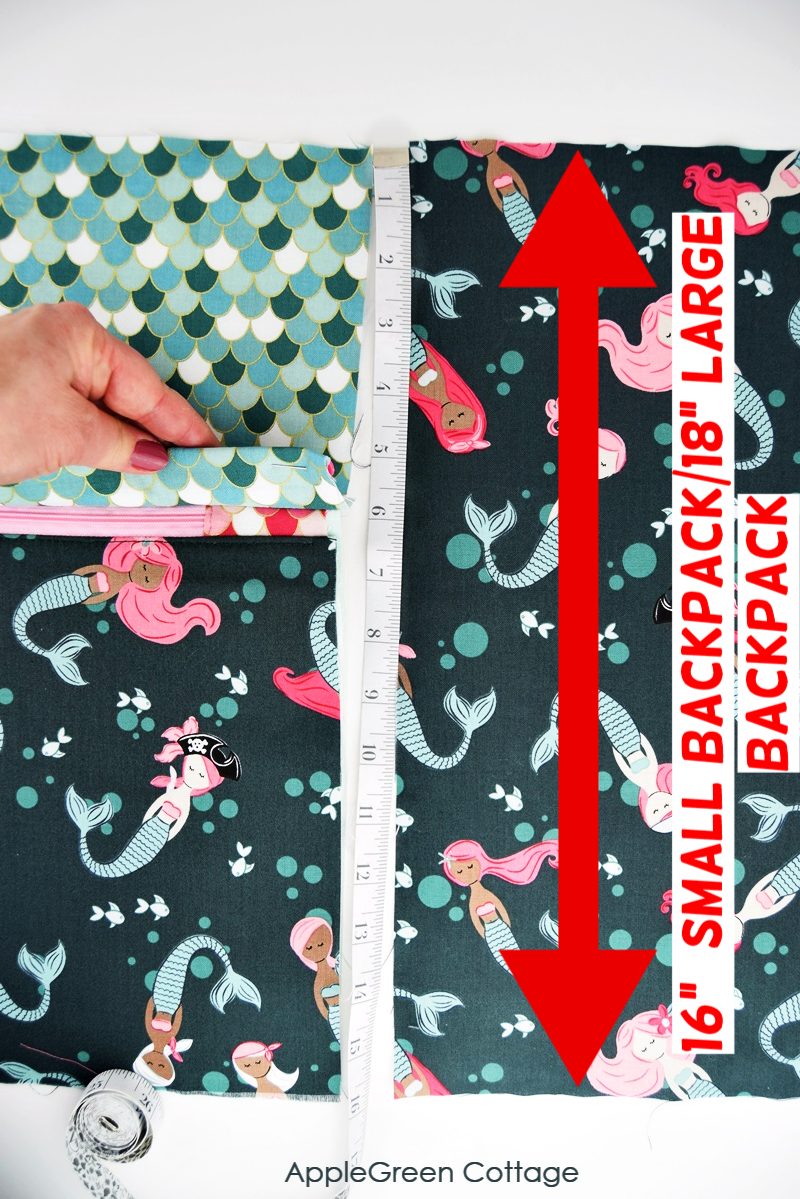
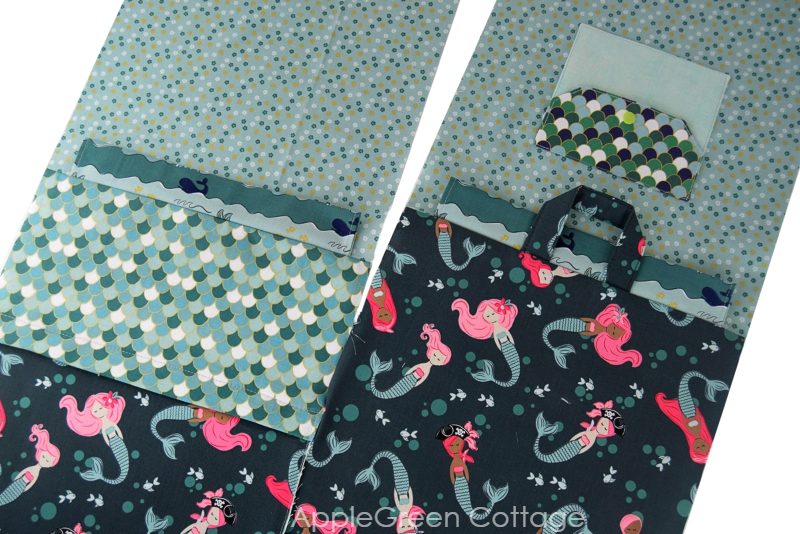
This is the Outer Front piece looks now (LEFT), compared to the Outer Back Piece:
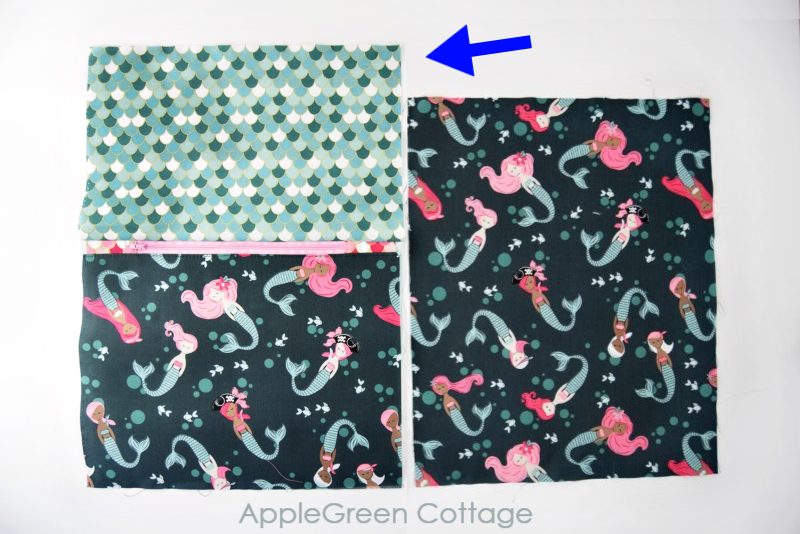
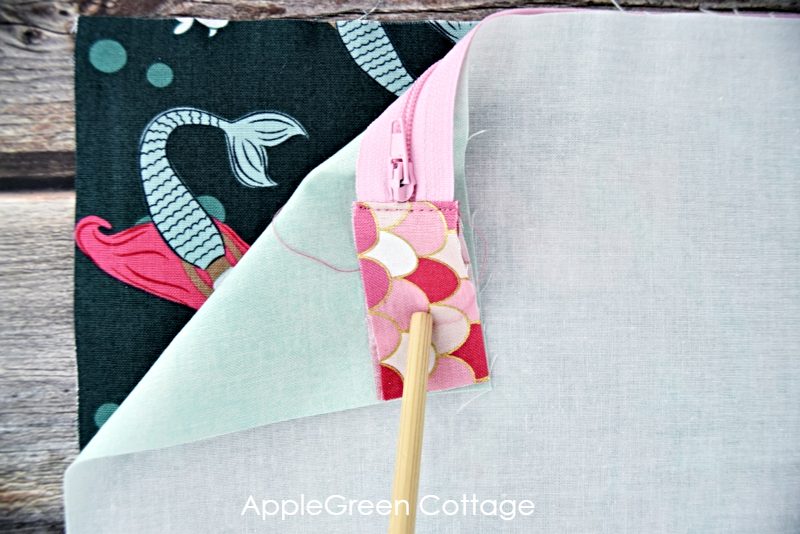
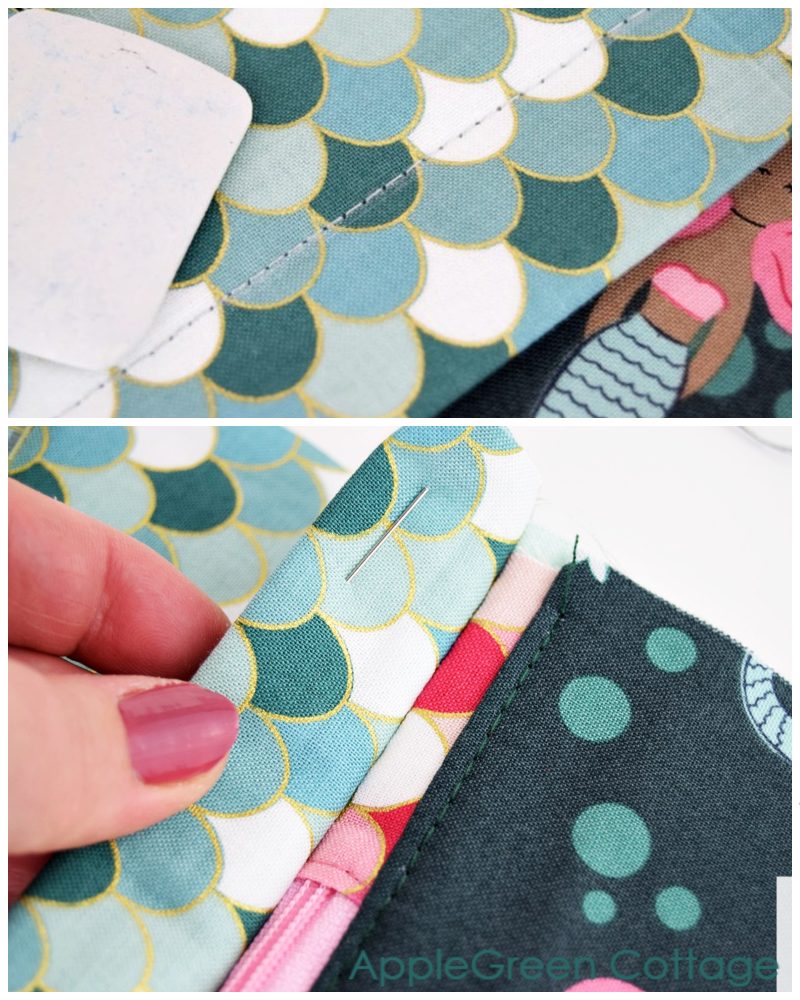
Step 6 - Create a Cool zipper Cover!
So, the Outer Front piece you've got now is taller than the other, Outer Back piece. Now we'll create a nice cover for the zipper. It will give your front piece a professional look. I love it!
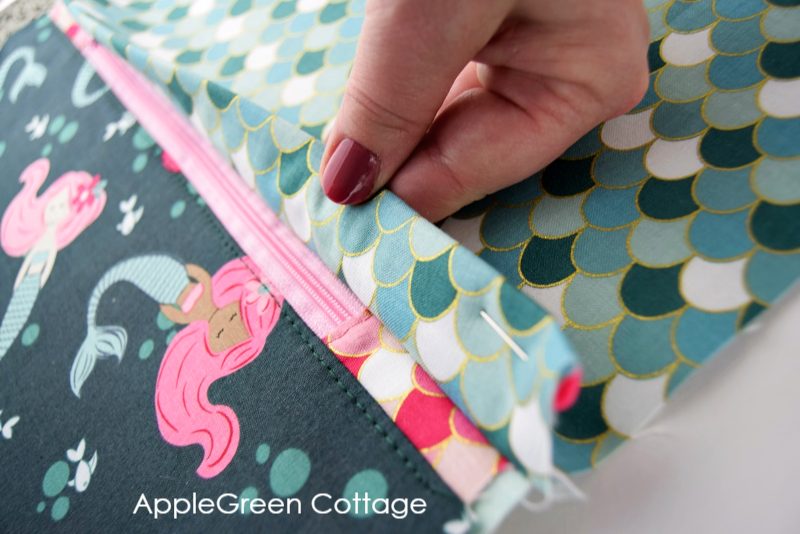
This is how: with your thumb and index finger, pinch the fabric just above the zipper (that's the scales fabric here) - creating approximately an inch of a 'roof', cover for your zipper. While doing so, model it against the Outer Back piece and adjust to get the Front piece approximately the same height as the outer Back (16" or 18"). Pin in place.
This will make the Outer Front the same height as the Outer Back piece. Like this:
NOTE: you'll get about a zipper cover of approximately one-inch size. A bit less if you used the #5 zip.
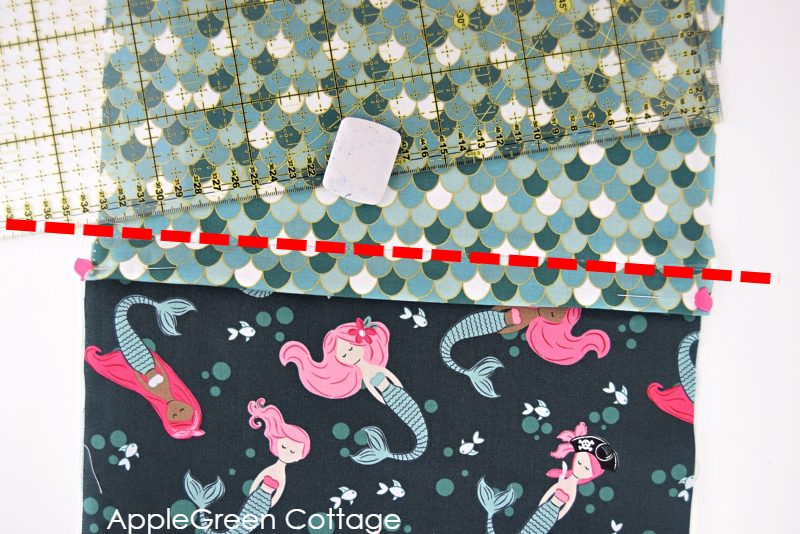
Press just the zip cover part of the fabric (don't iron over zipper teeth) to get a nice fold. Then use the ruler and chalk to mark the stitching line: the seam should go over that zipper tape and if possible, just a tiny bit closer to the zipper teeth than the original seam (one where you attached the zipper). Like this:
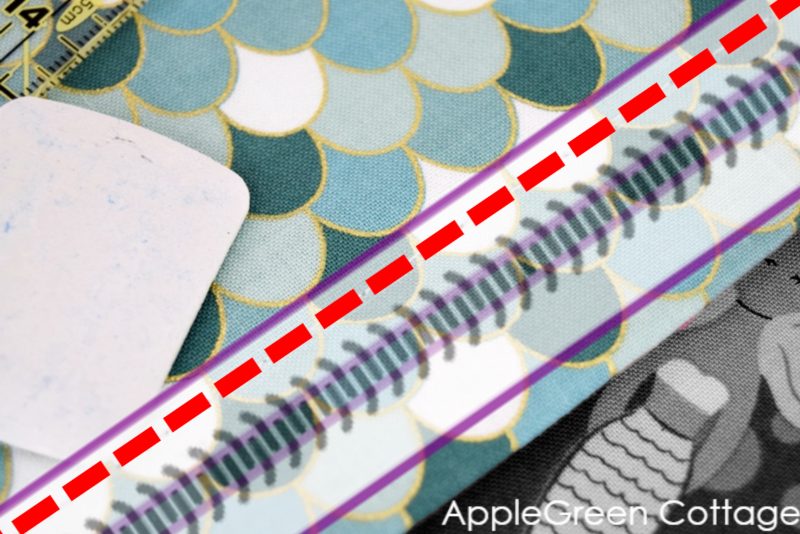
If you want to, you can stitch from the back side, just along the previous seam from step 5 - hence removing any guesswork:
Detailed view: this is how your seam should go through the zipper tape layer - if the zipper teeth WERE visible throught the fabric.
Front Outer done. Now we'll make sure we can use it as a backpack - we'll add tabs for the drawstring cords, ok?
Step 7 - Attach Tabs
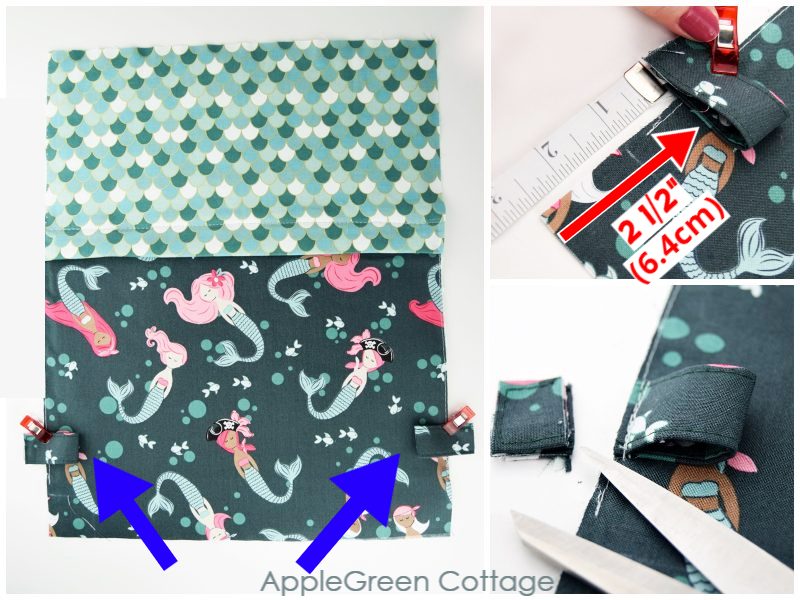
Remember the anchor tabs we made in Step 2? Time to baste them on. Fold the Outer Front Pieces and place them on the side of the Outer Front piece at a distance of 2 ½" (6.4 cm) from the bottom edge. While doing so, I also recommend basting the back pocket lining to keep it in place.
Step 8 - Add The Handle
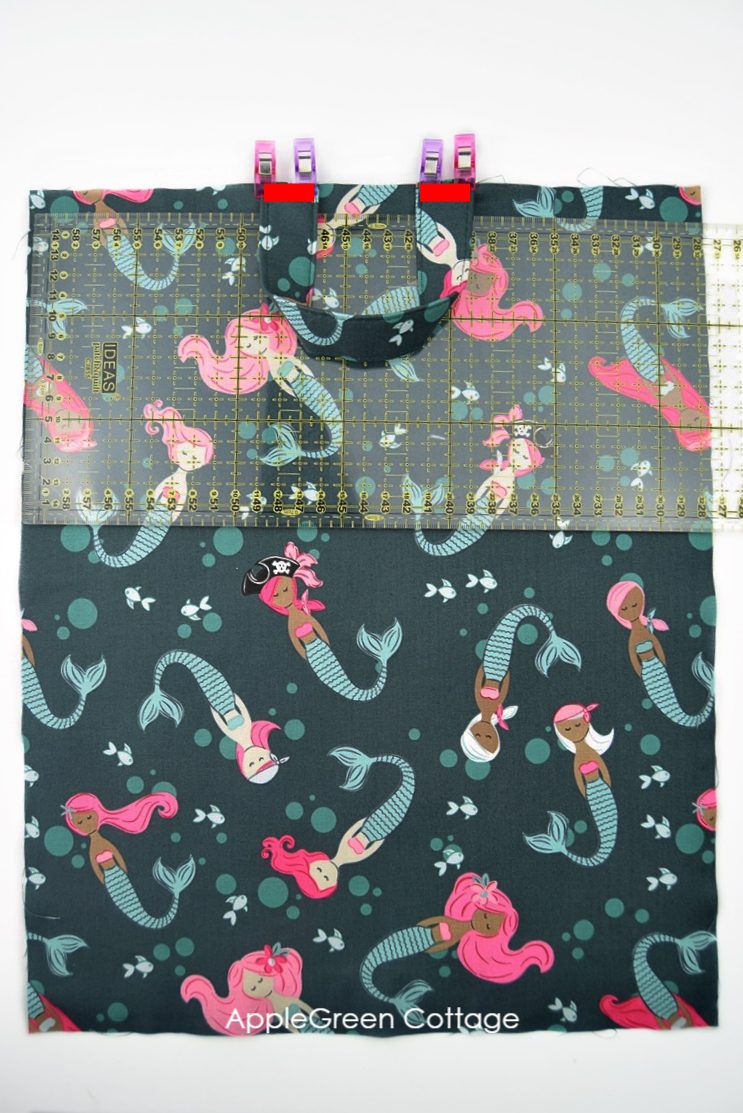
This drawstring backpack pattern includes a nice large handle that will make it easy to hang your backpack nearly anywhere. Let's add it now to the Outer Back piece:
Place the handle ends centered along the top of the outer Back piece - the distance between the two handle ends should be 2" (5 cm). Pin and then baste in place.
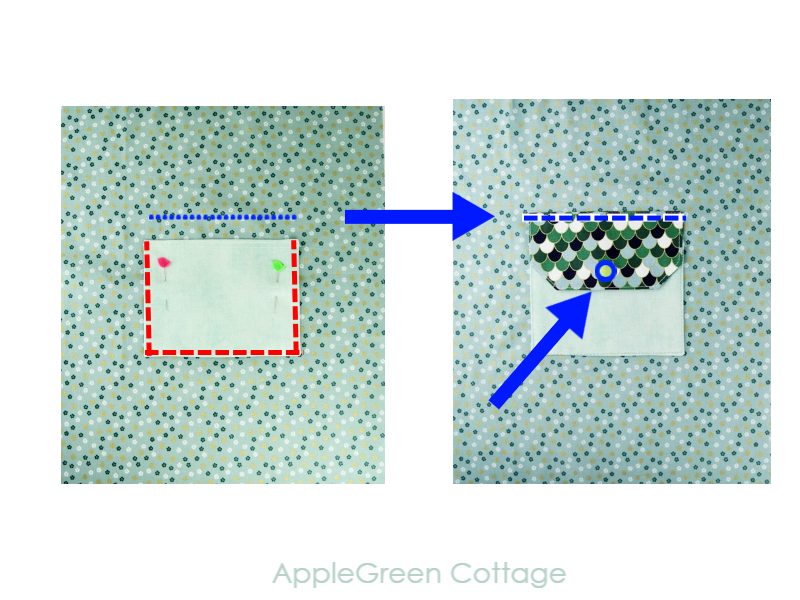
Step 9 - Optional Interior Flap Pocket
Interior pockets are so useful! If you're like me, you can't live without them. So I added this option - feel free to use or skip.
But it's the perfect size for this cute mini wallet you can make in a set!!
If you want to, you can make a flap pocket for the inside of your backpack. I've made a separate tutorial for that - it's easy, but I wanted to include all the photos, and this tutorial has too many already anyway 🙂 Check out here how to sew the flap pocket pieces.
Got them? Let's go on:
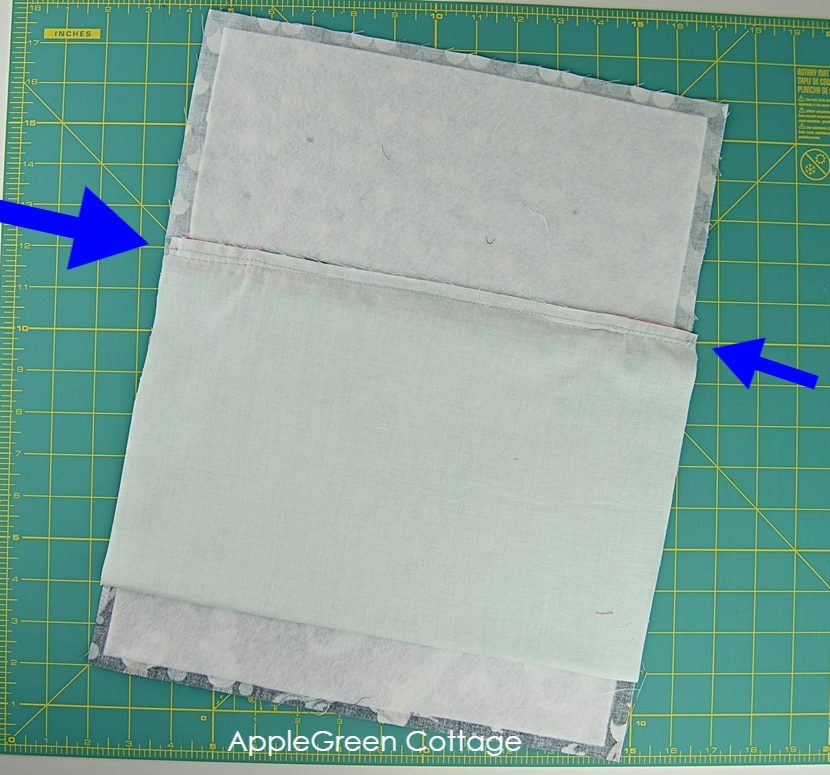
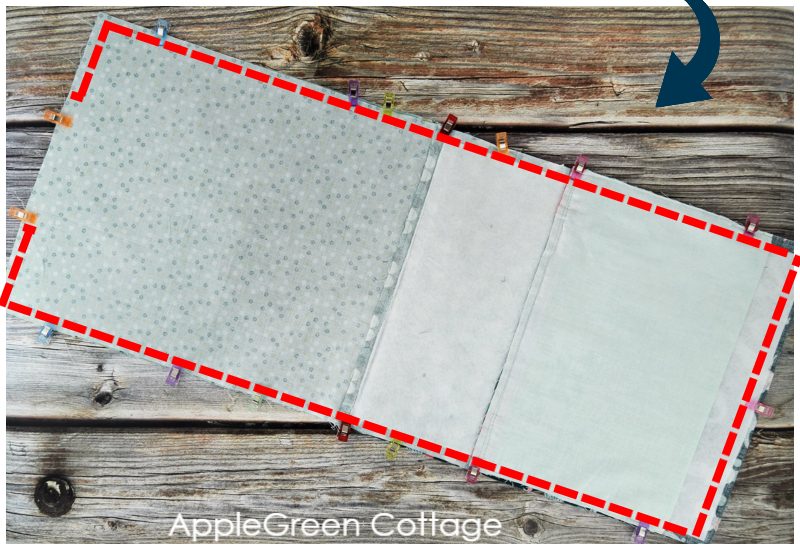
- Place the lining piece so that the width will be 13" (large backpack: 16"), then
- place the main pocket piece, with topstitching at the top side, centered on the lining.
- Sew around 3 sides of the main pocket piece, leaving the top open.
- Then measure 1" above the main pocket piece (blue dotted line) and stitch the flap in place.
- Closure: you can add a snap (tutorial here) or sew a button and make a buttonhole. Whatever works best for you!
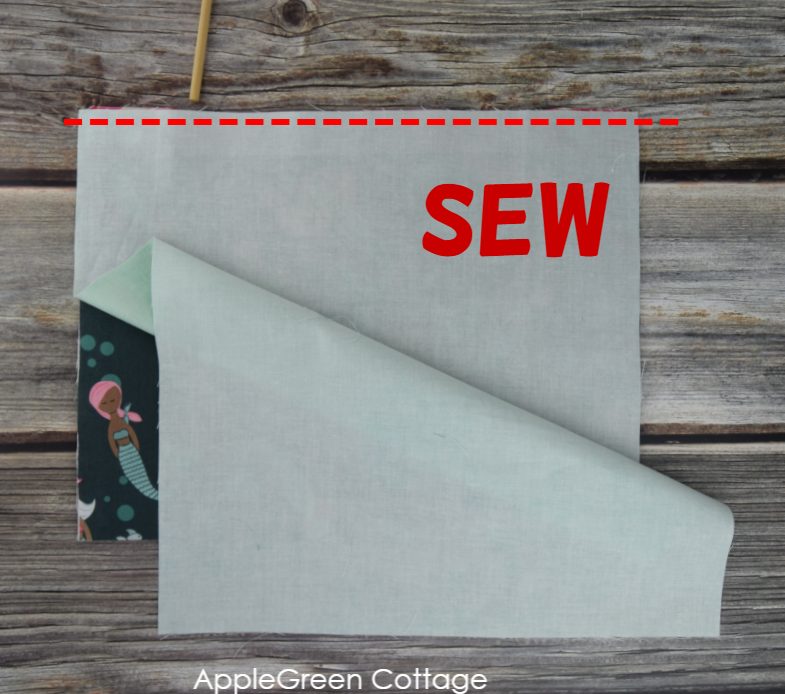
Step 10 - SEW the Top of the Backpack
I'll cut this part into several photos so it will be easier to see how to finish the top of your drawstring backpack pattern:
First place the folded casings along the two front pieces. Grab the two outer pieces and place them right-side-up, then place the two casing pieces (folded WST) with the raw edges aligned with the top.
Next, add the lining pieces, like this:
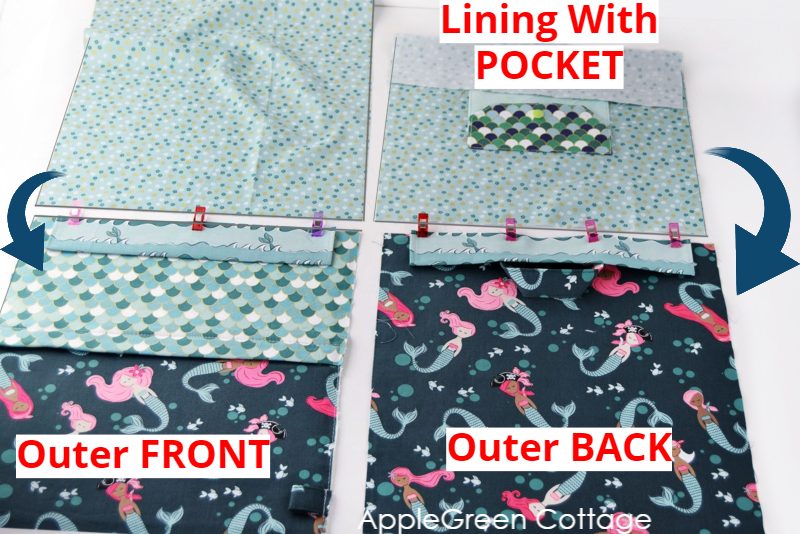
Place the lining pieces on top of the outer pieces, the raw edge aligned, and right sides together. The lining with the pocket needs to go on the Outer BACK piece, right side facing down.
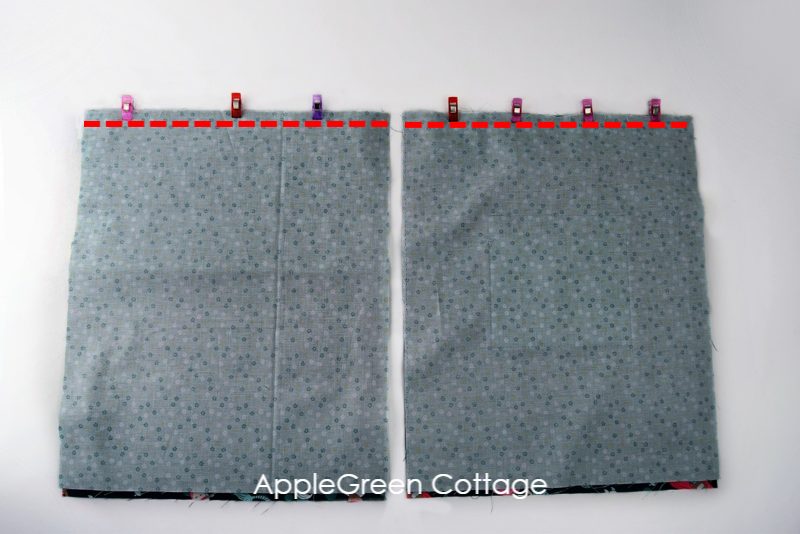
Stitch along the top edges, each time using a ½" (1.3 cm) seam allowance. This is what you get:
Feel free to understitch the top edge, see here how I did that in my free tote tutorial.
Step 11 - Assemble the Backpack
Now, place the two parts RIGHT SIDES together, with outer poieces facing each other, and lining pieces together too.
Use a ½" (1.3 cm) seam allowance to stitch around, leaving a few inches in the bottom of lining, for turning. Then clip the corners and trim any excess on the seam allowance.
Step 12 - Optional - box the corners
This drawstring backpack pattern will turn out just fine with or without boxed corners.
Feel free to box all four corners to give your backpack a flat bottom so it can stand on its own. Or you can leave the backpack flat and skip this step. Your choice.

I boxed the bottom corners on my backpack at 2 inches diagonally.
Fold the corner flat matching up the two side seams. The side seams should lie directly one over the other. Mark the corner perpendicularly to the middle seam - see the purple line I drew with a fabric marker? Then stitch over that line. Backstitch at the beginning and end of the seam to reinforce it.
Step 13 - Turn Right Side Out And Close the Gap
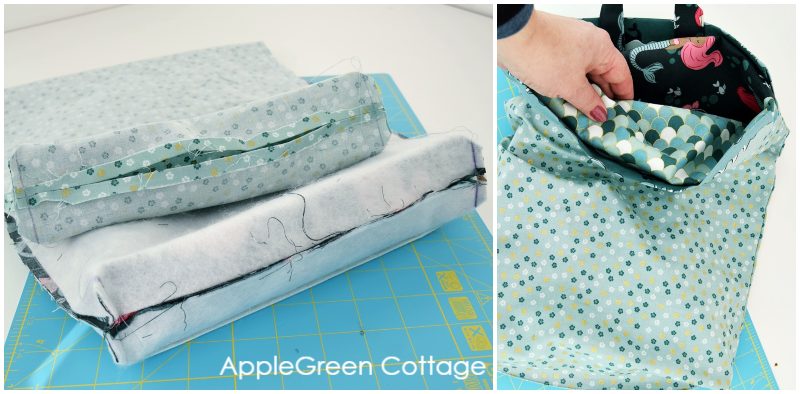
Trim any excess seam allowance and turn your drawstring backpack right-side-out through the hole in lining and stitch it closed.
If you want to, topstitch around the top edge. I always either understitch or topstitch (and sometimes both) - it makes such a neat edge and works for any drawstring backpack pattern!
Now give your backpack a good press - I always use a seam roll to press bags and similar - make one for yourself using my free seam roll tutorial.
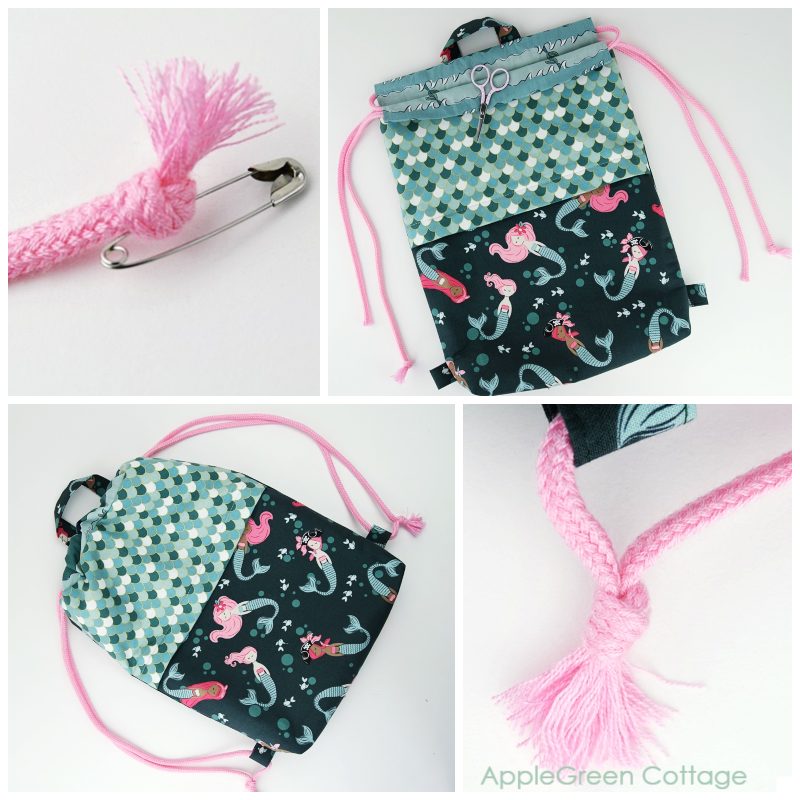
Step 14 - How To INSERT DRAWSTRINGS on the Backpack
Cut the cord into two pieces of 55" or 140 cm (small) or 65" or 165cm (large backpack) and use a safety pin or a bodkin to guide the first cord through the entire drawstring casing. Both ends of the cord will come out of the same opening.
Repeat with the second cord and the second opening, starting and ending on the opposite side of the casing.
Hoping you've enjoyed my tutorial. How would you rate it?
If you want to, check out more stuff I've got to sew, either in the bag patterns category, on the Free tutorials page. Or, see how to make your bags even better with this free guide:
Or …check out this popular PDF pattern - the Kalina Mini Wallet in our shop. So practical!


Liz says
Thank you for this pattern! I needed a gift bag for a 7 year old's birthday present and I despise spending money on something that will just be thrown away. I found his favorite Pokemon' on cotton fabric in 2 colors and to keep my costs down I'm using clothes line cording, you get a big pack for only couple dollars, would have cost $10US for cording at JoAnn's fabrics. I just know I'll be making many more of these!
Mudassar Hameed says
Absolutely love this drawstring backpack pattern!It's not just a pattern; it's a game-changer for anyone who enjoys sewing. The instructions are clear, concise, and beginner-friendly, making it a breeze to create a stylish and functional backpack. The versatility of the design allows for personalization and creativity, making each backpack truly unique.I highly recommend this pattern to both beginners and experienced sewers alike. It's a must-try for anyone looking to add a touch of handmade charm to their accessories.Thank you so much!