
See how to make 8 half-square triangles at a time - fast! Plus, grab the free HST Cheat Sheet to make the process even easier. ↓
Need a lot of HSTs quickly? I have the perfect solution: one of the fastest methods for creating multiple perfect half-square triangles, saving you time while ensuring precision. This is my go-to technique whenever I need a batch of identical HSTs fast.
Even better, I've included a handy math cheat sheet to help you create HSTs in any size you need - no more guessing or tricky calculations!

Table Of Contents
Why I love 8-at-a-time HSTs
While the traditional 2-at-a-time HST method is simple, there are times when I need to make more HSTs - and faster. Here's where the 8-at-a-time method comes in handy! (Don't worry, it's still easy!)
Why 8-at-a-Time HSTs are my go-to:
- Quicker: When you need a lot of HSTs quickly, this method saves you tons of time!
- Efficient: Perfect for making multiples of identical HSTs. No wonder it's also called The Magic 8 Quilt Block method!
Magic 8 HST Method Video
Finished Sizes CHEAT SHEET!
Each of the 8 unfinished blocks (before piecing them into a quilt) in this tutorial measures 4 ½" square. Once sewn into a quilt, just 4" square.
Want a different size? Get our Cheat Sheet →here to create all sorts of different sizes of HST blocks!
Supplies
Shop my personal favorite sewing supplies on Amazon HERE.
- quilting fabric: 2 squares in contrasting colors
- a rotary cutter and a cutting mat
- the usual: sewing machine, thread, iron, pressing board (←I DIYed mine!)
- a quilting ruler - see my favorite rulers here
TIP: a ¼" sewing machine foot is inexpensive and makes piecing so much easier (like this one on Amazon)
HOW TO Make Half-Square Triangles 8 at a Time
This is a fast but super effective way to make eight at a time half square triangles.
Since HSTs can be tricky to sew perfectly, we'll make them a bit bigger and then trim them down. It's an extra step, but it makes them so much more accurate - it really helps me get perfect HSTs every time, and I'm sure it'll do the same for you!
Step 1 - Get the HST Cutting Chart to choose your size
Join our mailing list and get the HST Cutting Chart a.k.a. HST CheatSheet emailed to you:
Pick the size of HSTs you need for your project.
Step 2 - Cut Your Fabric Squares
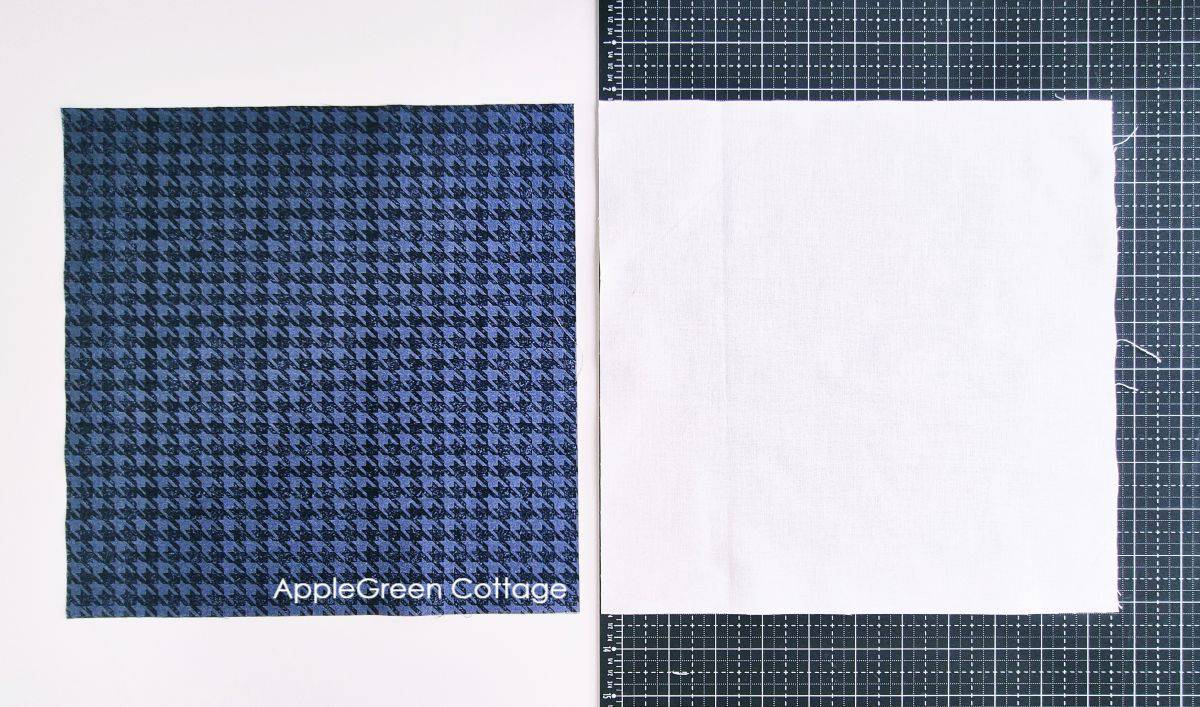
Cut two squares of fabric the same size, depending on what size of quilt blocks you chose from the cutting chart.
If you don't want to use the cutting chart, calculate the size of your squares by multiplying the desired unfinished quilt block size by 2 and adding 2" to that. For example, if you need 4 ½" HSTs (unfinished), cut your squares 11" - this will also leave you some room for trimming.
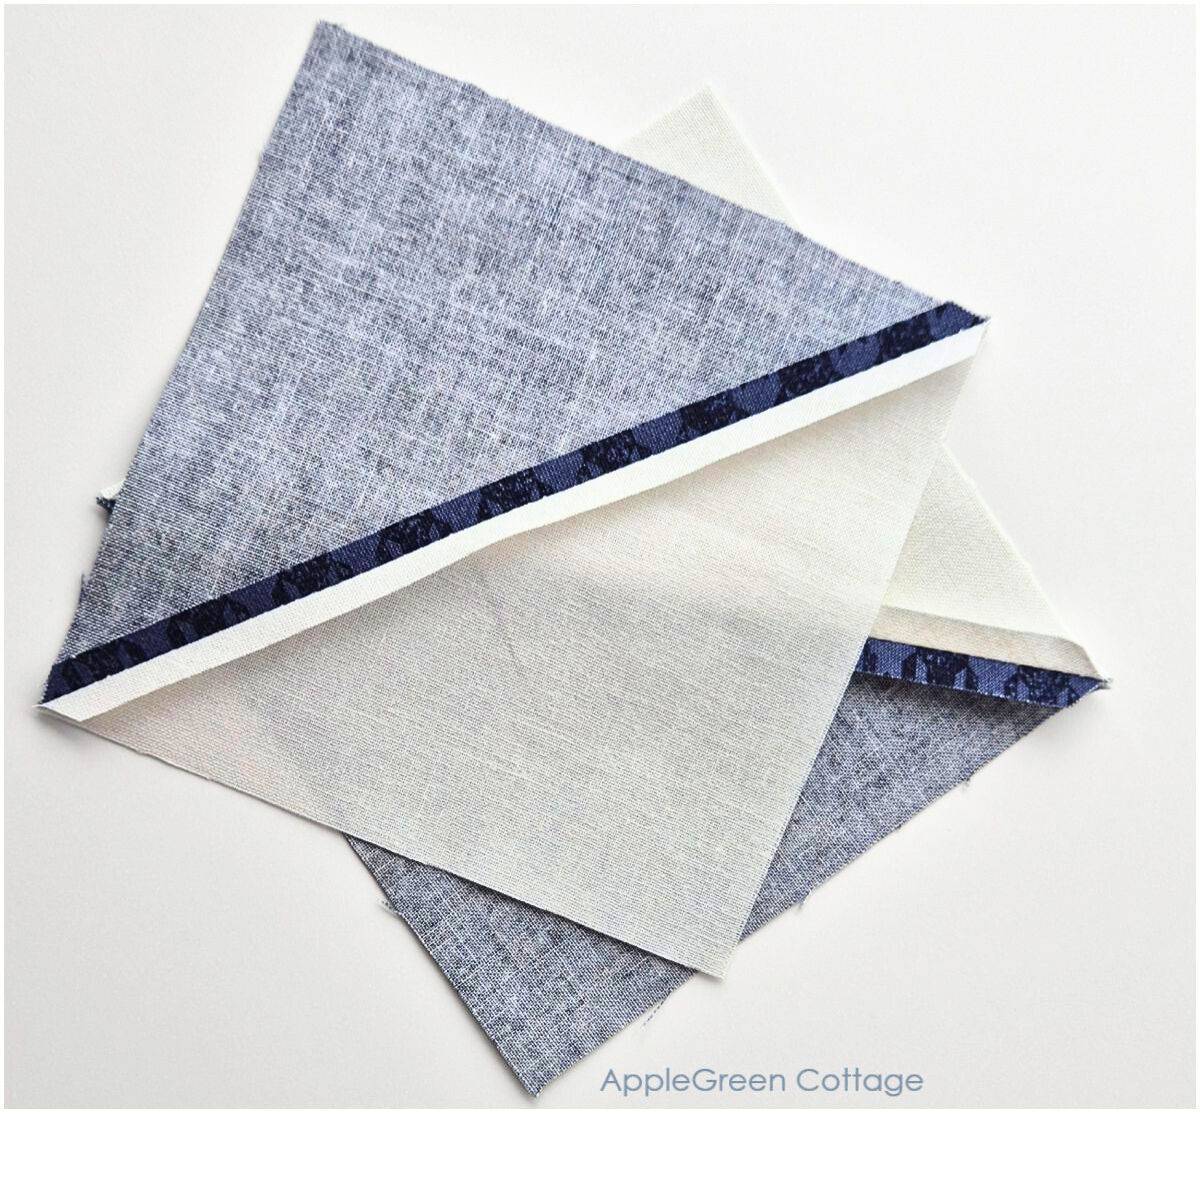
Step 2 - Draw 4 Lines
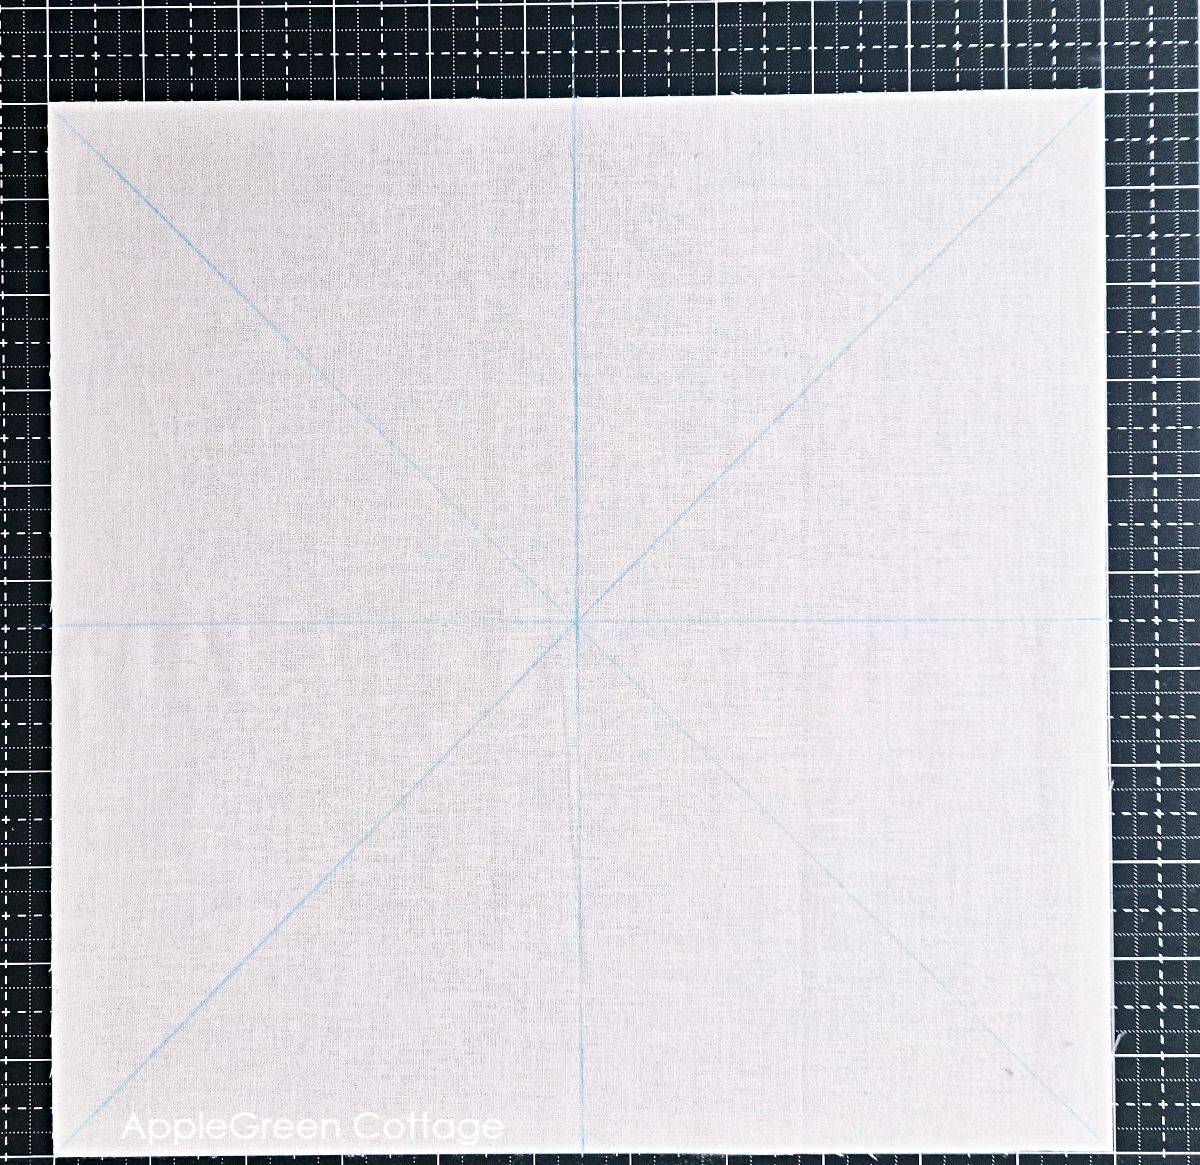
On the back of the lighter fabric, draw:
- 2 diagonal lines from corner to corner
- 1 vertical center line
- 1 horizontal center line
These will be your guides.
Step 3 - Sew on Both Sides of each diagonal

Place the two squares with the right sides together and pin.
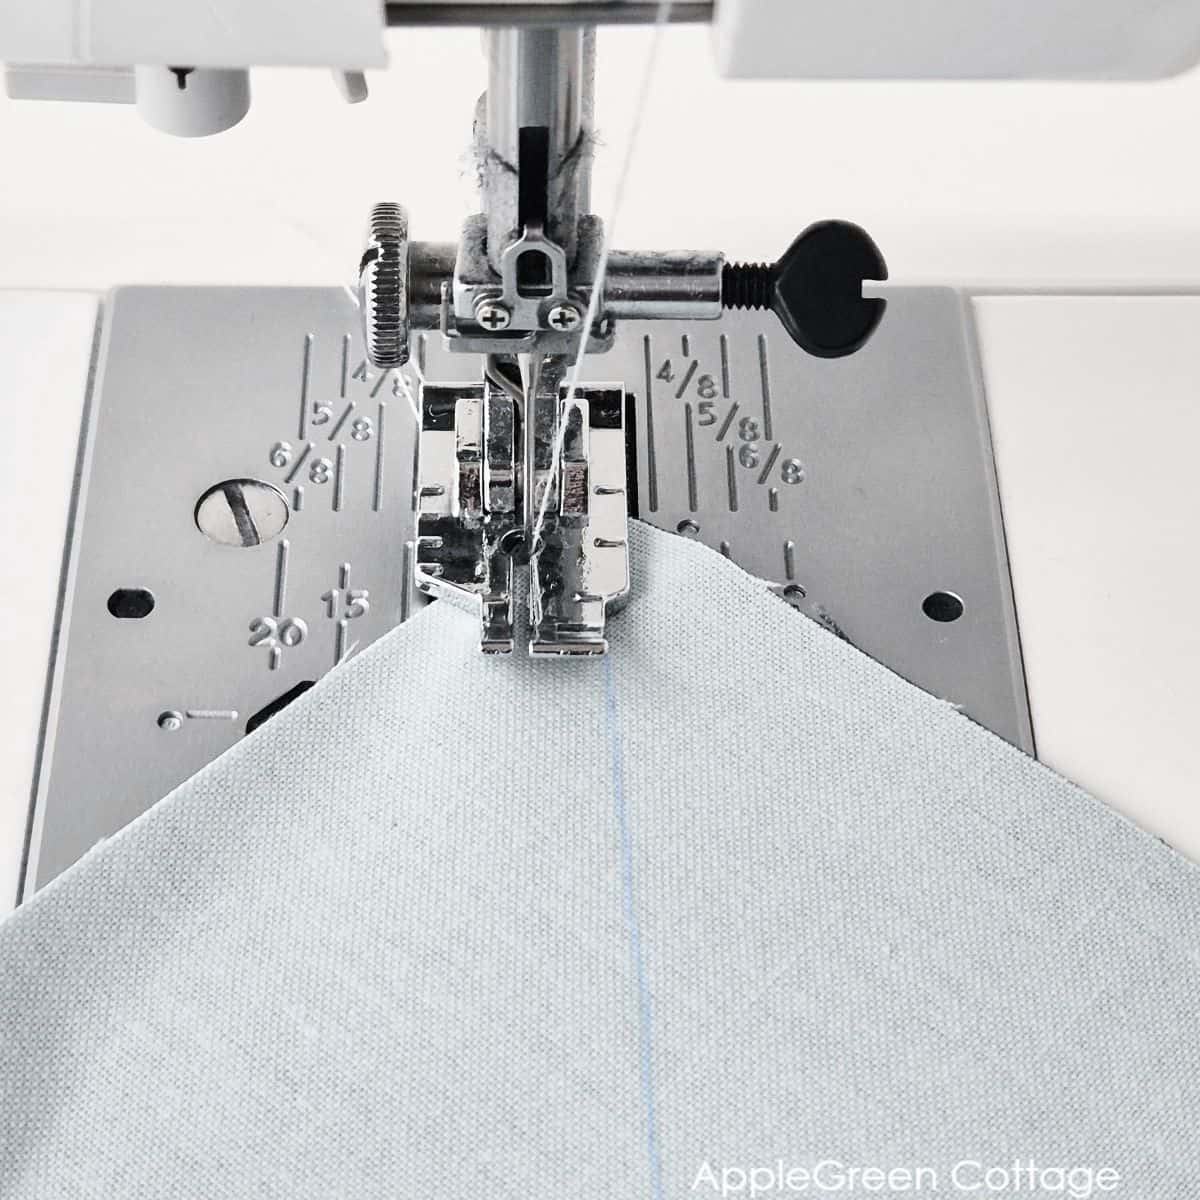
Using a ¼" seam allowance, sew four parallel lines - one on each side of the drawn diagonal lines. Keep your seams consistent for accuracy.
IMPORTANT: Consistent ¼" seams are crucial. Using a ¼" foot makes it easy-peasy for me. (Did you notice I moved the needle just a smidge towards the center in teh photo above? It makes the seam just slightly narrower. Find out about the scant quarter inch seam here.)
Step 4 - Cut
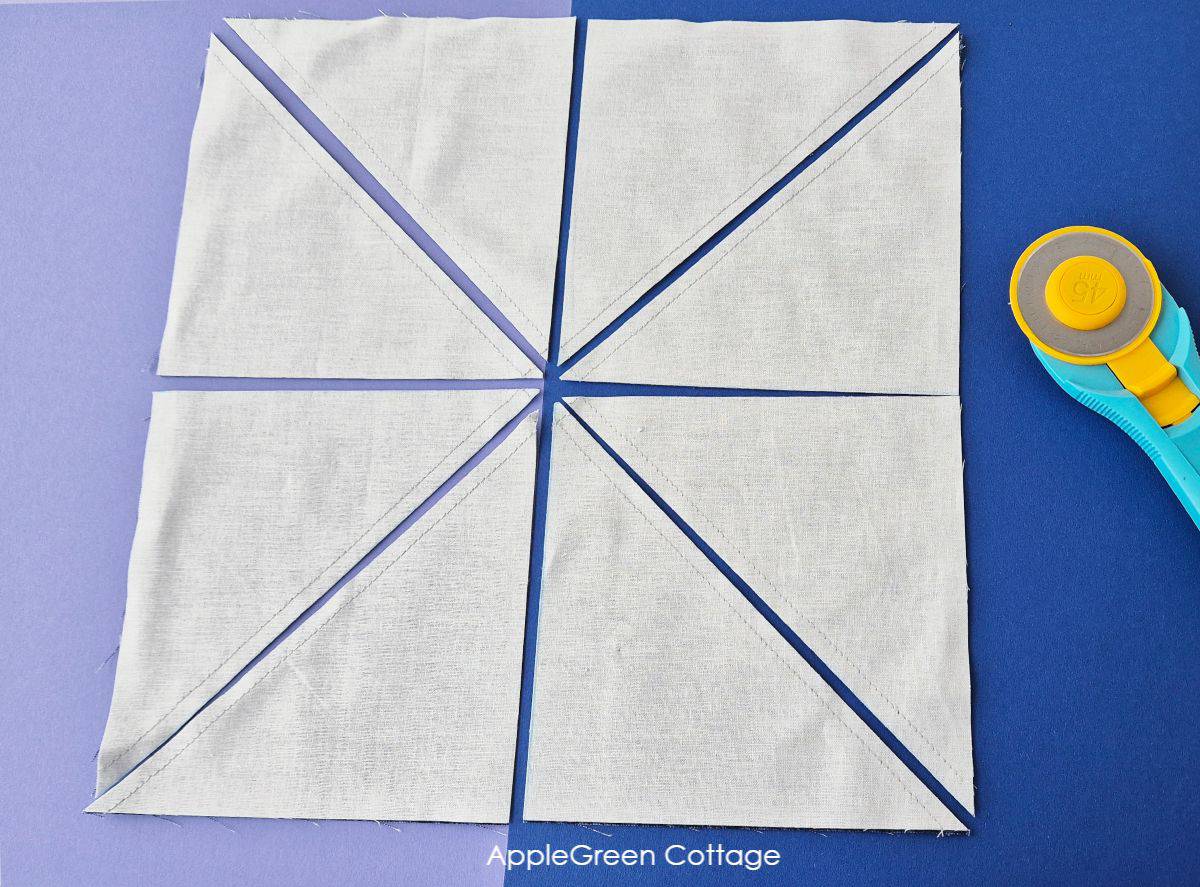
With your rotary cutter and ruler, cut the square into eights as shown in the image above. You will cut in half vertically and horizontally, as well as along both diagonal guidelines.
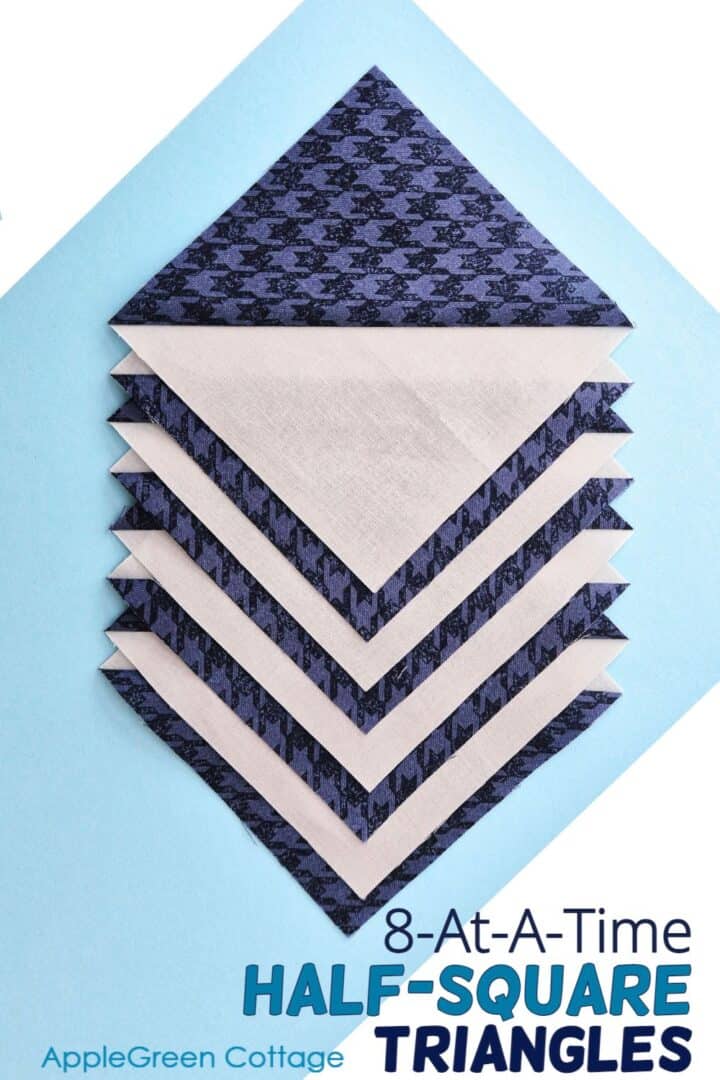
This will give you eight triangle-shaped units.
Step 5 - Press the Seams
Now unfold the pieces and press the seam allowances towards the darker fabric, or press them open.
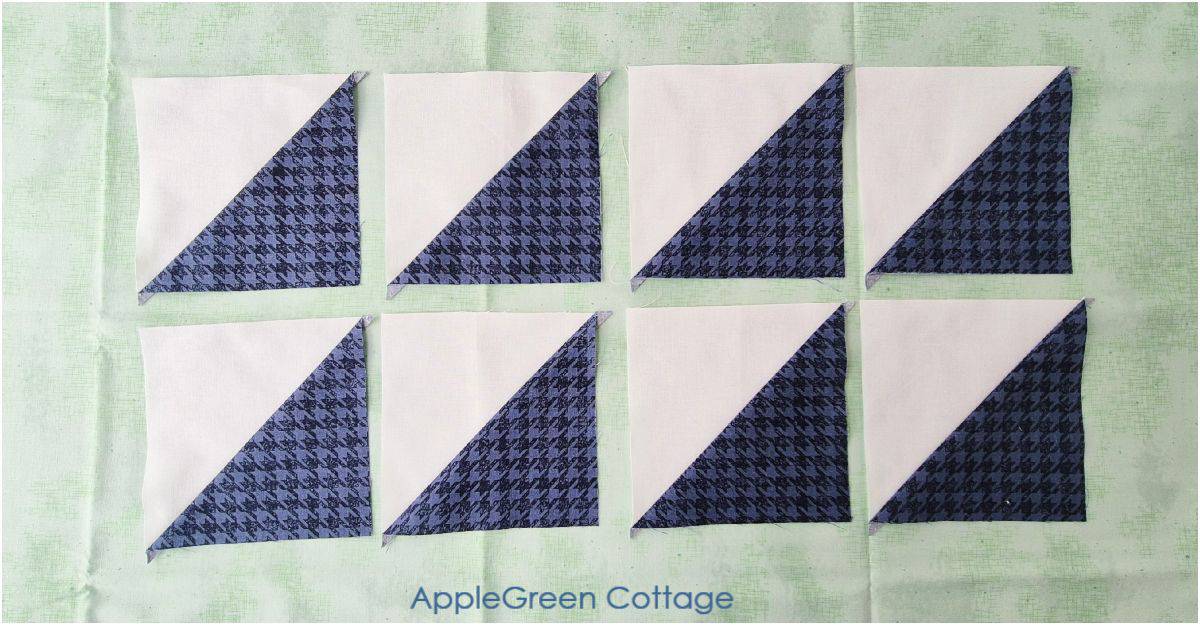
If you're new to quilting, check out in my previous HSTs tutorial where I show you the easiest way to press the seam towards the darker fabric. (However, if you plan a quilt with many seams, maybe best press them open. See tips at the end of this tutorial.)
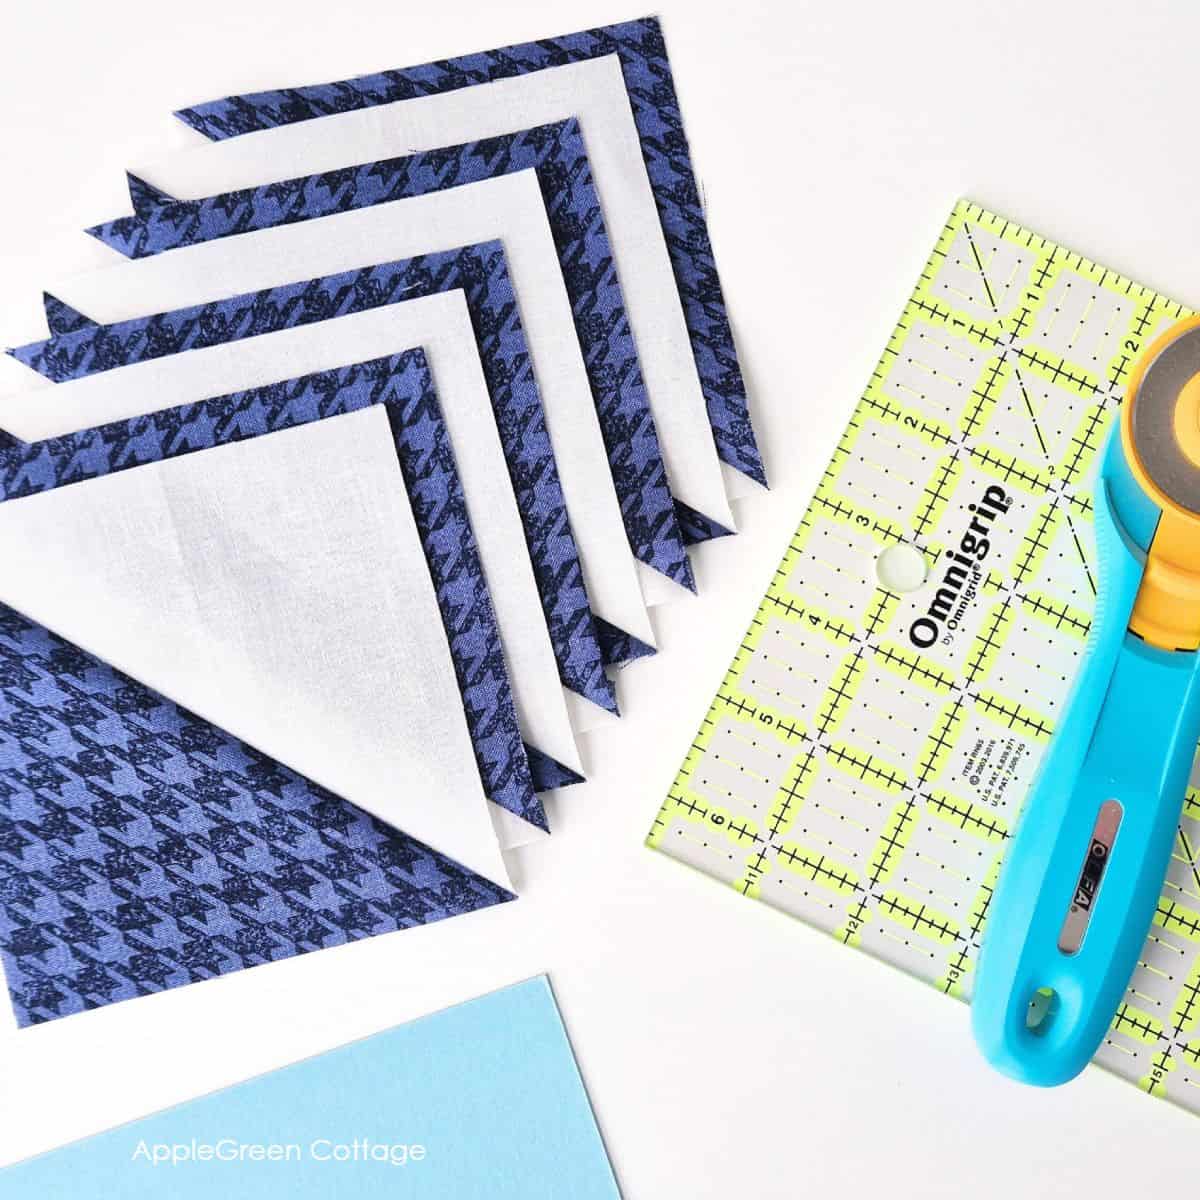
Step 6 - Trim to Size
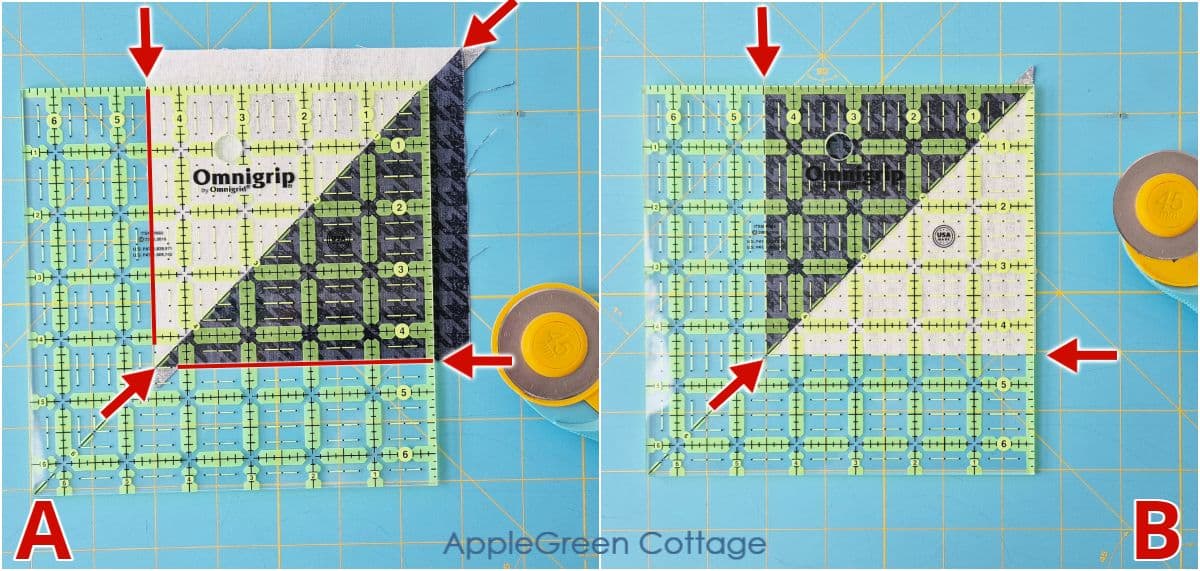
Using a ruler with a 45° diagonal line (Omnigrip 6 ½" in this tutorial), line it up with the diagonal seam on your HST while you cut it to size (image A). Trim the first two sides.
Then turn the block and trim the remaining two edges. (Image B)
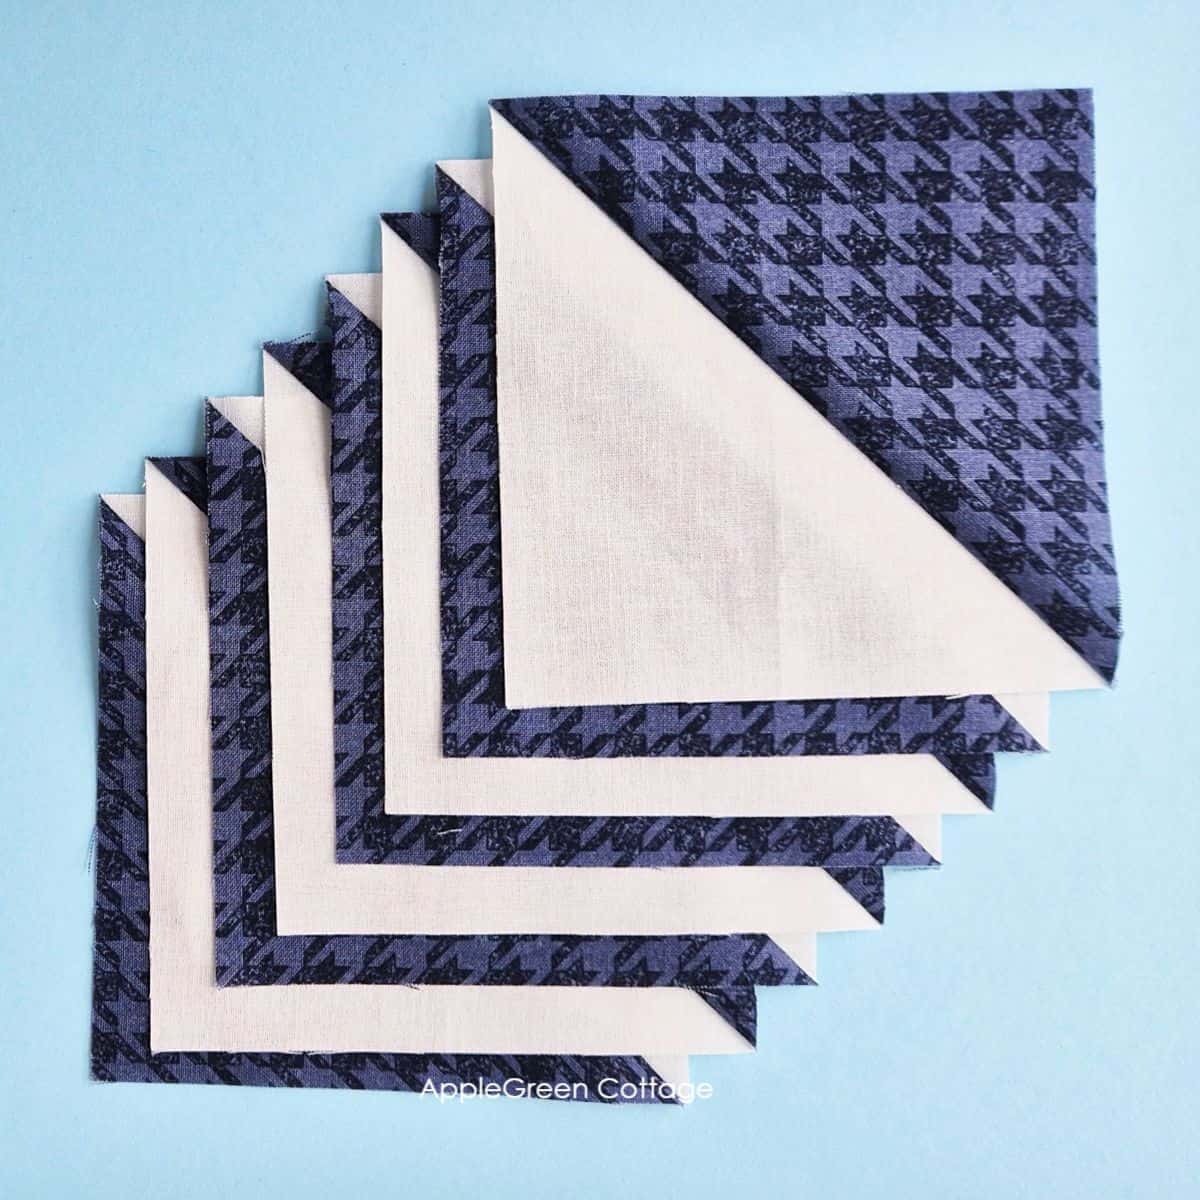
Repeat with the remaining 7 half-square triangles. YAY, I just had to line them up on a diagonal, they look so perfect! ↓
HST Cutting Math - Made Easier
To figure out the dimensions for 8 at a time half square triangles, you'll start out with the desired finished size of the HST.
The oversized formula for 8-at-a-time half square triangle is:
Starting square = Unfinished HST size x 2 + 2"
You might have seen another formula too, same thing: (Unfinished HST size + 1") x 2.
But you can always use a shortcut: our HST Cheat-Sheet! (Get the half square triangles 8 at a time chart and you'll never need to think twice about the size of your squares to cut.)
More ways to make HSTs
My go-to HST methods are the eight-at-a-time and two-at-a-time techniques. The eight-at-a-time method is fast, efficient, and avoids bias edges, making it perfect for sewing large batches. When I only need a few HSTs, the two-at-a-time method is my favorite because it's simple and easy to manage.
There are a few more ways to make HSTs, like the one-at-a-time and four-at-a-time methods. Honestly, I'm not a big fan of these two.
The one-at-a-time technique is slow and wastes more fabric compared to other options. (unless I use odd-shaped scraps to sew with!) The four-at-a-time method, while faster, creates bias edges that can stretch and distort, making accurate piecing more challenging. I need to practice on this one 🙂
Related Projects
Looking for other projects like this? Try these:


Randomize Quilt Pattern
Love modern quilts but want something simple - and NO tricky points to match? →THIS.
Helpful Tips For Making HSTs
How to press the seam allowance on quilt blocks?
You can either press your seam allowance to the (darker) side or press the seams open like I did with these pinwheel quilt blocks.

FULL DISCLOSURE: I later re-pressed all these 8-at-a-time HST pieces open because I had a special plan for them 🙂
What Ruler Is the best for trimming HSTs?
- Creative Grids Ruler - Non-slip grip and Turn-A-Round feature for precise ½" and 1" measurements, ideal for HSTs.
- Bloc-Loc HST Ruler - Locks into seams for perfect alignment and trimming without shifting.
- Quilter's Select Square Ruler - Non-slip surface and clear markings for precise trimming, especially for small HSTs.
- Deb Tucker's Tucker Trimmer - Versatile ruler with diagonal guides, great for precision piecing and triangle-based units.
- Omnigrip Square Ruler - Classic choice with bold gridlines and compact sizes, reliable for accurate HST trimming.
See my 4 Favorite Quilting Rulers!
What to Look For in a Ruler for Trimming HSTs?
When choosing a ruler, keep the following in mind:
- Diagonal Line: Ensure the ruler has a clearly marked 45° diagonal line to align with the seam of your HSTs.
- Size: Choose a size that suits your project. A 6½" square ruler is a versatile size for most HSTs.
- Grip: Non-slip rulers (like Creative Grids or my favorite - this Omnigrip) help prevent fabric shifting during trimming.
Bonus Tip: Rotating Cutting Mat Will Make Trimming Quilt Blocks Easier
Pair your favorite ruler with a rotating cutting mat to make trimming even easier. Instead of lifting and repositioning your fabric, you can simply spin the mat, maintaining accuracy and saving time.
Conclusion
I hope you liked the tutorial, and now have your 8 perfect Half-Square Triangles ready for your next quilt! I can't wait to see what you create!
Don't forget to grab your free cutting chart for HSTS (I joined two charts for you)

Leave a Reply