
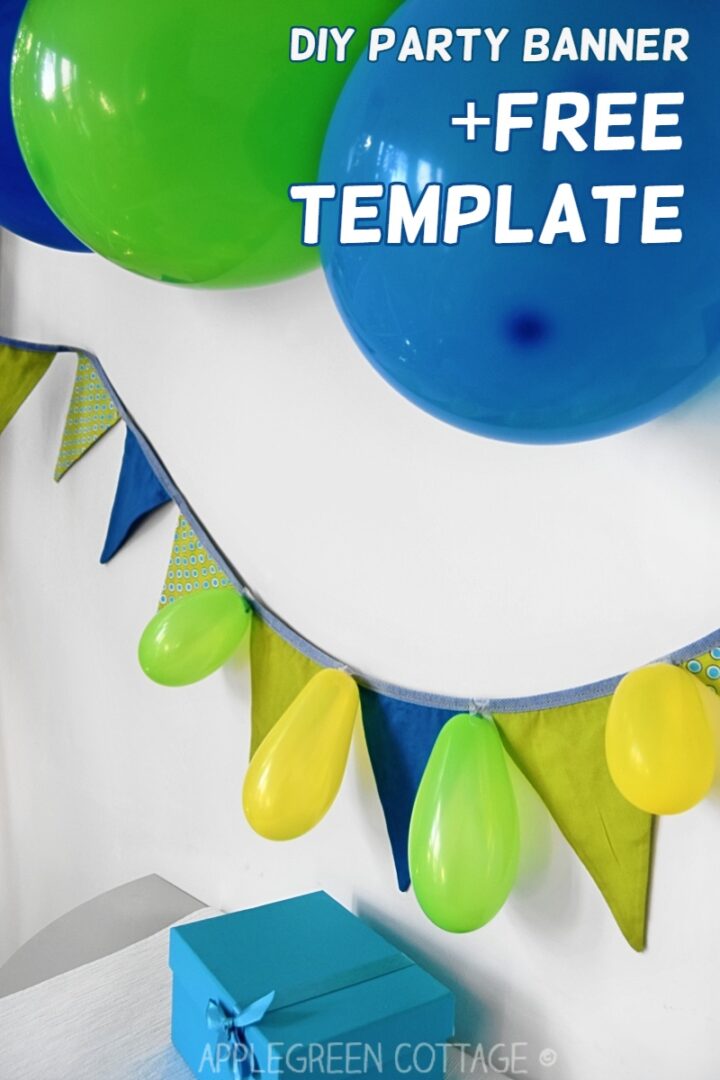
Make a pretty diy fabric banner using this free banner template. It's double-sided and so cute! Great decoration for a birthday party, and perfect diy baby shower party decor. It's reusable and it will last longer than any single-sided banner. It's so easy any sewing beginner can make it! Scroll down to get your free banner pattern.

This post includes affiliate links. Thanks for your support. Hello crafting friends! Another beginner sewing tutorial is waiting for you today. I'm excited to show you how to sew an easy fabric bunting banner with a free banner template included. If you want to see more tutorials, you'll find tons of easy projects here, including
- How To Make a Scrunchie
- Diy Keyfobs ..
- super easy sewing ideas
- and more than 100 other free sewing tutorials.

Diy Fabric Banner
Make your own fabric bunting to hang as decoration. It's a great use of your fabric scraps! I made this cute fabric bunting when my older son was a tiny baby. It's the first one I've ever made, and it's still my favorite! Because it's
- easy to make
- cute
- double-sided.
And if you want to, you can add some letter appliques - get your free alphabet letters template to print and use to make pretty letters here in this post on my favorite ways to add applique

After I saw how cute the bunting had turned out, I made another two for my friends' babies. Same template, because it looks just the right size, and just the right form. You don't want to make a bunting banner that is too small or too short - it will just look somehow lost on the wall. And I just love the blue-and green combination - can you tell? 😉

Oh, and one additional thing: I like double-sided way more than single-sided bunting.
WHY IS DOUBLE-SIDED BETTER?
This is why: if you want to keep the beautiful banner you've just made, as permanent room decor, it better be double-sided, since you need it to NOT fray when you throw it in the washing machine. Nobody says that but of course, your baby's bunting banner will get dusty if you want to keep it seen.
And also, being double-sided, both sides of the fabric banner will look great when it is hung overhead. Or across space. No limits, actually 🙂
And here's the latest news (update): I'm adjusting to those who prefer to watch a video when learning to sew. Yep, I've just created a video slideshow for a quick recap on how to sew this banner. Enjoy!
Supplies to Sew a Pennant Banner Template
You'll need:
- fabric (solids or prints, anything cute)
- grosgrain ribbon
- matching thread
- sewing machine
- iron
- pins
- scissors (or rotary cutter)
- a template - you can use mine, it's placed at the end of this tutorial
How To Sew A Banner Tutorial
This time, we'll be sewing a triangle bunting banner. There are tons of other forms you can choose from, but I find this one the easiest to start with. You might want to come back to the blog soon to see other types of banners to sew. So many sewing ideas to show!
Step 1 - Print the Free Banner Template
Print the template. You could also cut triangles without one, but using it will save you quite a lot of measuring (= a template makes the project way easier!) It's just the perfect size for me, and it might also be perfect for you.
To make it even easier, you can print it on cardboard paper. It will last longer and make cutting out flags a piece of cake.
Step 2 - Cut the Fabric
Now when you've got the template, cut out 2 pieces of fabric for each bunting flag.

Step 3 - Sew the Bunting Pieces Together
Put the two pieces right sides together.

...and sew along the 2 long sides. Leave the top part of the triangle open. Then trim off excess fabric at the tip of the triangle to make the point of the bunting flag reeeeeeally nice (But be careful NOT to cut into the seam line!)
Then press flat for easier turning.

Step 4 - Turn

Turn right side out. Push out the tip of the triangle using a point turner tool (or simply a knitting needle, chopstick or something similar).

Also, you'll also want to cut off the two bits on top of the triangle. (see photo below) Then press the piece flat again to get perfect form. (no photo, sorry 🙂
Repeat and make as many flags as you want to.
Step 5 - Assemble the pieces
Sew the flags onto the ribbon. You will probably want to leave at least 10 inches (25 cm) of ribbon on each side of the bunting for tying/hanging. I left more, approximately 20 inches (50 cm) and it allows me to hang it pretty much anywhere.

Fold the ribbon in half (lengthways) as you sew. Insert the first flag by tucking the unfinished side of the triangle between the two ribbon layers. Then leave a gap before the next flag (I left an inch). No matter how long the gap, just make sure to space the gaps evenly.
Then repeat on all pieces.

Done. How easy was that! Now what you need to do is hang up your cute fabric bunting and admire it. Or give it as a present. It would make a perfect baby welcoming gift, wouldn't it?
How To Store a Diy Bunting Banner
And here's a bonus tip for you. To store them, make this beautiful diy drawstring bag, or this cool diy snap pouch (no zipper, beginner-friendly!). You'll have a wonderful handmade present for your loved ones (aka 2-in-1!)

WANT TO ADD APPLIQUE?
You can see that in my title photo. I added the name of the child on the bunting and it looked great! Get free letter applique templates here in this how to make applique post.
If you want to add letters too, or any other applique, it will be easiest to use felt as you don't need to hem it and it's easy to cut. More about that in my how-to-make simple felt letters post. If you are adding felt, it's important you use just the right type for your project. If you scroll down the post about felt (here), you'll find a simple explanation of what type of felt exactly you need for your project.

Now you've made your first fabric pennant banner. A perfect beginner sewing project, isn't it?
Your Free Banner Template
I've created a simple bunting template. To open the FREE TEMPLATE, click the button below:
WANT MORE FREE TUTORIALS AND GOODIES?
Get email updates and never miss out on new patterns, printables, and tutorials:
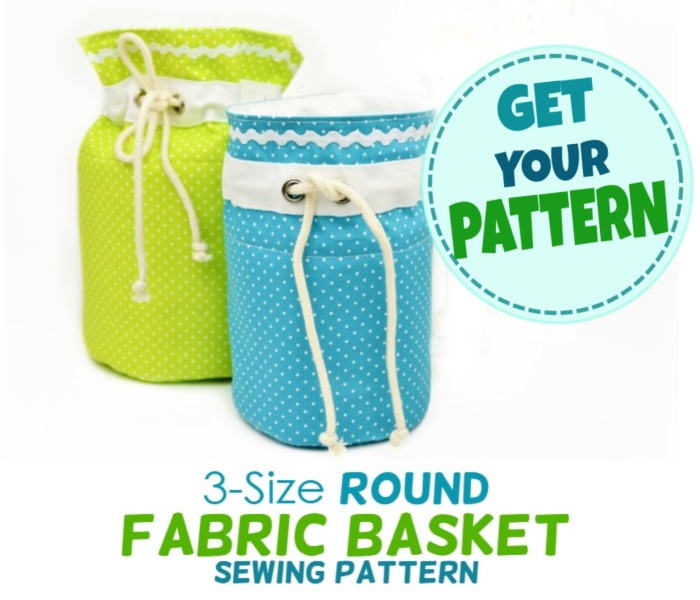
Or …check out this popular home storage pattern - the ROUND FABRIC BASKET - 3 sizes for all the rooms in your home!


Shawna says
What size grosgrain ribbon did you use?
Damjana says
Hi Shawna, a great question - I used the 1 inch width (2.5 cm) if I remember correctly. Happy sewing!
Unknown says
Perfect for my soon-to-be-here baby's room AND my sister's baby shower! Thanks for the easy to follow pics. 🙂