
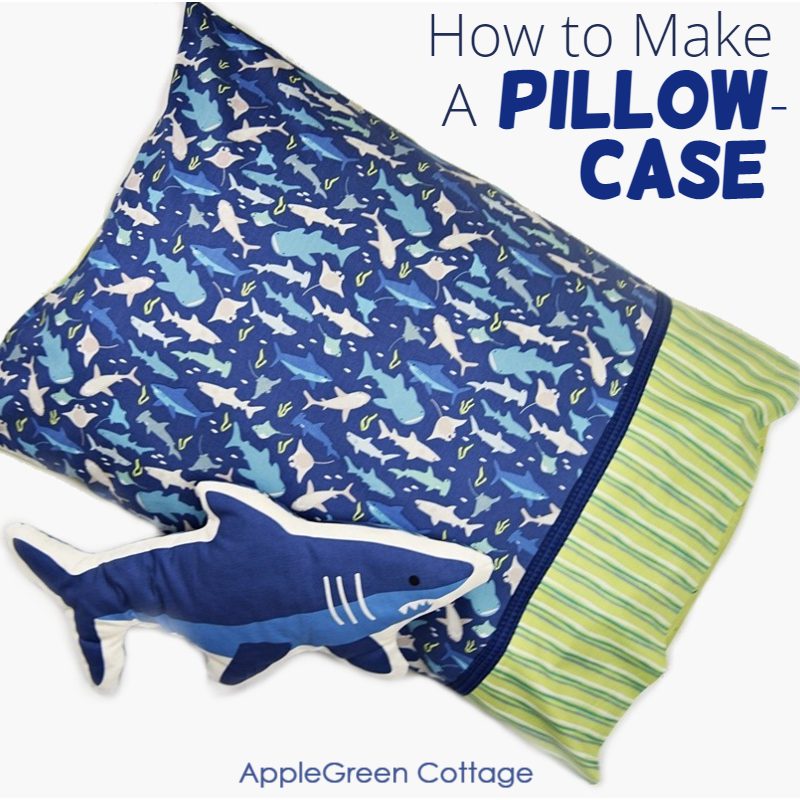
See how to make a pillowcase with French seams using this easy envelope pillowcase sewing tutorial. I tweaked the process so it's so easy (no burrito style needed!). Meet my best envelope pillow cover pattern for your bed, adjustable to any size:
No raw edges. No pillow inserts sneaking out. And the best part? It's SUPER simple! The result? A polished, high-end look. Everybody thinks these are store-bought! Sew one and you'll never go back!
Prefer an ad-free printer-friendly option of the whole tutorial+images? See the → optional PDF file in our shop.

This tutorial is also part of Printable Tutorials BUNDLE
100 PDF tutorials now, and growing!
Table Of Contents
Why This Pillowcase Tutorial Is the Best
This is what our readers love about this pillowcase sewing tutorial:
- No raw edges - just French seams, the easy way.
- No peeking pillow inserts - the European closure keeps them hidden (envelope style pillowcase!)
- No tube-turning- get the same neat result without the burrito method
- Beginner-friendly - quick, easy steps
- a professional, high-end look.
A total success - no wonder everybody wants to make these!
Making a pillowcase can be your perfect first sewing project! Looking for more things to sew for home? This tutorial is part of the SewPretty HOME series:

Join the FREE 7-part email course and make 6 beautiful items for your home! You'll love it!
Now, let's start! Let me give you a few pieces of info you'll need for sewing pillowcases:
Size of a Pillow Insert
These are the inserts you'll sew your pillowcase for:
- standard size pillow insert is 20" by 26" (51 cm by 66 cm)
- queen size pillow insert is 20" by 30" (51 cm by 76 cm)
- kingsize pillow insert is 20" by 36" (51 cm by 92 cm)
Finished Size of a Pillowcase (in this tutorial)
Now the pillowcase should be a bit larger than the pillow to account for loft differences - like an inch or so:
- standard size pillow case is 21" by 27" (approx 54 cm by 69 cm)
- queen size pillow case is 21" by 31" (approx 54 cm by 79 cm)
- kingsize pillow case is 21" by 37" (approx 54 cm by 94 cm)
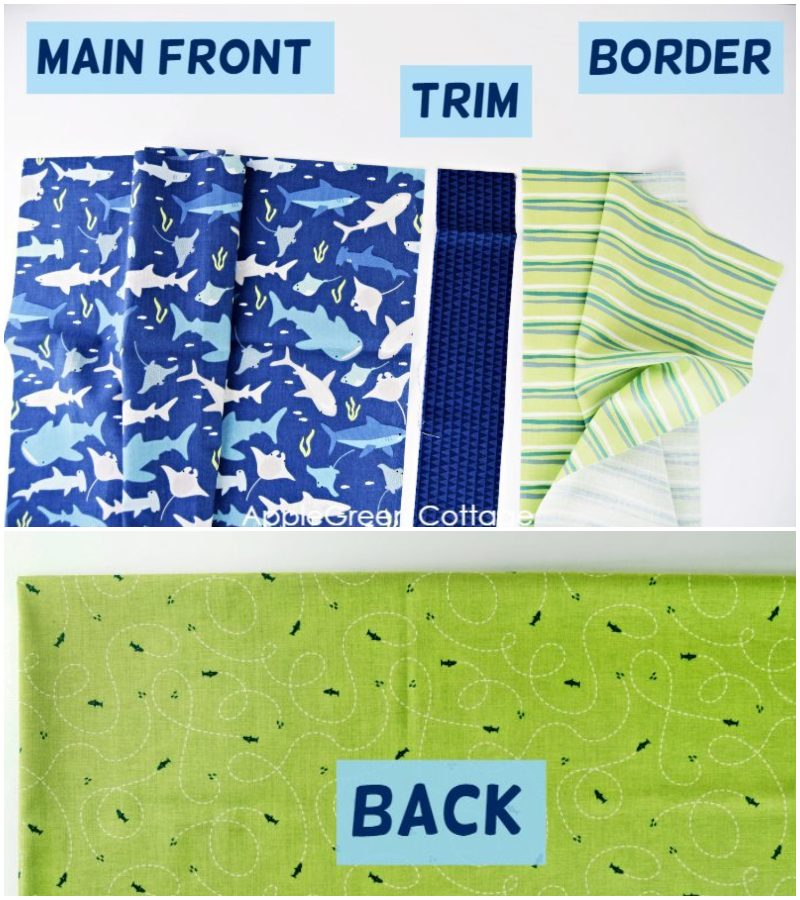
Fabric Cutting Instructions
For each pillowcase, you'll cut four pieces:
| Standard size | Queen Size | King Size | |
|---|---|---|---|
| Border | | 15" x 23" | |
| Accent trim | | 2-½" x 23" | |
| Main Front | 21-½" x 23" | 25-½" x 23" | 31-½" x 23" |
| Back | 35" x 23" | 39" x 23" | 45" x 23" |
Pillowcase pieces to cut (width x height)
Border and accent trim are the same for all sizes. Feel free to adjust the size an inch smaller if you want a snug fit. Just make sure it's not too small.
How Many Different Fabric Prints To Use For This Diy Pillowcase?
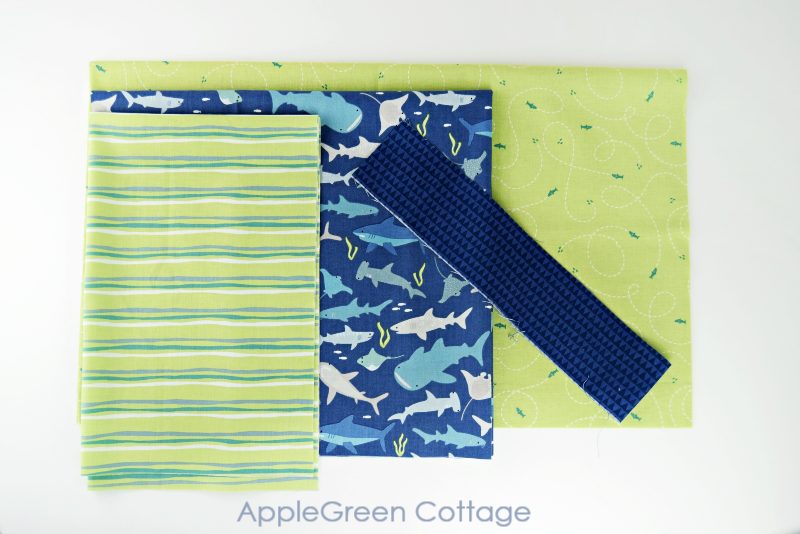
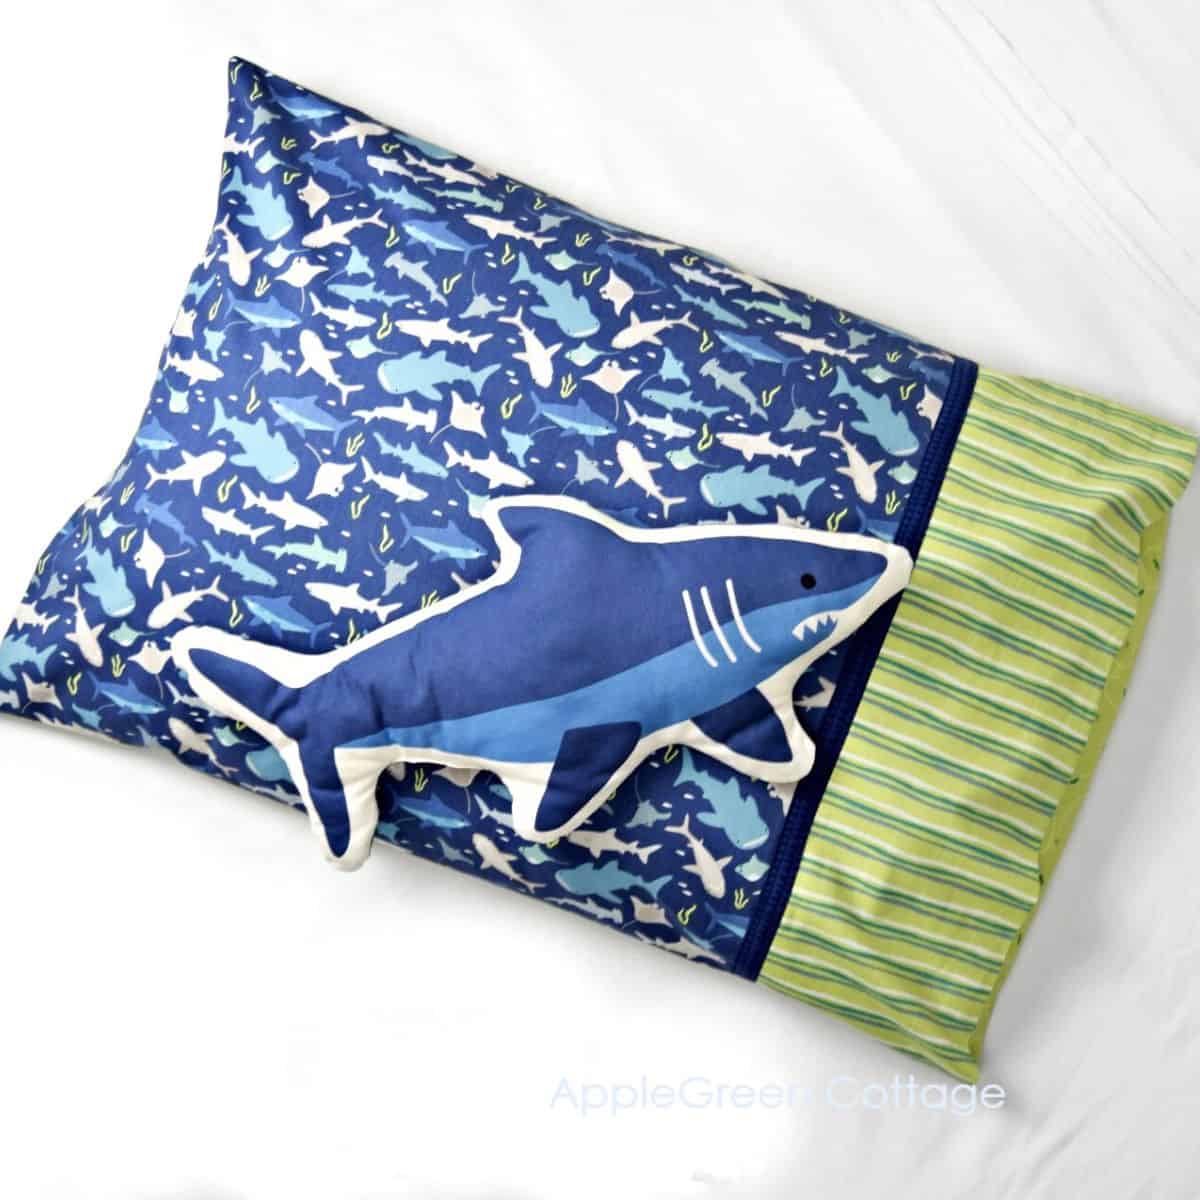
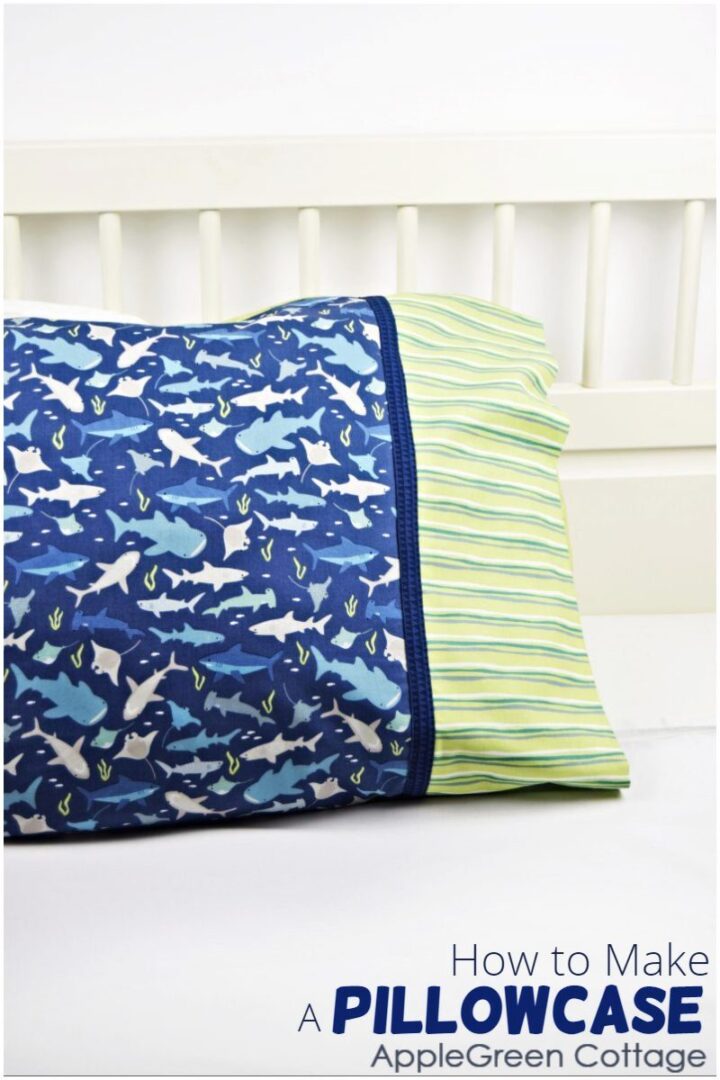
While you can just use one print, it's much more fun if you use several! I used four prints from the Riptide collection by @citrusandmintdesigns. Love at first sight, these blues and lime green accents, and all the cool sharks - along with all the seaside vibes we had to forego last summer. And there's even a Riptide panel! The sharks on the panel are simple sewing projects you can do with your kids. Shark pillow, anyone? Absolutely!
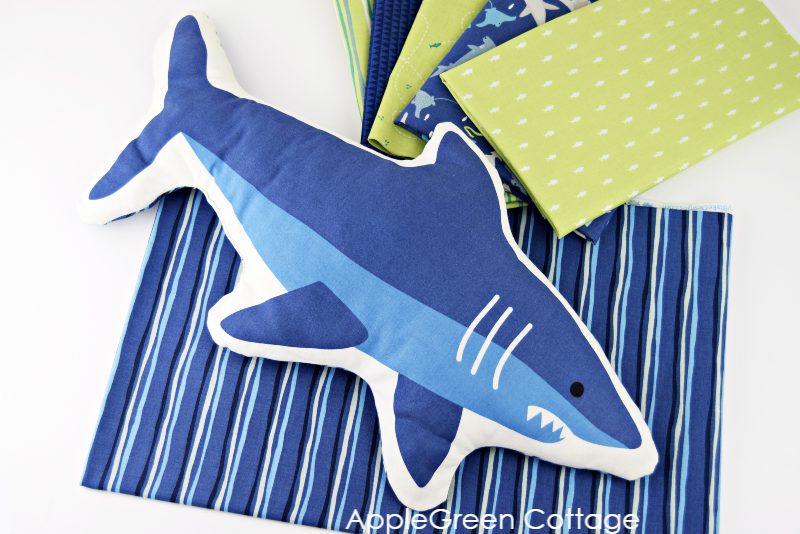
I couldn't help but use the one of the designs on the Riptide collection panel to make a shark pillow for kids to play with. Such an easy extra! Just cut out the two mirrored huge sharks, stitch the two pieces together, stuff, and - done. Ta-daa! Liked by preschoolers and nearly-teens alike!
Making A Pillowcase Tutorial
The seam allowance used in this tutorial is ½" or 1.2 cm.
Step 1 - Cut fabric
Use the cutting instructions above to cut 4 pieces: border, trim, front main, and back.
Step 2 - Press
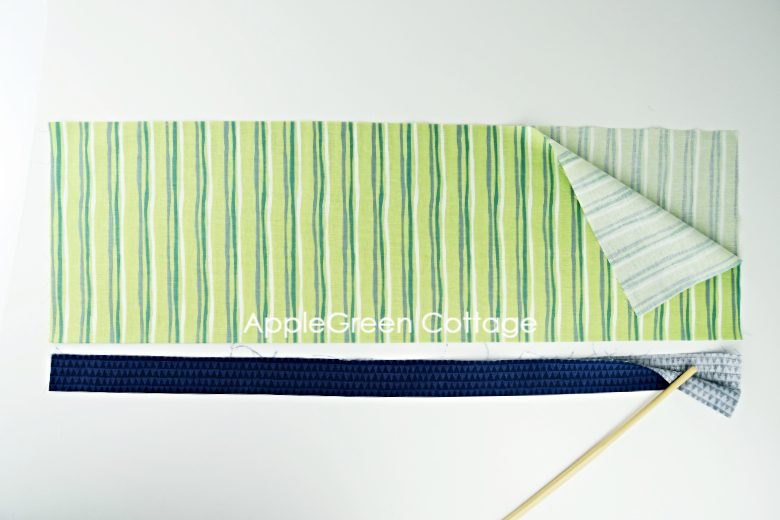
Press trim and border in half lengthwise, wrong sides together.
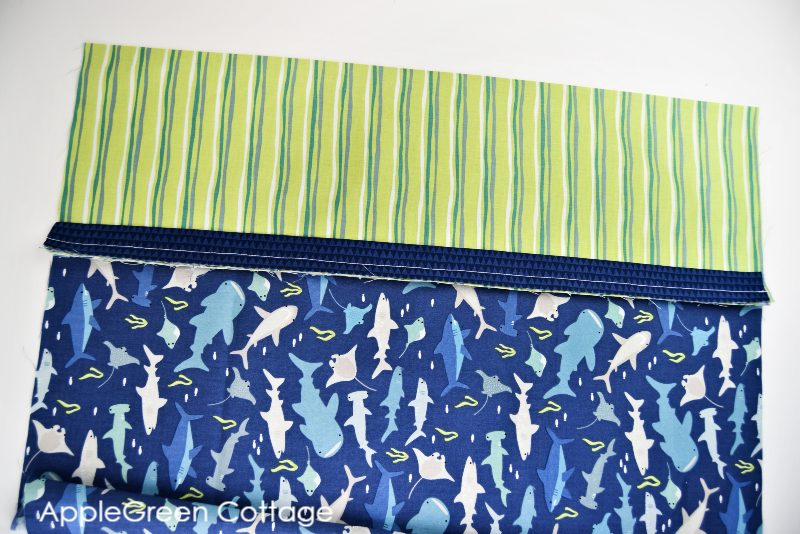
Step 3 - Layer the Fabric
Assemble the front pieces:
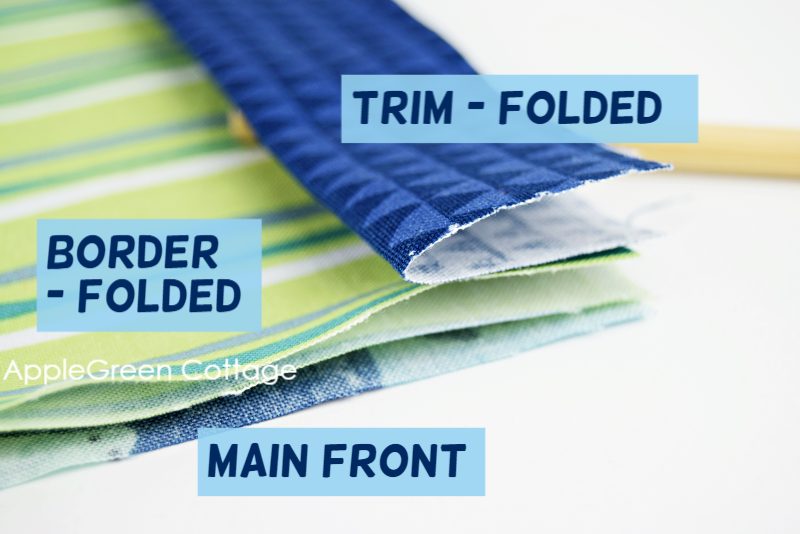
- lay the main fabric right side facing down (yes, DOWN)
- place the folded border on it, with the raw edges aligned
- place the folded accent trim on top, with the raw edges aligned
Step 4 - Sewing the Pillowcase Front
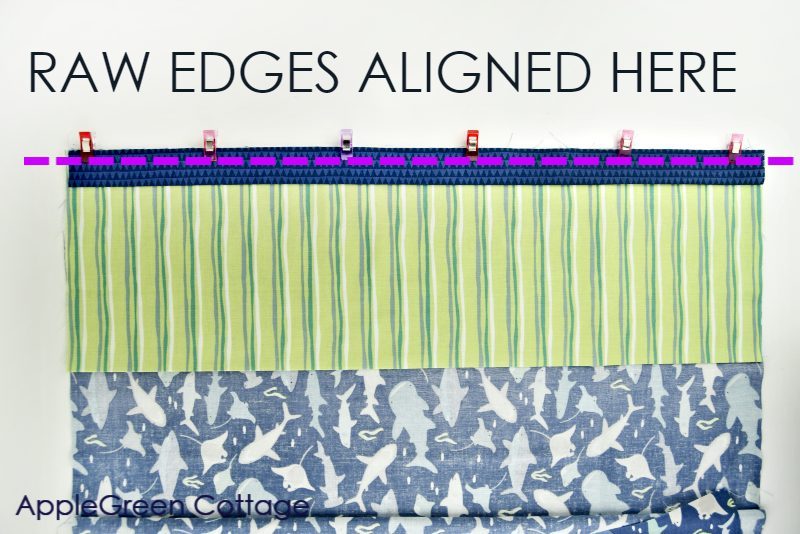
Sew through all layers with a ½" (1.2 cm) seam allowance, backstitching at the beginning and end to secure stitches.
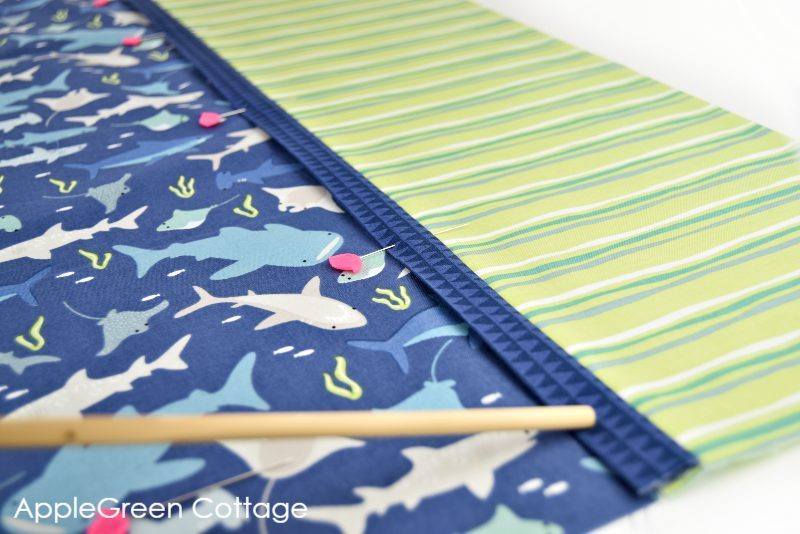
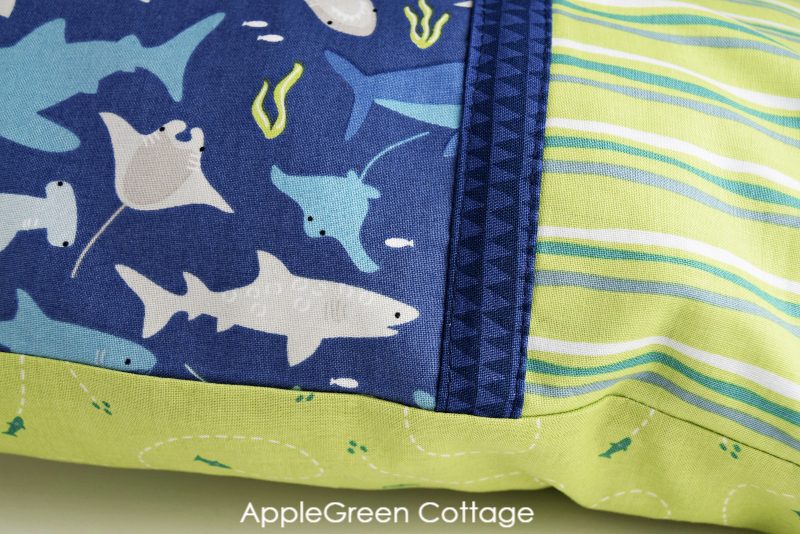
Step 5 - Sew Trim In Place
Unfold the piece, then flip the trim to cover the raw edges:

This is the clever part: notice the trim (see image 1)? Press, then flip the Accent Trim to cover the raw edges on the front side (see image 2). Press and sew in place making two seams, each very close to the Trim edge (see image 3). This will hide all the raw edges.
Here's a larger image of the flipped trim, just before I sewed it in place:
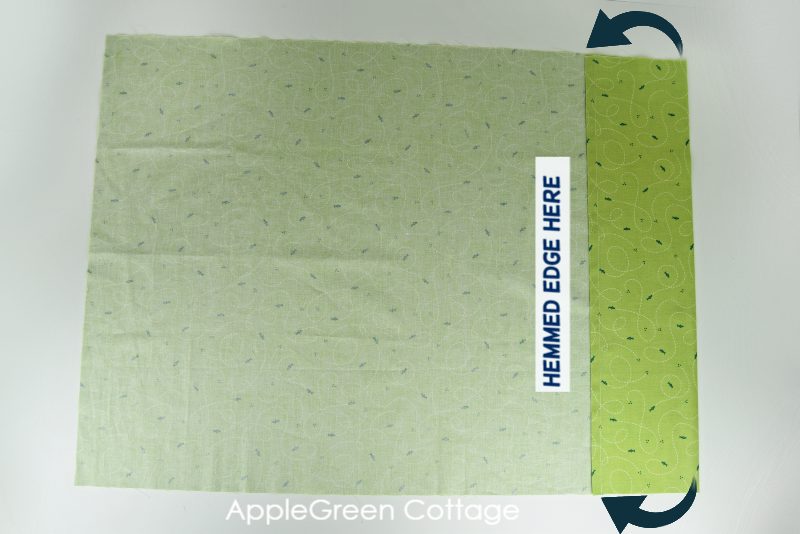
Step 6 - Hem The Back Piece
Place the back piece with the right side facing down (and with the print direction upside down if your print is directional). You'll do a double hem on the right side of the piece only, leaving the rest of the back piece unhemmed. This is how:

You can do a double hem two ways. The first one is by folding the first ½" (1.2cm) under, and then again ½" (1.2cm)and stitching the hem at ⅜" (1cm) away from the edge, encasing the raw edge.
Or, check out an even easier way to sew a double hem.
Step 7: Fold The Flap
We need to make an envelope casing for the pillow: with the finished edge on your right and the right side facing down, grab the edge and fold 6" of onto itself.
Step 8 - Assemble The Front And The Back
Place the back piece with the right side facing down, finished edge on your right. Then lay the front piece on it with the right side facing up and the border on your right too. Align the raw edges on your left:
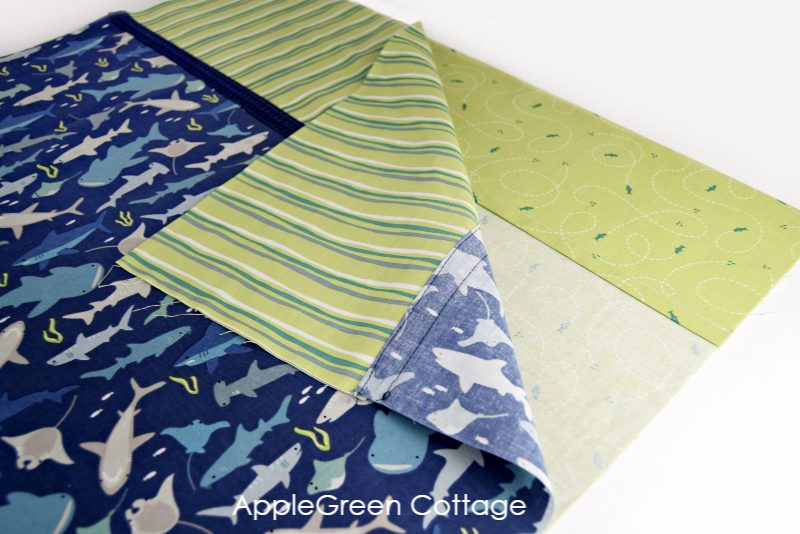
You'll have noticed that the wrong sides of the pieces are facing, and that's ok. We are about to see how to sew a french seam pillowcase - the French seam will make all edges neatly finished. No raw edges!
Step 9 - How To Make A Pillowcase With A French Seam
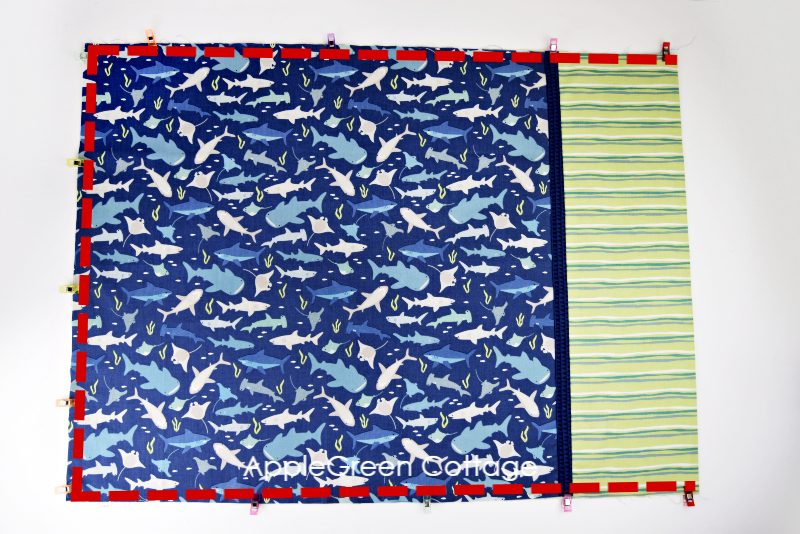
Pin or secure with sewing clips and stitch along the bottom, left side and top using a ½" (1.2cm) seam allowance.
Then trim the seam allowance on all 3 sides down to ¼" (6mm) and clip the corners (here's a good tip on how to clip corners)
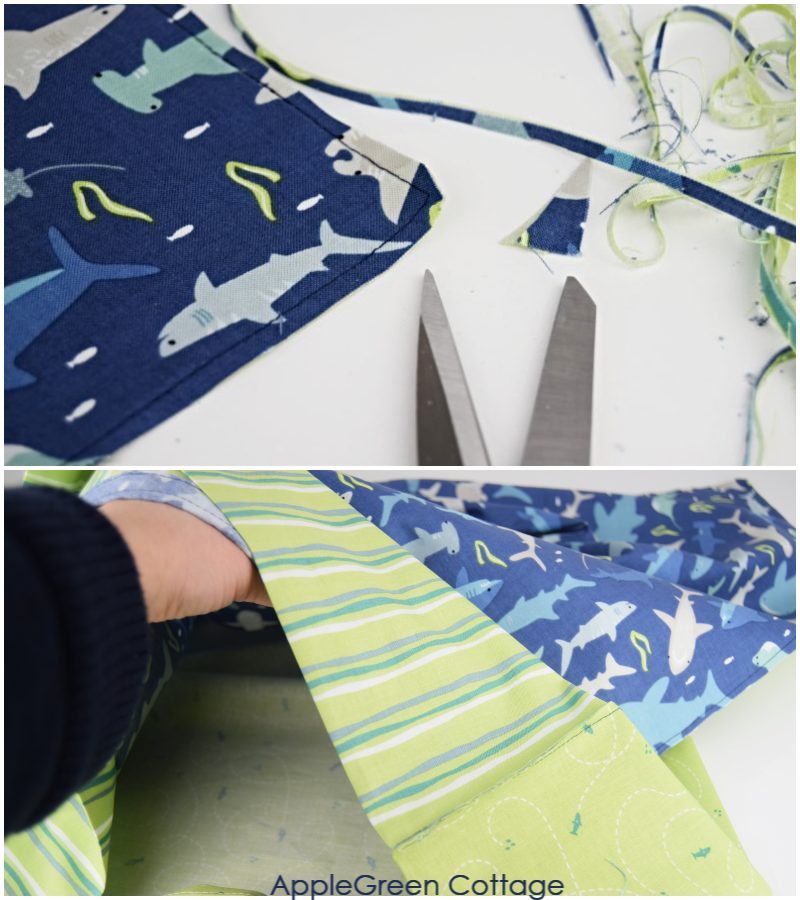
Then, turn the pillowcase wrong side out, press, and sew using again a ½" (1.2cm) seam allowance, encasing all raw edges. Nice and neat!
Also, here are the exact steps for french seams in a video form too:
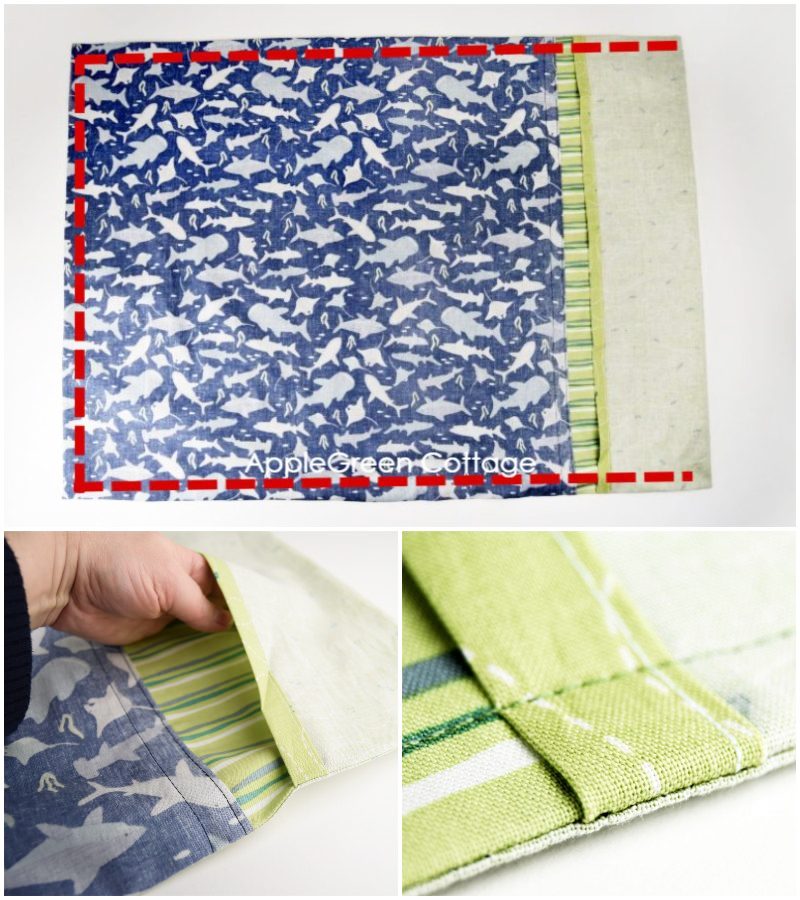
Step 10 - Turn And Press
Flip the pillowcase right side out, give it a final press and it's ready to use. You can mix and match it to my other, super simple pillow cover project.
+The EASIEST Pillow Cover
Use matching fabric and create a few!
And just in case you're wondering, I'm also adding this bit of info:
A standard size pillowcase measures 20 inches by 26 inches (51 cm by 66 cm).
Simple. You will recognize it under the name envelope pillowcase. Most pillowcases in the US are exposed at the end, so nothing holds the pillow insert from peeking out. On the other hand, (our) European pillowcases always cover the end of the pillow. It only means adding a simple, yet effective fold when sewing a pillowcase. All I added was an approximately 8-inch flap wrap into the case. It holds the pillow in place and neatly covers the end. From now on, I bet you'll want all your pillowcases like these!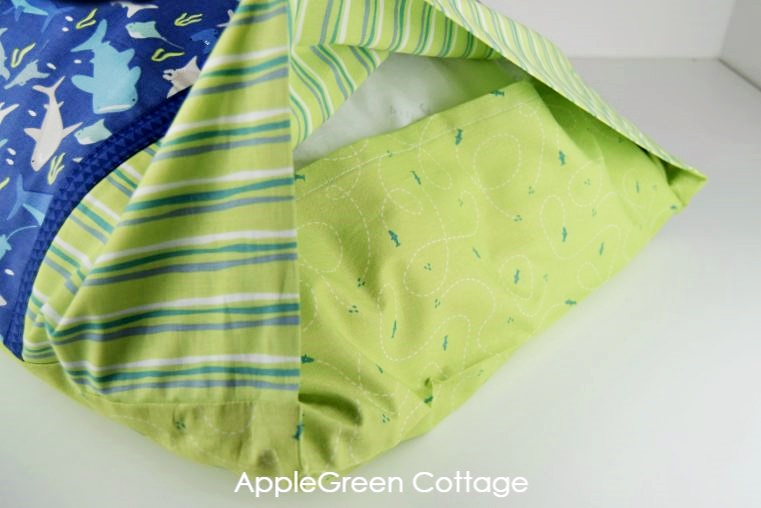
The Story Behind This Pillowcase Sewing Tutorial
Actually, know why I even started to sew these pillowcases? Kids. With the latest obsession of my kids with sea creatures, they have been asking for more fish ever since they got their first small fish tank. And after the last two (online) trips to the pet shop and a few more species added to our fish family, I decided it was time to continue nurturing their love for sea creatures elsewhere. So I got us a few cool shark-themed cotton prints! (Yeah, I could turn just every hobby into an excuse for me getting more fabric, haha!)
Looking around their rooms and seeing a lot of pink and floral bins in my daughter's room, and dinosaur stuff in my son's room, I noticed their neutral bedding could use some improvements. So, ta-daa! Now I'm guessing I need to make a few more for our bedroom too. Let me go shopping for some geometric prints.

+Free Oven Mitt Pattern!
Use matching fabric and create this cute oven mitt - 2 sizes, no binding!
If you enjoyed this tutorial, share it, like it, or tell your friends about it. Or save it for later, so you've got it ready whenever you want to make a lovely pillowcase - in your choice of colors!
You can also check out this diy throw pillow cover- Easiest Ever! Or make your dining room look beautiful with this diy table runner.
Want a printable copy of the whole tutorial?
Prefer a full, ad-free and printer-optimized Printable Tutorial with both instructions AND images included? ↓↓
Want More Free Patterns?
Get email updates and never miss out on new patterns, printables, and tutorials:
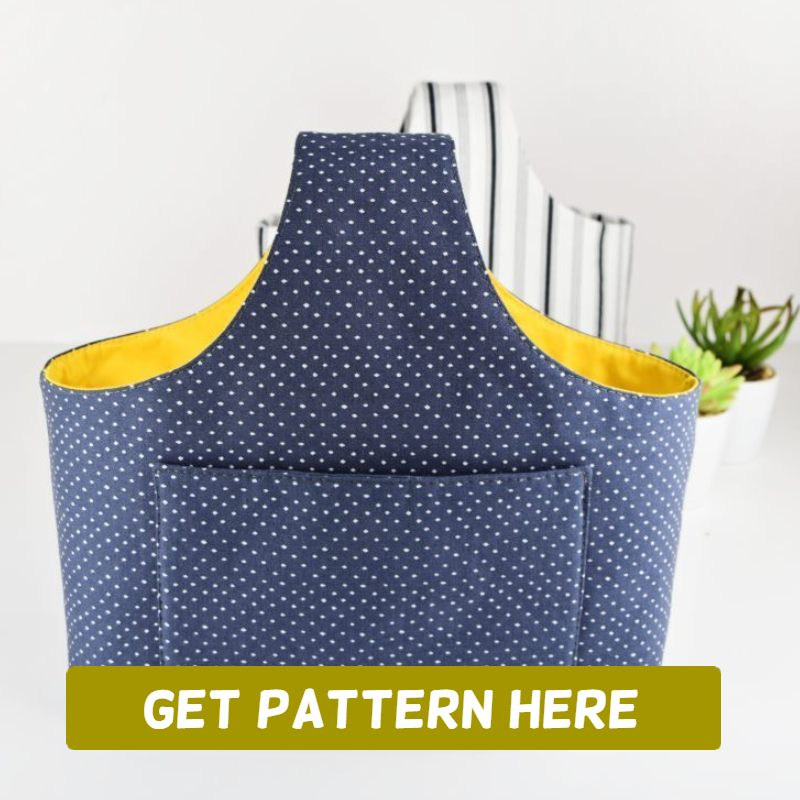
Or check out this pretty ALLina project bag pattern in our shop - for all your storage needs:


Kathy says
Love love love !! But I think I did something wrong at the closed end I don't think I did the envelope right
Susan says
I am going to try and follow these instructions. I am not sure where the French seam comes into play, but there is no link for for the video.
Damjana Jakos says
Susan hi, the french seam comes into play when sewing around the pillowcase, and the video will show once you disable the adblocker. Happy sewing!
Tricia says
what a great pattern- thank you so much for posting it. On the border for my daughter's I hand-embroidered a monogram letter and motifs, which was a nice touch to this very elegant yet simple pattern. I will be making so many of these, I dont thin kI'll ever order premade pillowcases again
Jamie Leman says
Thank you for this pattern! I've made lots of burrito style pillowcases and am so happy to try this easier version and the pocket is brilliant, especially for those "slippery" type pillows. Can't wait to try it !
Katrina says
This is EXACTLY what I'm after from the use of multiple fabrics to the European flap. I am so excited to sew one up!! THANK YOU!!
Damjana Jakos says
Katrina you're welcome, happy sewing!
Jeanne Gayle says
I found this pattern on your site several years ago and still make this style today. I have never understood the 'US' style that you always have to 'shake down' the pillow every morning when making the bed. Thanks for the re-post, all pillowcases should be made this way, it just makes so much more sense and much neater. Again thanks, my extended family has not purchased cases in several years because other than IKEA they cannot find anything that keeps their pillow contained.
Jo says
I will try this. Have to add that most US pillowcases are longer than the pillow, which does not peek out. As a pillowcase for kids dragging their pillow around, great. Not too sure about the pocket material showing so prominently. We'll see.
Paula says
Thank you for this beautiful pillow case pattern I’ll let you know how it turns out 😉
Susie Williamson says
I just made one of these pillowcases for my granddaughter's college dorm room! It was easy and sewed up nicely! I know this isn't a new pattern on your site, but another great one, Damjana!!!
Sandra Watson-Brown says
Hi there,
I tried to reply before but I don't think it worked so I am trying again.
These instructions are excellent! It is very easy to make this pillowcase and it is a beautiful finish! My daughter has already claimed the one I made on my first try.
I'm just wondering how you make this without fabric waste. Most cottons I get these days are 43" wide, so if I were to cut 23" pieces, I couldn't get two across and I would have a large amount of fabric leftover. I made a pair of these by cutting my fabrics down the middle, skimping on the cut width, and using narrower seam allowances. It worked well, but I just wondered what you do to avoid waste.
I made a pair using one continuous piece for the main and back and I love how that turned out! There was less bulk because I didn't have a seam across one end of the pillowcase. I was using a directional print and I successfully created a pair of pillowcases, one with the cuff on the left end and one with the cuff on the right end so that they would look good next to each other on a bed with no upside down print.
Thank you for these instructions, and whatever advice you have about fabric waste would be appreciated!
Sincerely,
Sandra WB
Kate says
This is brilliant! Thank you for your excellent instructions.
Gayle says
Thank you for the. Pillow case instructions! Best pillow cases I have ever made. So easy and they look wonderful.
Damjana says
Gayle hi, I'm glad you like my pillowcase sewing tutorial. xoxo, d
Marta62 says
Thank you for your great sunny tutorial! ☀
Kate Broughton says
Brilliant! I have made dozens of "burritos," and they never quite hit the button as far as looking upscale. This pattern is all that Damjana promises in the intro. I'm throwing out my burrito charts and going with this design from here on out. And wow, thanks for making it free! xox
Gwen says
Great and easy to follow instructions! I'm always sort of stumbling around, knowing what I want, but unsure how to achieve it.
I will add one kind of weird thing. I used to live at the beach which was connected to an estuary in a house that we later found out had every color mold under the sun. My allergies were such that I always had at least one tissue if not multiples and my significant other and I both got tired of waking up and playing search the sheets for the tissues. So I added a pocket of sorts to each side in the same fabric and got in the habit of stashing them there. Problem solved! I've moved and don't have the runny nose at all, but I still use the pockets for things like cell phones & gadgets or whatever I'd like handy before, during, and right after sleep. Can we say the Alexa Remote? (or whatever system you use.)
Damjana says
Gwen,
what a creative way to use pockets!
Rachel Foster says
Hello! Love these pillowcases! Can someone more skilled than me convert to a toddler or travel size pillow dimensions. Total beginner here and the math is overwhelming me!
Lesley Gilbert says
Nice easy project that could be made to any size 🙂
Damjana says
Lesley hi,
absolutely agree! Thanks for dropping by,