
Are you a coffee person? Use this free coffee cozy pattern and make a beautiful yet easy diy coffee cup sleeve to brighten up your day - one coffee cup at a time!
Now you can quickly make gifts for yourself and all your coffee-loving friends. Scroll down for the tutorial and the free printable coffee cozy template.
This reversible coffee cozy will protect your hands and keep your coffee warm. It folds up nicely to fit in your purse, pocket, or car so you will always have it with you. Also works well for cold drinks in the hot summer!

Prefer an ad-free printer-friendly option of the whole tutorial+pattern? See the → optional PDF file in our shop.

Less searching. More sewing.
Keep 100+ printable AGC tutorials ready to print, save, and sew anytime.
Table Of Contents
Why you'll love it
How cute is this coffee cup cozy! It's reusable, reversible, and portable to carry in your purse, glove box, gym bag, or pocket. What's not to love about it!
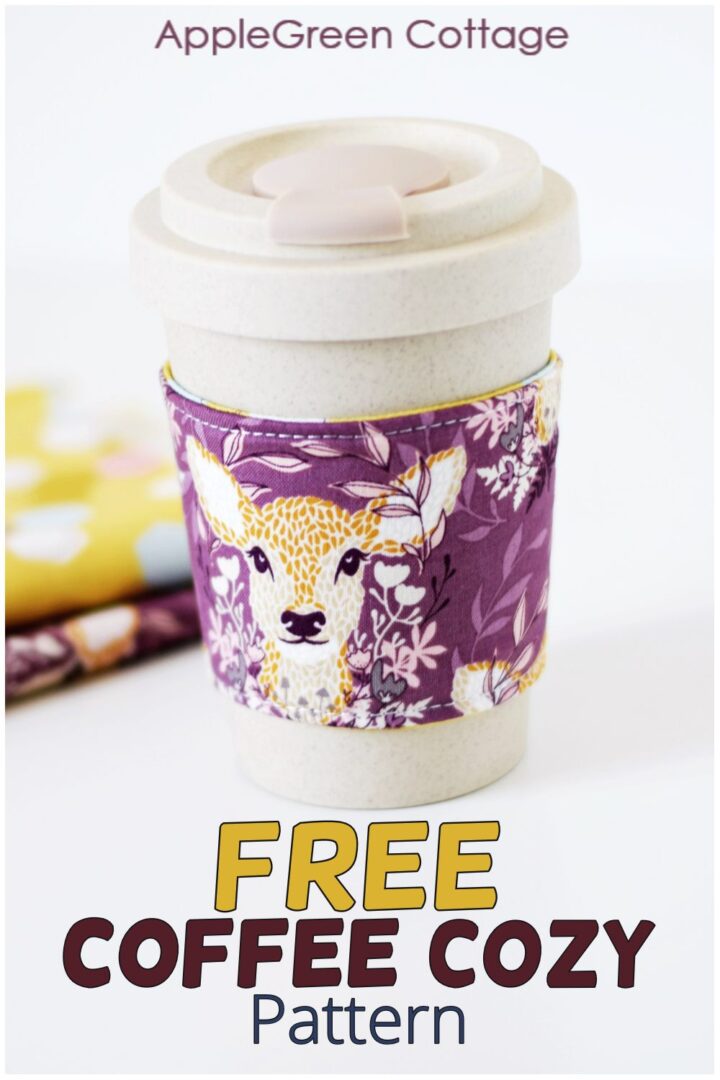
I made this coffee cup cozy for my new bamboo coffee cup, though I need to admit, I have no idea if this si the right spelling. Might be coozie or koozie, or even cozie.

No matter the spelling, let's dive into the more important question: the gorgeous fabric prints everyone has been asking me about: it's from the Harmony collection designed by Melissa Lee for Riley Blake Designs. The Harmony Oh Deer print in grape was just perfect for it, isn't it adorable! And if you turn it over, this: sunshine!

I lined it with specially insulated fleece, Insul-Bright. It reflects heat/cold back to the source. Iced drinks stay cold and hot drinks stay warm! You might know Insul-Bright from my other projects like these hot pads (free hotpad pattern!), or from these small diy potholders.

A reusable coffee sleeve is such a cute way to go green! And it's a perfect gift for teachers, coworkers, family, and friends. And this print would be so perfect for fussy cutting flaps on small purses, I need to make one.
Supplies:
- 2 scraps of fabric, 14" by 4"
- 1 piece of Insul-Bright, same size
- hook and loop tape (without adhesive at the back side): 2 ½" of each
- the usual: sewing machine, thread, pins and sewing clips, rotary cutter and cutting mat or scissors, iron
- Free pattern
Shop my personal favorite sewing supplies on Amazon HERE.
NOTE: Insul-Bright is not suitable for a microwave. If you plan to use your coffee cozy in a microwave please consider using cotton batting in place of Insul-Bright. Need more info on interfacing? Visit this post on interfacing.
The hook-and-loop tape should be without adhesive at the back side, as that glue can gum up your needle. With fabric it's usually better to use sew-in velcro than just tape it.
What size is this diy coffee cup cozy?
It's sized at 10 ½" (top circumference) and 2 ¾" tall. It fits a 10" circumference reusable cup, which is pretty much standard size (and fits Starbucks Grande and Venti).
If you are sewing these coffee koozies as gifts, it's so cool if you add a reusable cup. You've got a stylish gift set - instantly! If you want to, you can get reusable Starbuck cups from Amazon:
- reusable Starbucks hot cups Grande 16
- or even stack up for the summer with these reusable Starbucks cold cups Venti 24 and make your cozies for cold drinks as well.
How to make a coffee cozy STEPS
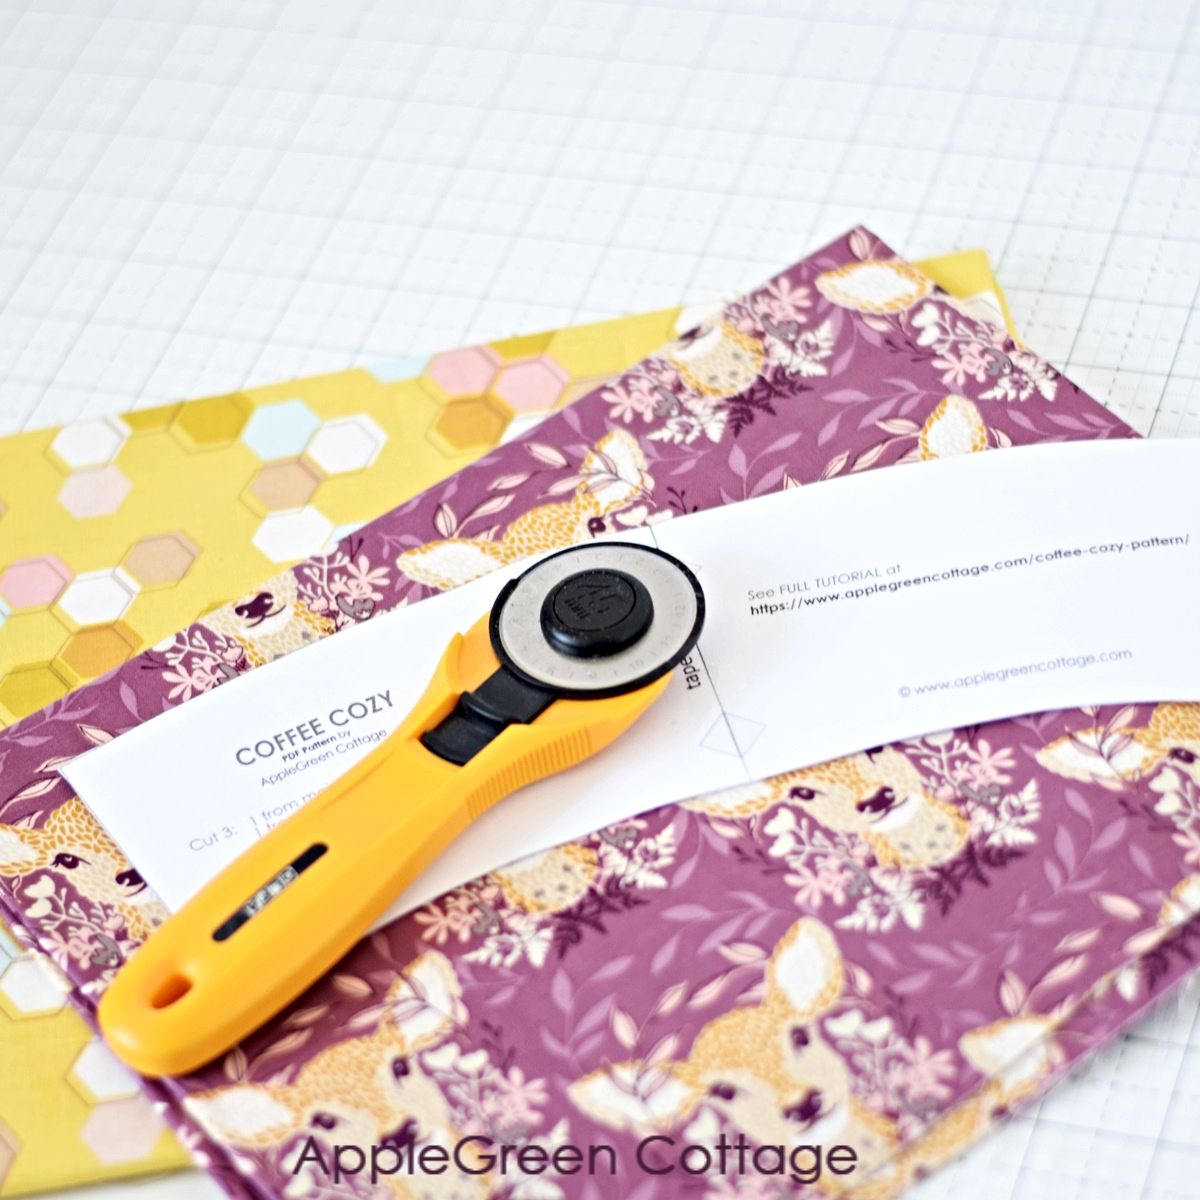
Step 1 - Print The Free Coffee Cozy Template
Join our mailing list and get the free pattern emailed to you:
Prefer an ad-free printer-friendly option of the whole tutorial+pattern? See the → optional PDF file in our shop.
The printable coffee cozy template already includes a ⅜" (1 cm) seam allowance and is slightly on the bigger side, due to the velcro used as a closure.
And so you can safely use a thick stabilizer like Insul-Bright, or some super-soft batting. After all, you deserve some pampering!
Step 2- Cut Fabric
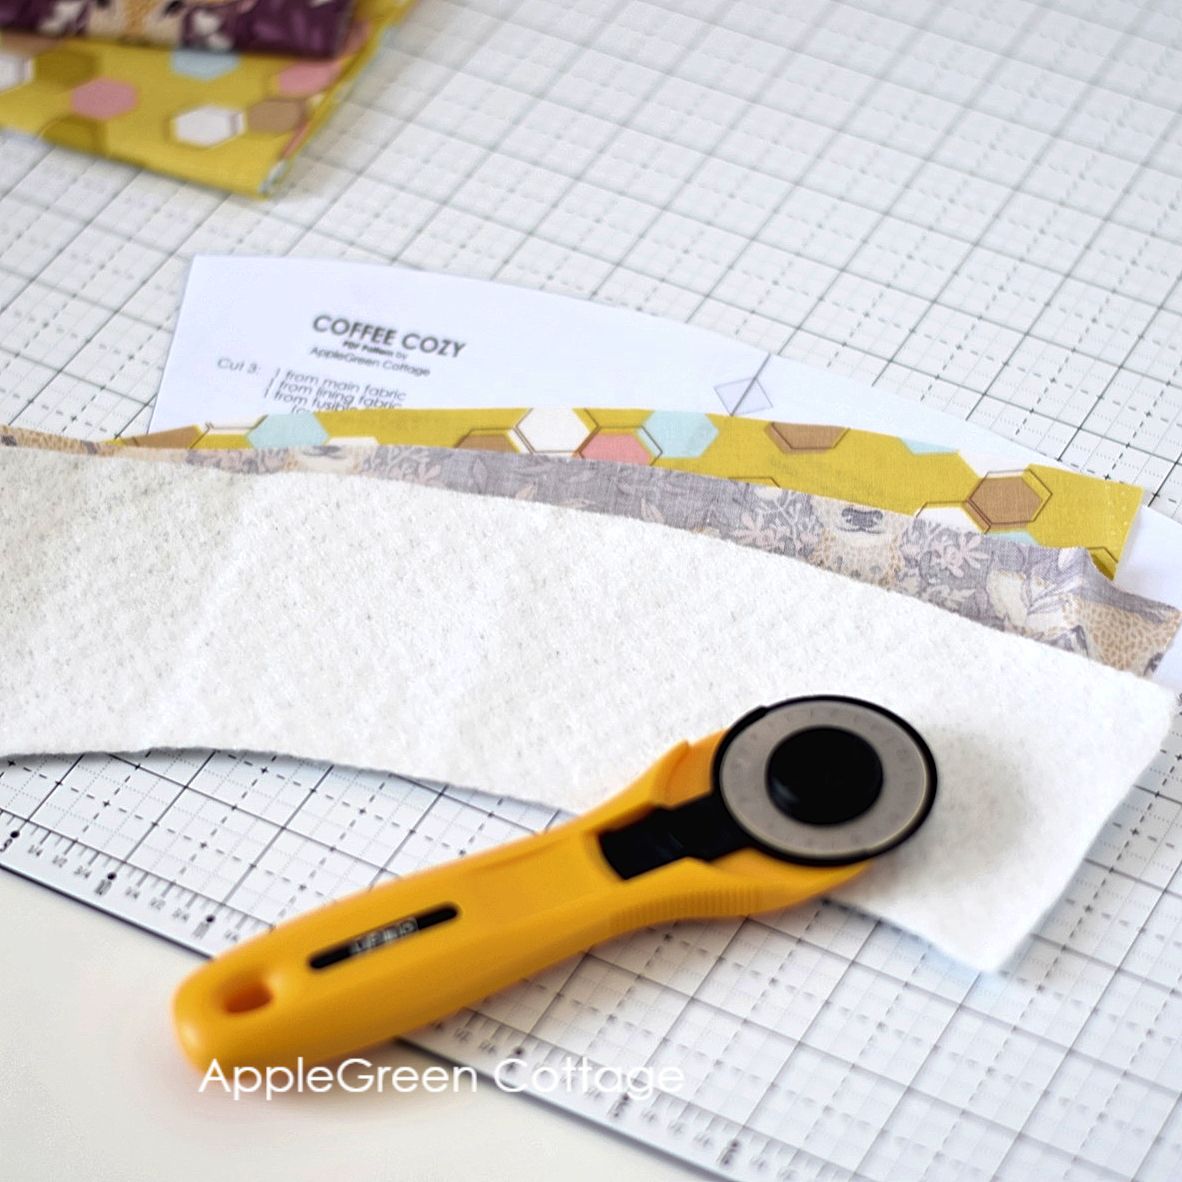
Use the free coffee cozy pattern to cut 2 pieces from fabric and one piece from Insul-Bright.
Step 3 - Add the Hook Tape to Lining
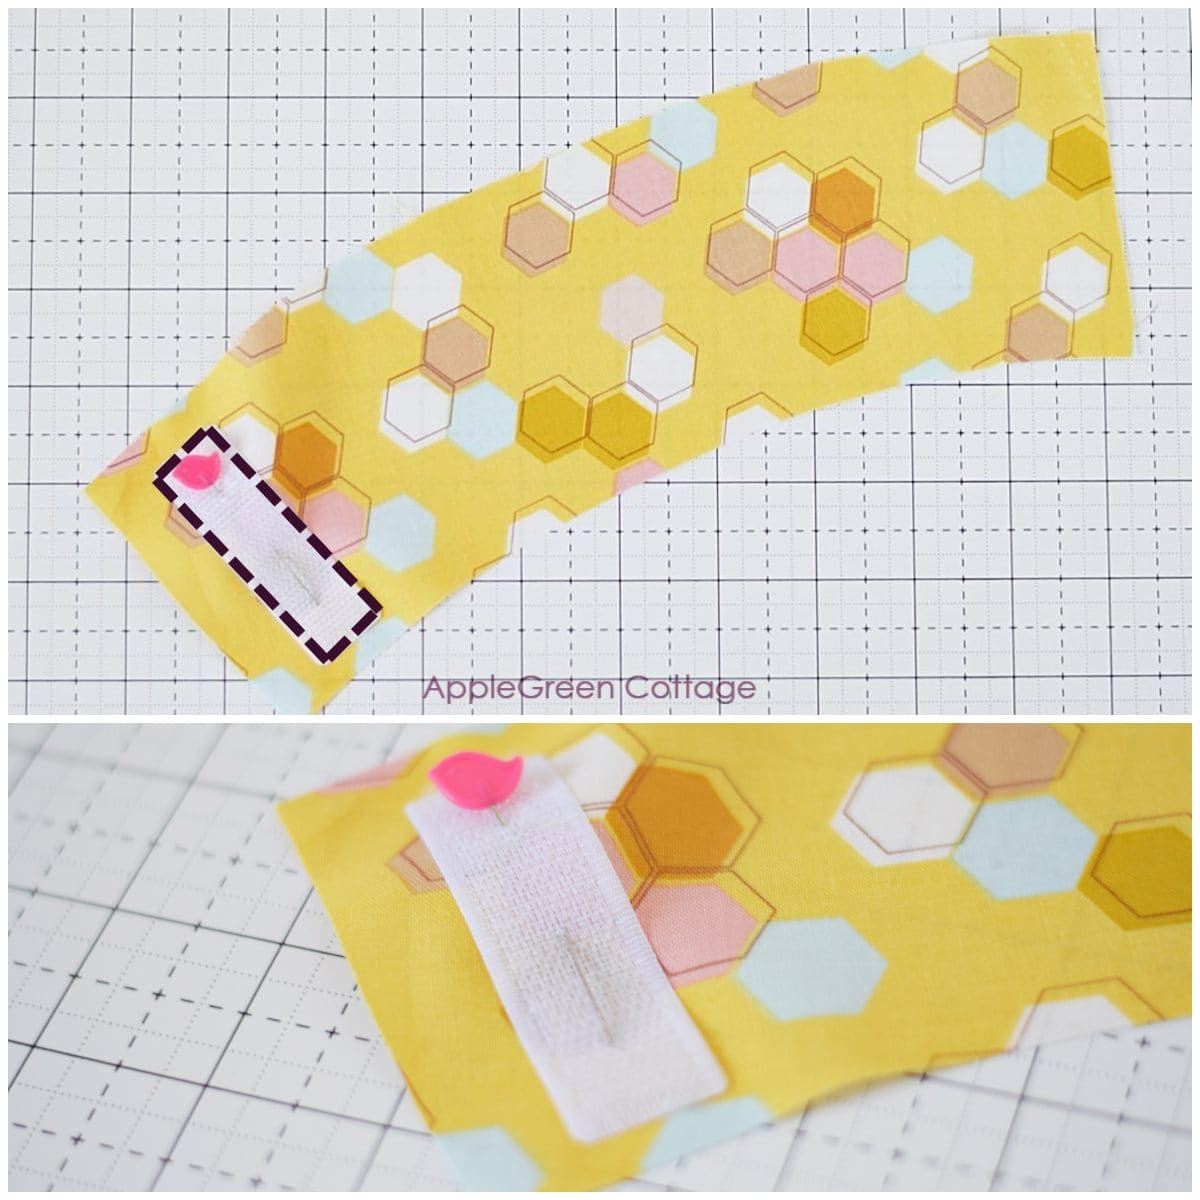
Sew the 'hook' tape piece onto one short end of the lining: make sure to place it vertically on one end, about half an inch away from the raw edges of the lining piece, like this.
NOTE: Why add the hook tape now? Because this way, you won't have any visible stitches of your velcro piece on your outer fabric. If you don't mind that, you can add your hook tape (to the lining) at the same time as the loop tape (to the outer).
Step 4 - Sew Together
Place the lining piece (1) right side up and cover it with the outer fabric piece (2). The right sides of the fabric pieces need to be together. On top, add the Insul-Bright layer (3).
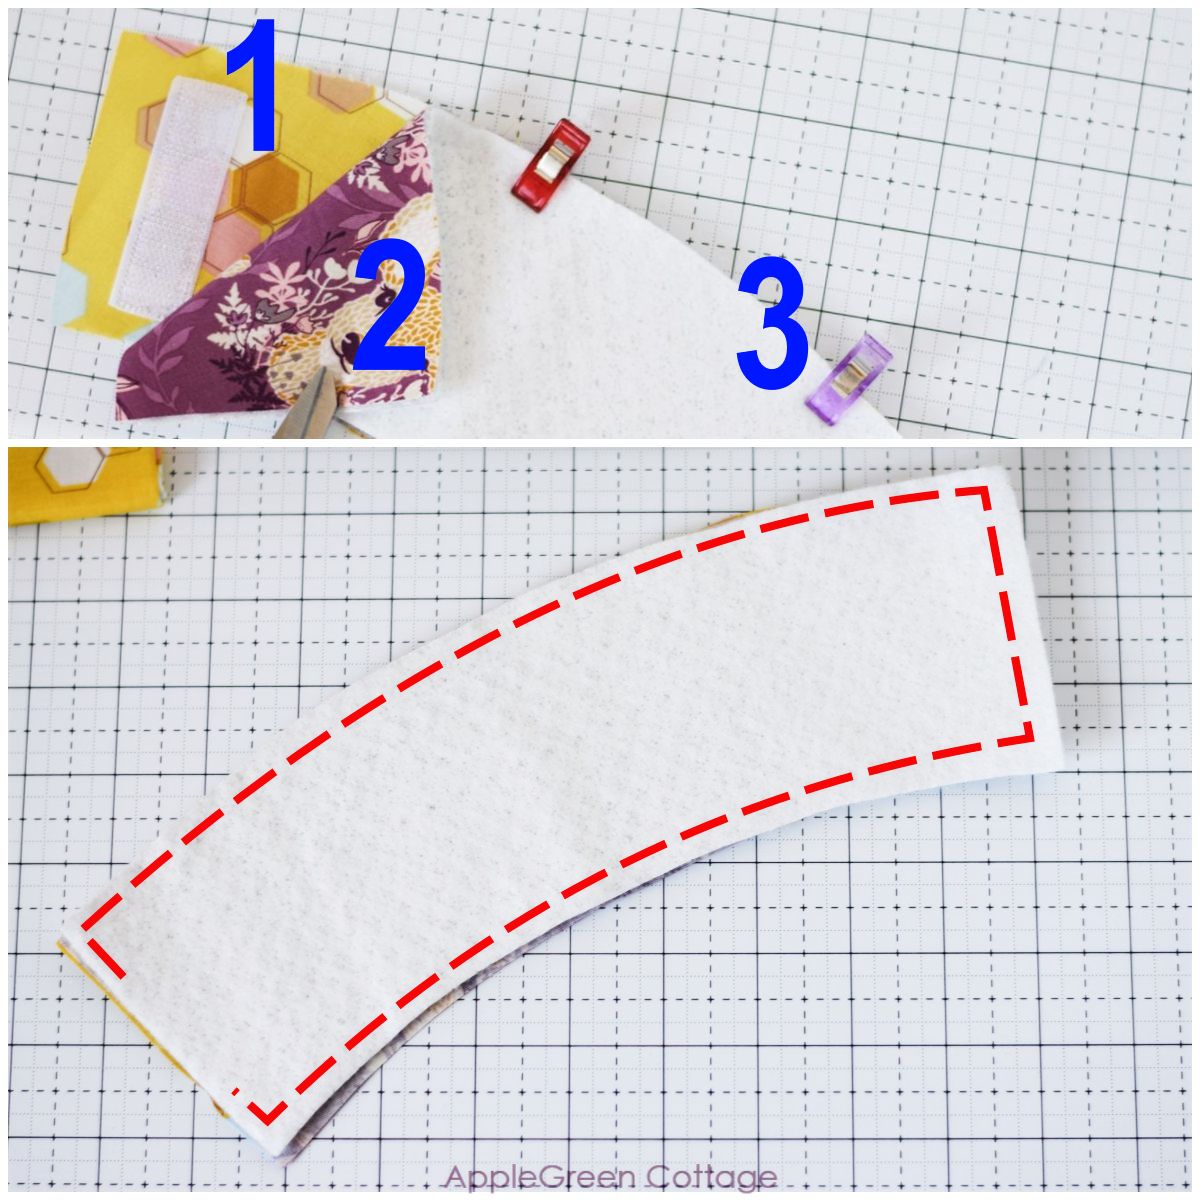
Sew around using a ⅜" (1 cm) seam allowance, leaving a 3" gap on one short side. Backstitch at start and end of stitching.
Step 5 - Trim SA and Turn
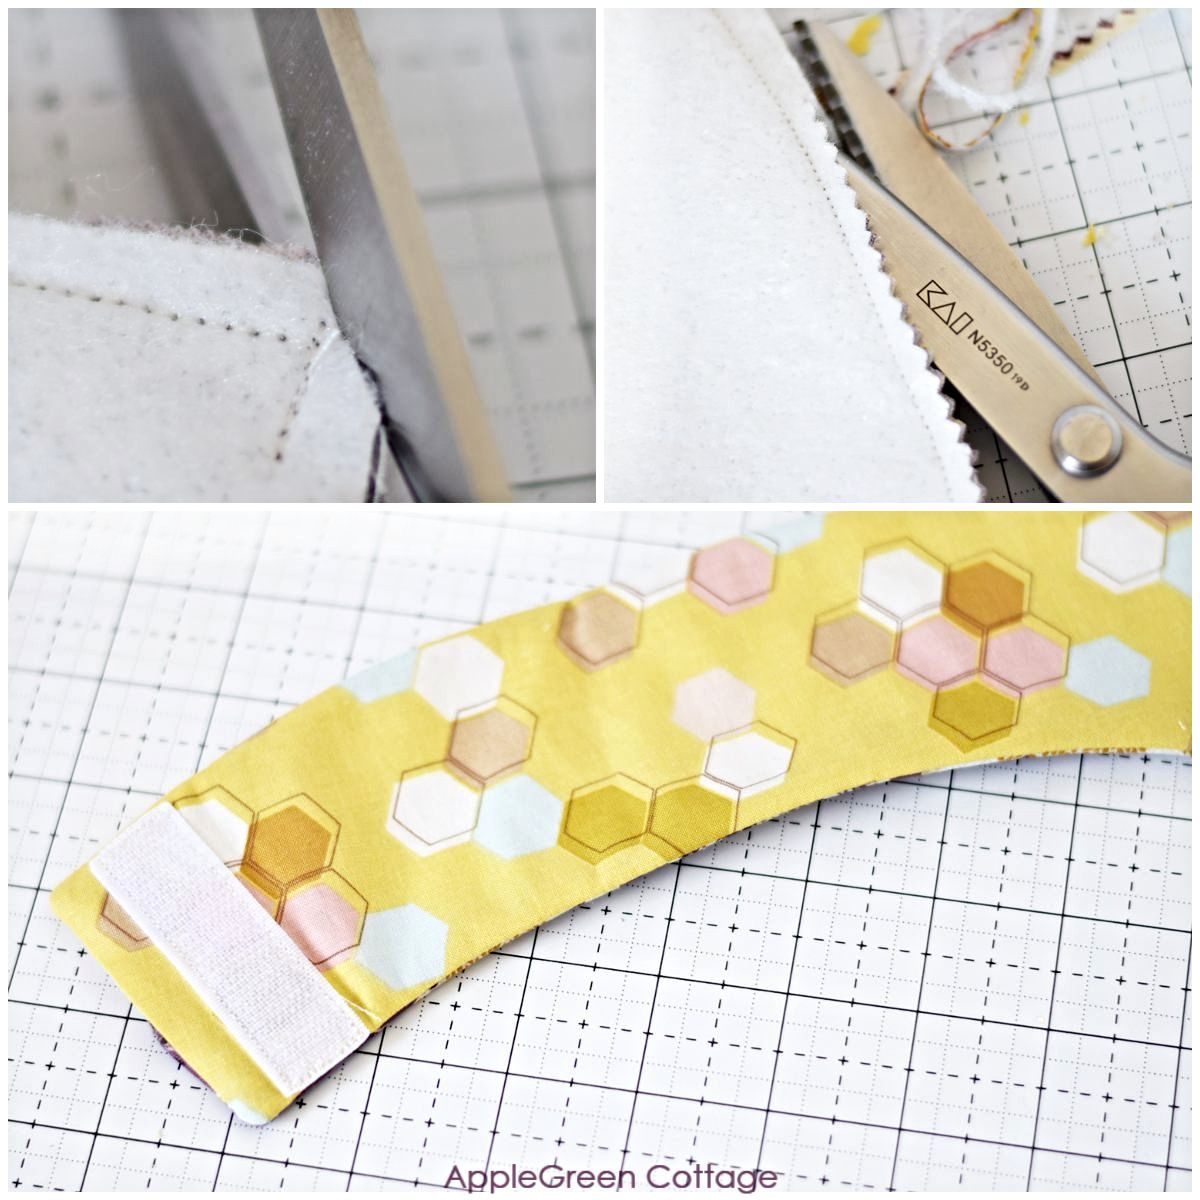
Trim corners and the edges. Do not trim the seam allowance on the unsewn part. Turn, tuck the extra fabric at the gap inside and press on both sides.
Step 6 - Add the Loop Tape
Attach the loop tape vertically on your outer fabric, opposite from the hook tape you added to the lining before:
If you usually drink coffee at home, you're likely to use the same size cup. If your cup is not exactly the standard size, model your coffee cozy against that cup and mark the spot where you need to add your velcro tape (the loop tape). Then attach the loop tape as shown above.
Is your cup a bit narrower than the Starbucks Grande cup (actually standard size), or my reusable bamboo coffee cup? No worries: the bit of extra length will not be seen. It will make your coffee cozy a bit softer, even better!
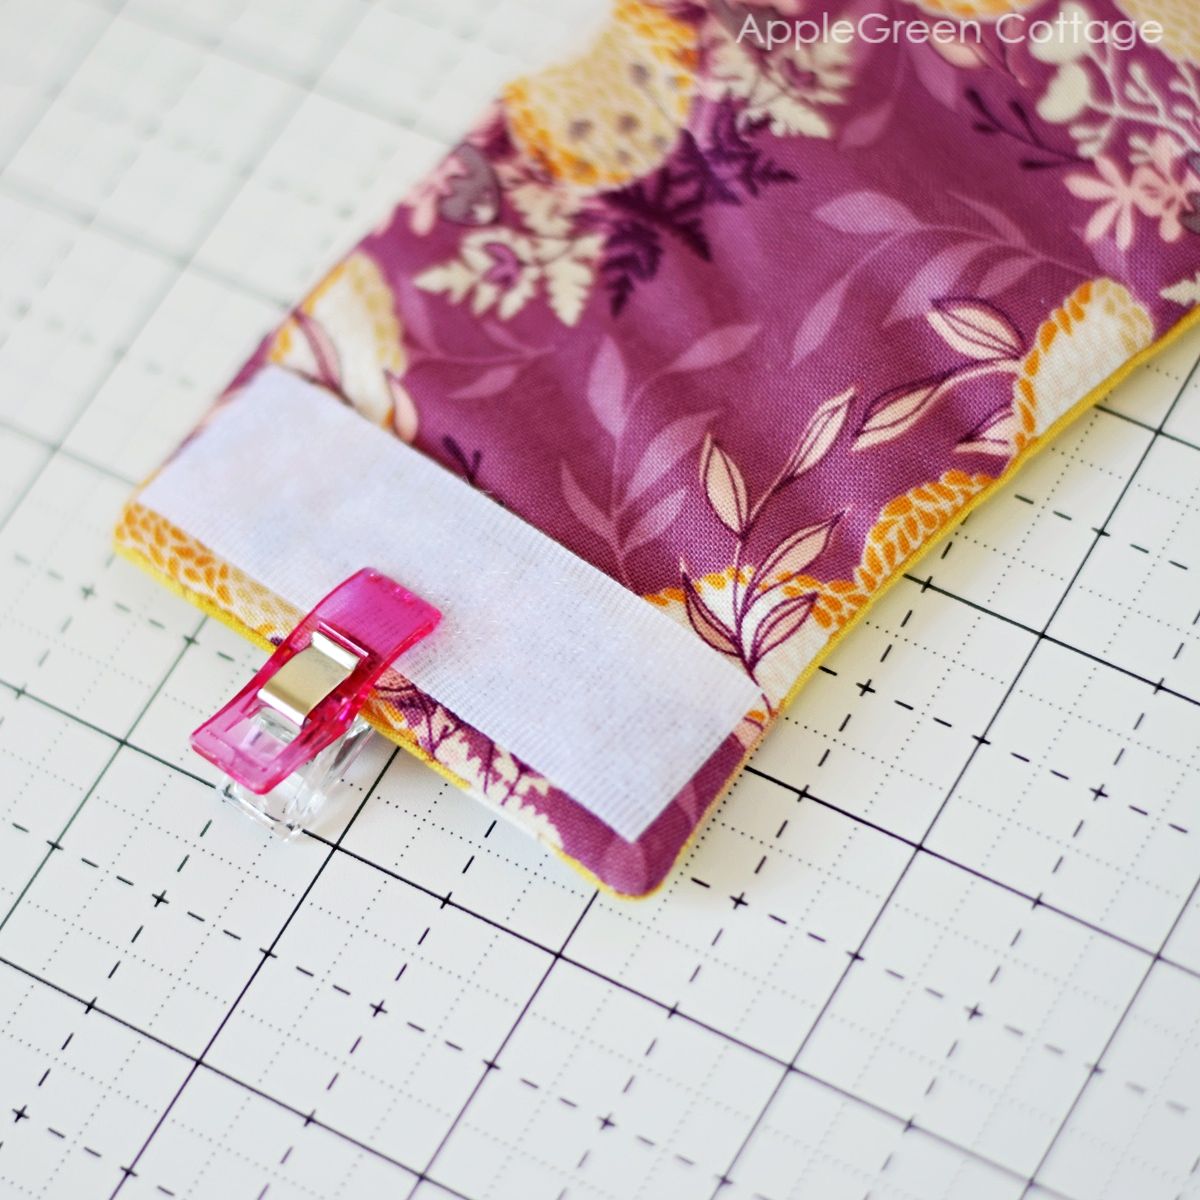
Step 7 - Topstitch
Topstitch around the entire coffee cozy at ¼ inch from the edge, also closing the turning gap. Admire your brand new coffee cozy!
More Ideas Like This
6 Quilty Ideas +BONUS
Love a quick quilty win? Don't miss THESE!

Let's end with a smart tip from one of our readers:
'Add two loop tape pieces, about ½" apart, on the lining. It'll fit both small and medium cups - perfect for caffeine mood swings!' Thank you Holly, that's a fantastic idea!
Want A Printable Copy of the WHOLE Tutorial?
Prefer an ad-free printer-friendly option of the whole tutorial+pattern? See the → optional PDF file in our shop.
This tutorial is also part of Printable Tutorials BUNDLE
100 PDF tutorials now, and growing!
WANT MORE FREE TUTORIALS AND PATTERNS?
Get email updates and never miss out on new patterns, printables, and tutorials:
Or …check out the NELTO Slim Crossbody Bag pattern in the shop. You might be surprised when you see how it's designed! Check it out here:


Monica Martin says
Thank you for the tutorial! my question is, what width of hook & loop tape did you use?
Eileen says
Thanks for the pattern and template. I found that I had to cut the strip 5” wide rather than 4”. Very easy and cozy.
Emma says
Very nice!!! I love coffee............................
Chris says
Your patterns look do-able for the gifts I'm filing away for Christmas gifts 2023. THANK YOU!!! you just my gift sewing easier!! God Bless You!! Chris
lee says
Very cute! Thank you for the pattern!
Julie says
Is the fabric cut on the fold? I couldn't find a picture as to how the pattern was cut. Thanks.
Damjana says
Julie hi, a good question. No, the fabric is not to be cut on fold. But the paper pattern at the end of the tutorial needs to be taped before you start cutting your fabric. Do, print out teh poaper pattern, cut and tape as marked, then cut the fabric as is, no folding: one outer piece, one lining, and one interfacing layer. I hope this helps. Happy sewing,
Star says
Thank you so much for this pattern and tutorial! I found everything fit a little easier with a bit shorter hook and loop. Also, I expanded your suggestion to put the hook on the lining before sewing the pieces together and also put the loop on the outside piece at the same time. This made the cozy reversible without stitches showing. Thank you again! Wonderful!