
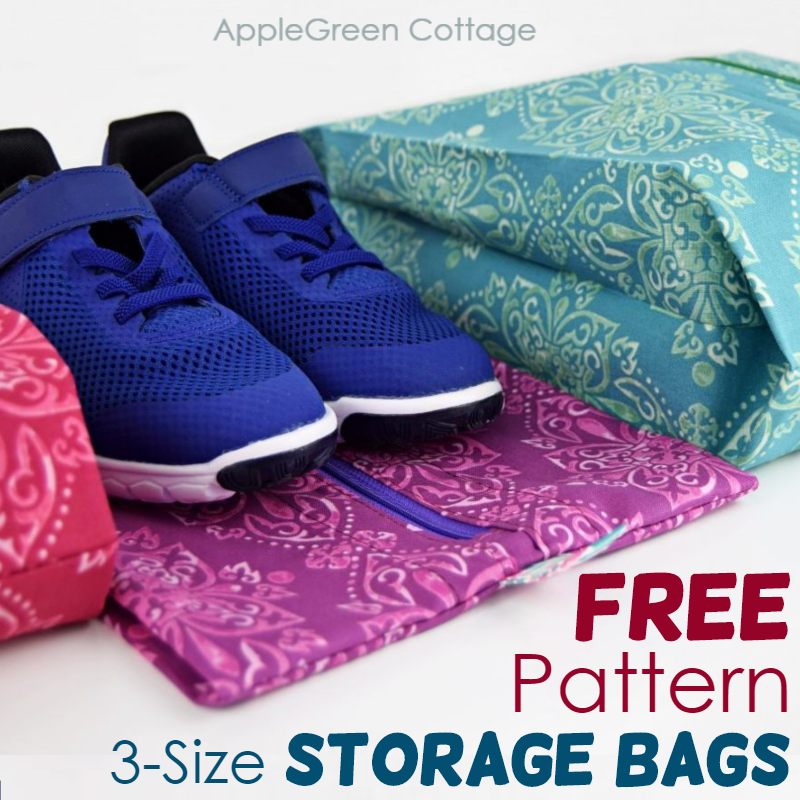
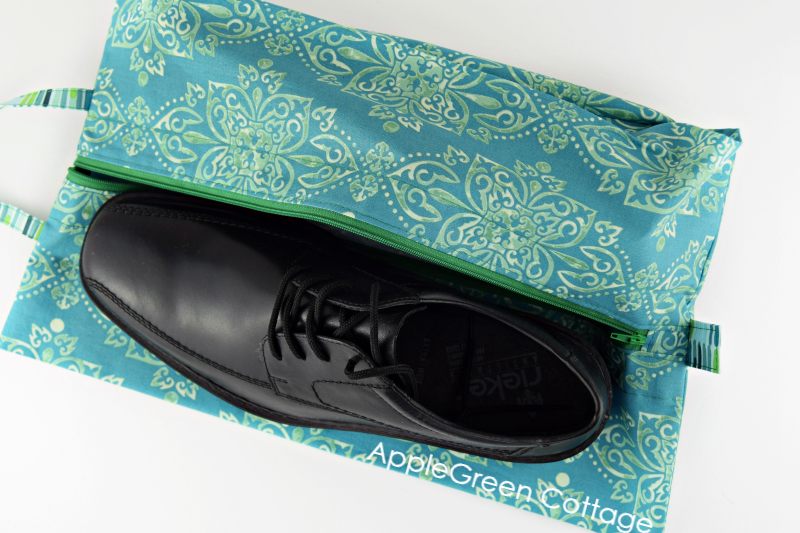
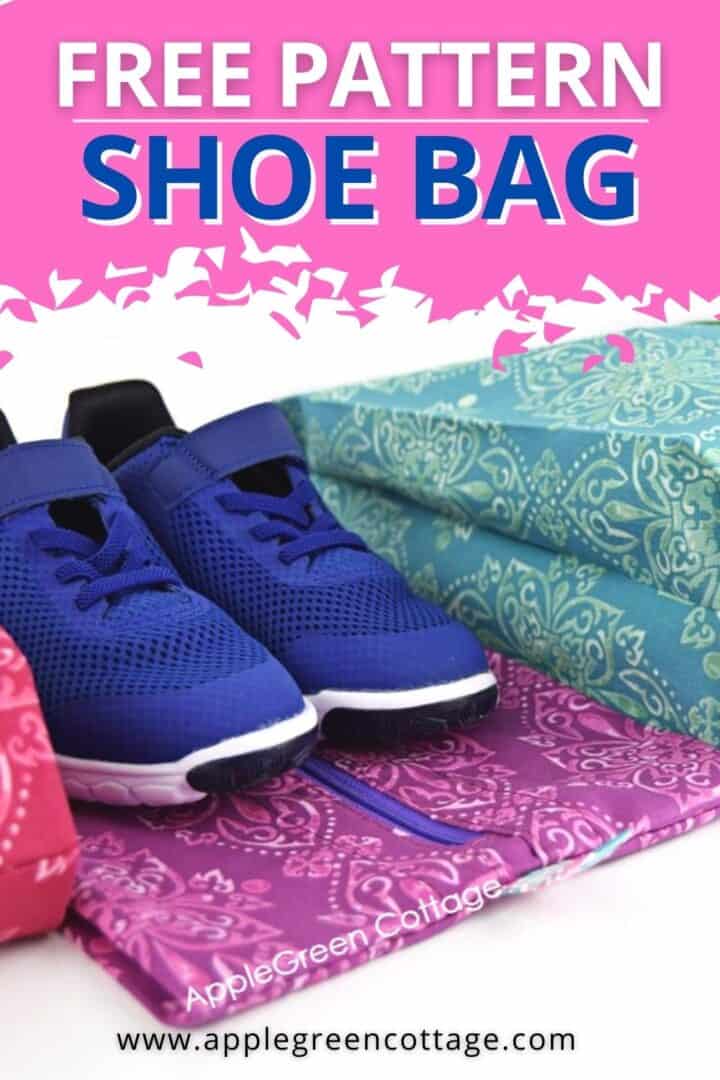
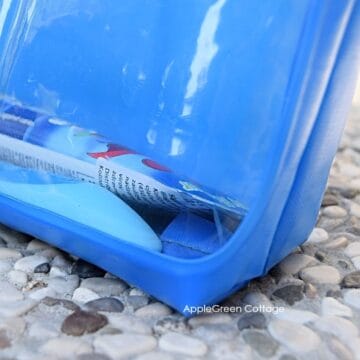
Home storage? You bet! This is a smart flat diy storage bag that can expand - a brilliant way to organize your travel and entire home!
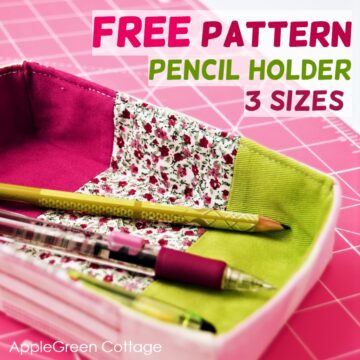
The best for home organizing and travel storage bags, and so easy to sew! Get the free pattern in 3 sizes - and keep things neat and organized, no bulk!
Prefer an ad-free printer-friendly option of the whole tutorial+pattern? See the → optional PDF file in our shop.

This tutorial is also part of Printable Tutorials BUNDLE
100 PDF tutorials now, and growing!
Table Of Contents
Why This Pattern Got so Popular
One of your favorite projects since 2020 whe I posted it:
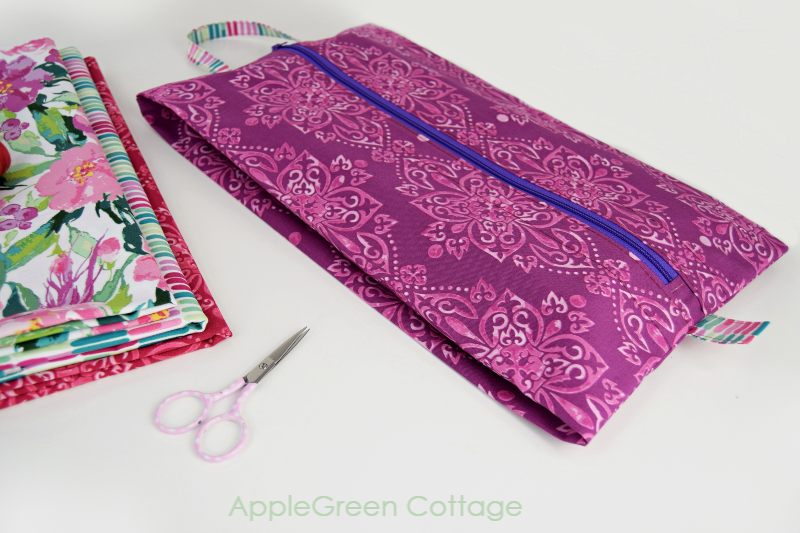
- Lightweight, expandable, and absolutely no raw edges - neat!
- Keeps everything organized so you're not digging through your suitcase for that one tiny thing.
- Packs flat, expands when needed, and adds no extra weight.
Getting organized? Check out more diy storage ideas here. Or see the free SewPretty HOME series:

Join the FREE 7-part email course and make 6 beautiful items for your home! You'll love it!
Smart Ways To Use Them
- Project bags - perfect for UFO storage, fabric pulls, and notions
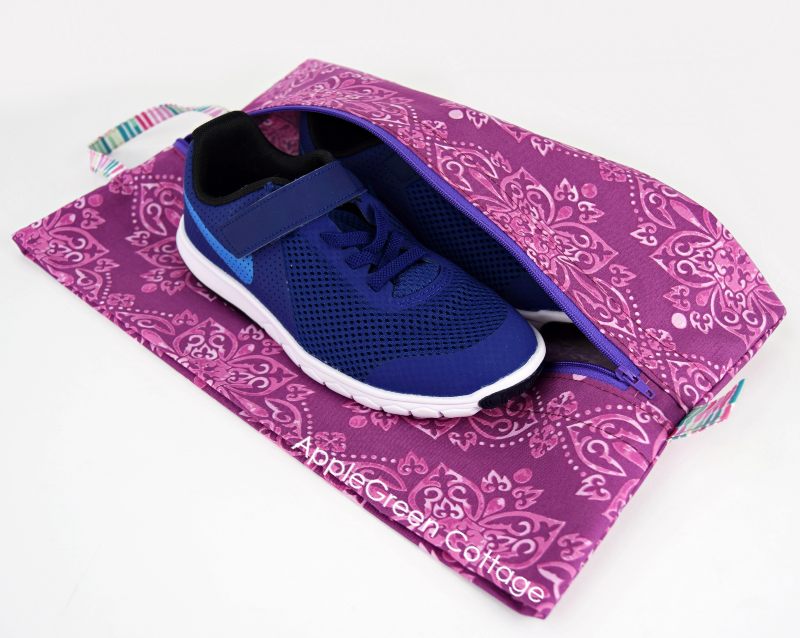
- Shoes - store dust-free or keep them off your clothes while traveling
- Socks & small items - no more searching!
- Toiletries - neat and contained
- Weekend packing - grab-and-go organization
And, they solve the biggest travel frustration: digging around for lost items. (Ever had to empty the entire case just to find one little item?)
They pack flat, expand beautifully, and keep everything tidy without adding weight.
A Great Diy Project Bag!
They also make fantastic project bags. I'm using the large size to store my works-in-progress - pattern pieces, fabric pull, zippers, all in one place. One day, all my UFOs will be neatly packed in these… or that's the plan anyway!
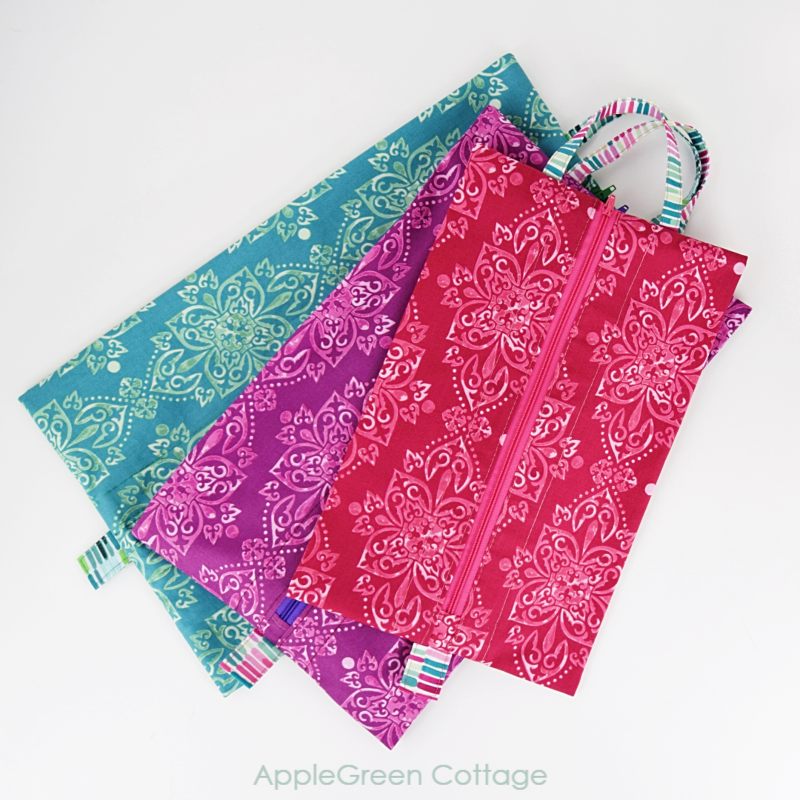
3 Finished Sizes
The finished sizes are as follows:
- SMALL: flat 12 ½" long, 8" wide - expanded 3" tall (32 x 20 cm, exp. 7.5cm tall)
- MEDIUM size: flat 15" long, 9" wide, expanded 4" tall (38 x 23 cm, exp. 10 cm tall)
- LARGE size: flat 16" long, 10" wide, expanded 4" tall (40 x 25.5 cm, exp. 10 cm tall)
The small bag will fit a sock knitting project with all the yarn needed, or children size sneakers up to size 5 (EU size 35).
The medium size is good up to size 10 ladies' shoes (high heels too), running shoes up to size 10.
Bulky hiking boots size up to 10? Use the large storage bag for those. Also, my partner's basketball shoes just managed to get into the large size, too. But those are bulky. Men's shoes:
Supplies
Shop my personal favorite sewing supplies on Amazon HERE.
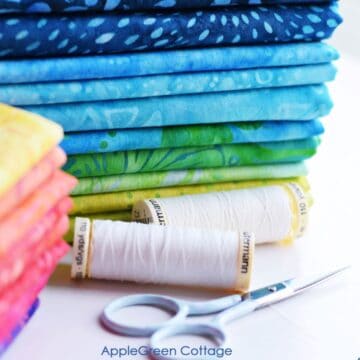
- half yard of fabric (I used prints from the Hampton Garden collection)
- a #3 nylon coil zipper - 12"/15"/17" (30/ 40/ 50cm) long, depending on the bag size you're making (see my zipper sewing guide for more sources of quality zippers)
- sewing machine, needle, pins or sewing clips,
- iron, scissors, or rotary cutter plus cutting mat (I use this one by Olfa)
- the free Pattern
To make the smaller two sizes, you'll have some leftover fabric.
PART 1 - Get Free Pattern
1 - Get the pattern and cut fabric pieces
Prefer an ad-free printer-friendly option of the whole tutorial+pattern? See the → optional PDF file in our shop.
How To Print this PDF file
For best results, download the PDF to a desktop or laptop, open it in Adobe Reader, and print at 100% size. (I recommend not printing directly from a browser window or from mobile, it could cause issues.)
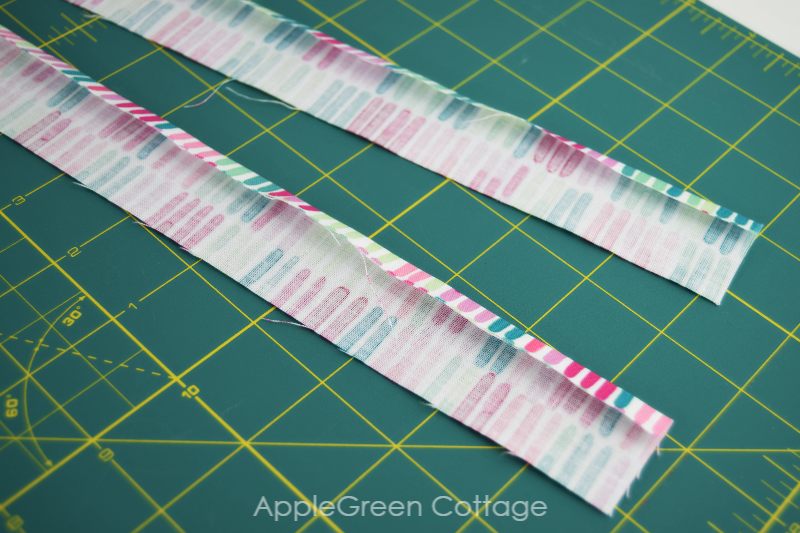
Next, cut these fabric pieces:
- 1 MAIN PIECE
- 2 FACING pieces
- 1 (top) LOOP HANDLE
- 1 (bottom) PULL TAB
- 1 ZIPPER TAB
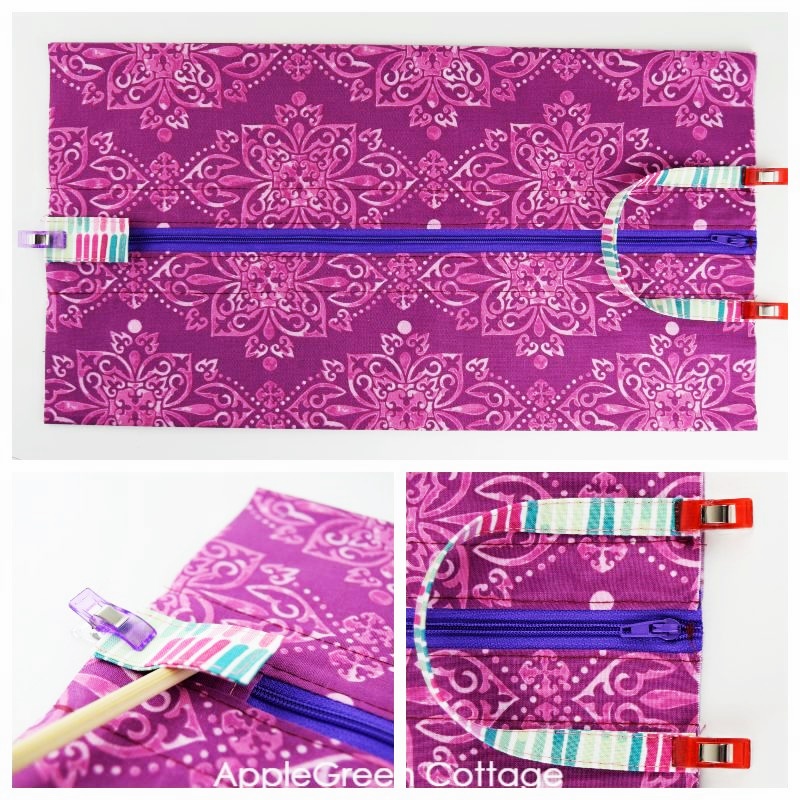
2 - Prepare the zipper:
1 - Cut off the metal stopper at the bottom of the zipper and secure the end by hand-stitching at ⅛" (3 mm) from the cut.

2 - Tab the zipper end. Use the ZIPPER TAB piece to:
- Fold the fabric tab in half and press RST (right sides together).
- Slide the tab on the zipper end. You can use wonder tape or sewing clips to hold in place.
- Machine-stitch using a ⅜" (1cm) seam allowance.
- Then fold the fabric ends back and finger-press.
- Topstitch at ⅛"(3mm) from the fabric edge to stabilize the fabric.
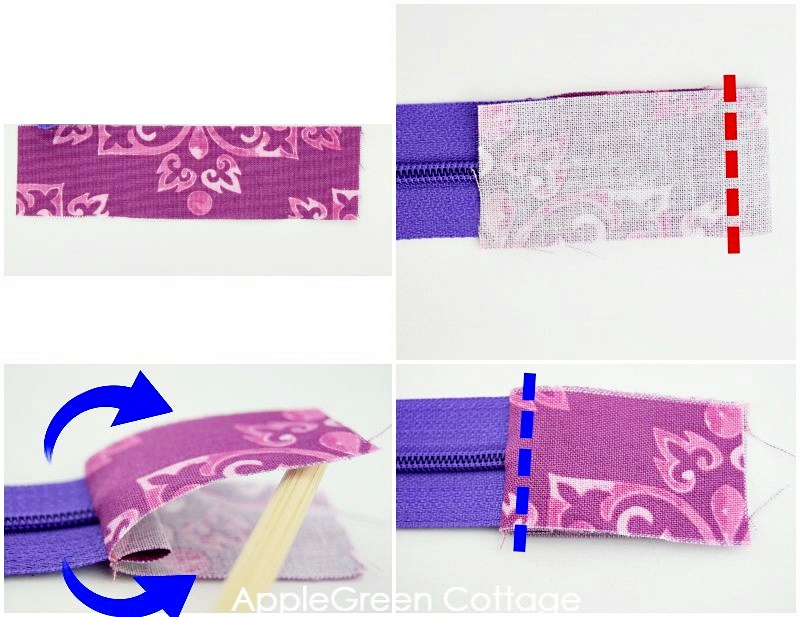
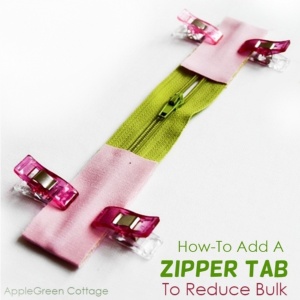
Need help tabbing the zipper? Check out THIS ZIP TAB TUTORIAL.
3 - Make the pull tab and the pull handle
PULL TAB piece:
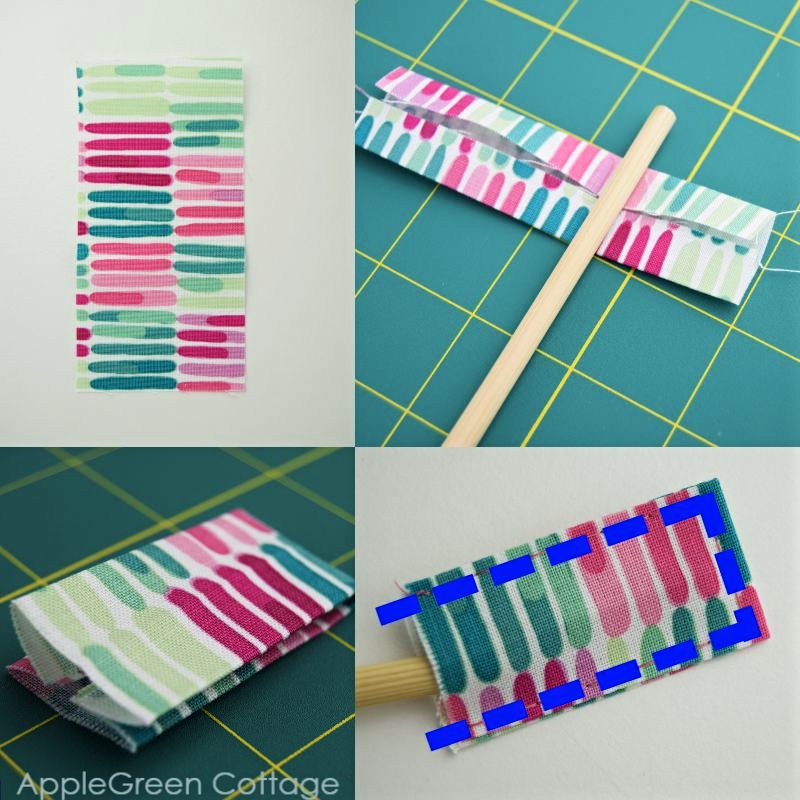
1 - Turn under the two long edges, each by ½" (1.3 cm) so they meet in the middle. This way, you'll get the pull tab width of 1" (2.5 cm).
2- Press, then fold in half, bringing the ends together. Topstitch from bottom to the top, across, and back down again. That will keep the raw edges hidden, except for the one that will be sewn in.
Pull Handle:
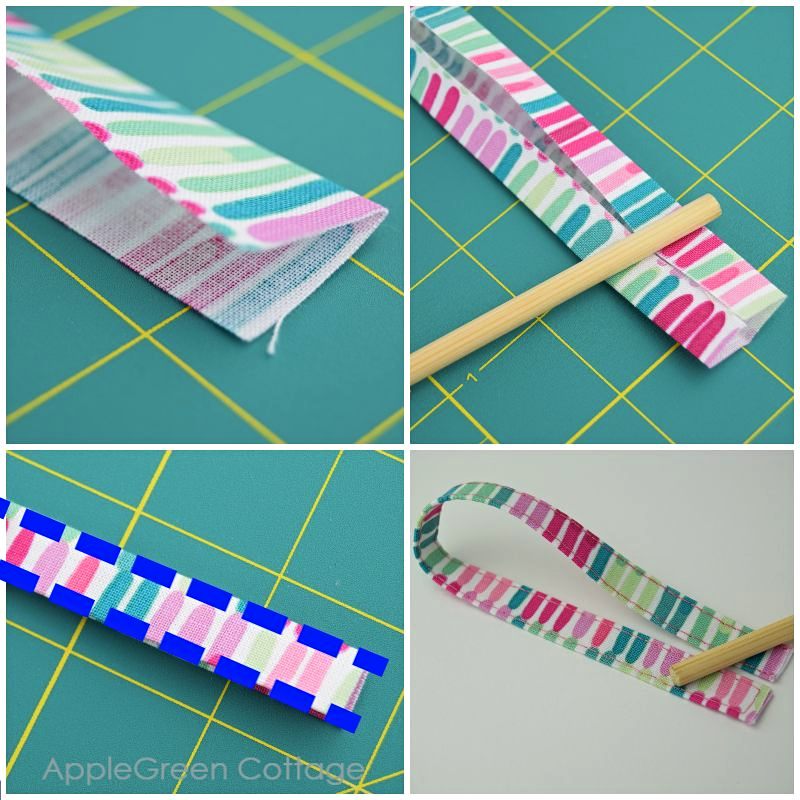
- Fold the strip lengthwise in half, press and unfold.
- Fold the upper edge to the center crease and do the same with the lower edge.
- Fold again along the original center and press, then topstitch along the long edges.
PART 2 - Attach the zipper to the main piece
1 - Prep the 2 FACING pieces: turn under and press one long edge by ⅜" (1cm) on each of the 2 pieces.
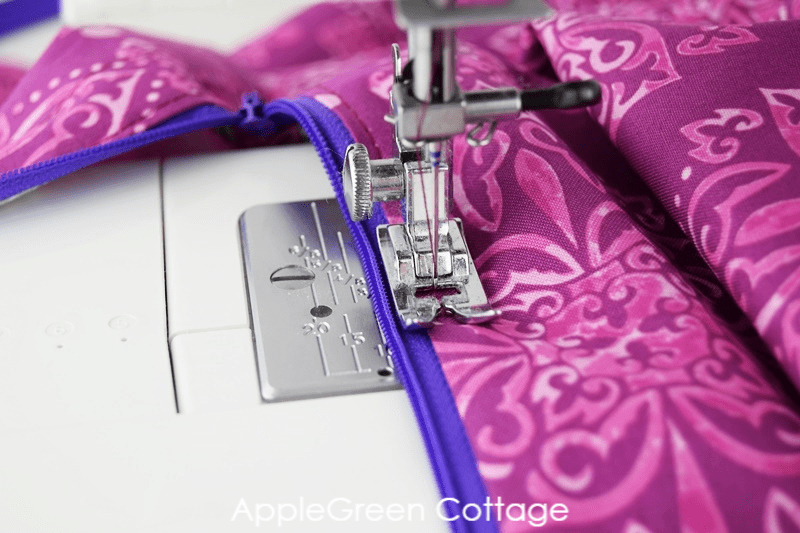
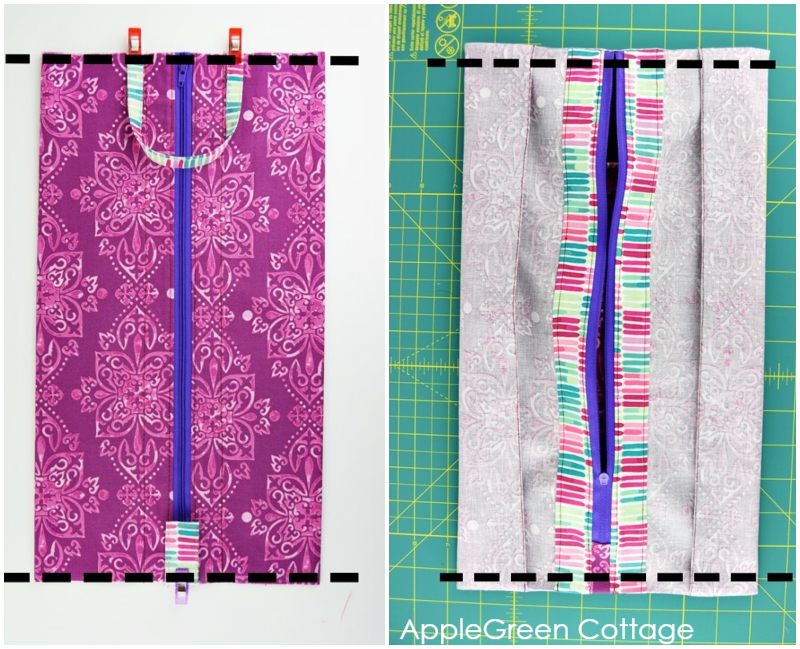
2 - Take the main piece and place it right side up, spread horizontally in front of you (see the blue arrow). On the main piece, align the zipper (the zipper pull should be facing down, towards the fabric) on one short side of the fabric piece. Place one FACING strip right side down, with the edge that has not been pressed. Stitch using a ¼" (7mm) seam allowance:
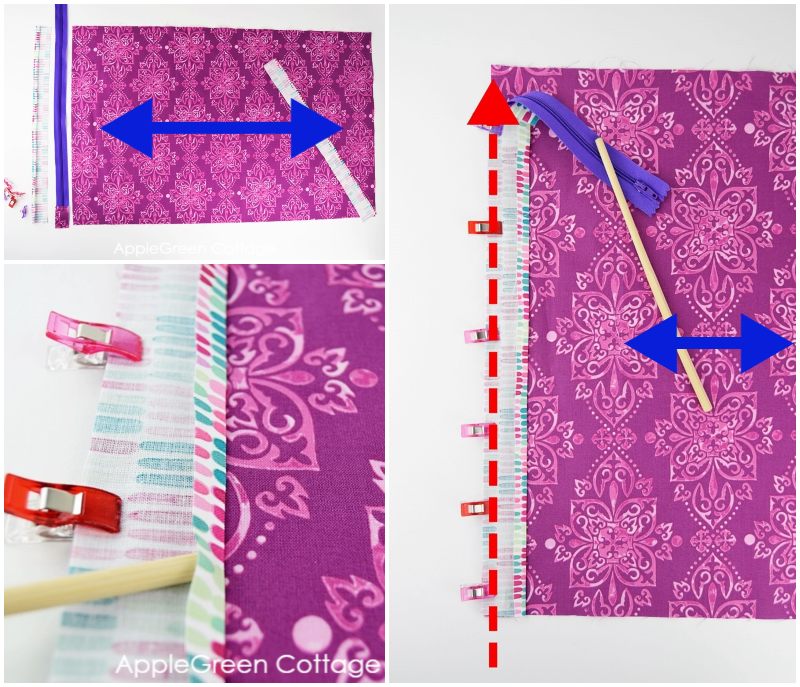
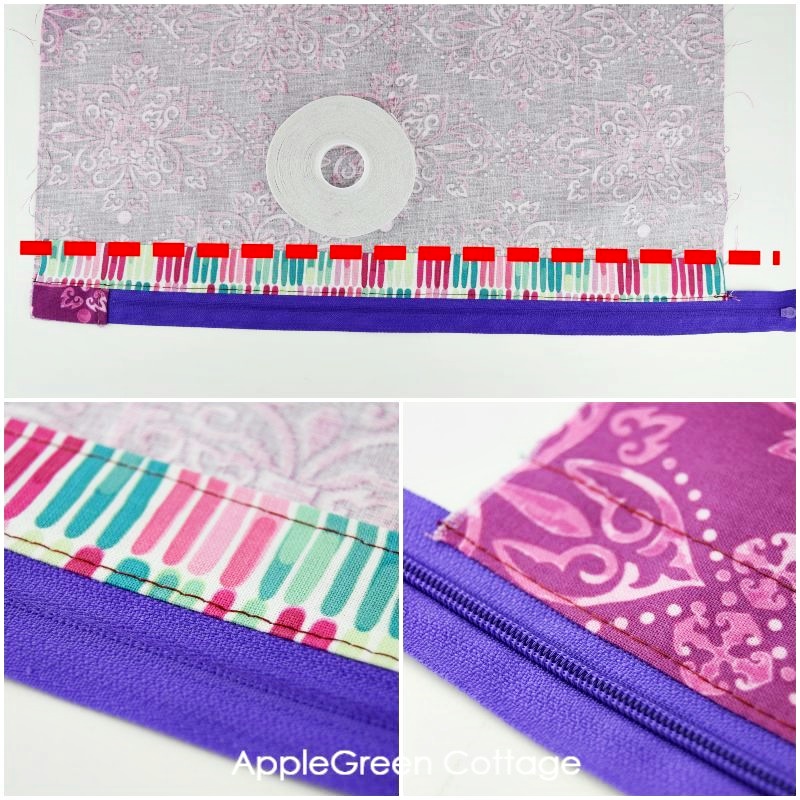
3 - Turn and topstitch along the zipper:
4 - Press. Pin the other long edge of the strip on the backside and stitch in place, sewing close to the edge of the folded strip. Instead of pins, I often use sewing tape - so comfortable!
5 - Repeat on the other side to attach the zipper: With zipper closed, fold the fabric to meet the other long edge of the zipper tape. Then align the second long narrow strip on the zipper edge:
6 - Pin or clip to keep the layers from sliding. Then open the zipper and stitch using again a ¼" (7mm) seam allowance:
7 - Topstitching step again (see the two dashed lines). First, topstitch along the zipper edge from the front side, then do another topstitching line to fix the facing in place.
Press well.
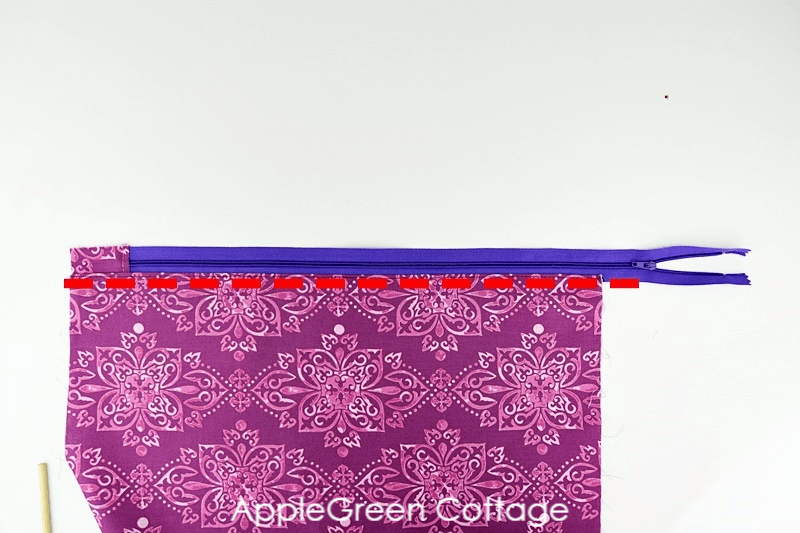
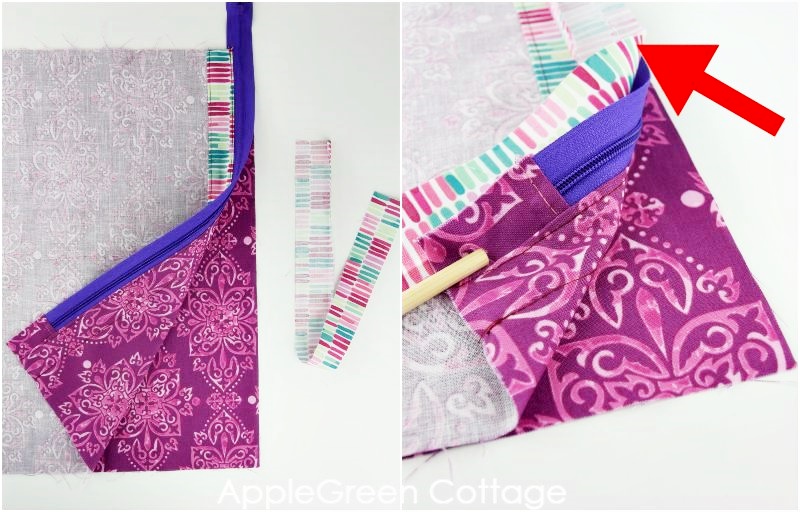
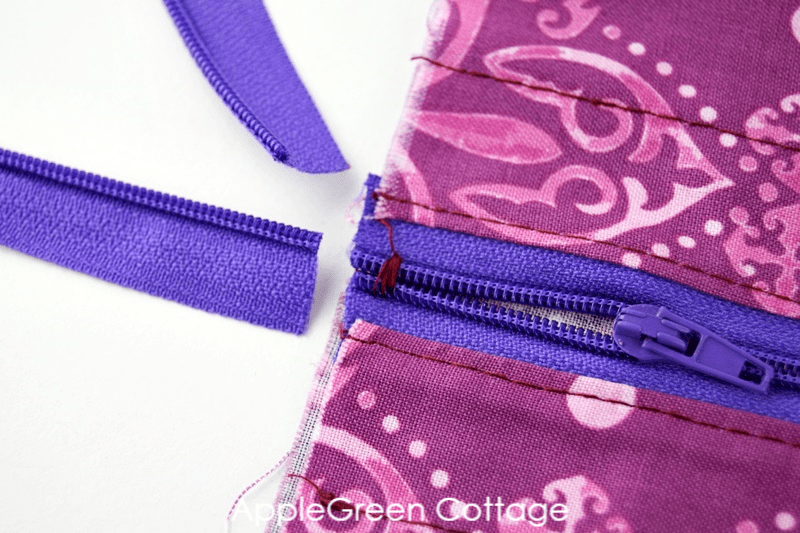
8 - Open the zipper so the zipper PULL is somewhere in the middle, then cut off excess zipper tape. Make a few stitches at ⅛" (0.3cm) away from the tape end to make a new zipper stopper:
PART 3 - Make the Folds
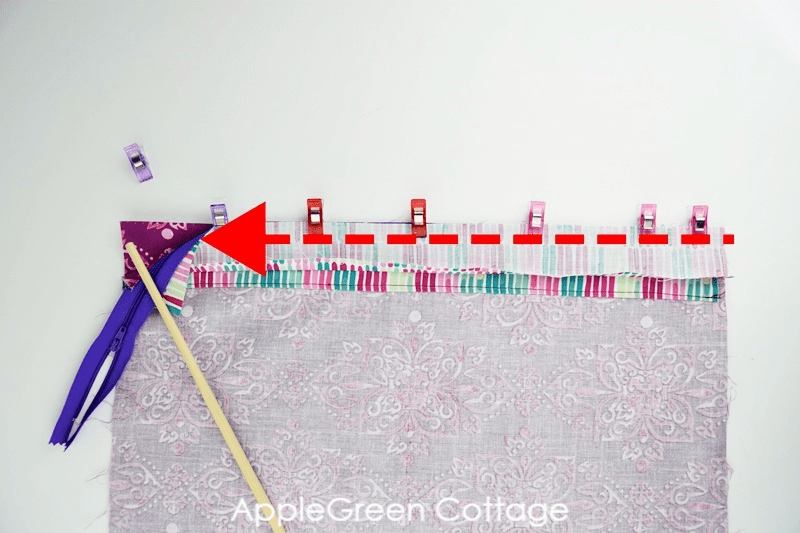
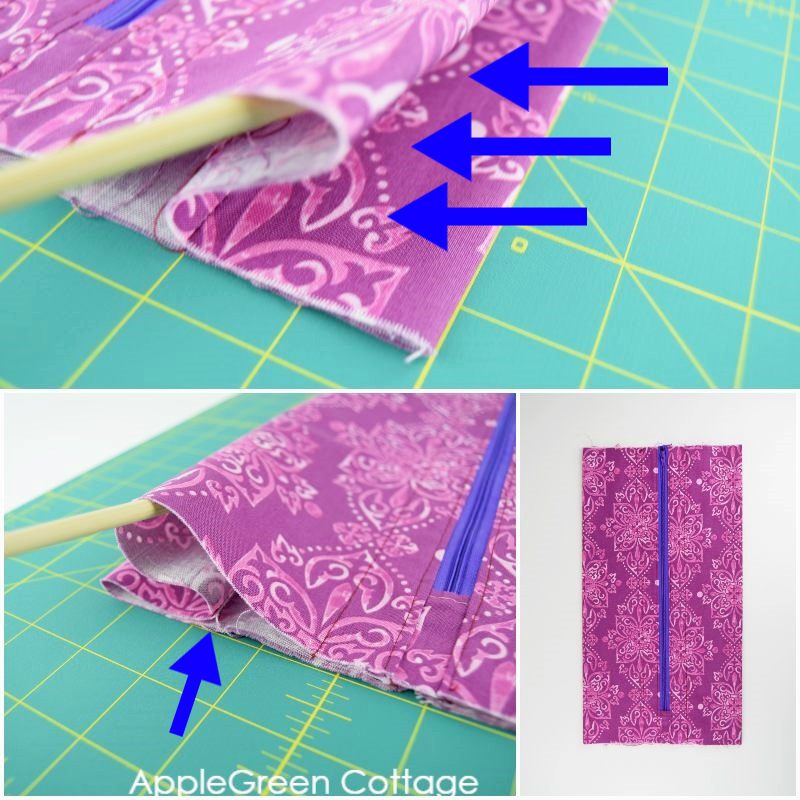
1- Turn your tube wrong side out. (yes!) Place on a flat surface and position the zipper in the center. Measure and double-check, then press both edges. Edgestitch both of them using a long stitch:

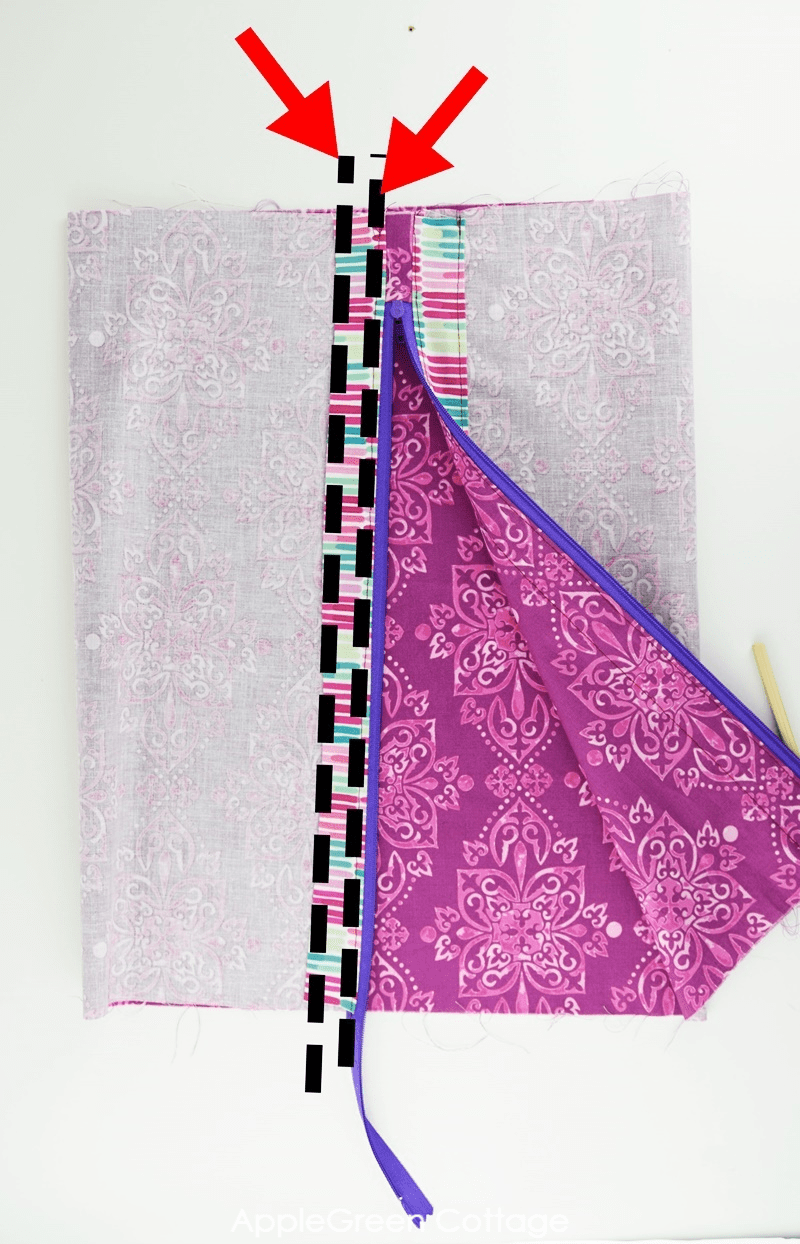
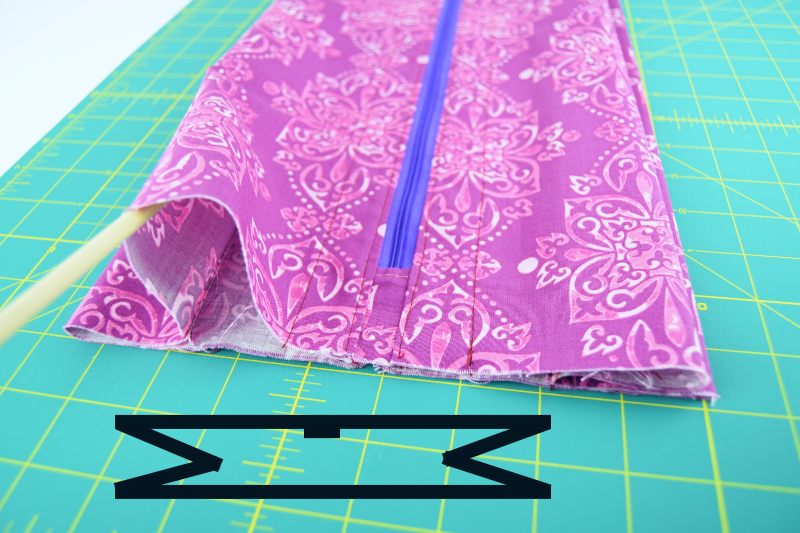
2- Turn the tube right side out. Now measure 1 ½" for Small size (2" for Medium and Large) from the edge-stitched edge and push the edge towards the inside, so it's sandwiched between the layers.
3- Create the same size fold on both sides. Pin to hold in place:
Part 4 - Assemble the Pieces
Make sure the tube is still right side out. Then center the bottom Pull Tab to the bottom (tabbed part) of the zipper and baste. Place the top Pull Handle ends on the top edge. They need to be 3" apart, each 1 ½" away from the centered zipper. Like this:
Baste in place, both the bottom pull tab and the top pull handle.
PART 5 - 2 French seams and - done!
Now we'll use the French seam (more about French seam HERE if you need it.)
This is your next step: sew the top and bottom edge using (first) a ¼" (7mm) seam allowance, then turn wrong-side out, press, and stitch again, this time using a ⅜" (1 cm) seam allowance. This second seam will encase the raw edge.
All you need to do now is turn right side out again, press, and - use!
If you enjoyed this tutorial, share it, like it or tell your friends about it. Or save it for later, so you've got it ready whenever you want to make a lovely storage bag - or ten!
Want a printable copy of the whole tutorial?
Prefer a full, ad-free and printer-optimized Printable Tutorial with both instructions AND images included? ↓↓
This tutorial is also part of Printable Tutorials BUNDLE
100 PDF tutorials now, and growing!
Or …check out the popular Aiden Cell Phone Purse in our shop. Guess what's on the back of this cool phone bag!

Damjana Jakos says
test
Owen says
Hello! Is there a reason there is no batting or anything between the fabrics? Is the fabric you use thicker? I feel like it wouldn't hold its shape enough, but I'm new to sewing.
Damjana Jakos says
Hi Owen! Great question - this one is intentionally just a single layer so it stays super light for travel, and all seams are finished so there are no raw edges. It’s not meant to hold its shape on its own (that would add bulk), but works perfectly as a lightweight solution. Happy sewing,
Lynn says
What a fantastic tutorial and pattern. Love the zipper facings and French seams for keeping the bags lightweight but with no raw edges. Just made the medium and it fits a pair of trainers perfectly. Thank so much!
Damjana Jakos says
Lynn hi, I'm thrilled to hear you enjoyed the tutorial and pattern. Love that the medium size worked perfectly for your trainers! Happy sewing!
Kat White says
Thank you for this pattern! A quick and easy sew!! I’ve always wanted to have bags to separate my shoes from clothing in my luggage, but never thought to purchase any. I was so glad to come across this pattern and just in time as my husband and I are about to travel for our honeymoon! I’ve already made the two of them and will be making more!
Carol Farmer says
Love your patterns and bags. What is the purpose of the zipper facings. Looks great just didn’t know about zipper facings. Thank you.
Damjana says
Carol hi, a great question. The facing here hides the zipper tape and acts as a thin stabilizer, without the need to add another fabric layer to the entire interior - I wanted to keep the bags as lightweight as possible, for travel. I hope this helps,
Carol says
Thank you. I wish I’d known about this year’s ago. Nicely done.
KAREN BARNES says
I have seen this pattern before but the end seam was bound (which I am not a fan of) but the French Seam is sooo clever!! I will be making lots of these from gifted upholstery cut offs. Thank you.
Pam says
I just made my first flat, expandable bag! I love it! I’m planning to make a lot more, some to keep, some to gift and some to sell! THANK YOU so much for making your patterns not only easy to make with professional results, but also the end product sellable!
You do a fantastic job in all areas…your patterns as well as your website that is easy to use, and very attractive to spend lots of time browsing and dreaming! 😊
Jen says
I cannot express how much I LOVE your patterns! Your tutorials are so easy to follow. This is the 3rd or 4th pattern I have made from AGC and I always love the tailored look of every project.
Kay O'Regan says
Oh wow, these are perfect for holding belly dance accessories like dance shoes, hip belts or veils, and the little handle means you can hang the items onto the hanger holding your costume to keep the whole outfit together.
I am currently making loads of these from upcycled fabric to sell to my dancer friends to raise money for charity. Once you get the production line set up, they come together very quickly.
Thank you! xxx
Mary W. says
Love it! Tried the medium, which I think will accommodate most shoes I would take on trips. Now, I’ll make 2 or 3 more. Tired of using ugly plastic shopping bags for shoes!
Crystal Bell says
The shoe storage bag is my next project! One of the things that frustrates me the most about hiking is having to put dirty boots back in my car.
Jessica says
Hello,
I love this pattern! I'm using it with a waterproof fabric (silnylon and silpoly) for backpacking stuff sacks. I haven't yet been able to figure out why the pattern calls for a long edge stitch down the edges before making the folds on either side in part 3 of the instructions. Can I skip that? All those holes in the fabric just make the final product less waterproof, and I couldn't figure out how they help, other than perhaps to make it lay flatter and/or fold better? Thanks!
Damjana says
Jessica hi,
a great question, and yes you are right. The seams you mention are to make the bag lay flat easier, and they make a big difference in making quilting cotton fold exactly on the lines required. Feel free to skip those if you want the least possible amount of stitching holes. Also, I'd use the longest stitch possible on waterproof materials for teh reasons you mentioned. Happy sewing,
Dani P says
Thank you for another wonderful pattern.
These are perfect as gifts for my sons' girlfriends. They won't be travelling this year due to Covid, but they can always use them at home until we can all travel again.
Damjana says
Dani hi,
happy you like these. Good thinking 🙂
Rosemary Havens says
Thank you, looks great. I'm looking forward to making several!
Damjana says
Happy sewing!