
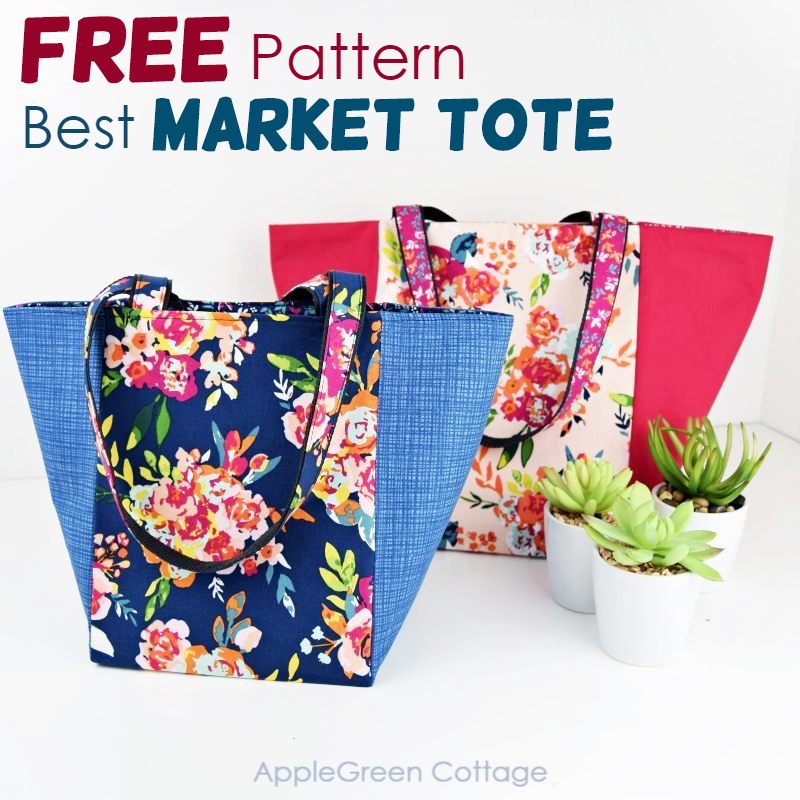
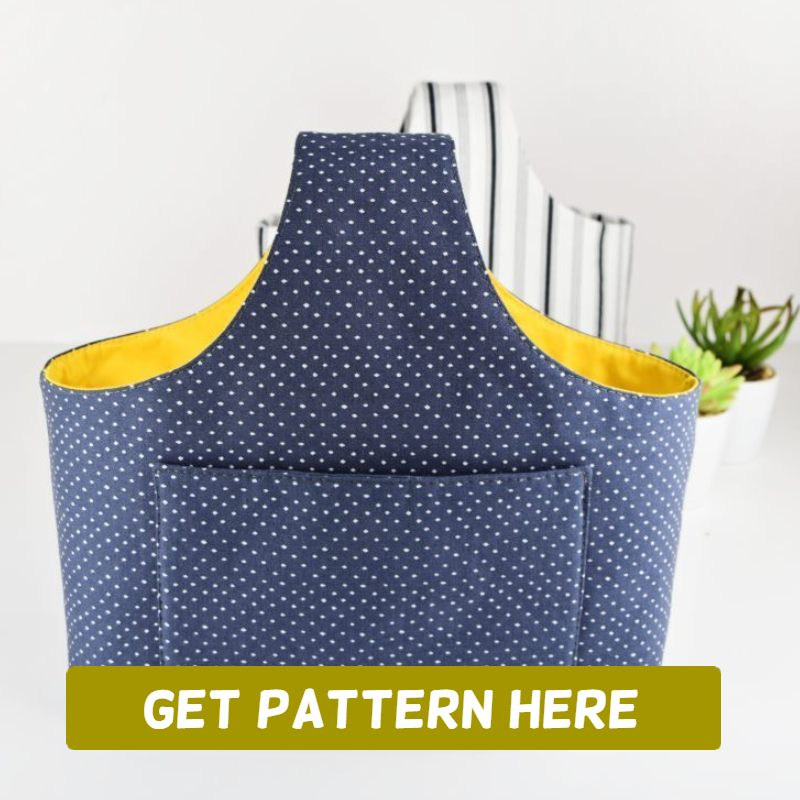
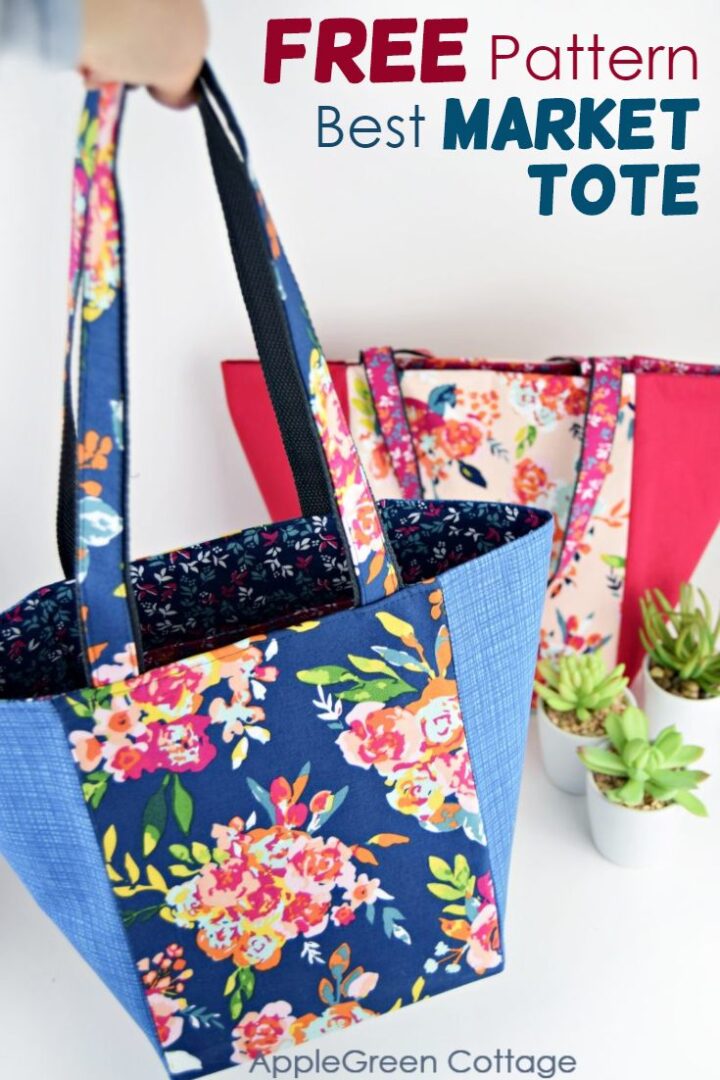
See how to make a tote bag using my best free market bag pattern in 3 sizes. And it's more than just a tote - see why I call it a two-in-one pattern!
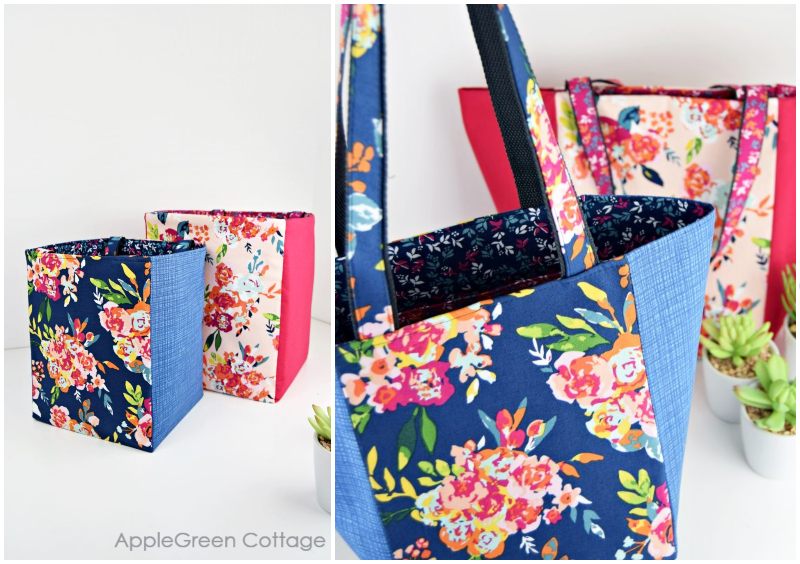
Plus, no corner boxing is required, due to a specific bottom construction - all super easy, promise! The result is stunning, and it looks so professionally made!
Prefer an ad-free printer-friendly option of the whole tutorial+pattern? See the → optional PDF file in our shop.

This tutorial is also part of Printable Tutorials BUNDLE
100 PDF tutorials now, and growing!
If you like sewing bags, make sure to check out the popular AppleGreen Cottage tote bag pattern and this large, free messenger bag pattern. Must-see!
Table Of Contents
- Why you'll love this tote pattern
- Market Tote Feature Video
- 3 Finished Sizes
- Supplies
- How To Make A Tote Bag - Tutorial
- Additional Sewing tips:
- How To Interface the Tote BAG For More STABILITY
- Topstitching OR Understitching?
- Want to Add Magnetic closure?
- WANT A PRINTABLE COPY OF THE WHOLE TUTORIAL?
- Want More Free Patterns?
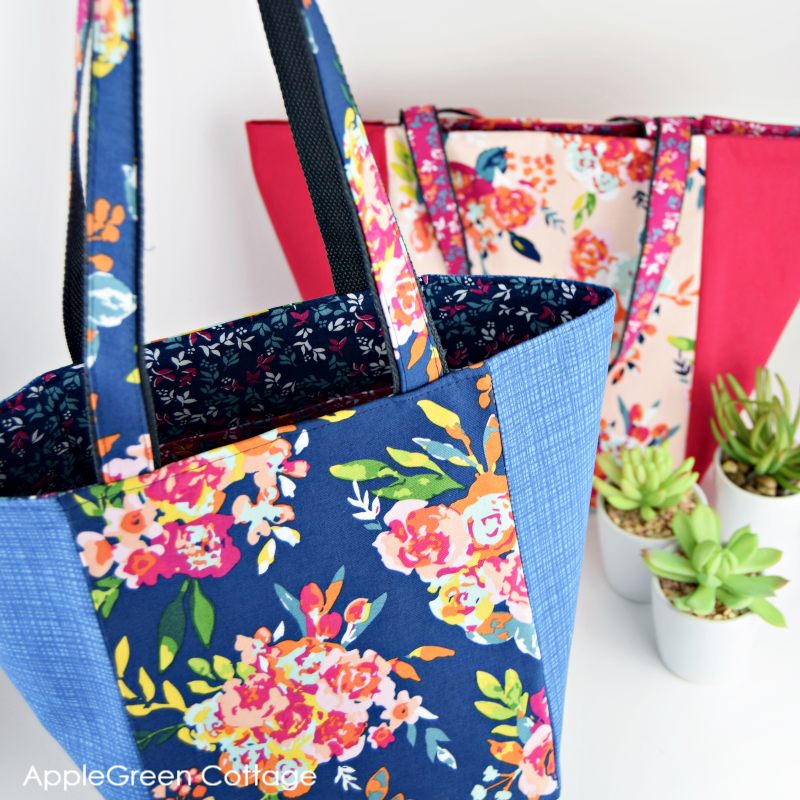
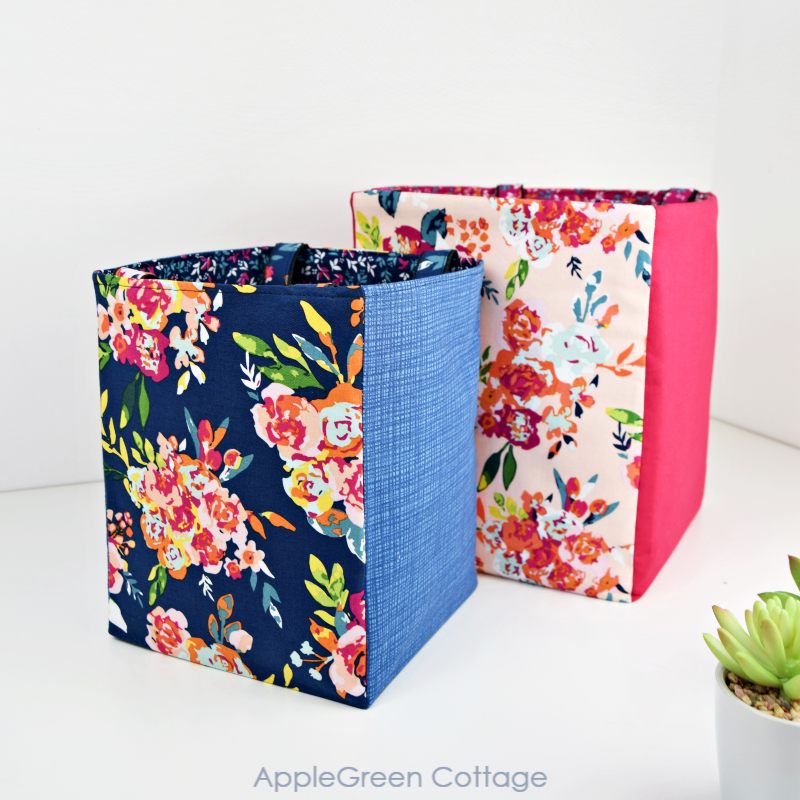
This is a great-looking tote in 3 sizes you can make with 3 different prints or solids. I love how it can be used either as a storage basket or as a proper market tote.
Why you'll love this tote pattern
My favorite features of a bag pattern? Well constructed, easy, and beautiful. And this one covers all three.
Firstly, this market tote has a generous, square flat bottom, allowing you to bring your delicate market purchases home with ease. It's perfect for a baguette or two, some fresh produce, and a bundle of herbs and flowers - all in your favorite market tote bag!
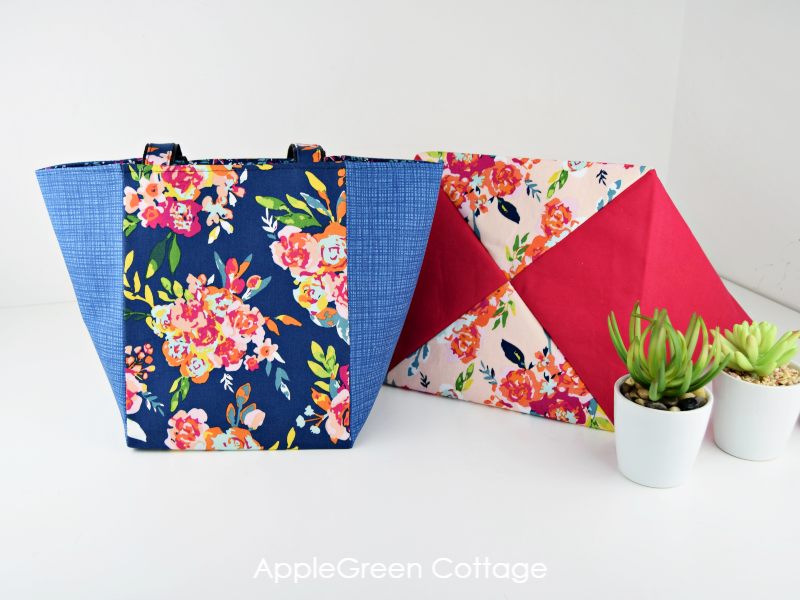
Secondly, I'm sure you'll also love the two-in-one feature: this market bag pattern can be used either as a storage basket or a tote - the same item! ↓
See how to sew a tote bag like this one, now. Also, don't forget to scroll down for even more tips to make this market bag pattern work for you - better, easier, and quicker!
Market Tote Feature Video
3 Finished Sizes
The finished sizes of the market bag are as follows:
- small tote: 7" x 7" at the bottom, 9" tall, 14" wide on top (18 x 18 cm, 23cm tall, 36cm wide on top)
- medium tote: 9" x 9" at the bottom, 11" tall, 18" wide on top (23 x 23 cm, 28cm tall, 46cm wide on top)
- large tote: 11" x 11" at the bottom, 13" tall, 22" wide on top (28 x 28 cm, 33cm tall, 56cm wide on top)
Supplies
Shop my personal favorite sewing supplies on Amazon HERE.
For the Large Market Tote
To make the large tote, you'll need:
- free market tote pattern
- ½ yard/meter of Fabric #1 (Outer MAIN)
- ½ yard/meter of Fabric #2 (Outer SIDES)
- 1 yard/meter of Fabric #3 (LINING)
- 44" of 1" to 1 ¼ -wide webbing for handles, preferably cotton + thick (heavyweight)
- ¾ yard of fusible fleece (for tote lining and pocket)
- ¾ yard/meter of stiff mid-weight interfacing like Pellon Craft Fuse, Vilene S320 or stronger like Decovil I Light (to interface the outer and handle accents)
TIP: Visit my interfacing post for more info on what stabilizers you can use.
To make the medium and the small sizes, you'll have some leftover fabric.
I used the Garden Party collection by Keera Job for Riley Blake Designs to sew for these totes. Rich colors, and these gorgeous bouquets of flowers are so perfect for a stroll through the Saturday market. I can't wait to visit it again, hopefully soon!
How To Make A Tote Bag - Tutorial
Here's how to start making your own market tote. You'll be offered options as you go, and you can just stick to the basics, or go a few extra steps - your choice entirely!
Step 1 - Get the FREE Market Bag Pattern
Join our mailing list and get the free market tote bag pattern emailed to you:
Looking for the entire tutorial+pattern PDF? See the → optional PDF file in our shop.
Step 2- Cut the Fabric Pieces
Using the free market bag template, cut these pieces from fabric and interfacing:
From Fabric #1 (OUTER MAIN), cut
- 2 main pieces from the PDF template (for tote outer, main panels)
- optional 2 strips 1 ½" x 22" (3.8 x 56 cm; for handle accents)
- 1 rectangle for interior pocket: 9" x 15" (22.9 x 38.1 cm) for large+medium tote size / OR 7" x 11" (17.8 x 28 cm) for small tote size - the pocket can be in a different print (I used tiny red florals here)
From the Fabric #2 (OUTER SIDES) cut:
- 2 main pieces from the PDF template (for tote outer, side panels)
From Fabric #3 (LINING), cut:
- 4 main pieces from the PDF template (for tote lining)
- IF YOU DON'T WANT WEBBING FOR HANDLE base: 2 strips 4" x 22" (10 x 56 cm; for handle base) - not pictured
From fusible fleece, cut:
- 4 main pieces from the PDF template, but make sure to cut them on the seam allowance to avoid bulk (fuse to bag lining)
- 1 rectangle for interior pocket: 8" x 7" (20.3 x 17.8 cm) for large+medium tote size / OR 6" x 5" (15.3 x 12.7 cm) for small tote size
From fusible stiff mid-weight interfacing, cut:
- 4 main pieces from the PDF template, but make sure to cut them on the seam allowance to avoid bulk (fuse to market tote outer)
- OPTIONAL accents FOR HANDLES: 2 strips ¾" x 22" (3.8 x 56 cm; for handle accents)
Not sure which interfacing to use? Start here.

Step 3 - FUSE interfacing to main pieces
Using the manufacturer's instructions, add fusible fleece to the back of the 4 lining pieces, and stiff interfacing to the 4 outer pieces. Here's some help for how to fuse interfacing if you need it:
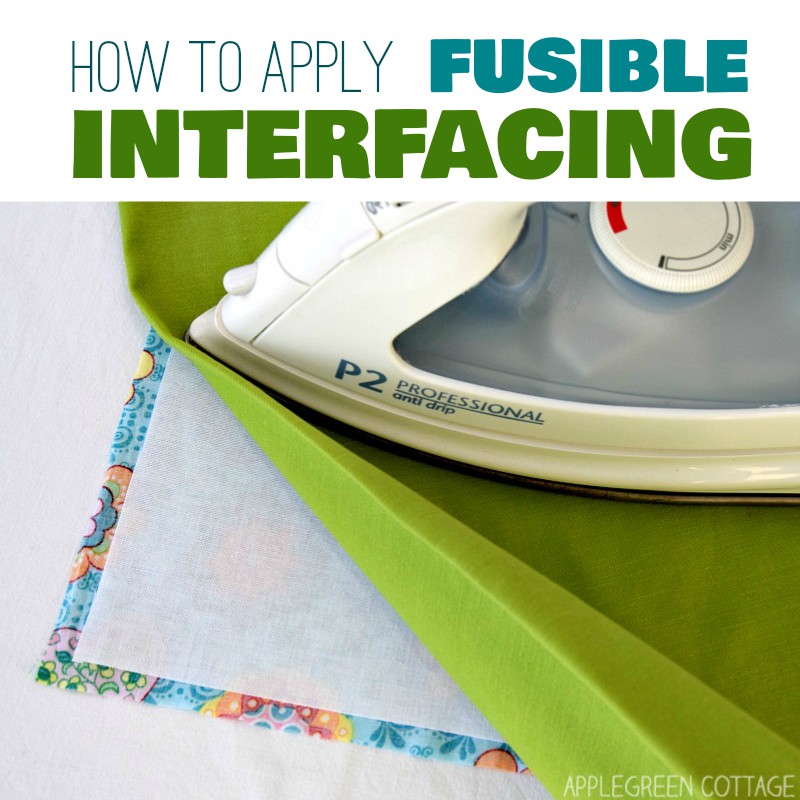
New to fusible interfacing? See how to add fusible fleece. Or visit our free
Step 4 - Make Tote Handles
Your finished handles will be 21" (53 cm) long. You can opt for webbing only, in this case just cut 2 pieces as indicated in the cutting chart. I made my handles 1" (2.5 cm) wide. I used poly webbing as the base for my tote handles - cotton webbing would have been better, but I ran out of it.
OPTION: handles are sturdier and stronger - and prettier - when you add a stripe of fabric to your webbing. Optional, but it's easy:
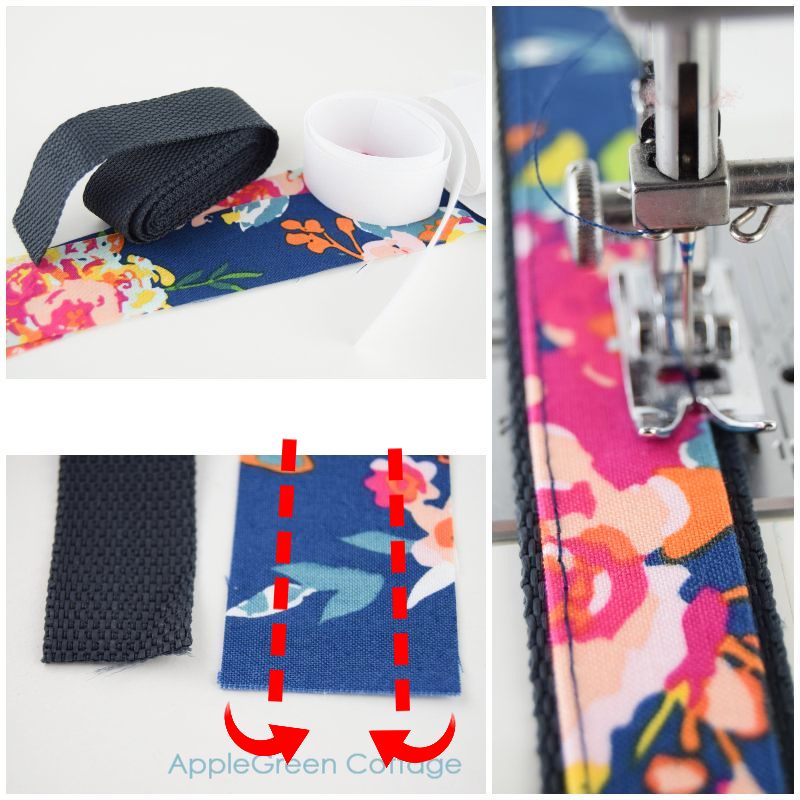
What you need to do is 1- fuse the interfacing stripe to the fabric, then 2- turn under the two long edges of the fabric to make it ¾" wide (1.9cm), press the fabric strip well (NOT the poly webbing!) and 3-stitch it onto the 1" wide webbing. Feel free to adjust the width if you like.
If you need more guidance to make the handles or want to make the handles entirely out of fabric I've got you covered. Check out my bag handles tutorial here:

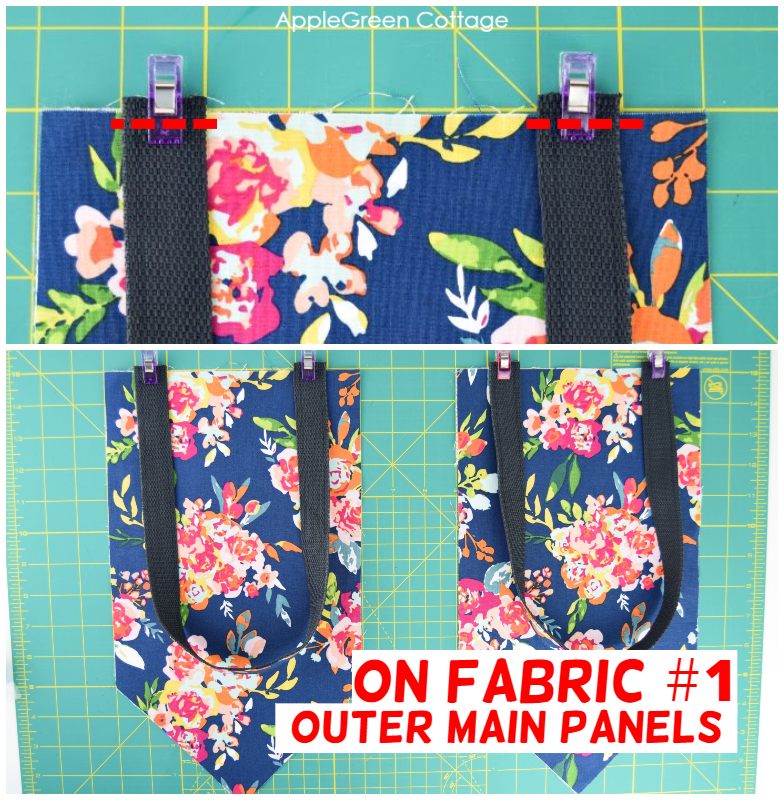
Step 5 - Baste Handles to Outer MAIN PANELS (Fabric #1)
Take the two main pieces cut from Fabric #1 - that is, OUTER MAIN panels, and baste the handles on their top edge, each end of the handle 1" (2.5cm) away from the top corner. Also, make sure the accent fabric on the handles is facing the fabric main panels.
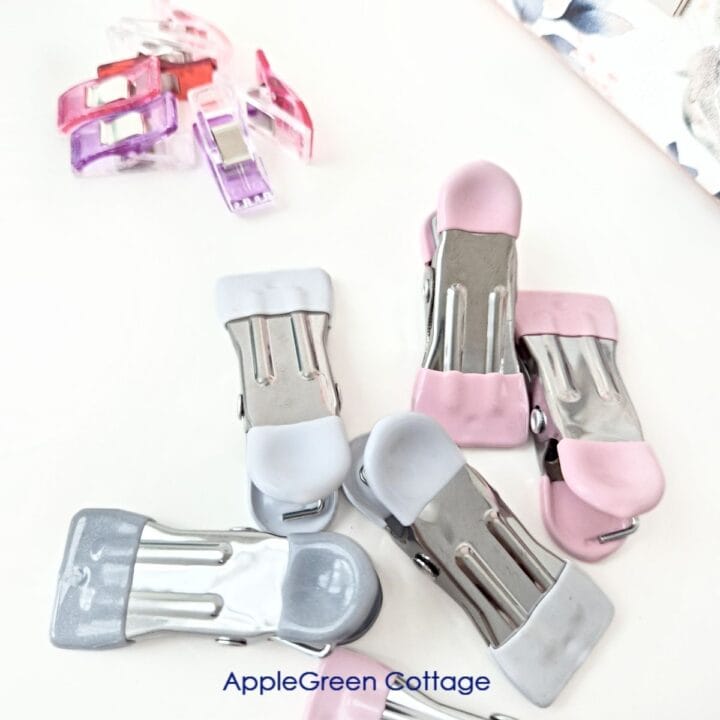
Sturdy Bagmaking Clips I love
Set them aside for now.
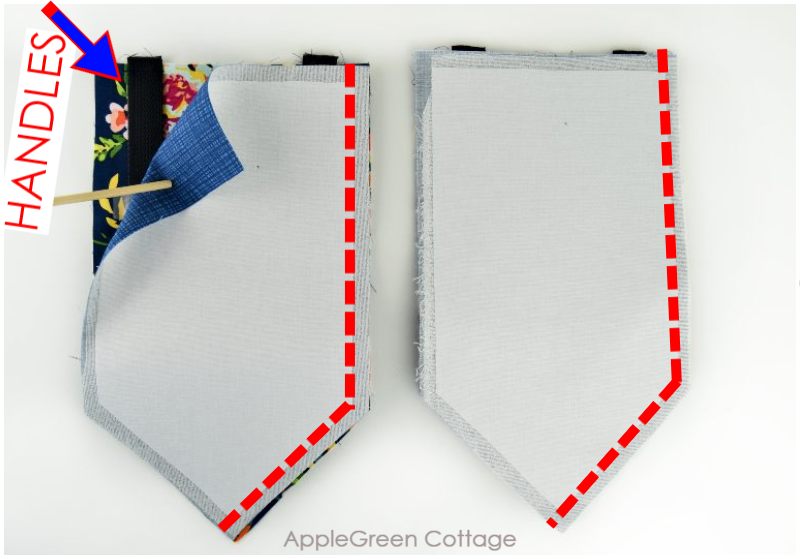
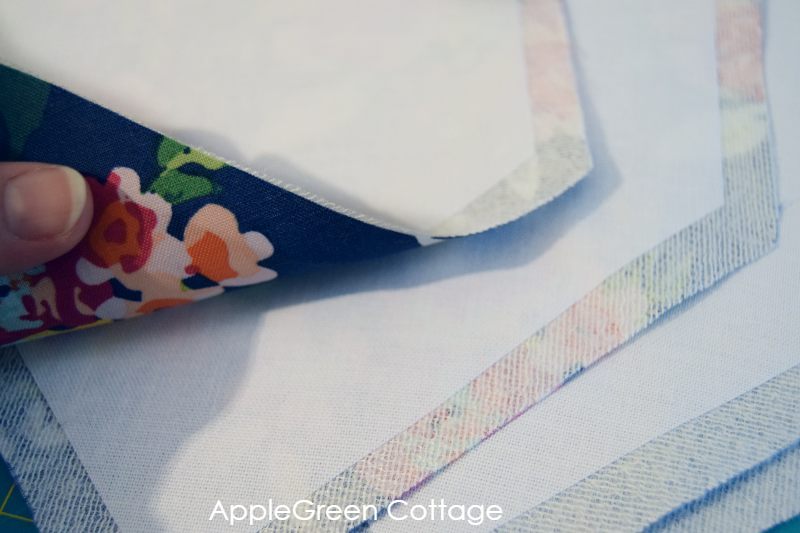
Step 6 - Make the Pocket
Add fusible fleece to the pocket piece, making sure to leave the seam allowance free (see photo below). Then fold right sides together and sew with a ½" seam allowance, leaving a gap for turning.
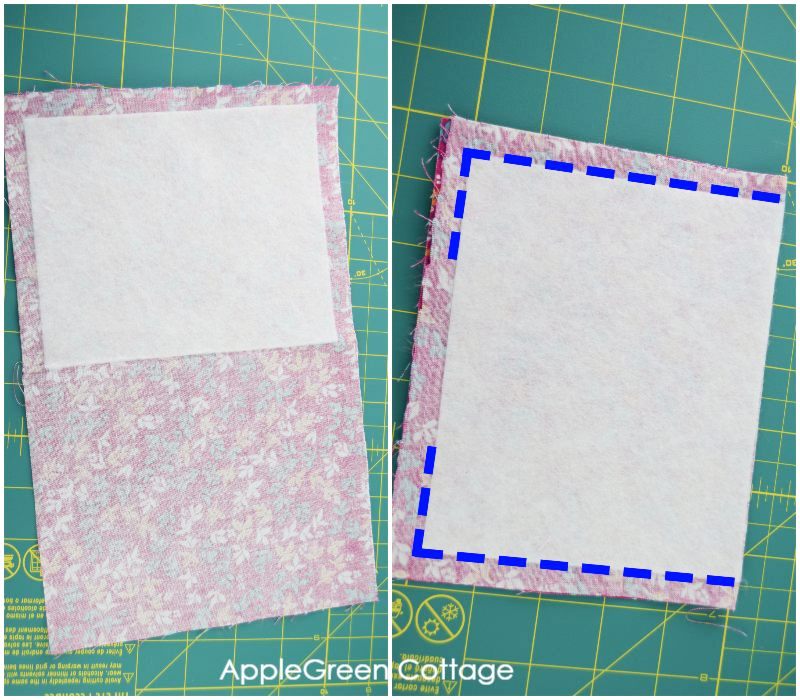
Trim and notch the corners and turn right side out. If you need help with trimming the seam allowance, this is a good how-to: See how to clip corners and make sewing easier.
Once you've turned the piece, topstitch, but NOT all around the piece: you'll ONLY topstitch the top (folded) edge. The turning hole will remain open. Like this:
Step 7 - Attach Pocket To the Lining
Now attach the pocket to one of the lining pieces. Place the lining piece right-side-up, then place the pocket piece, with topstitching at the top side, at a distance of 3" (7.5 cm) away from the top edge of the lining, and horizontally centered. See the photo:

Pin and topstitch the pocket in place: I start at the top right, across the bottom and go back up on the left. See the white dashed lines above.
Step 8 - Assemble The Tote
Now you'll have 4 outer pieces (2 main panels have handles basted on) and 4 lining pieces (1 has a pocket installed). The assembly will go in several steps, I'll try to guide you through each substep to make it super clear:
8A- LINING PIECES
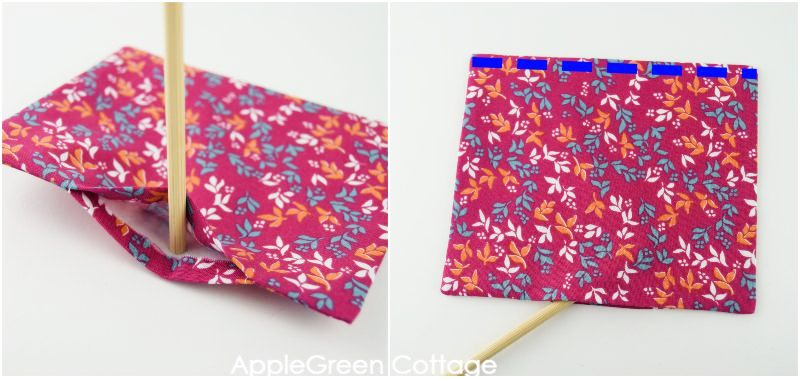
First', take the lining pieces and place them two by two right sides together. Make sure the POCKET piece will be at the bottom. Using a ½" (1.3cm) seam allowance, stitch along the LEFT side from top to the bottom tip.
Make sure to leave a 5" gap on the one pair that does not have a pocket. This will be your turning gap.
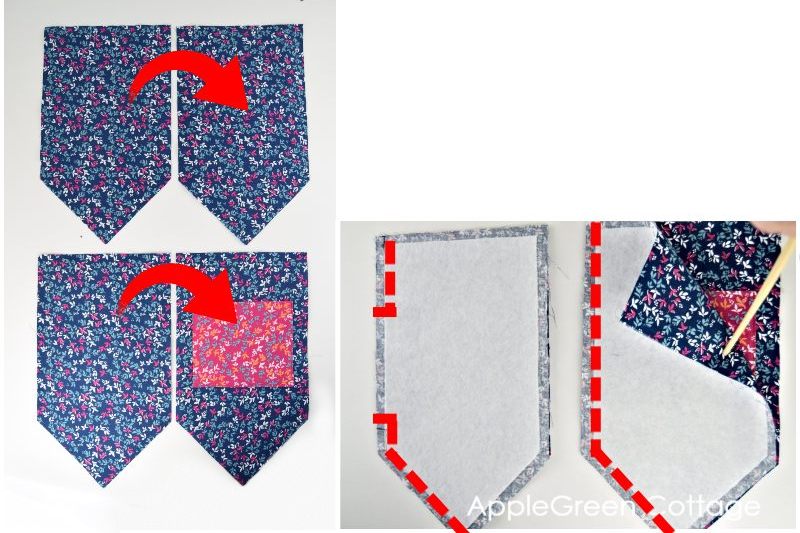
8B - OUTER PIECES
Now, the OUTER panels. Place them as pictured, MAIN panels with handles at the bottom (with right-side-up) and the SIDE panels on them, right-sides-down. The handles will be sandwiched between the layers.
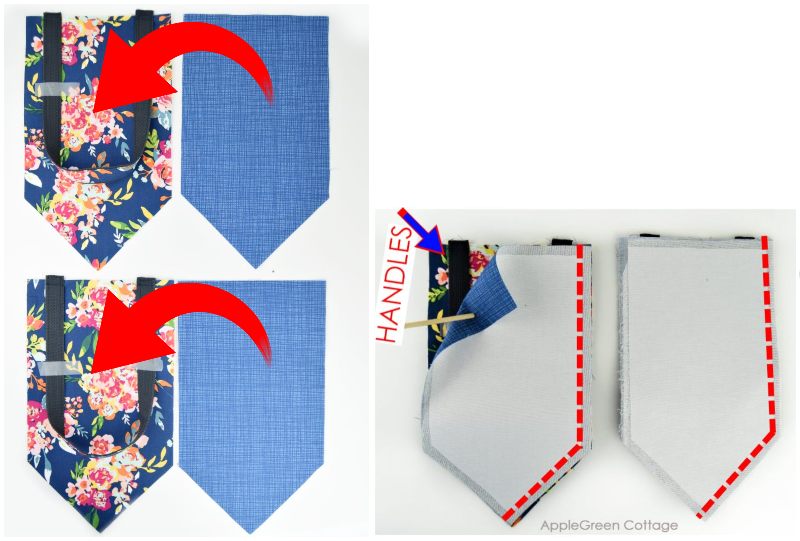
Using a ½" seam allowance, stitch on the RIGHT side of the stacks only - from top to the bottom corner.
8C- LINING+OUTER
Trim the seam allowance on the finished seams. Now let's place the new sets together: take the lining set WITH the pocket and align it to the top edge of one of the OUTER panels so the POCKET will lie directly OPPOSITE the MAIN panel (handles!) - see the 2 WHITE arrows below:
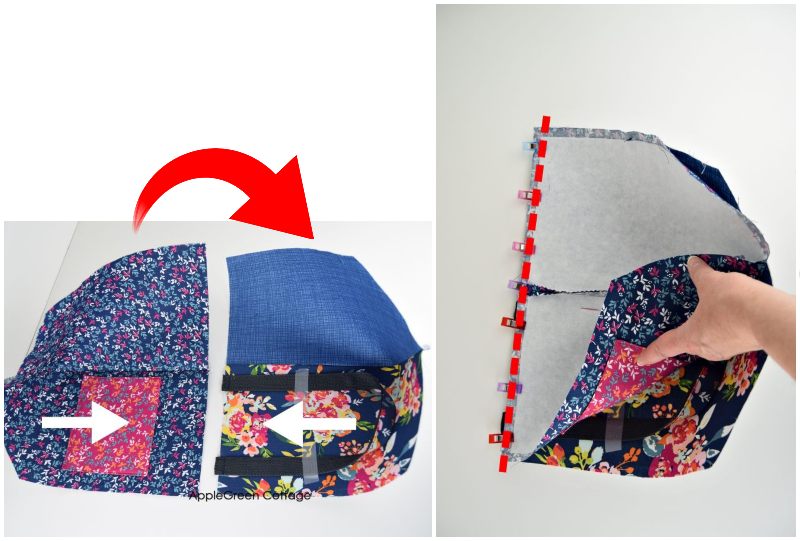
Using a ½" seam allowance, stitch the top edges together. This will become the top of the tote.
Then repeat with the other, remaining set (no pocket on lining.)
ADVANCED SEWING TIP: Optionally, understitch: press the seam allowance towards the lining and topstitch on the lining side all the way along the sewn edge. See the sewing tips section below, towards the end of the post.
8D - The Grand Finale 🙂
All you need is to stitch together the final two panels. Use the ½" seam allowance and stitch all the way around. You'll already have a turning hole in lining from one of the previous steps:
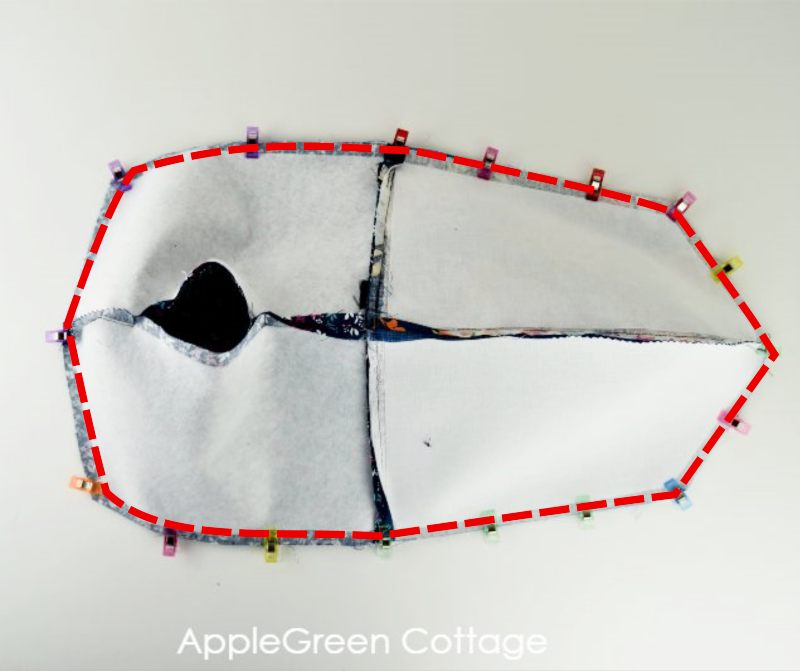
The two panels will be right sides together. Make sure that lining fabric is touching lining, and the outer is touching the outer fabric.
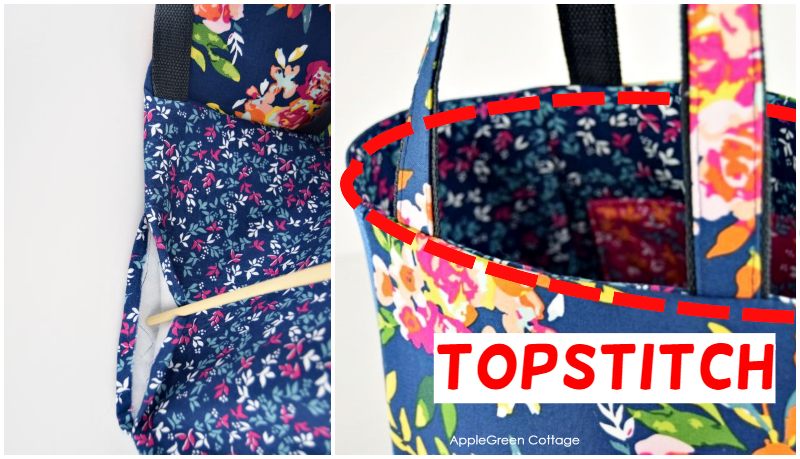
Step 9 - Turn Right Side Out And Press
Turn your tote right-side out through the hole in the lining and stitch it closed. Then topstitch around the top edge of your tote.:
Press and voila! Done, congratulations, you've made a beautiful square bottom tote. Now that you're familiar with the steps, the next one will go much faster, I promise!
Additional Sewing tips:
And here are even more tips to make this market bag pattern work for you - better, easier, and quicker!
How To Interface the Tote BAG For More STABILITY
If you want a stand-uppy tote, feel free to use Decovil I Light for Outer instead of Decor Bond, or do like I did: use two layers.
This is what I did with my outer pieces: I added some mid-weight fusible first (the weight is similar to the Pellon SF101 or WovenFuse) and the stiff interfacing on top of that (cut on the seam allowance to reduce bulk).
Topstitching OR Understitching?
A NOTE to ADVANCED SEWERS: Towards the end of the tutorial, I suggest topstitching the top edge of the tote. If you are a seasoned bag maker, you've probably already understitched the top edge in one of the above steps as mentioned. (see step 8C) If you understitched, topstitching might not even be necessary, depending on the structural stability of the materials you've used. Just to compare, I understitched the larger, red colorway tote, so no topstitching was necessary here:
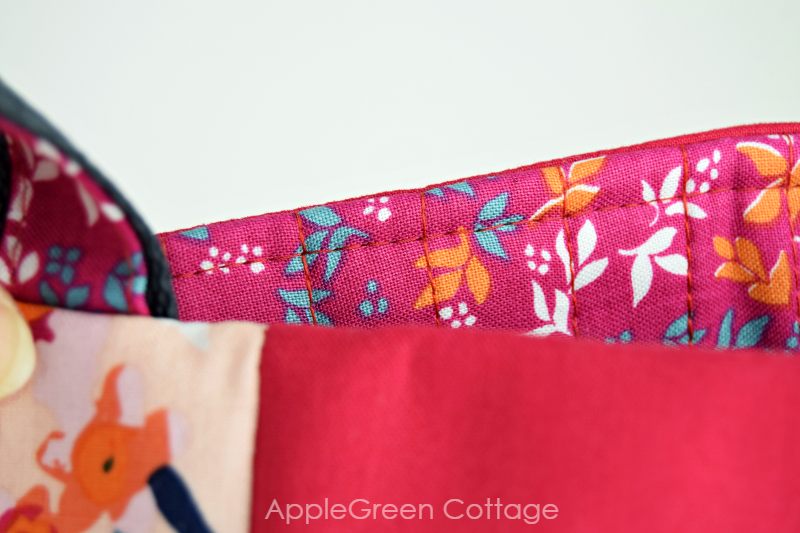
I also quilted the lining on the red tote, as I used quilt batting instead of fusible fleece. Worked great, and I love the soft, squishy lining layer on my larger size tote.
Want to Add Magnetic closure?
Here's a quick placement photo in case you want to add magnets to your market tote: check out the green dots below (ignore the arrows and whatsnot other markings. Just the GREEN dots). And this is the ONLY place that's right for your magnets on this pattern:
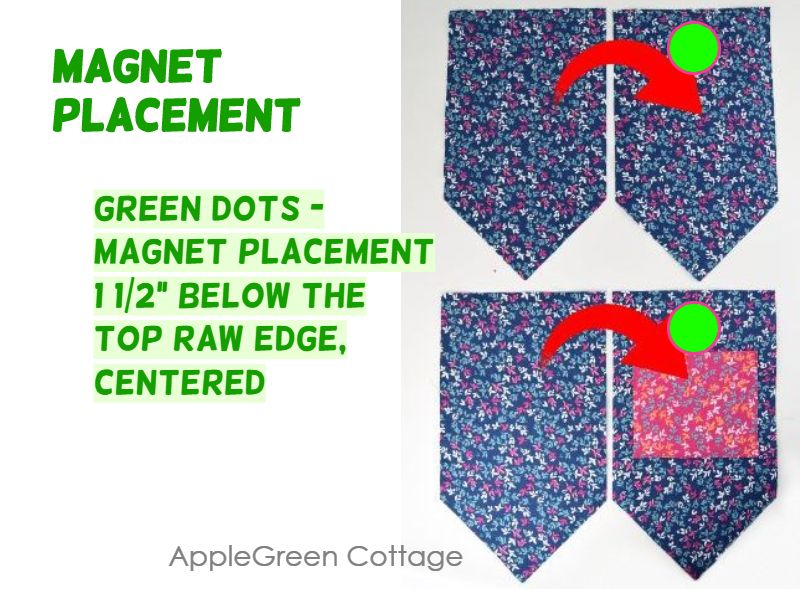
PLACEMENT: install your magnets at 1 ¼ or 1 ½" below the top raw edge of the two lining pieces as marked in the above photo, making sure they are centered horizontally. If you need guidance for installing magnets, I've got you covered, too 😀 - here's how to install magnetic snaps. Super easy!
And I have so many more ideas for bag sewing tips, like the scotch tape I used (did you notice it above, on the handles? Yep, one of my fav tricks to keep things in place so they are out of the way when I'm sewing. But let me stop here, I have a whole post on bag making tips and tricks and I desperately need to bring it to life, or else I might clog all my tutorials with extra bag making tips and hacks not everybody might want to hear about 🙂 Soooo, get ready for a bag sewing tips kinda post then. Or run - you've been warned 🙂
As always, I'd love to see if you've made a tote using this tutorial. Please post a picture to Instagram and tag me @applegreencottage or #applegreencottage - so I can take a look!
WANT A PRINTABLE COPY OF THE WHOLE TUTORIAL?
Do you want an ad-free, printable copy of this online tutorial? Get it in our shop. Or get the whole →BUNDLE!

Want More Free Patterns?
Get email updates and never miss out on new patterns, printables, and tutorials:
Or check out this pretty ALLina project bag pattern in our shop - for all your storage needs:
Or check out the classic SIRINA Shoulder Handbag pattern in our shop. Ample space, pockets inside and outside, two closure options, and a beautiful feature front pocket - for your favorite fabric print!


Bev Cote says
Thank you so much for your generosity. I love your videos. Blessings.
Kelly A Kovaleski says
Thank you! Love your bags!
Linda says
Where is the pdf of the pattern pieces?
Damjana Jakos says
Linda hi, look in Step 1 of the tutorial - enter your email and the free pattern gets emailed to you.
Wanda Couture says
I made the bag. Love it. Using as a gift bag for a baby shower. It will contain burp cloths, bibs & a blanket from your web site.
I do have a question about the bag. Is it washable?
Thank you.
Also thank you for all the patterns and tutorials. I'm having a blast sewing gifts and stuff for myself. 😃
Damjana Jakos says
Wanda that sounds like such a thoughtful gift! Whether the bag is washable depends on the materials you used – quilting cotton is absolutely fine, and if you added batting, that usually works well too. As for interfacing, it's best you read the manufacturer's instructions.
Kirsten says
If I don't have fleece and don't want to buy it, can I apply interfacing to both layers for structure?
Damjana Jakos says
Kirsten yes, absolutely! You can use interfacing on both layers instead of fleece – it just depends on the stiffness and type you’re using. If it’s too thin, the bag might end up floppy, especially in the larger size.
Janet Goodpaster-Gates says
I made this tote bag about a year ago. It came out beautiful and very handy. I love the bag and have gotten many compliments on it. However, since I always have a bunch of stuff to carry around I chose the largest size. This size is big enough to carry around one of my great grandbabies. I am able to use it for any large object(s) that I need to transport. Now I need to make the next smaller size to use as a purse. Thank you for sharing this pattern. It's well worth the time and cost of fabric to make it.
Damjana Jakos says
Janet I'm so glad!
Lisa Turner says
Fantastic instructions, better than a purchased book . Thank you xx
Katie says
Love this so much! I have been making tons of the other tote bag pattern with a bunch of fabric I rescued. Thank you so much for this amazing tutorial! For this bag, I am making it special for my sister. Is there a way that I could add a recessed zipper to it? Do you think that could work? She spends time in a place where there are pickpockets and I want her bag to be as secure as possible.
Patty Ward says
You were right! The second one went more quickly!! Really love this pattern.