
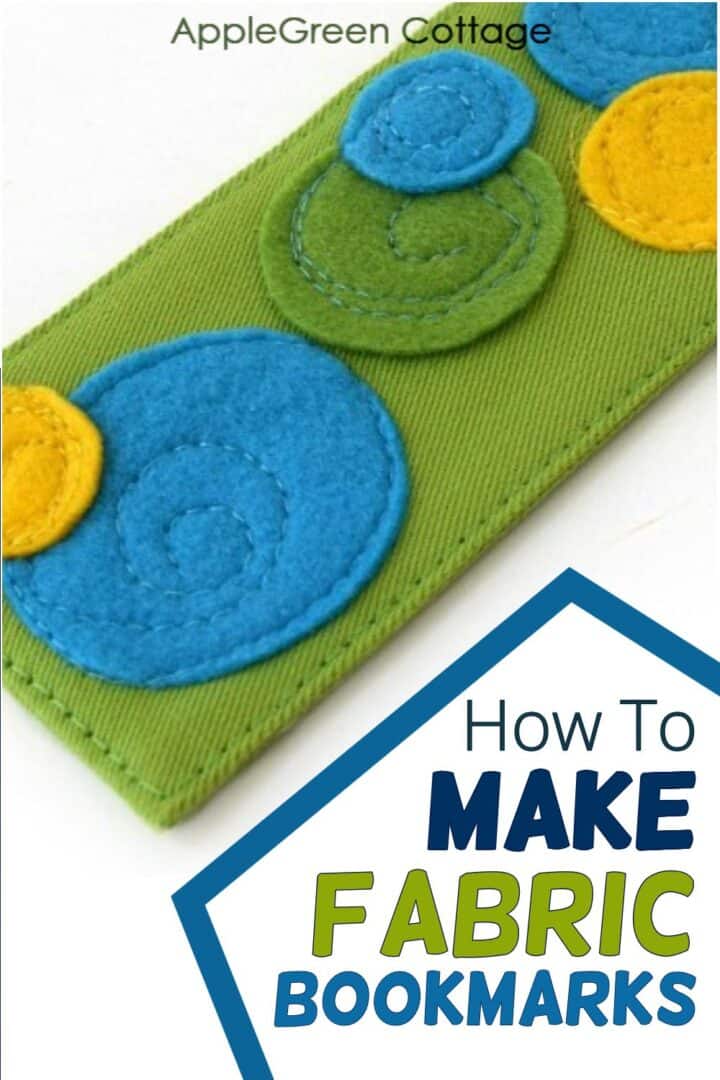
Ready for a totally easy-sew project? And that a lovely one! Here's how to make bookmarks with cute little felt circles. Scroll down for the free template with 4 free designs and an easy-sew trick that will make your corners look beautiful. You'll love this little hack! And make sure to get the free template with 4 FREE designs.
These DIY fabric bookmarks won't take a lot of your precious sewing time. You'll see making a bookmark like this one is a breeze. And if you happen to know a book-lover whose birthday is close, you've got a great DIY present idea.

This post contains affiliate links. Thanks for your support. Are you here for easy bookmarks? You'll want to see these too:
- Easiest Corner bookmarks to sew
- 10 Cute And Easy Bookmarks Anyone Can Make
- Diy Paper Bookmarks - For Kids
- Free Template - Folded Felt Flowers - you can attach these to a plain bookmark and make it pretty!
How To Sew Fabric Bookmarks
Do you want to know where I got the idea for how to sew fabric bookmarks? It was just after I had finished another batch of my colorful felt coasters. Do you know those? Love sewing them, and they look so professional - but so easy to sew!
First, for those of you who like video tutorials, I've made a video slide show just to make it easier for you. Check it out:

You might have some leftover felt from previous projects, and the best part is, you don't need a lot of it! It's a scrap busting project.
You might even make them in batch to stock up on DIY birthday presents, make a teacher appreciation gift, or even a Christmas stocking stuffer! (Yes you've heard that right, I'm saying this before the summer even started!) I've also added a little sewing tip that will make your project even easier. Let's do it!

Supplies
You'll need:
- a 9 by 6 inch (=23cm x 15cm) large scrap of fabric
- a piece of fusible felt interfacing: 2 ½ inch x 8 ¼ inch (=6.5cm x 21cm) - i.e. in the finished bookmark size to avoid bulk on the stitching line)
- a few felt scraps in your favorite colors
- sewing machine or needle, pins, sewing thread, scissors
- optional: your free template with 4 additional shapes to use - get it at the end of the tutorial!

What you get with the free fabric bookmark template
The free template that's attached at the end of this tutorial will make it even easier to sew beautiful bookmarks. It includes
- the basic bookmark template to cut and sew, and
- 4 free designs for felt cutouts I added for your convenience, each in 3 sizes that match the bookmark template size:
- paisley,
- 5-point star
- circles
- 4-point star
Very handy for when you want to add diversity to your unique bookmarks! What is the bookmark finished size? It is 2 inches wide and 8 ¼ inches long (5 x 21 cm).

How To Make Fabric Bookmarks Tutorial
While there are several different designs you can use with these bookmarks, I opted for circles in this tutorial.
Step 1 - Print the free bookmark template and cut pieces
Cut circles out of the felt colors you've selected for your bookmark.
CIRCLE SIZES: none should be larger in diameter than 2 inches (so they fit the background fabric). The template has 2 inches, 1.5 inches, and 1 inch in diameter, but you don't need to stick to that dimensions. Distribute them over one-half of the fabric as you see fit. No rules here, have fun!
Step 2 - Arrange Cutouts

Pin the felt to hold the circles to hold them in place. You'll remove pins as you sew. (I love using my 'birdie' pins for projects like this one. They are long (2"), thin and they lay flat, so pinning felt is a breeze!)
Step 3 - Stitch Circles on the Fabric

Select matching or contrasting threads (your choice!). Start sewing in the middle of a felt circle and work your way towards the outer edge, making a few circles. No need for any precision here!
Sewing Tip: DO YOUR FELT CIRCLES OVERLAP?
What you need to make sure is you sew the lower-layer (i.e. the larger) circles first. You'll sew the top circles over those.
Step 4 - Pull threads To the back

A close-up: as you see, I just sewed, keeping the threads unfinished. In the end, I pulled all the threads from the front to the back side and tied knots to secure stitches.
If it's too messy for you, you can finish each seam separately, off course.
Step 5 - Sew The Main piece together

After you've secured the stitches, fold under the seam allowance along both long edges of the fabric. Press.
Here comes the easy-sew trick. Follow along:

Unfold the center fold and re-fold it inside-out - see the image above.

Stitch over both short ends, using the ⅜" (=1 cm) seam allowance.

Step 6 - Trim the Seam allowance and Turn
Trim the corners to reduce bulk.

Turn right side out.
To push out the corners, use a point turning tool or something similar, like a chopstick, a knitting needle, or simply a pencil. Don't use anything sharp since it could make holes in your fabric.Now's the time to press the fabric for a nice and crisp finish.

10) One long side is still open. One step more and you've made it!
Step 7 - Topstitch

Edge-stitch around the entire bookmark. This way, you'll stitch the opening closed. Done!

This bookmark sewing project makes a great sewing project for kids, too. As an option, you can sew a few fabric bases for the bookmark (see steps from 5 onwards) - and leave it to the kids to hand-stitch the felt circles. It makes an amazing kids-sewing project AND a great motivation booster for reading.
Save the bookmark sewing project for later:

Free Bookmark Sewing Template
I've created a simple bookmark template that you can get for free. To open the FREE bookmark TEMPLATE, click the button below:
This is a basic free template to make cutting even easier and more fun. I suggest you print the 2 template pages on cardboard so you'll have the forms handy for any additional sewing projects.
Want MORE Free Patterns?
Get email updates and never miss out on new patterns, printables, and tutorials:
Or …check out the NEA Small Crossbody Bag pattern in our shop. This bag skyrocketed to the top of our best-sellers in less than a week after it was released:


margaret says
so good to have found your blog through Pam`s blog but cannot find a way to follow you
Damjana at AppleGreen Cottage says
Hi Margaret,thank you for reaching out! If you'd like to subscribe to new posts on my blog, I'd be happy to add you manually, so you have no work to do. In addition, you get a freebie: a 3-size earwarmer headband pattern (for baby to 1 year old).Let me know if you'd like that, OK?Damjana
Pam @Threading My Way says
Your bookmarks would make lovely gifts, Damjana. I love the effect you have created with the circles. I've showcased your tutorial today.
Damjana at AppleGreen Cottage says
Thank you Pam - so kind as always!