
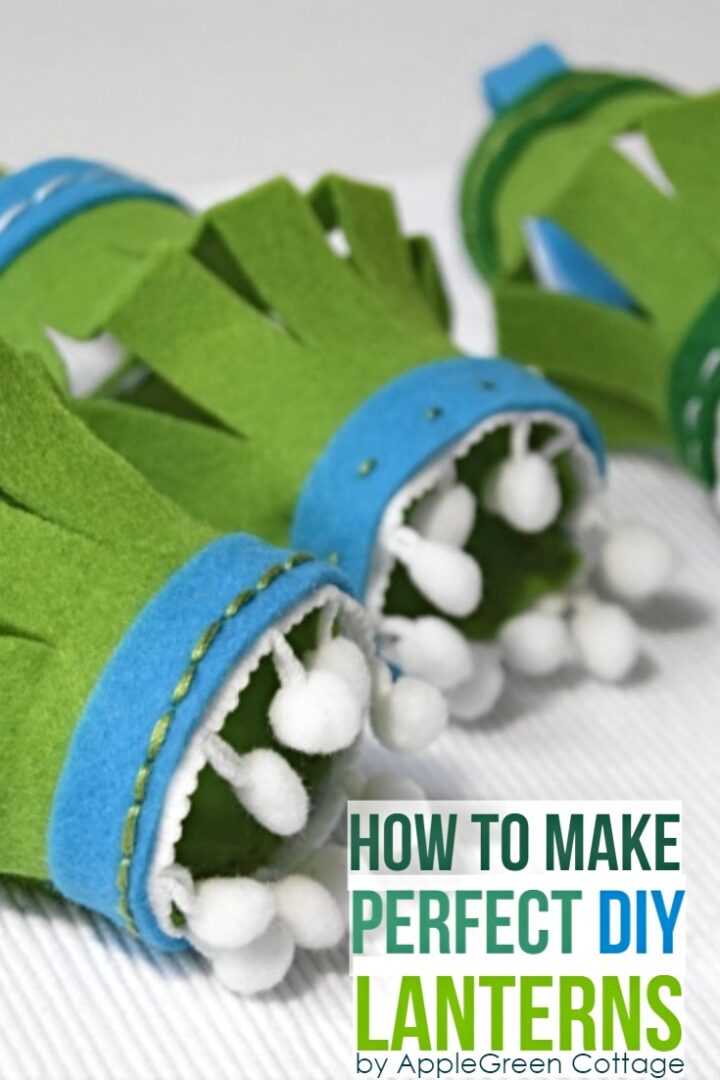
See how to make a lantern using this easy tutorial. You won't believe how easy they are to sew - even if you've never sewn before!
Why you'll love these DIY lanterns? They're fun and easy to sew (even for kids!), perfect for parties or décor, budget-friendly with felt scraps, and reusable year after year. Let's create a few!

Table Of Contents
Make Reusable Felt Lanterns with Just Needle And Thread
Both my kids have summer birthdays, and I wanted decorations we could reuse year after year. (Admitting that paper lanterns don't survive that long in our home...) These easy hand-sewn felt lanterns were such a hit - they still have them hanging in their rooms!
'My grandkids loved the time we spent together crafting these cute little lanterns this summer!' ⭐⭐⭐⭐⭐
Mary M.

These easy DIY felt lanterns are perfect for using up felt scraps, no sewing machine needed - just a needle and thread! Great beginner sewing project for kids that will turn into diy reusable birthday party décor.
Video
First, for those of you who like video tutorials, I've made a quick slideshow, just to make it easier for you. Check it out:
So if you have a grandchild or know a kid who'd like to sew, give it a try! Sew these simple lanterns together and have tons of fun 🙂
🧵 Skill level: Beginner - perfect for kids or first-time stitchers!
Supplies

Felt required:
- 5" x ½" strip of felt - for the handle
- 6" x 4" (1 piece) - for the lantern body
- 6" x ½" (2 pieces) in contrasting colors, as embelishment
Shop my personal favorite sewing supplies on Amazon HERE.
Plus:
- matching thread,
- sewing needle or sewing machine
- embroidery floss
- scissors
- measuring tape
- option: pompom trim (6 inch per lantern)
Diy Lantern - STEPS
TOP TIP: I added images to every step, so if your kids want to follow the instructions here, they do not necessarily need to read them.

1) Fold the main piece in half lengthwise.

2) Cut on the folded side. Make sure not to cut all the way through.

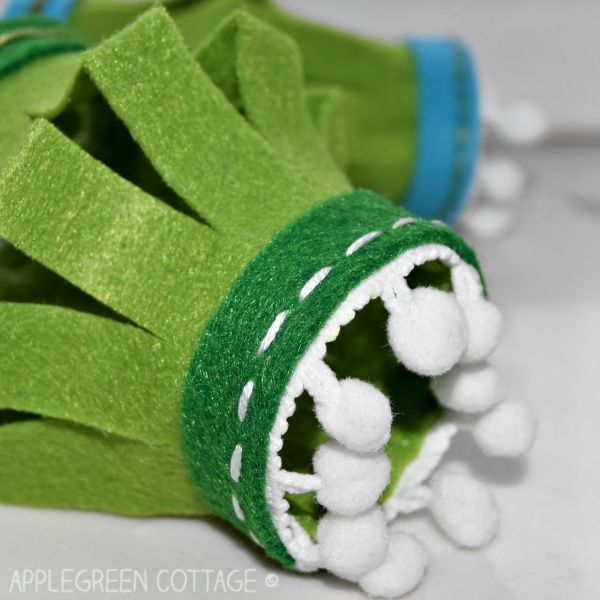
3) Place the two 6" stripes on the top and bottom of the piece. Feel free to add a pompom trim, or tassels if you like. My daughter is all about little fluffy pompoms, so we added them to each of the lanterns.

4) Stitch the stripes in place. They will make your lanterns more stable in the wind. And add additional colors (which always translates to 'prettier' in my sewing world!)

Make sure your stitches catch all layers (like pompoms). Use Wonder Tape or Clips to hold pieces in place. Adjust the stitching to your child's skill level - any simple embroidery stitch will work!
Simple hand stitches to use for sewing felt lanterns:
Below are a few easy ones to try:
|
| Back stitch |
 |
| Chain stitch |
 |
| Running stitch |

5) After the two stripes are done, now's the time to either fingerpress the fold lengthwise, or use iron with a cloth and a low heat to set the crease on the lantern.

6) Fold the sheet into a cylinder and make a few stitches to join the two ends. We only stitched at the bottom and at the top of the lantern, it's enough.

7) Attach the handle.

8) Hang and enjoy!
You can take a string and hang them up in a kid's room. A wonderful decoration! These diy lanterns will look really cute when you hang them in the backyard for a birthday party.

These felt lanterns are such a fun little project - perfect for teaching kids a few simple stitches and letting them get creative. Super easy, totally beginner-friendly, and great to get creative! You can sew on additional scrap pieces of felt, or even these easy felt flowers - or see how to make folded felt flowers.
More Ideas
If you're here for all-felt projects, visit these felt sewing ideas too. For more quick makes, join this free email course:

Join the FREE 6-part email guide and make super easy diy GIFTS - each in 30 minutes or less! You'll love it!
If you like fun and easy projects, check out these free tutorials, too:

And, if you want more diy party decoration tutorials and inspiration, here are 30 more ideas for DIY party garlands.
WANT MORE FREE TUTORIALS AND PATTERNS?
Get email updates and never miss out on new patterns, printables, and tutorials:
Or …check out my latest PDF pattern in the shop - the SILA Duo Zipper Bag pattern. Two patterns in one, see more here:


Pam @Threading My Way says
Damjana, these would be perfect for Christmas, and a great project to do with, or by kids. Pinning this so I remember at Christmas.
Cucicucicoo: Eco Crafting & Sewing says
Oh my gosh, Damjana, I LOVE these! They are so pretty and festive, and so simple to make! And might I add... stringing them up with pom pom trim?! Gaahhhh!! I'm dying over here with coolness overload!! 🙂 Lisa
Damjana at AppleGreen Cottage says
Lisa,Your comment just rocks! Thank you! 😀
Laura C says
I like this project very much and the adaptability to many occasions through the change of color scheme. Thank you for sharing your creativity!
Damjana at AppleGreen Cottage says
Laura,agree! I can't wait to make a few for Christmas 🙂