
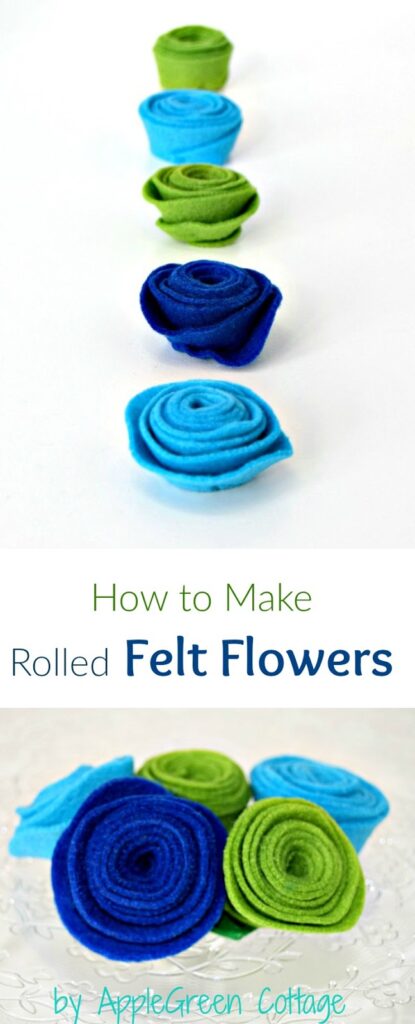
Here's a rolled flower tutorial for making totally easy rolled felt flowers.
There are many ways to make felt flowers, but this time, I'd like to show you the EASIEST and QUICKEST technique. See how to make rolled felt flowers - one of the easiest things you can create out of felt scraps.
All you need is a scrap piece of felt and 10 minutes of your time. Let's start!

This post may include affiliate links at no cost to you. Thanks for your support. If you're here for all-felt projects, visit these felt sewing ideas too.
Rolled Felt Flowers
Let's make a bunch of cute little DIY felt flowers!
Supplies
- felt scraps
- scissors, needle, thread
- optional: a small bowl or an old unused CD as a template*
*Finally a post when I'm not bothering you with PDF templates, haha! And here's a video slide-show for a little sewing trick that makes my hand-stitching even easier. Always! Check it out here:
I'm sure those who often do embroidery have known this for ages, but for some of the readers this might be a great new little trick. Hope you'll like it!

Rolled felt Flowers Tutorial
1) Cut out a circle. If you like making things easier, use a small bowl or a CD as a template - anything round will do just perfectly!

2) Then cut a felt stripe out of this circle, going in spirals.

When you come to the center, there will be a circle-like end. Leave it just like this:

3) Now, thread the needle to have it ready. (Or get glue if you're not a fan of stitching by hand.)
Then grab the outer end of the felt stripe and start rolling it.

4) When you've used up the whole stripe, there will only be a small circle-like portion hanging off the roll of felt. Leave it like that.

5) I'ts time to make a few stitches through the back of the flower to ensure it doesn't fall apart.

6) When you've made the few stitches (possibly even without needing to make a knot if you watched the video!), you'll attach the small circle in the end. It will cover the back of the flower, giving it a nice finish:

7) If you like, you can add a green leaf or two to add color. Lovely!

These sweet little things can turn even the plainest storage box into a beauty (and this is a sneak peek into one of my other posts:

For me, it was a relaxing, quiet, and nearly meditative activity. I enjoyed so much that I might have made in a few flowers more than care to admit.
More tips to make rolled flowers
Here are more tips to tweak your felt flower-making process and to get absolutely beautiful felt flowers - so pretty that nobody will believe are just diy-ed:
What is the best way to cut felt to make rolled flowers?
No measuring is needed when cutting the spiral out of the felt scrap piece, and no precision either! In fact, the flowers will be prettier if you are not too precise when cutting the spiral.
ROLLING TIP: Why start with the outer end?
When making the first felt flower, I started rolling in the center of the felt spiral - and liked the result.
But then after a few flowers had been made, I (accidentally) started rolling one from the outer end of the felt spiral - an adorable result! It has something to do with the angle of the curve. So I must admit that the flowers will be prettier if you start on the outside. And the rolling is easier too!
Can you make rolled felt florals using glue?
Sewing thread or glue, both are fine! Not a fan of the slow motion of a needle and thread? Then felt glue will do just as well. Both ways - the flowers will look adorable!
Can Rolled Flowers Be made from other materials too?
Yes. paper rolled flowers can be just as beautiful though not as soft and stable. I prefer the look of the felt flowers because they tend to last longer than paper flowers. A personal preference only!
How Do You Use Rolled Felt Flowers?
Rolled felt flowers make beautiful tabletop decor. These flowers are very real looking and can be used for DIY decor, crafts, appliqué, and scrapbooking.
You can make hundreds of things with these flowers! Embellish a simple hair tie. An adorable piece of accessory for girls with long hair! Make a brooch. Or glue them on hair pins. You can use them as home decor: make a wreath to hang on the front door. Or make a beautiful hanging decoration if you thread them on a string.
Or toss them in a decorative bowl and you've got a nice table decoration for the days there are no fresh flowers at hand:

Embellish your bags, put them on a zipper pouch, glue them all around a simple photo frame and make it beautiful. You can even attach a few flowers to a lampshade! Or - since Christmas is not that far away - you can use them as incredibly cute Christmas tree ornaments. (So far, we've got quite a few DIY felt Christmas tree ornaments like THESE, but none are flowers. Yet!)
They make a lovely gift-wrap topper:

I couldn't resist making a few extra, and now I need to figure out where to put them. One ended up on my KAIA Mini bin (I've made so many of these cute mini bins you can literally find them all over the house!) Couldn't resist the urge to mix and match the green with the beautiful fall scenery in the backyard. These amazing colors are the highlight of fall here!

Are there more ways To Make Felt Flowers?
Sure they are, but this one here is the easiest and fastest way to create your own felt flowers I've ever seen! And if you want to add a bunch of felt flowers like these, you can use my other felt flower-making how-to: Folded Felt Flowers tutorial (with a free PDF template).
I hope you enjoyed this rolled flower tutorial. For me, these felt flowers have been the fastest and easiest little hand-stitching home decoration project!

Want More Free Patterns?
Get email updates and never miss out on new patterns, printables, and tutorials:
Or check out this pretty ALLina project bag pattern in our shop - for all your storage needs:


Kathy Heitkamp says
I will be making these for sure. I will do a trial one then I will teach my 8 and 10 year old grandchildren. The others are either too young or too old. This will make a wonderful Mother's Day gift!
Cucicucicoo: Eco Crafting & Sewing says
These are so adorable and easy, and I love how that little circle at the end is just perfect as a backing! Great tutorial, Damjana! 🙂 Lisa
Anonymous says
Just found your blog. Love this project and others. You are so creative!! Thanks for sharing with us!!
Damjana at AppleGreen Cottage says
Thank you, it warms my heart to hear this. Happy crafting!
maurisa mark says
Your tutorial is a great one had fun reading it an am inspired by whole idea this is something I am going to try
Jamie Tomkins says
Those are adorable! I never knew that it could be that easy to make. Definitely going to try this out for the holidays! 🙂
Damjana at AppleGreen Cottage says
Jamie, thanks! And if you do, send me a photo, I'll post it here!