
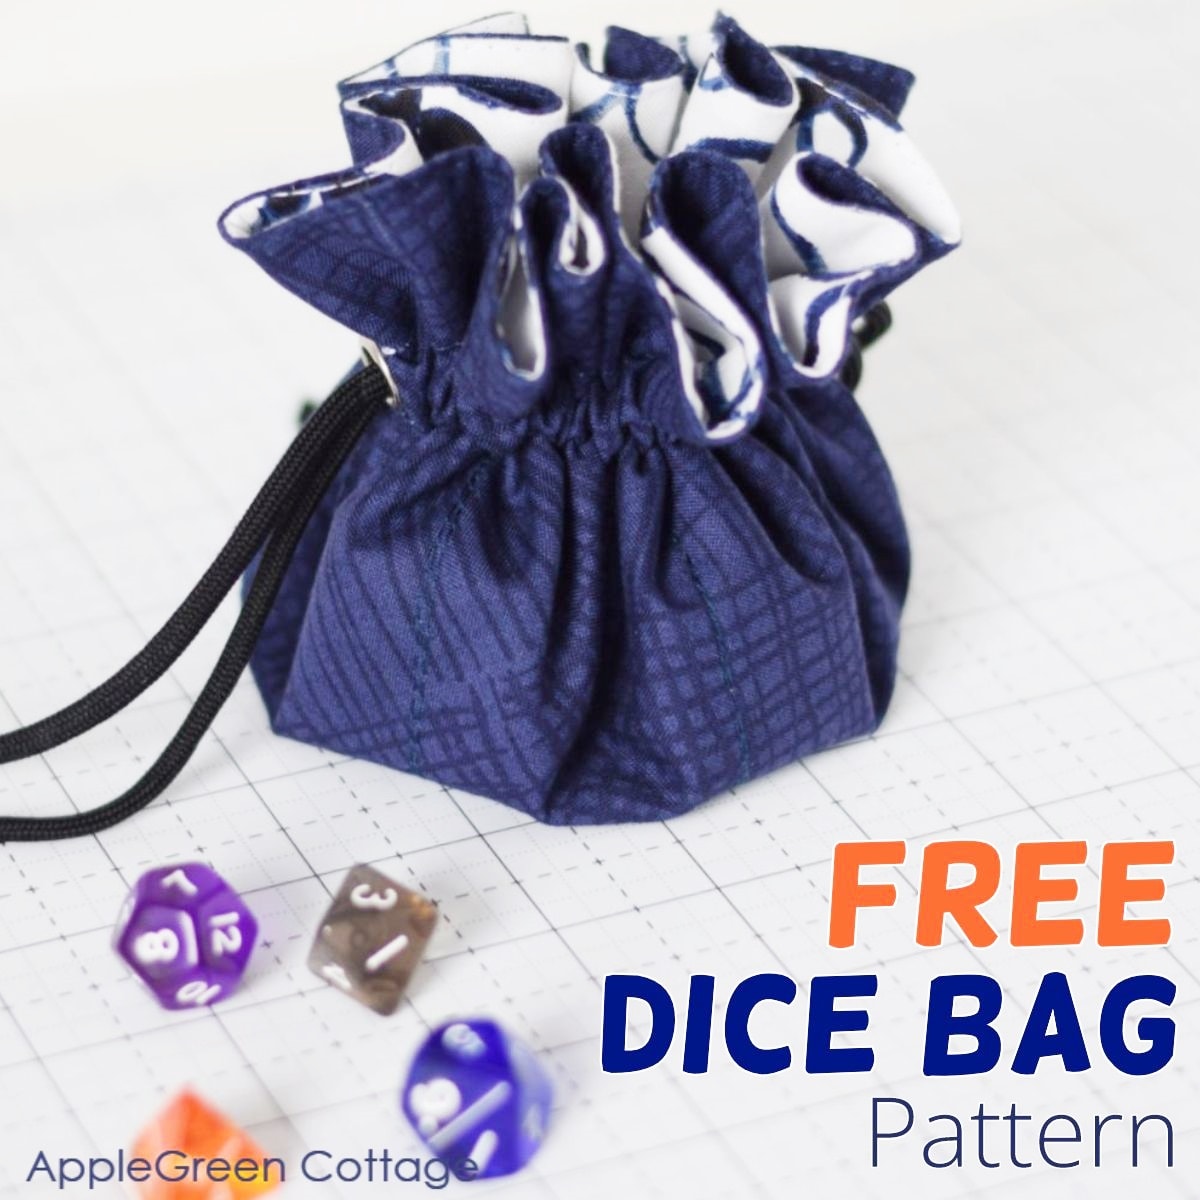
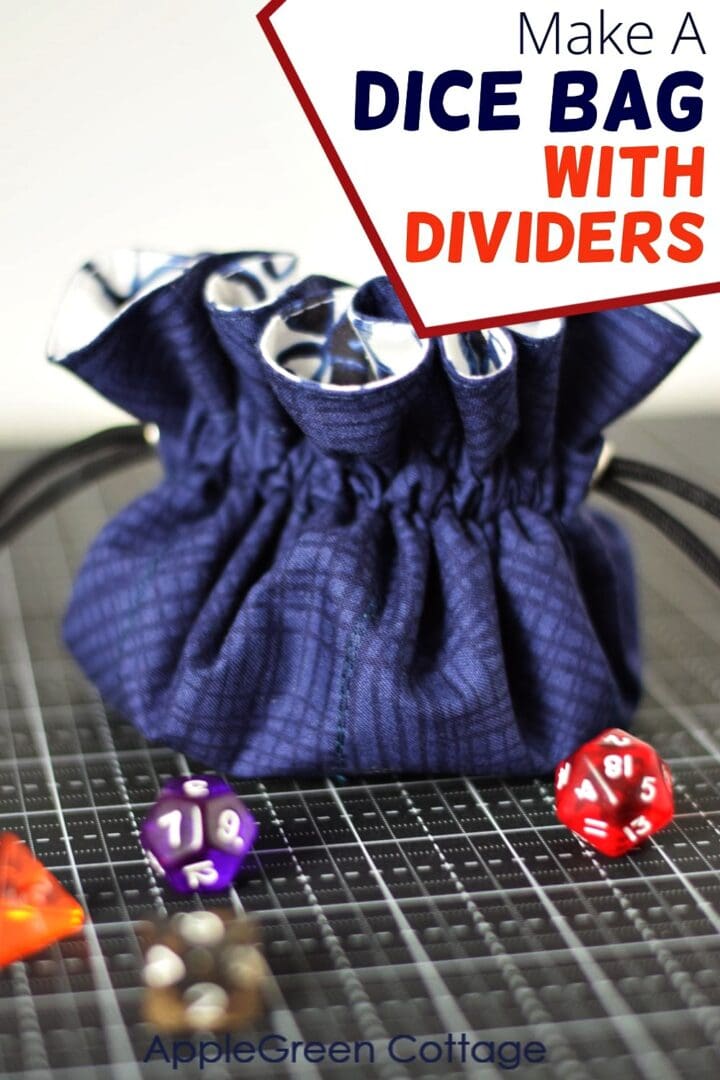
Make this super practical and cute diy dice pouch with dividers, using a free dice bag pattern! This multi-pocket dice bag pattern with dividers is perfect for games like Dungeons & Dragons, Magic the Gathering, or whatever tabletop game you may need to store dice for!
Now imagine having all your dice sets neatly organized, safely stored in an organizer, a dice bag with proper dividers. You'll love it when you don't ever again need to search for missing dice. A perfect present for a Dungeons And Dragons fan!
Prefer an ad-free printer-friendly option of the whole tutorial+pattern? See the → optional PDF file in our shop.
Table Of Contents
If you're here for diy gifts, check out this free SewEASY Gifts series for even more fun things to sew:

Join the FREE 6-part email guide and make super easy diy GIFTS - each in 30 minutes or less! You'll love it!
Now back to my dice bag pattern...Actually, I was looking for a way to help my kids store their own dice.
My kids loved it, and then I noticed how this pouch would be perfect for someone who has several sets of dice, and does not want to have them scratched, or lost. How cool is that!
Dice Bag Makes a Cool Diy Gift!
You could even make a dice pouch as a birthday present, and add a set of beautiful, polyhedral dice - I have been scrolling through these beautiful dice collections here and want them all! (and I don't even play DND!)
This dice bag sewing pattern is a modified version of my other, jewelry organizer pattern.
I hacked my jewelry organizer pattern to help you make your own dice bag with pockets. I just changed the assembling process, made it a bit simpler to sew, and easier, plus added a few adjustments to suit the dice better. And you know I'm always looking for easier ways to make stuff - same with the drawstring dice bag pattern I'm about to teach you to sew.
Why everybody loves this pattern
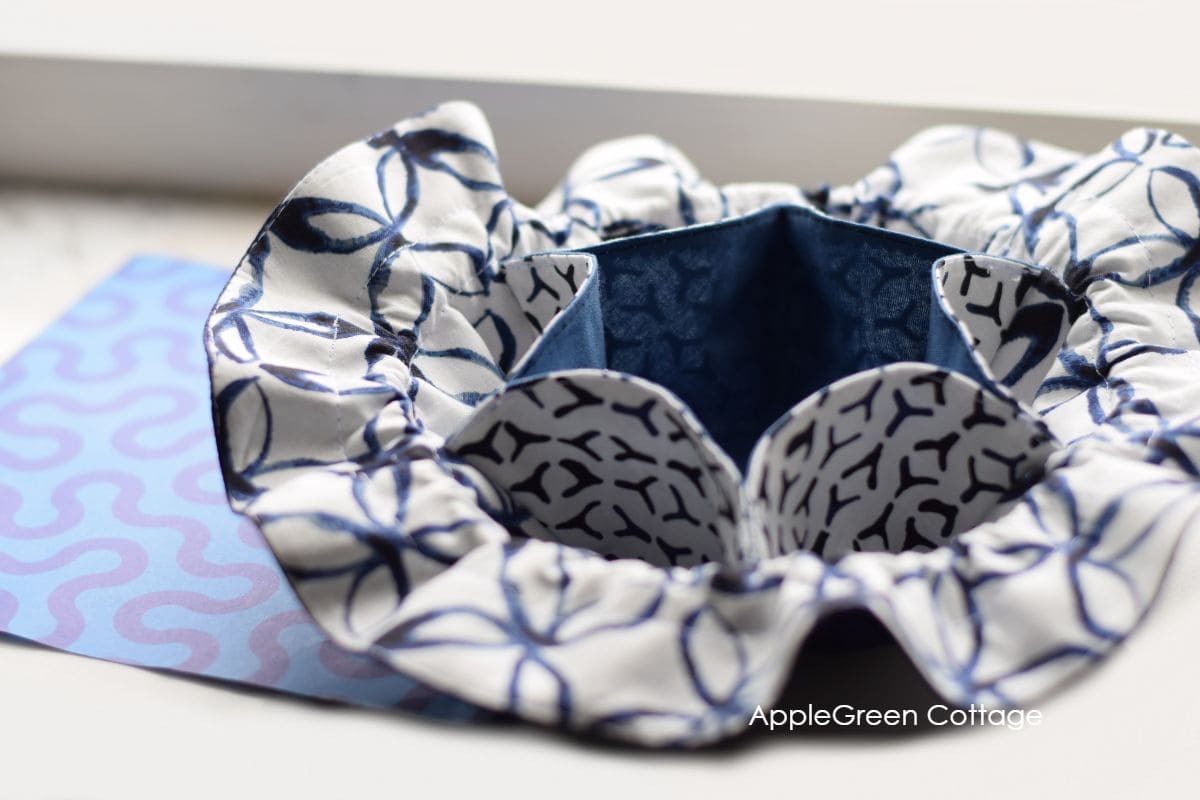
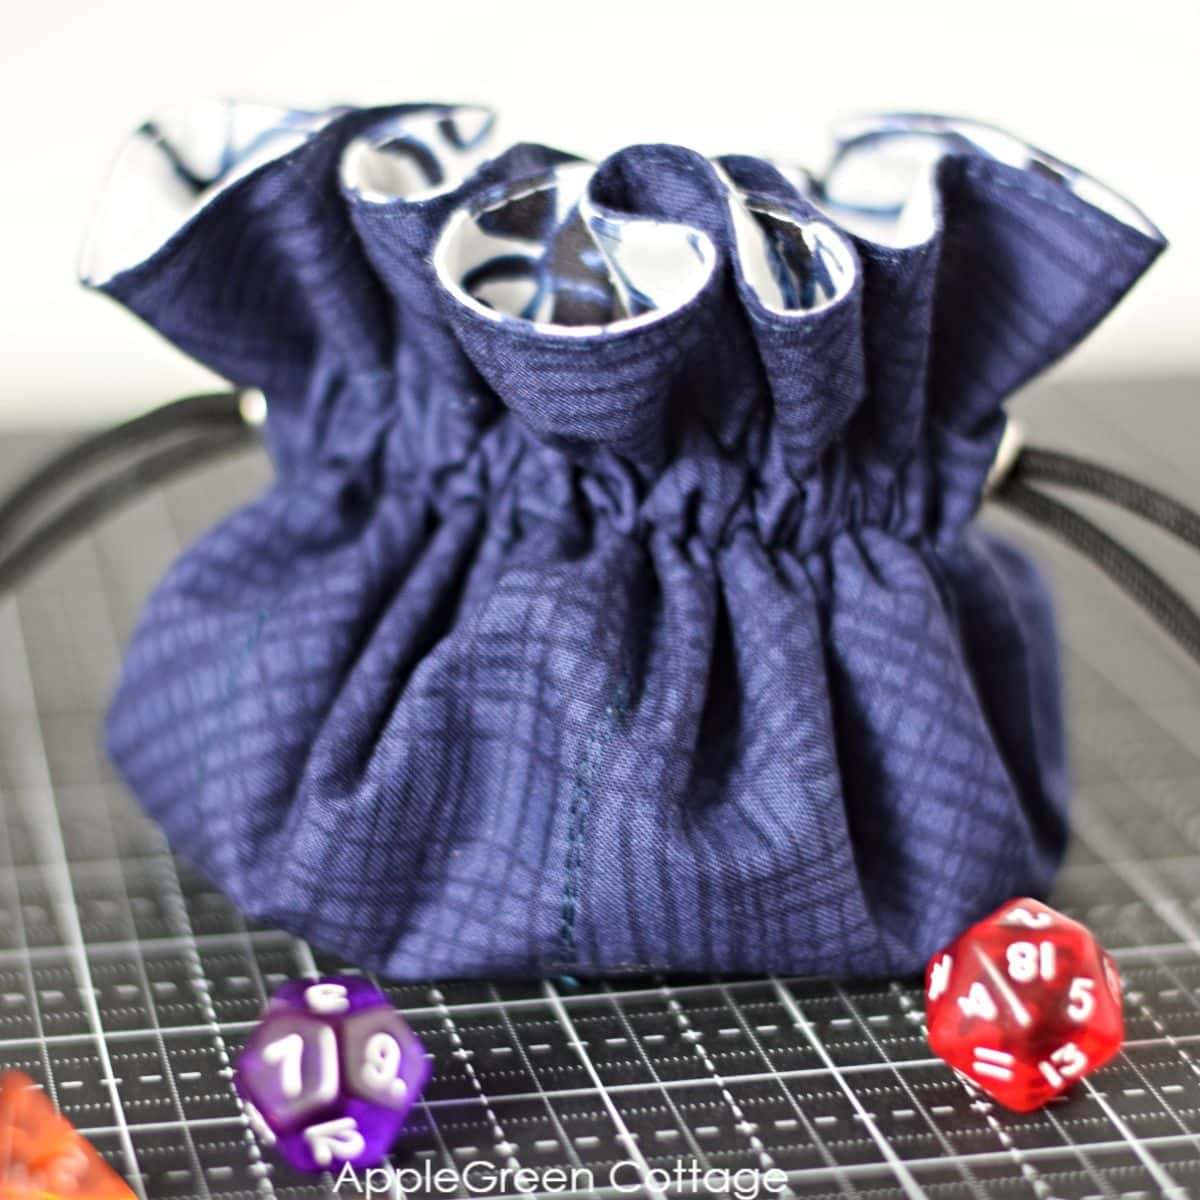
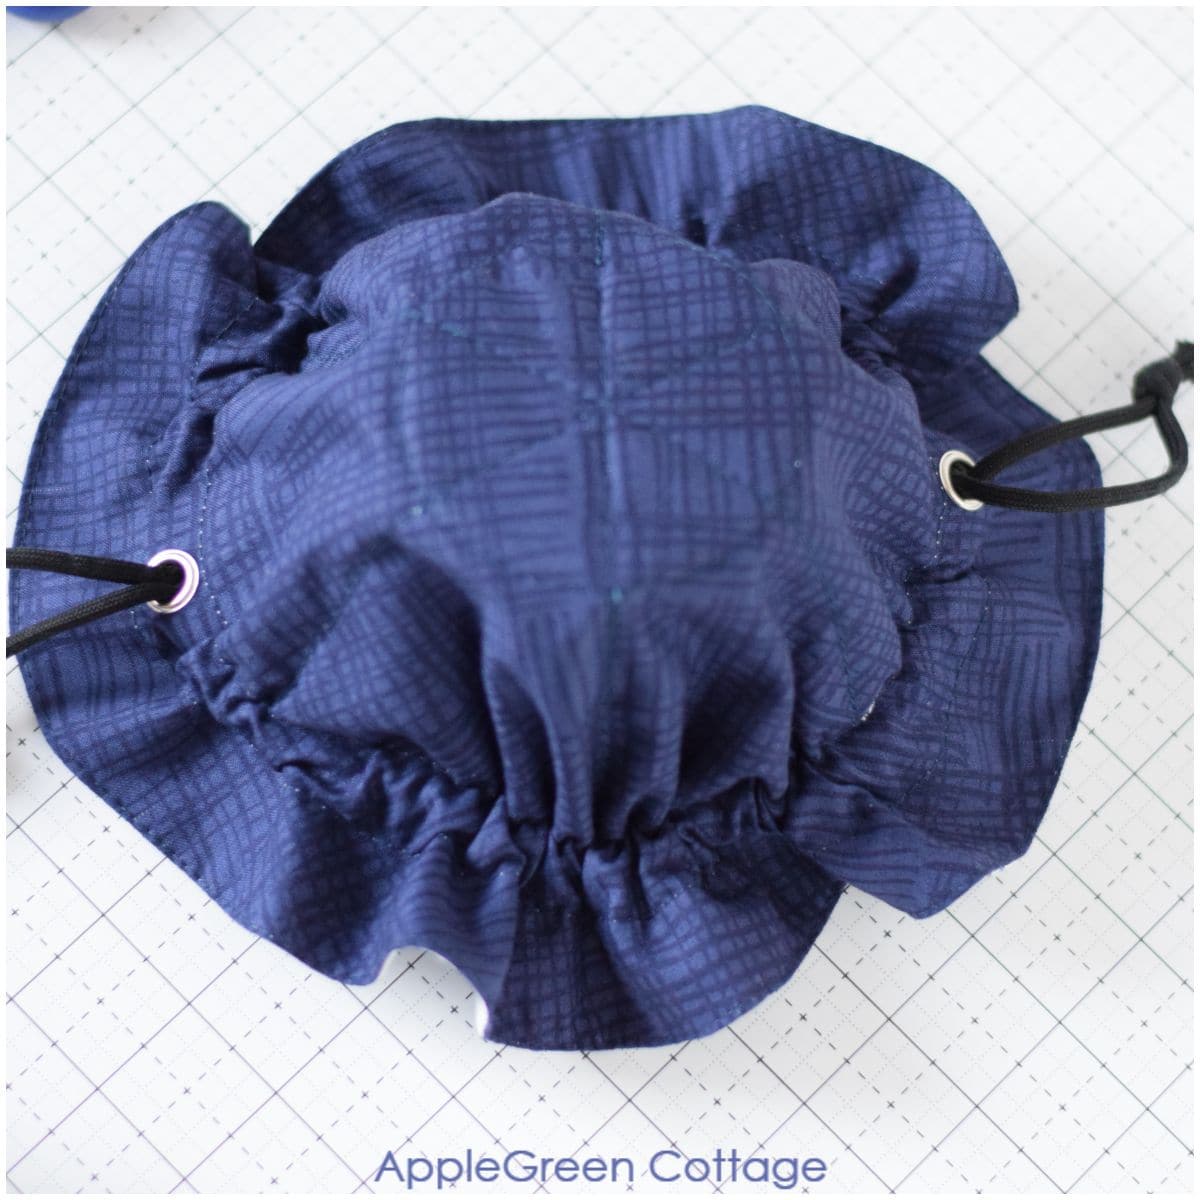
In total, this dice bag has seven pockets. These pockets, dividers, will store several sets of polyhedral dice, you can arrange them by shape or color. Or simply toss them all in, pull on the drawstring, done! Perfect for a d&d fan, for dice storage.
The center pocket can double as a dice tray during your dice game. The dice pouch pockets are held in place by a drawstring closure. This dice bag pattern will fit both the standard size dice as well as the larger metal dice. Your choice!
- it has a padded center storage area to stash larger dice, or use as a dice tray during the game,
- six (or four, or eight - you choose!) inner pockets provide convenient storage for several dice sets
- the drawstring cord cinches the top closed and prevents losing your dice
- a hack of my other pattern!
Finished Size
What I also love about this diy dice bag is the size. So handy - it's something like a 5" ball, you can safely carry it anywhere with you!
Finished size: closed 5" x 5" x 6" (13 x 13 x 15 cm), open flat: 12" (30cm)
Supplies
So how do you make dice bags with dividers? First you'll need these supplies:
- free pattern (see Step 1 below)
- two fat quarters of quilting fabric (I used prints from the Watermark collection)
- a 3" scrap piece of fusible fleece
- approximately 2 yards of drawstring or 3/14" (5mm) drawstring cord
- 2 grommets, ½" or smaller
- sewing machine or needle, pins or sewing clips,
- iron, scissors, or rotary cutter plus cutting mat (I use this one by Olfa)
Shop my personal favorite sewing supplies on Amazon HERE.
How much fabric do you need to make a dice bag with dividers
You only need two fat quarters of fabric, and 2 yards of cord. I used these colorful prints from the Watermark collection by Tammie Green, and added some matching solid blue. Super happy about how it turned out!
How To Make a Dice Bag With Dividers - STEPS
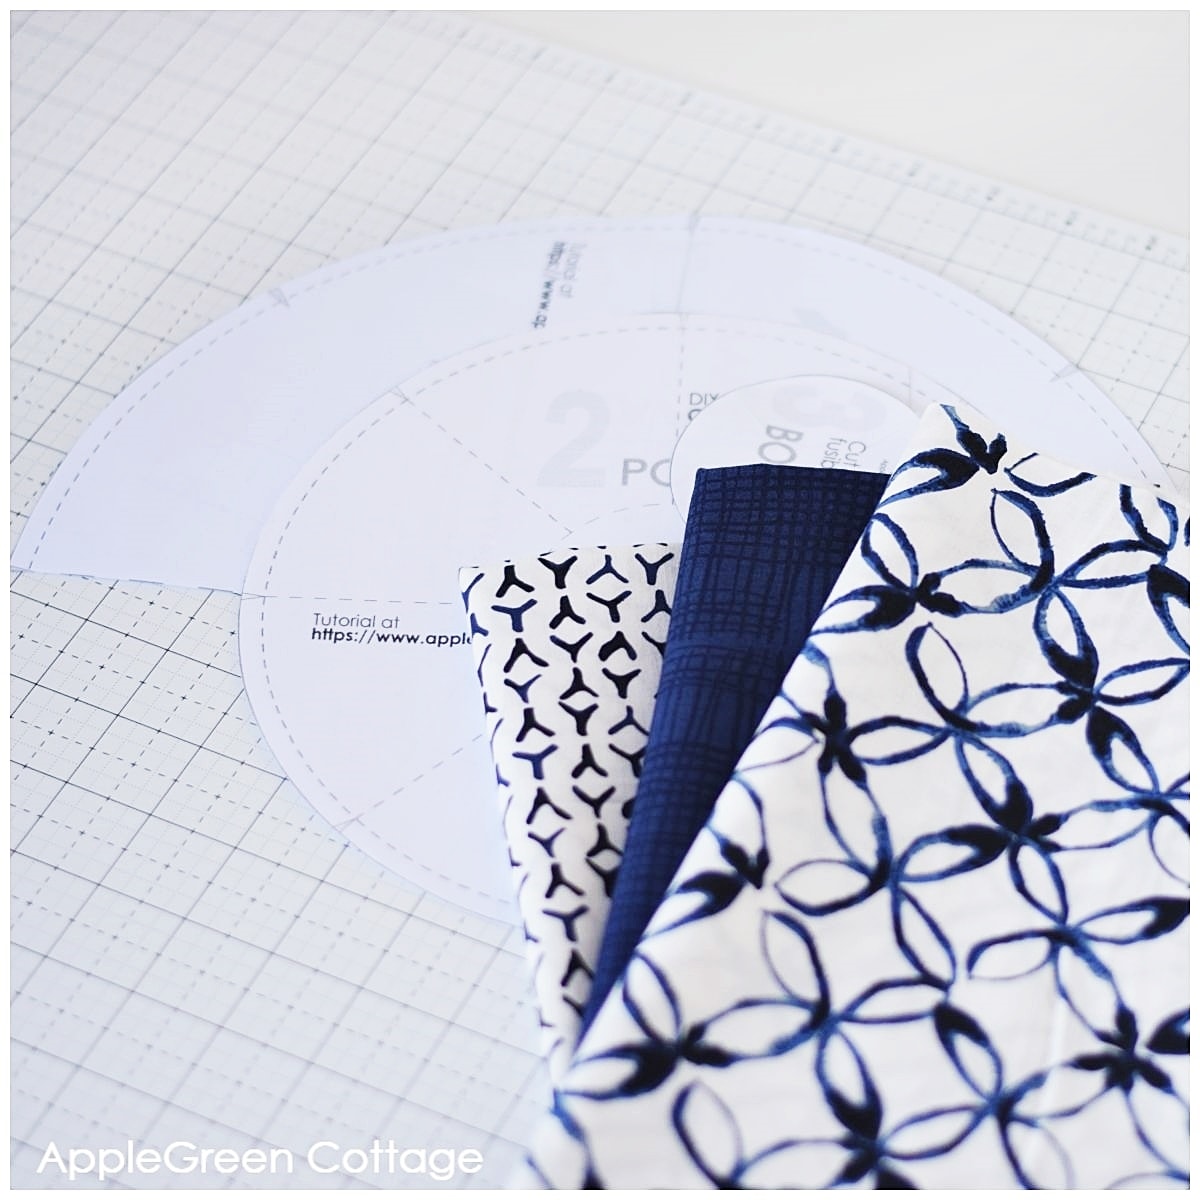
Step 1 - Print the pattern and Cut The Fabric
Get my other, 'jewelry organizer pattern' here - you'll use exactly this template, but with a bit of a different way to sew:
Do you want a printable copy of the WHOLE tutorial? → See it HERE or get it in the huge-value BUNDLE!
Print the template at no scaling (=100% size), and tape the paper pieces where necessary. Then cut out the fabric pieces:
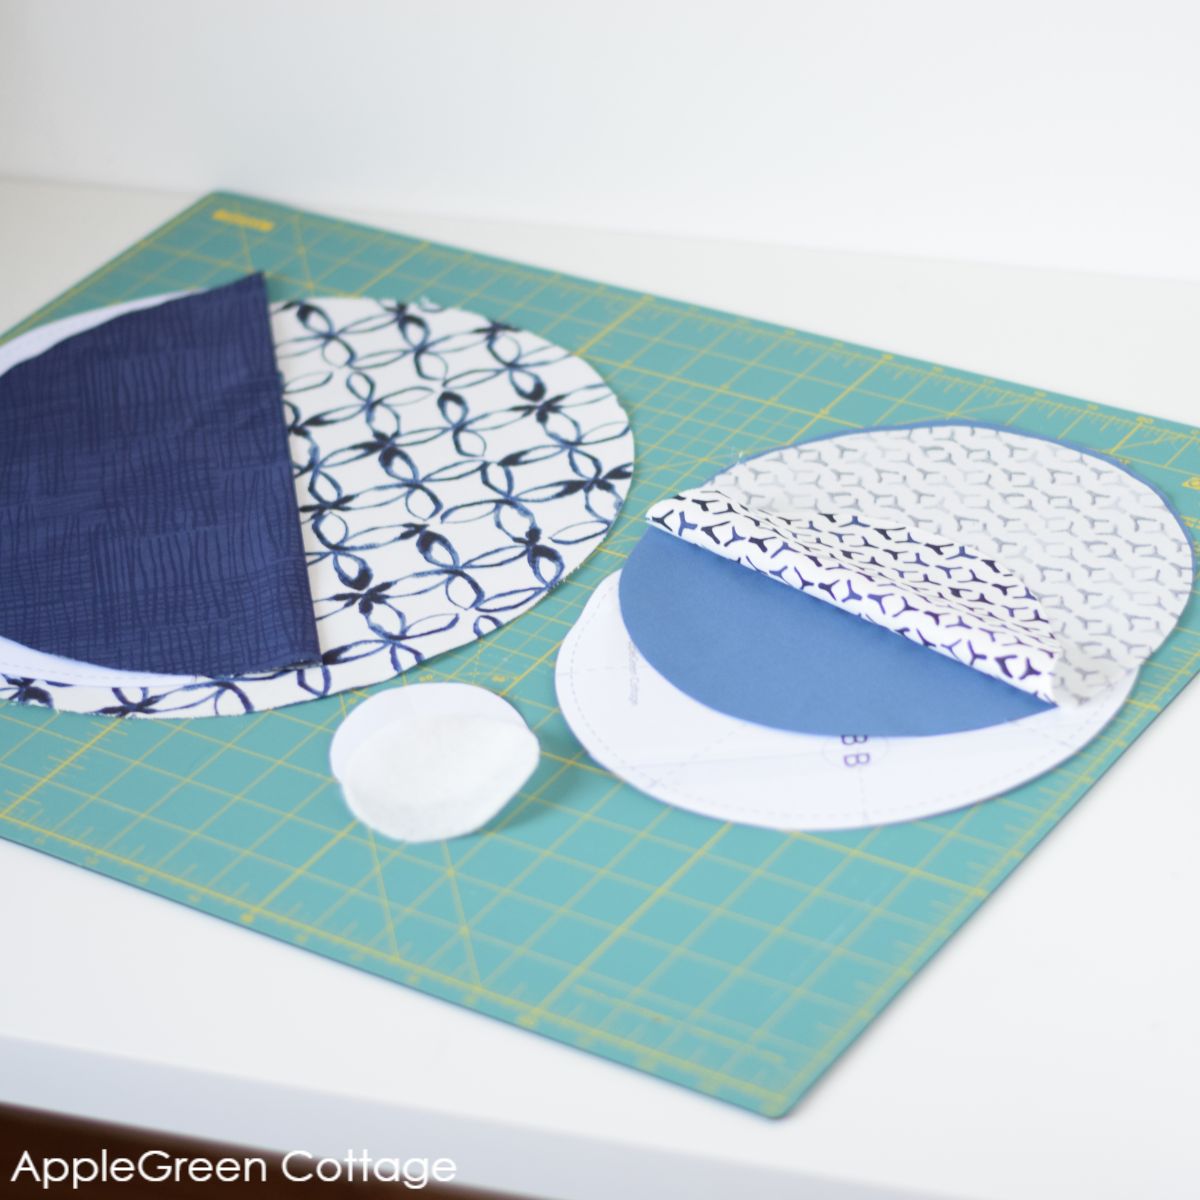
- 2 large circles (Pattern Piece #1)
- 2 smaller circles (Pattern Piece #2)
- 1 piece of fusible fleece (Pattern Piece #3)
Feel free to interface one of the larger circles if using quilting cotton. (optional)
Step 2 - Make 2 Holes
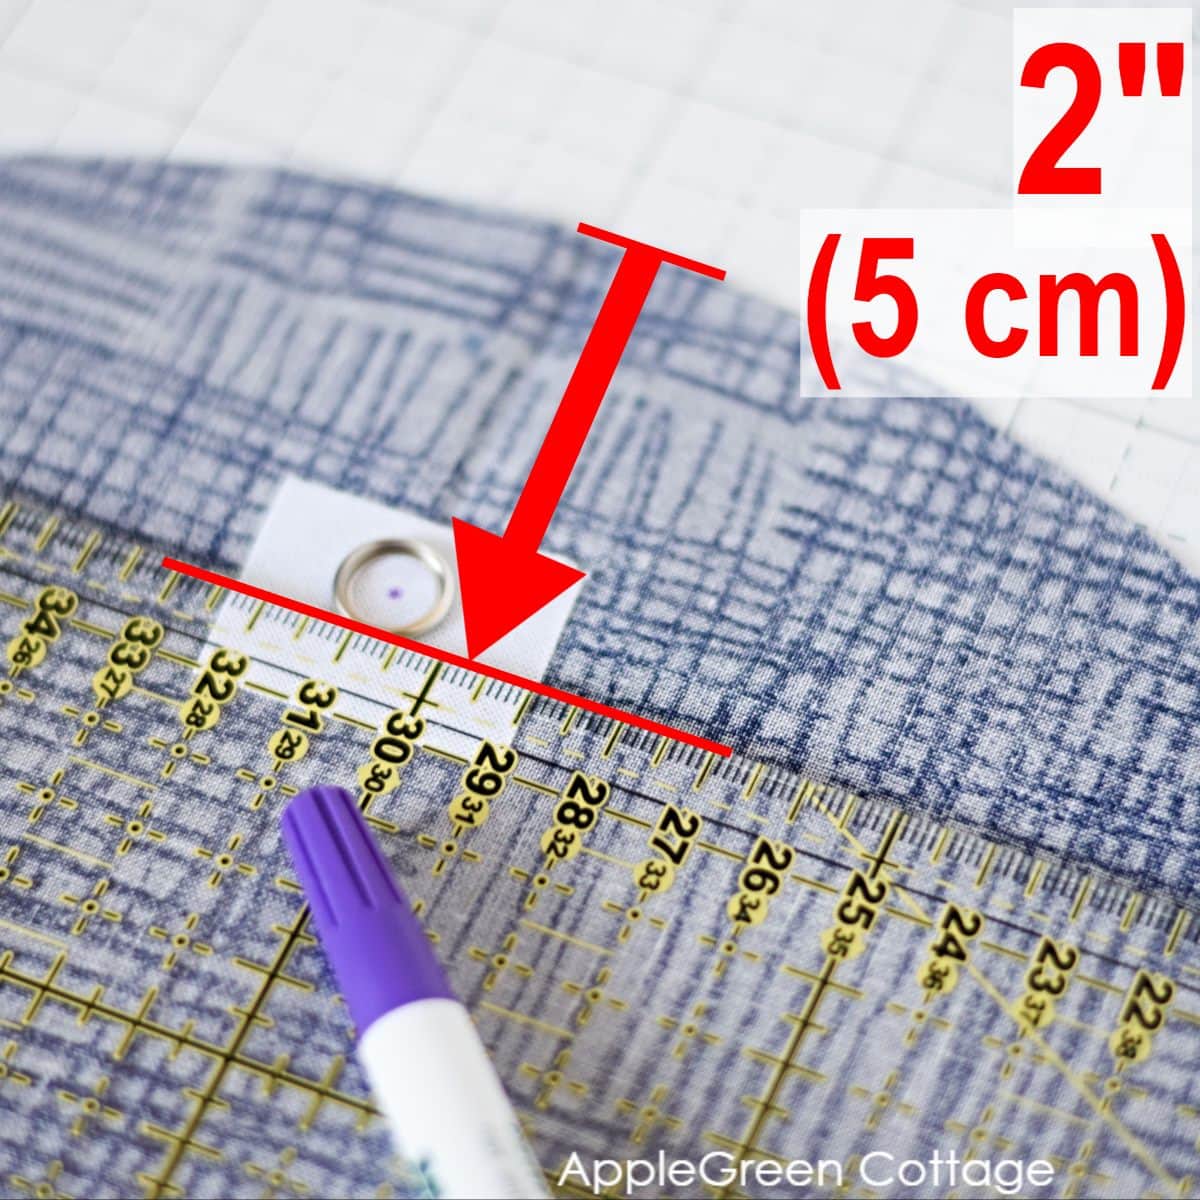
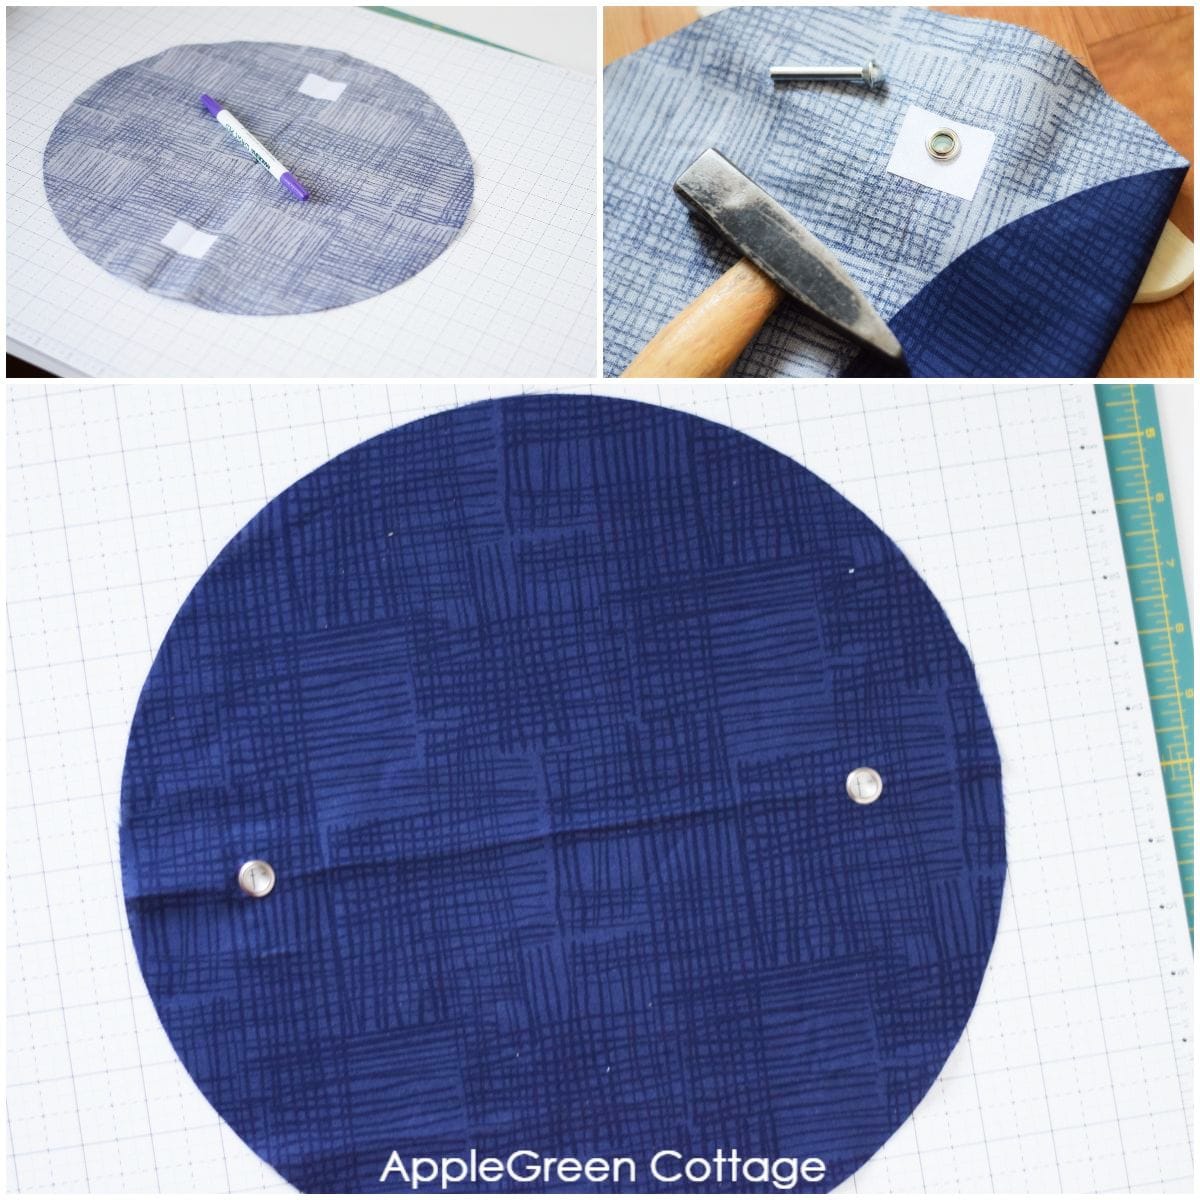
Once you've cut out the 2 large circle pieces (from pattern piece #1), grab the one that's planned to become the outer and make either
- install 2 grommets on opposite sides of the circle, each the size of half an inch, and placed between 1 ½" and 2" (3.8 and 5cm) away from the outer edge, or
- 2 buttonholes at the same two spots as noted above.
NOTE: This will allow for some leeway, so if you really need to, the grommet edge could be pushed a bit further towards the center, i.e. up to 2 ¼" away from the outer raw edge of the circle. But I prefer it 2".
If buttonholes are new to you, here's how to make buttonholes. I added grommets to my dice bag - here's how to add grommets the easy way.
Please note:
- before starting, fuse a 1" square piece of strong interfacing on the back side of the fabric where a grommet or an eyelet will be installed
- grommet's or eyelet's outer diameter must not be larger than ½", or it might NOT fit into the channel.
- Caution when sewing: make sure the needle never runs into the grommet/eyelet, or it will break!
One grommet will end up on one, and the other grommet on the opposite side of the bag.
Step 3 - Sew the large piece
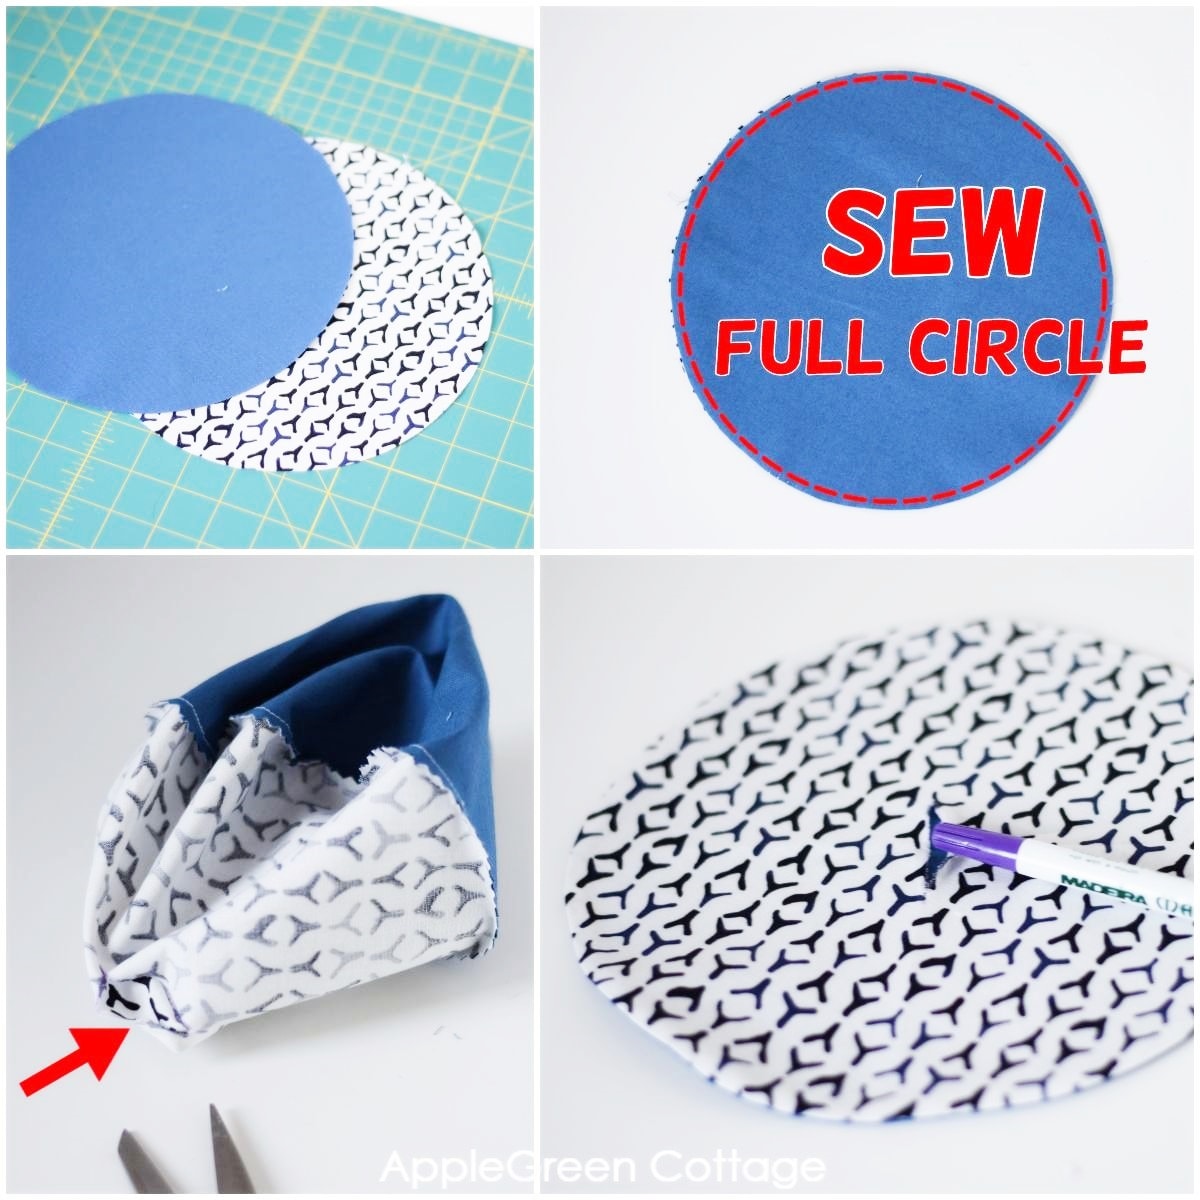
We're still with pattern piece #1 - Now it's time to stitch the two large circles together: Place the two large circle pieces RST and stitch around using a ¼" (7mm) seam allowance all the way around. No, you don't need to leave a gap for turning.

Use pinking shears to trim the edges or make small notches all around the circle for easier turning. (I really, really love using pinking shears here, it goes so much faster!)
Step 4 - Turn The Large Piece Right side out
Time to turn the piece. Here comes a convenient hack: we'll make a 2" slit into the inner layer - the one that will become the inside of the dice bag.
DOUBLE-CHECK: Make sure to cut into the piece that has no grommets (or buttonholes) installed. See the photo:
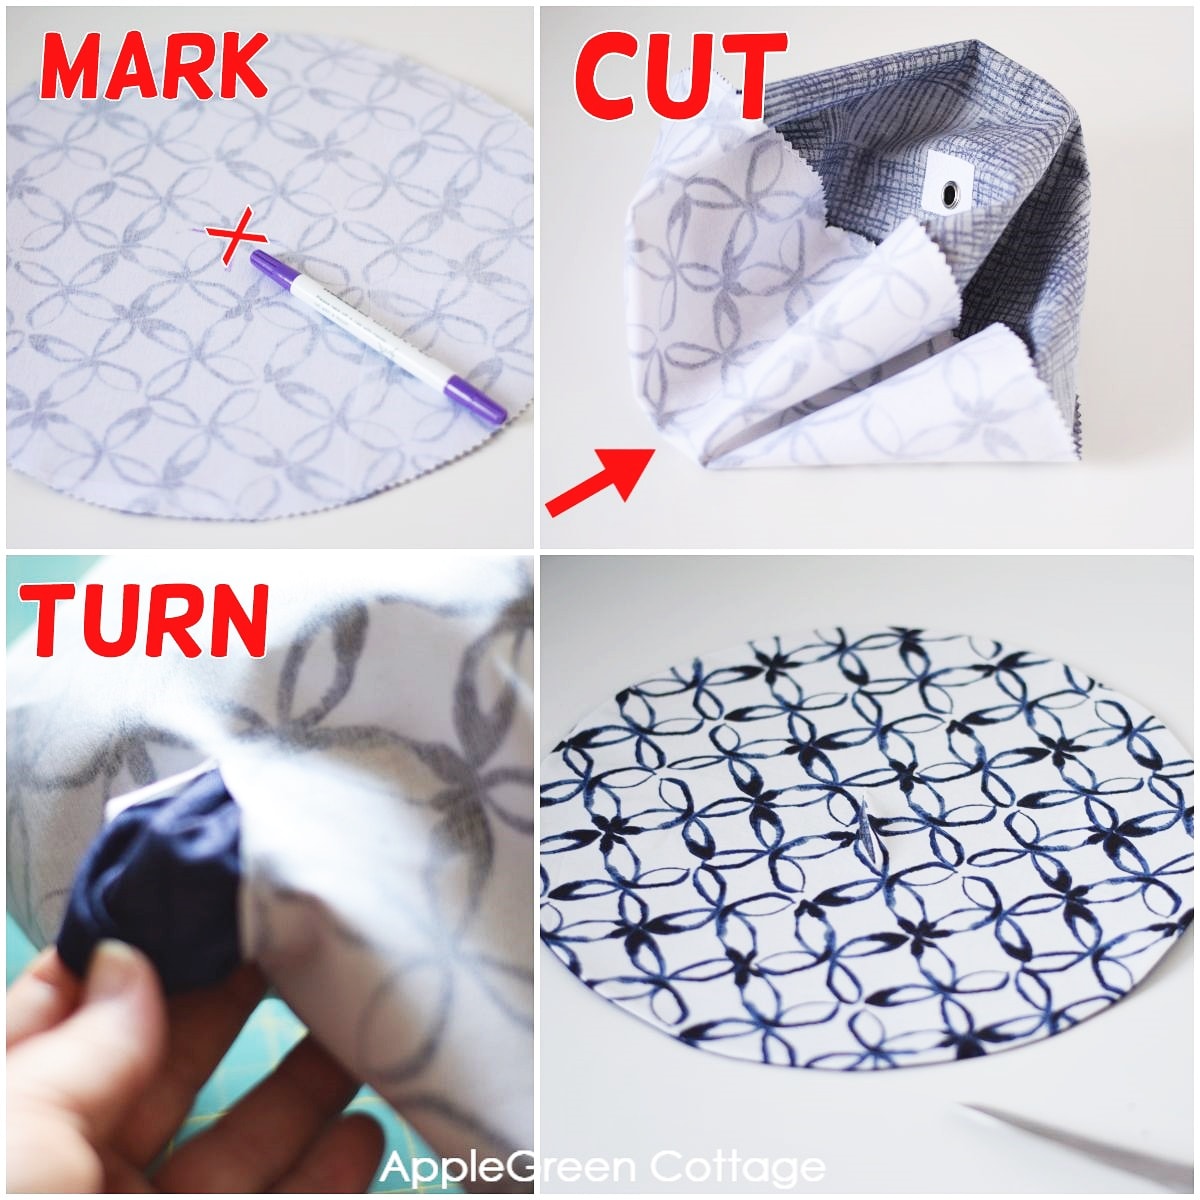
This simply means you'll mark the center, cut (the slit needs to be smaller than 3", and centered on the inner layer). Once cut, pull the fabric through the opening and press. You should get a nice circle.
Don't worry about the turning hole, it will be covered by the other piece we'll finish next, using the same technique.
Step 5 - Edgestitch around
Once turned right-side-out, press and then edgestitch all the way around.
Step 6 - Make Pockets
Start working on pattern piece #2, one that will turn into the dice bag dividers. You'll finish it the same way as pattern piece #1. But first, decide on which of the two pieces will be visible on top - mine was the solid blue piece (no cutting into this one!)
- place the two pieces RST and stitch around using a ¼" (7mm) seam allowance - all the way around.
- mark the center of the layer that will not be facing the top (i.e. will not be visible once sewn)
- pinch the layers to split them and cut a small slit into the layer that won't be facing the top
- turn through the slit and press
- edgestitch if you like.
Step 7 - Bring the two pieces together
In this step, we'll hide the unsightly cuts in the centers of our two circles. Let me show you what you've got now: pieces #1, #2, and 3# (fusible fleece).
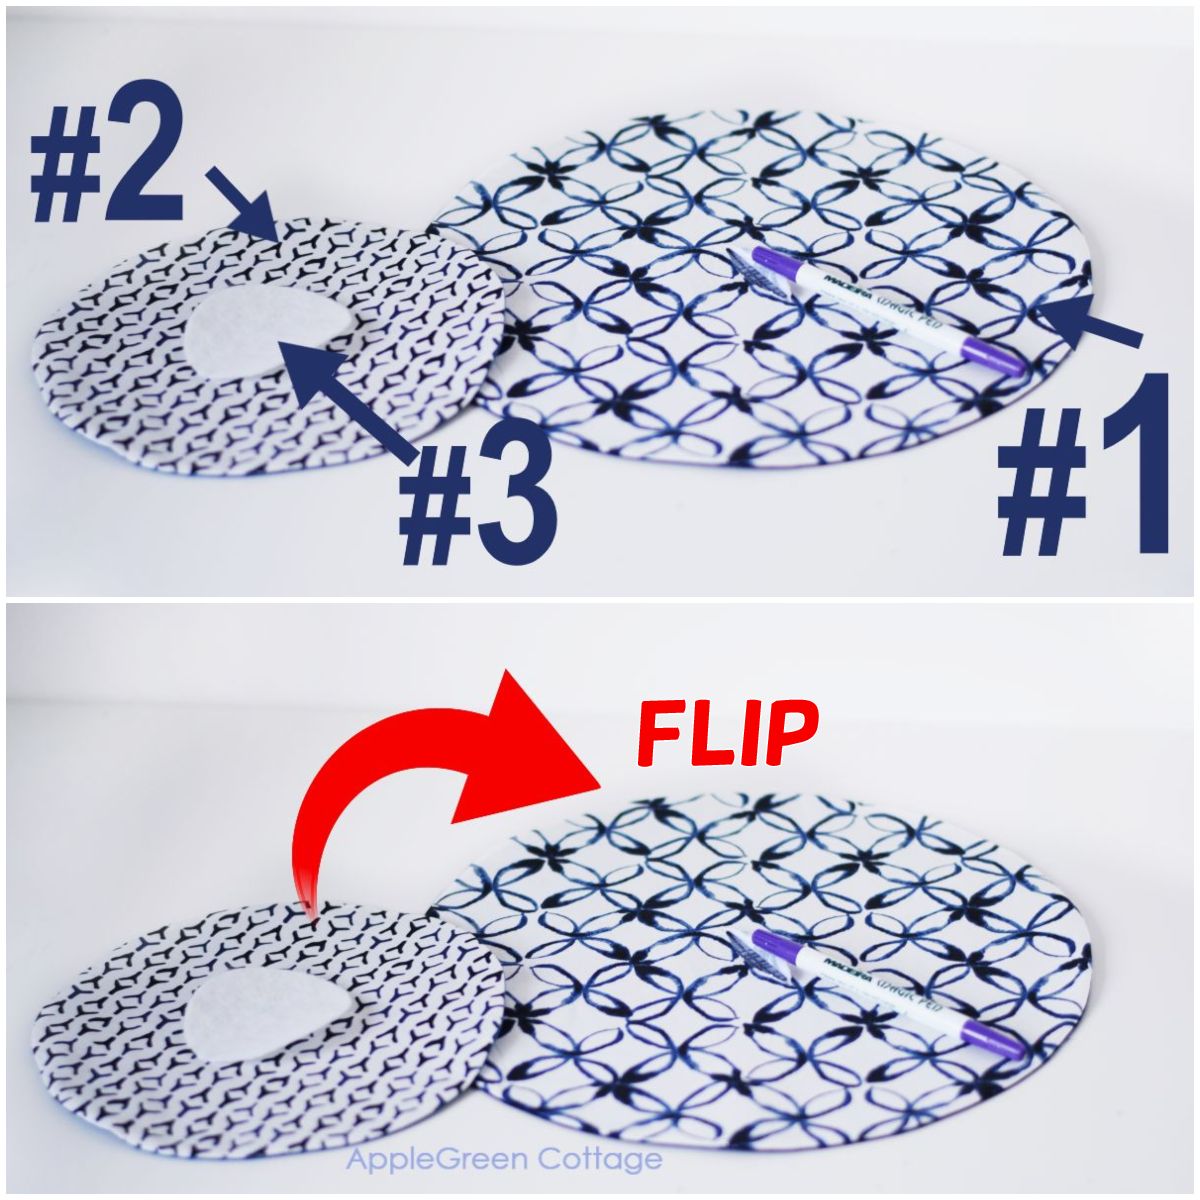
First, fuse the small 3-inch circle of fusible fleece (#3) to the #2 piece - right over the turning hole of the small circle!
Flip the smaller fabric circle onto the larger one so that the turning holes will be facing each other (well, the fusible fleece piece will be the only layer between them). This step will make the holes invisible. Center the circles.
TIP: I added a bit of double-sided tape to the center to hold in place.
Step 8 - Trace And Sew Slip Pockets
Use pattern pieces #3 and #2 to trace the central 3" circle and the dividers onto the sewn pocket piece (#2). Depending on how many pockets you want to make, I recommend choosing one of these three options:
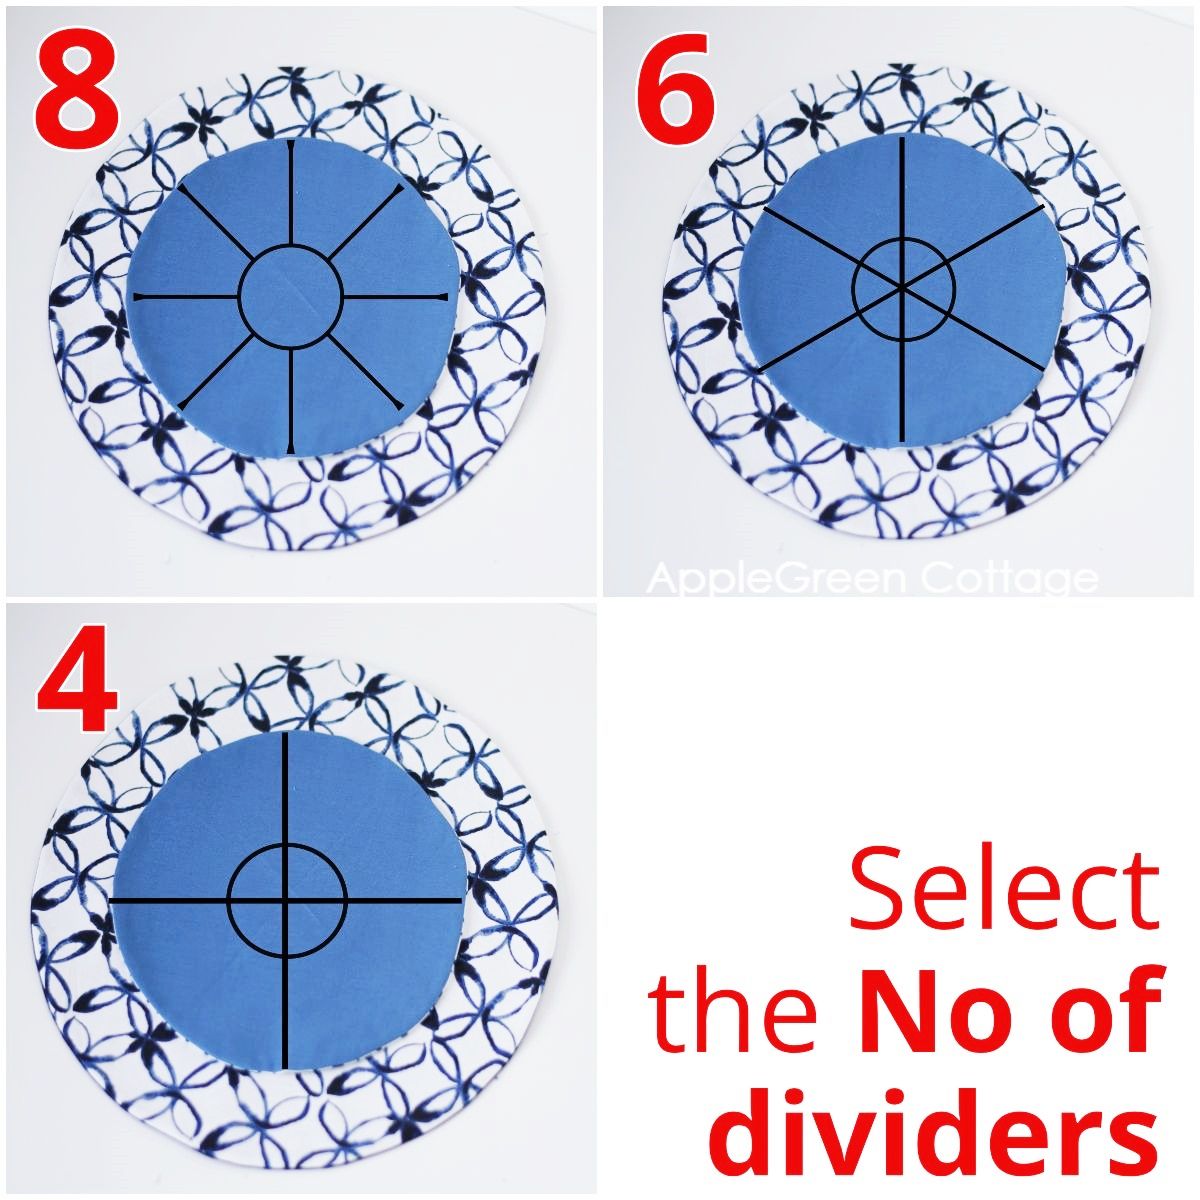
I chose to have 6 dividers (these are the only ones NOT marked on the PDF template!), so I drew three lines across the inner circle, all intersecting in the middle, at 60 degrees.
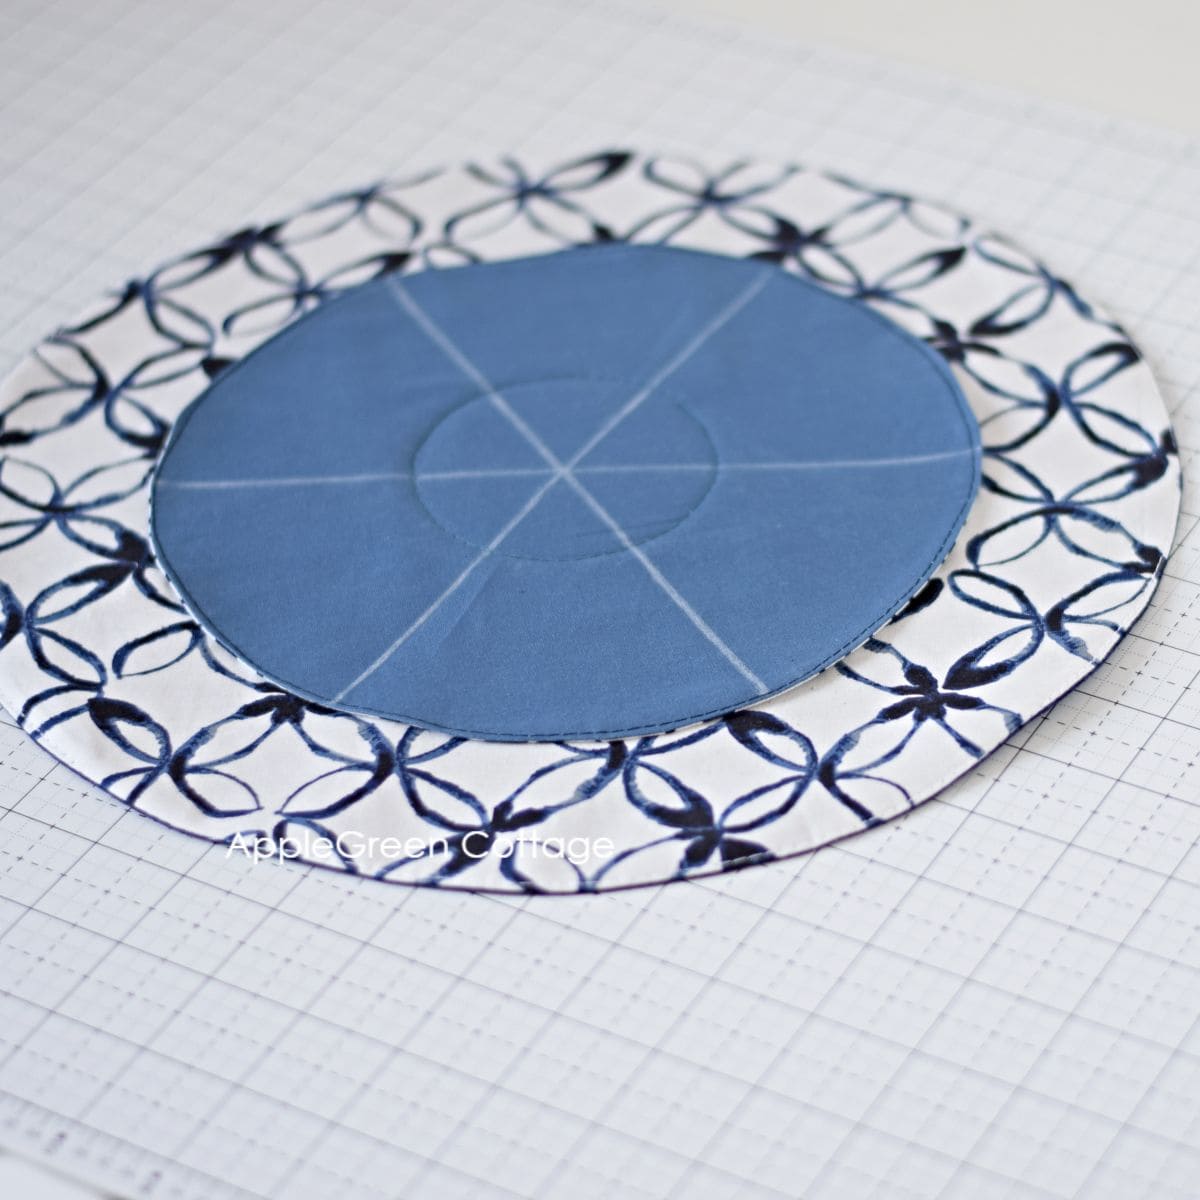
Topstitch through ALL the layers - both the small center circle and all straight pocket dividers, as seen in the next photo.
Step 9 - Make A Casing For the Cording
Remember the two grommets you installed (or buttonholes you made) when starting the project? These are on the outer side of the large circle. Now, we'll make the casing - two circular seams that will align with the grommets - see the two red circles in the below photo.
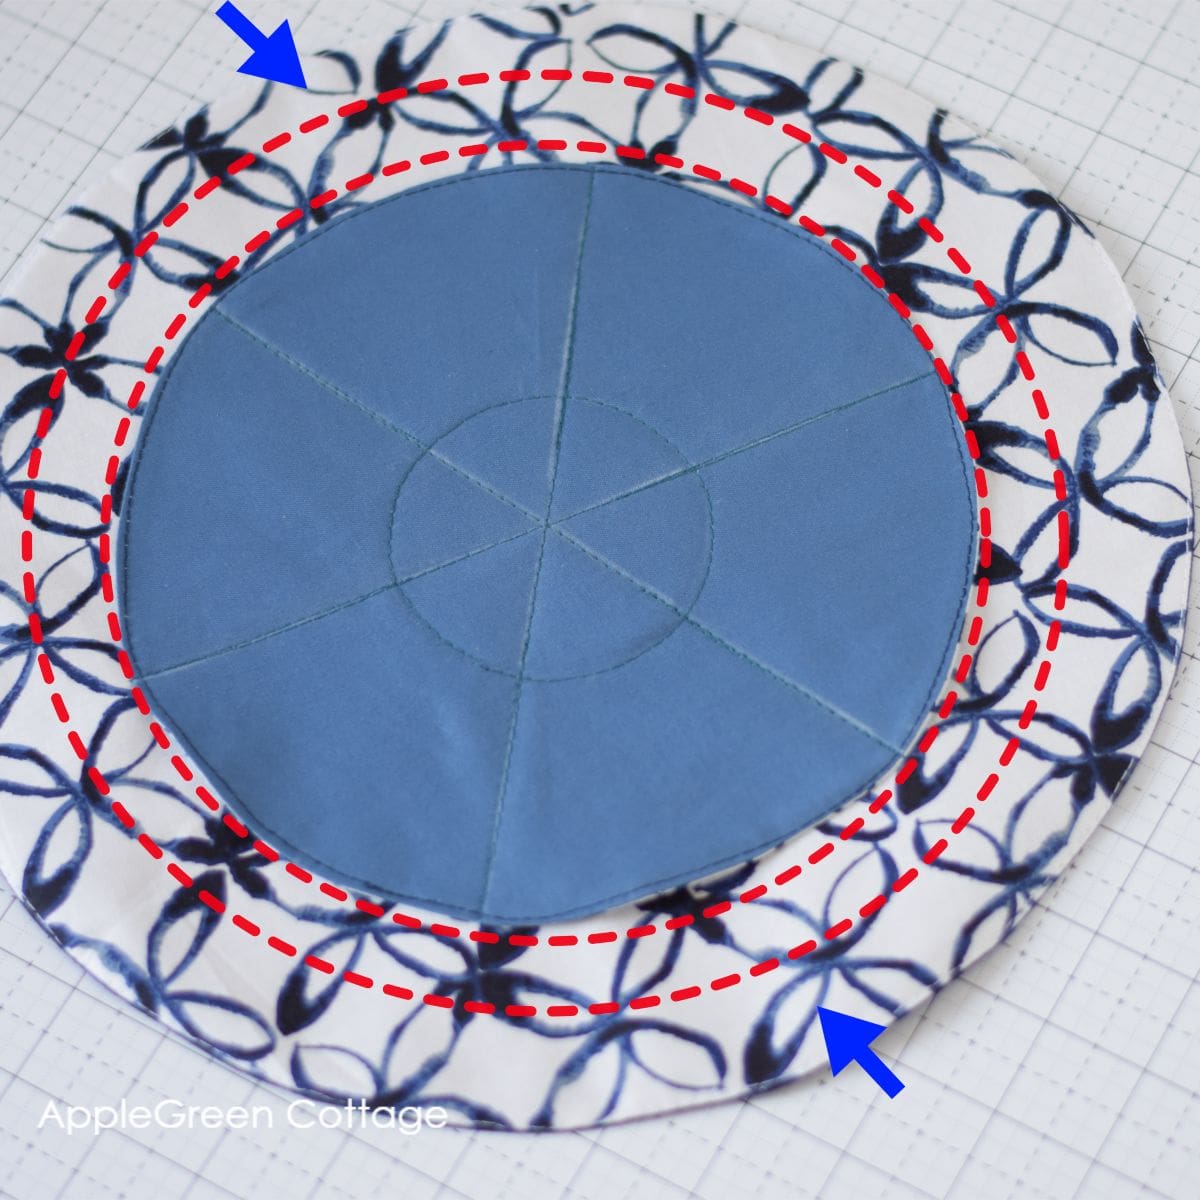
- The grommets will end up between the two seams.
- The INNER LINE of stitching will be close to the edge of the smaller circle - just make sure not to stitch over it, or over the grommet.
- The OUTER LINE of stitching should be at LEAST ½" (1.3cm) away from the inner line.
IMPORTANT: the two seams should be at least ½" (1.3cm) apart:
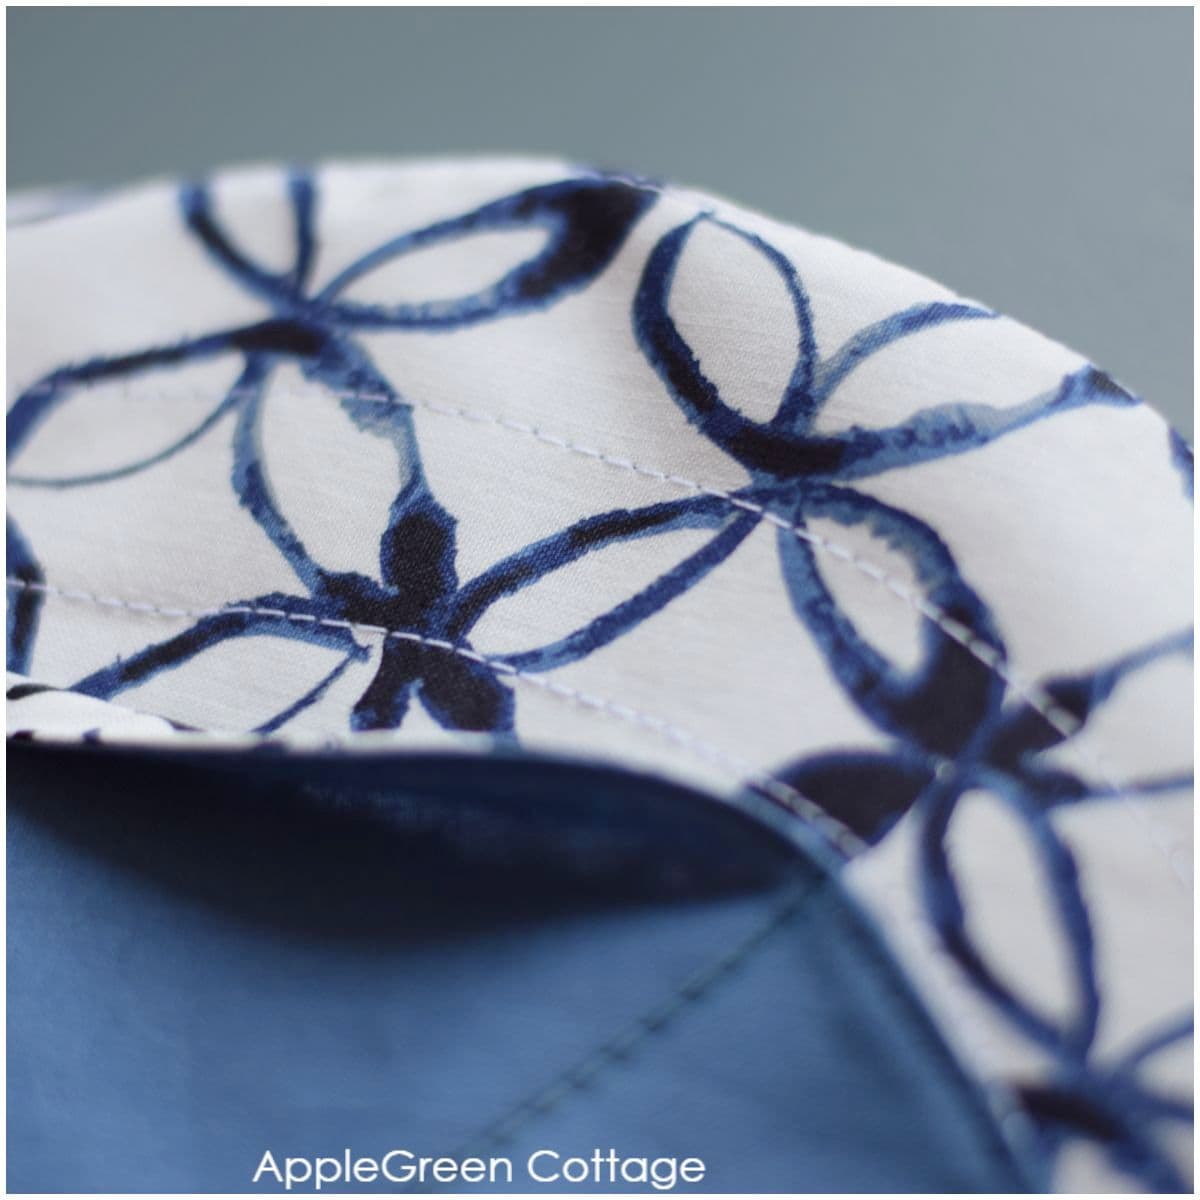
The two stitching lines will 'encase' the grommets, and the drawstring casing is finalized.
Step 10 - Optionally, stabilize the dice bag dividers
I found it so cute to connect the dividers - and this makes the dice pockets somehow stand-uppy. It's not an obligatory step though, and you can skip it. I stitched the pockets together at 6 sports. I simply pinched two neighboring pockets using my thumb and my index finger, and stitched the ¾" together, like this:
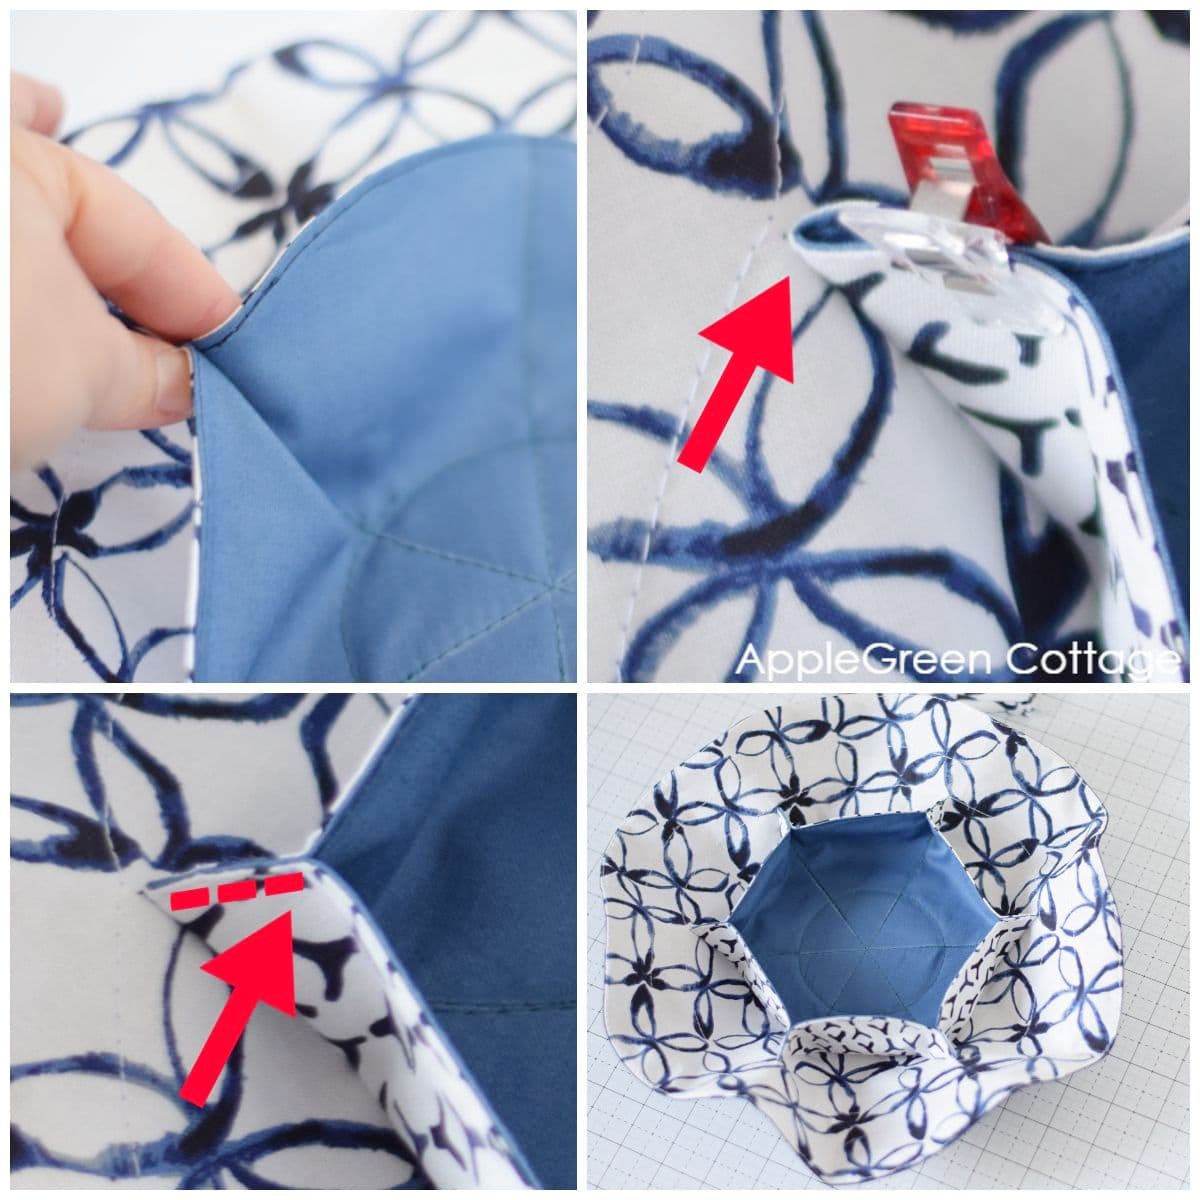
I'll show you another photo:

Step 11 - Insert the cording into your new diy dice bag
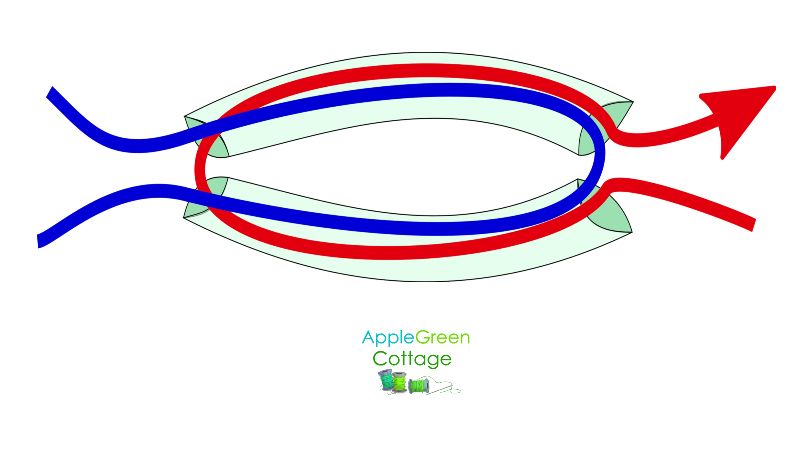
Now we'll need to insert the two 36" (90 cm) cords into the casing. Here's how:
- Attach your first cord to a safety pin and guide it through one grommet opening all the way around. Yep, you've read that right, both cord tails will peek out from the SAME grommet.
- Guide the other cord through the other grommet, all the way around. See below:
Bonus TIP: Did you know you can make your own drawstring cords? Here's how: how to make drawstring cording.
Step 12 - Tie Off the Drawstrings
Last step: tie off a knot on each end of the drawstring. You've finished your diy dice bag with dividers!
Oh, and guess who came to the room just when I unpacked the new dice set to photograph with this lovely diy dice pouch! I guess my son will be keeping both the pouch and the dice set. Oh well, I can always sew a new one, maybe in florals?
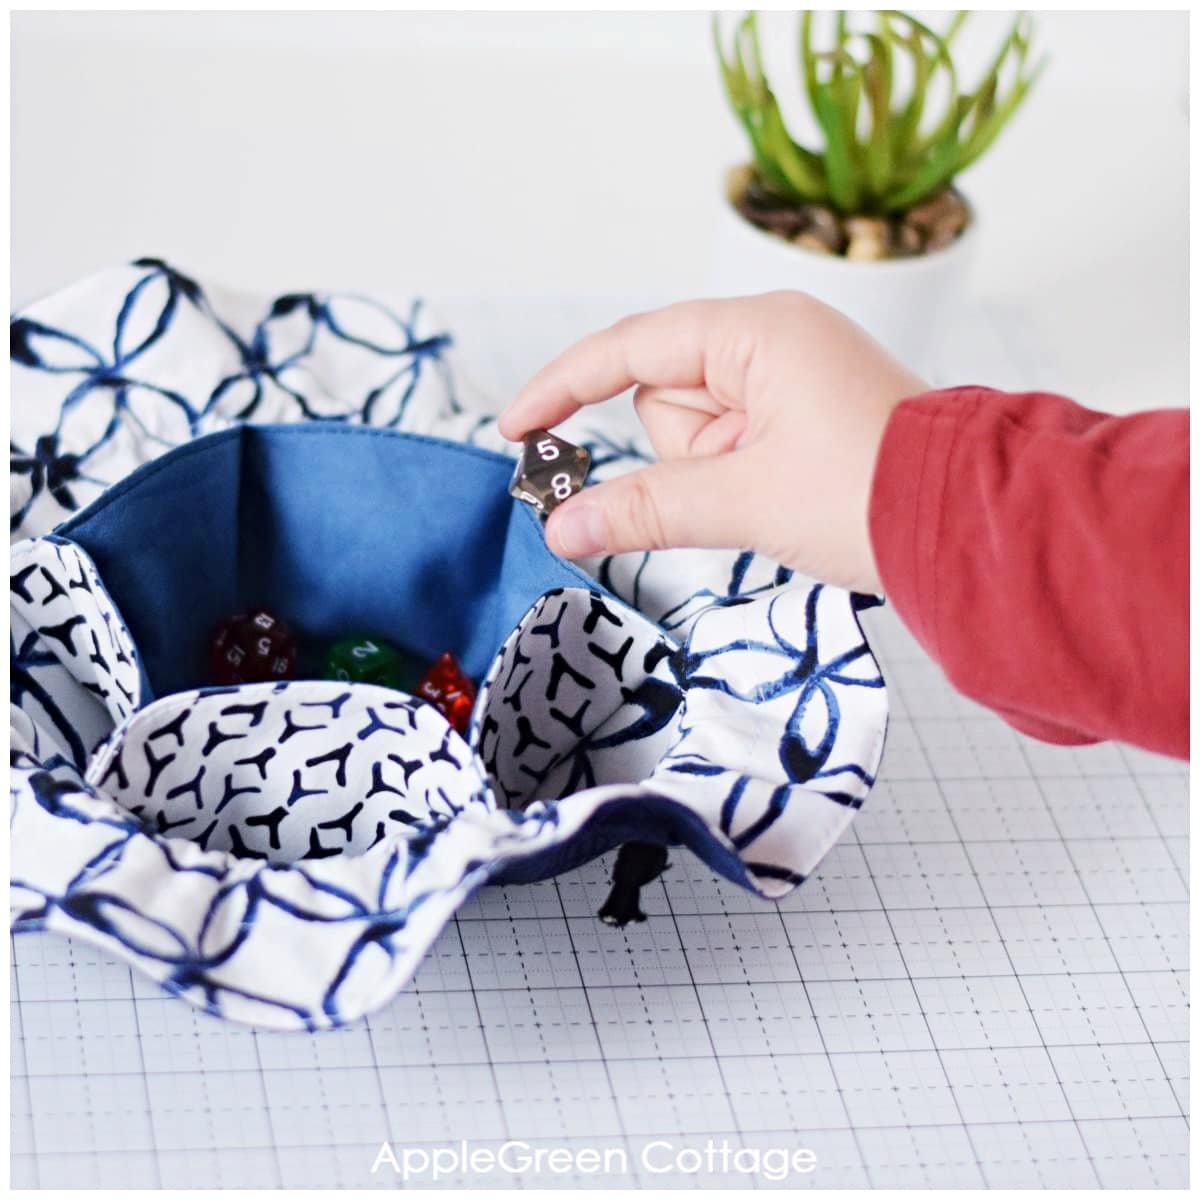
How To use a dice bag with dividers?
This dice bag pattern features seven pockets that can hold several 7-piece sets of dice or your favorite miniatures. The center of the bag is perfect for holding extra items you may need at the gaming table, or additional sets of dice. The drawstring design lets you easily close the bag.
This cool diy dice bag with dividers will make storing all your dice a breeze - never losing any of your precious dice again. But when you sew one, make sure to cut the pieces for your own too, as it's perfect for carrying cosmetics too. Tried-and-tested!
Want a Printable Copy of the Whole Tutorial?
Prefer an ad-free printer-friendly option of the whole tutorial+pattern? See the → optional PDF file in our shop.

This tutorial is also part of Printable Tutorials BUNDLE
100 PDF tutorials now, and growing!


Rebecca C says
Made this about 2 years ago. Put a layer of lightweight interfacing on the entire small circle to make the pockets a little sturdier. To secure the pockets together, I simply backstitched over the entire inch rather than just at the beginning and end. Once my son’s friends saw these, I started getting text messages about whether I would make more! They work great!!
Marion says
Hello ! Do you think this would work with a less flexible outside fabric ? I'd like to use fake leather for this 🙂
Damjana Jakos says
Marion, unless it's a super soft, apparel faux leather, this design does not allow for any rigid materials. I hope this helps,
Elizabeth says
This is a great tutorial! Just wondering if you hand stitched or machine stitched the reinforced line in the pockets? I want to make some but I have no idea how you would go about machine stitching that
Damjana says
Elizabeth, I machine-stitch these pockets. When I want the line to be reinforced, I'd make a stitch and then turn and sew just a millimeter away to form another stitching line - as these are so closely together, they appear as one single, but reinforced line. Alternatively, you cqn use a tripple stitch on your sewing machine, that one is neat and strong, too. I hope this helps,
Damjana
Stephany Lein says
Will the dice get mixed up with other dice if you don't attach the inner pockets to the outer bag?
Damjana says
Yes, I think so.