
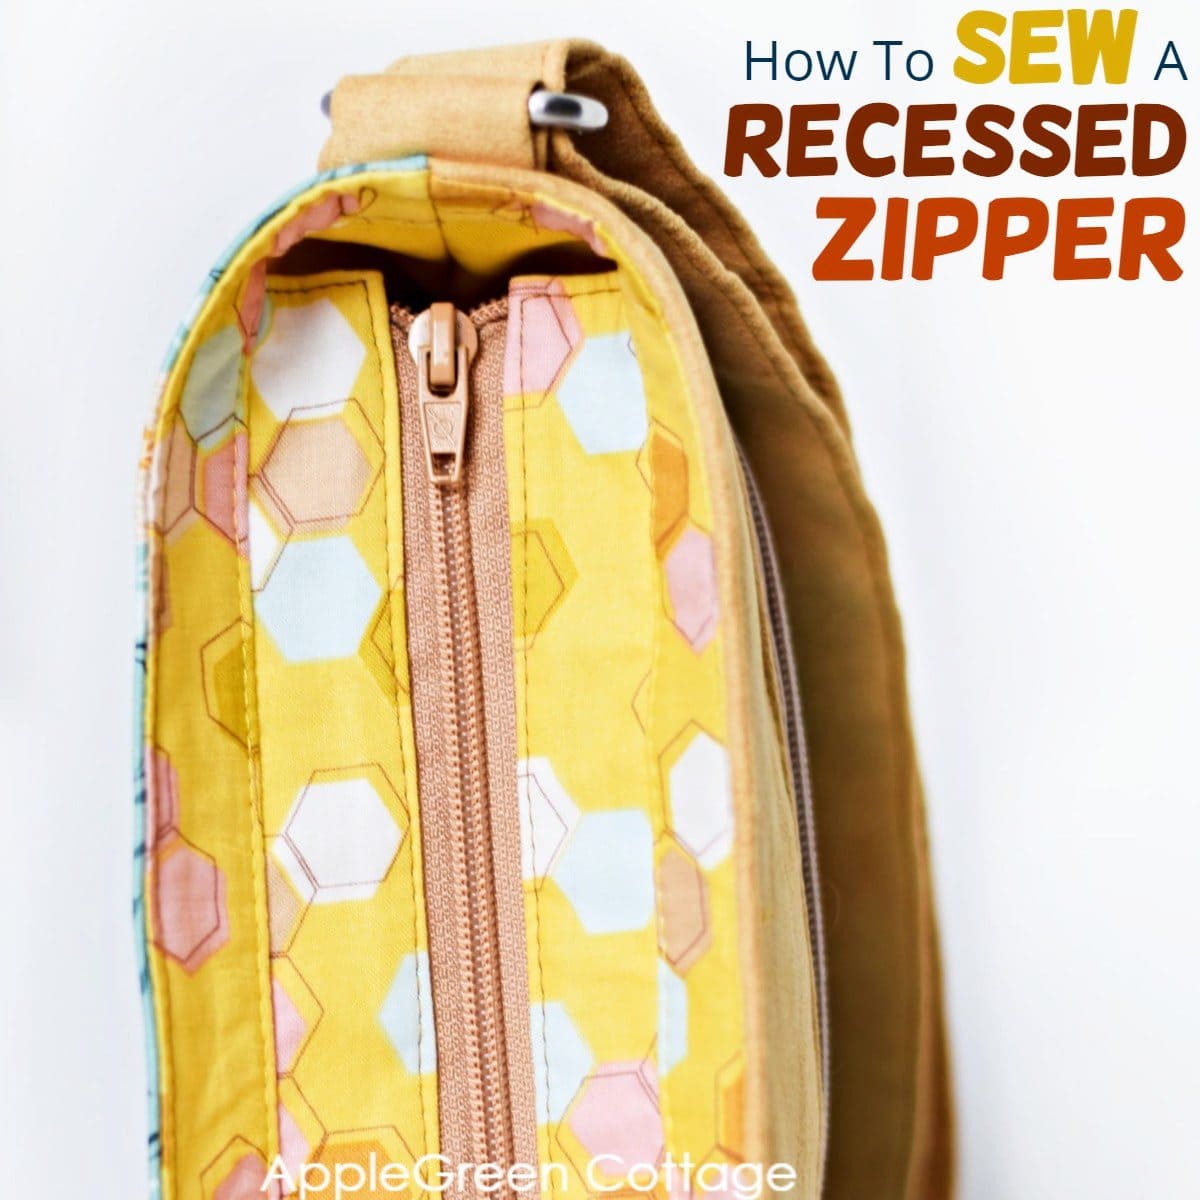
Are you looking for the best top closure for a bag? See how to sew a recessed zipper in a tote bag. It's easy to sew and convenient to use. This tutorial will enable you to put a recessed zipper panel in any bag you wish!
It's beginner-friendly but gives a bag a professional look. It adds more space to a bag (never a pinched top!) and, bags with this closure sell well!
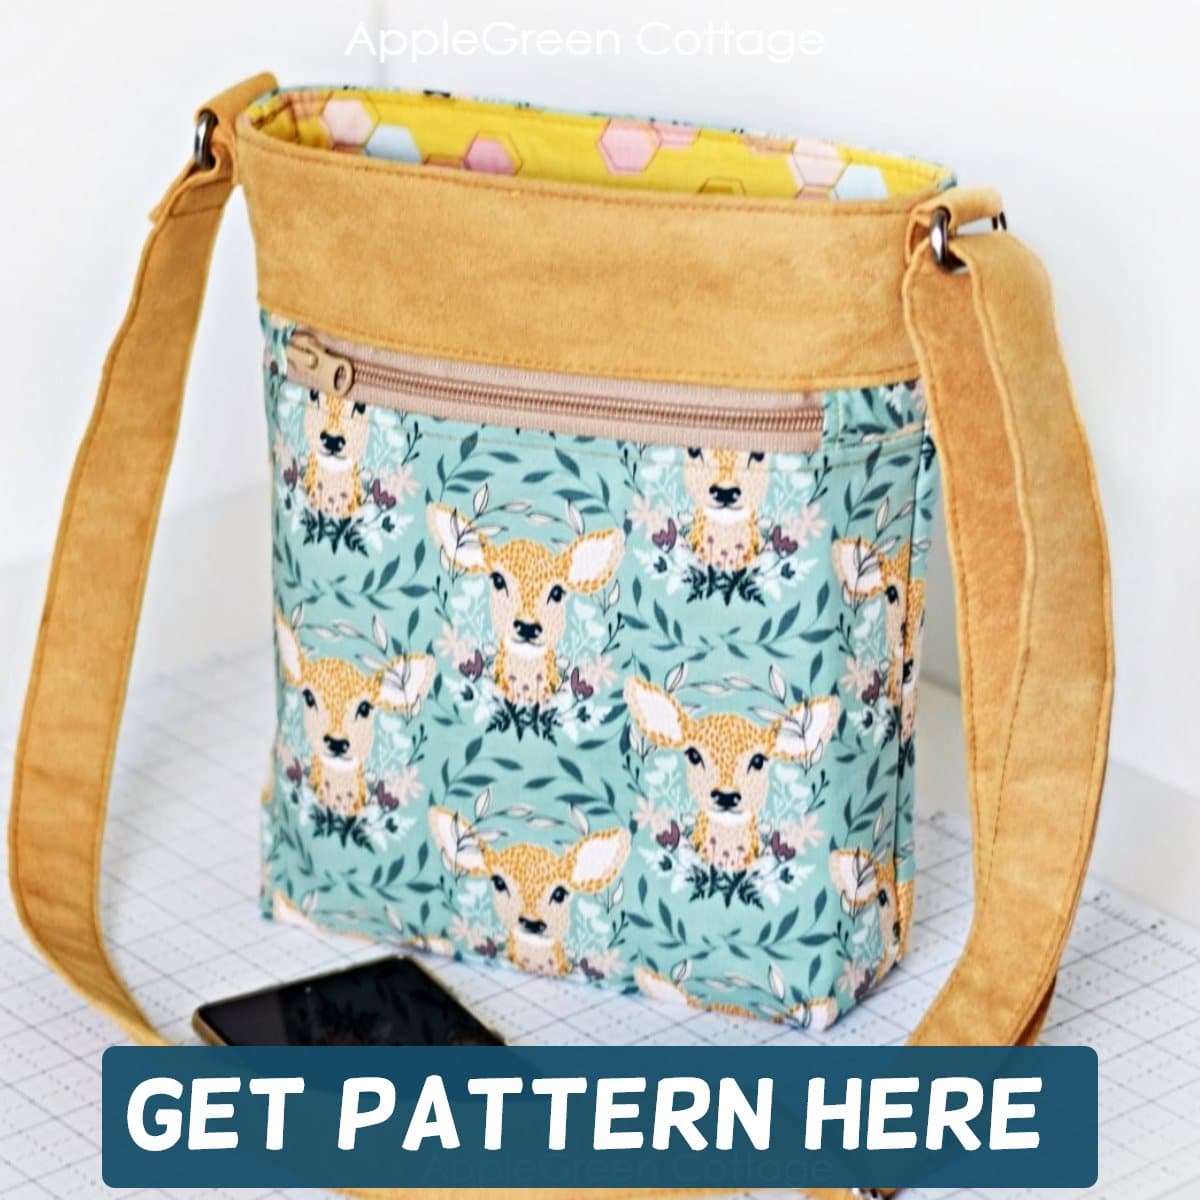
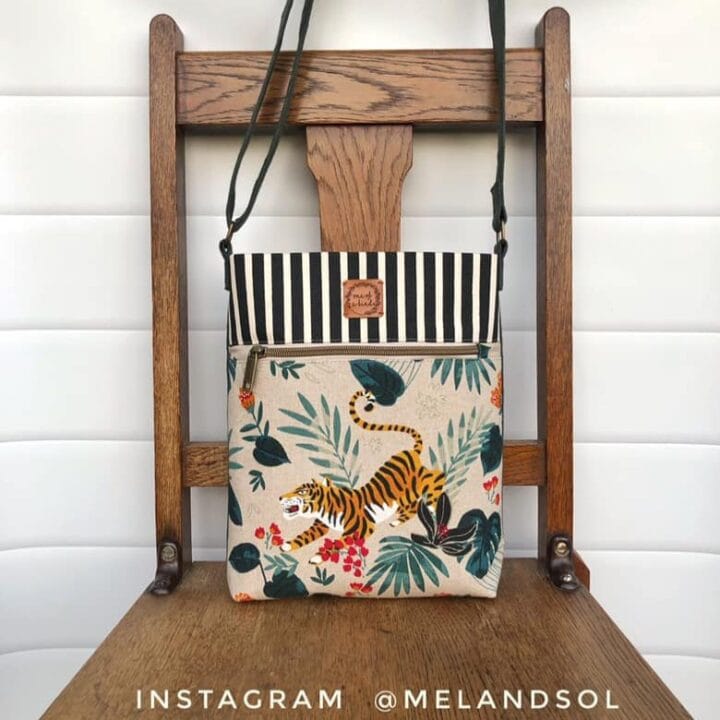
I made this tutorial to complement my Teya crossbody bag pattern - one of my older popular bag patterns that I've updated. Even better now!
Want a printer-friendly option of the ZIPPER PANEL tutorial without ads? See the → optional PDF file in our shop.

This tutorial is also part of Printable Tutorials BUNDLE
90+ PDF tutorials now, and growing!
And there are more zipper sewing tutorials here, check them out:
- how to put a zipper pocket in a purse lining - welt zipper pocket!
- simple zipper sewing tutorial
- MASTER Zipper Sewing Guide
Sewing a Recessed Zipper Panel
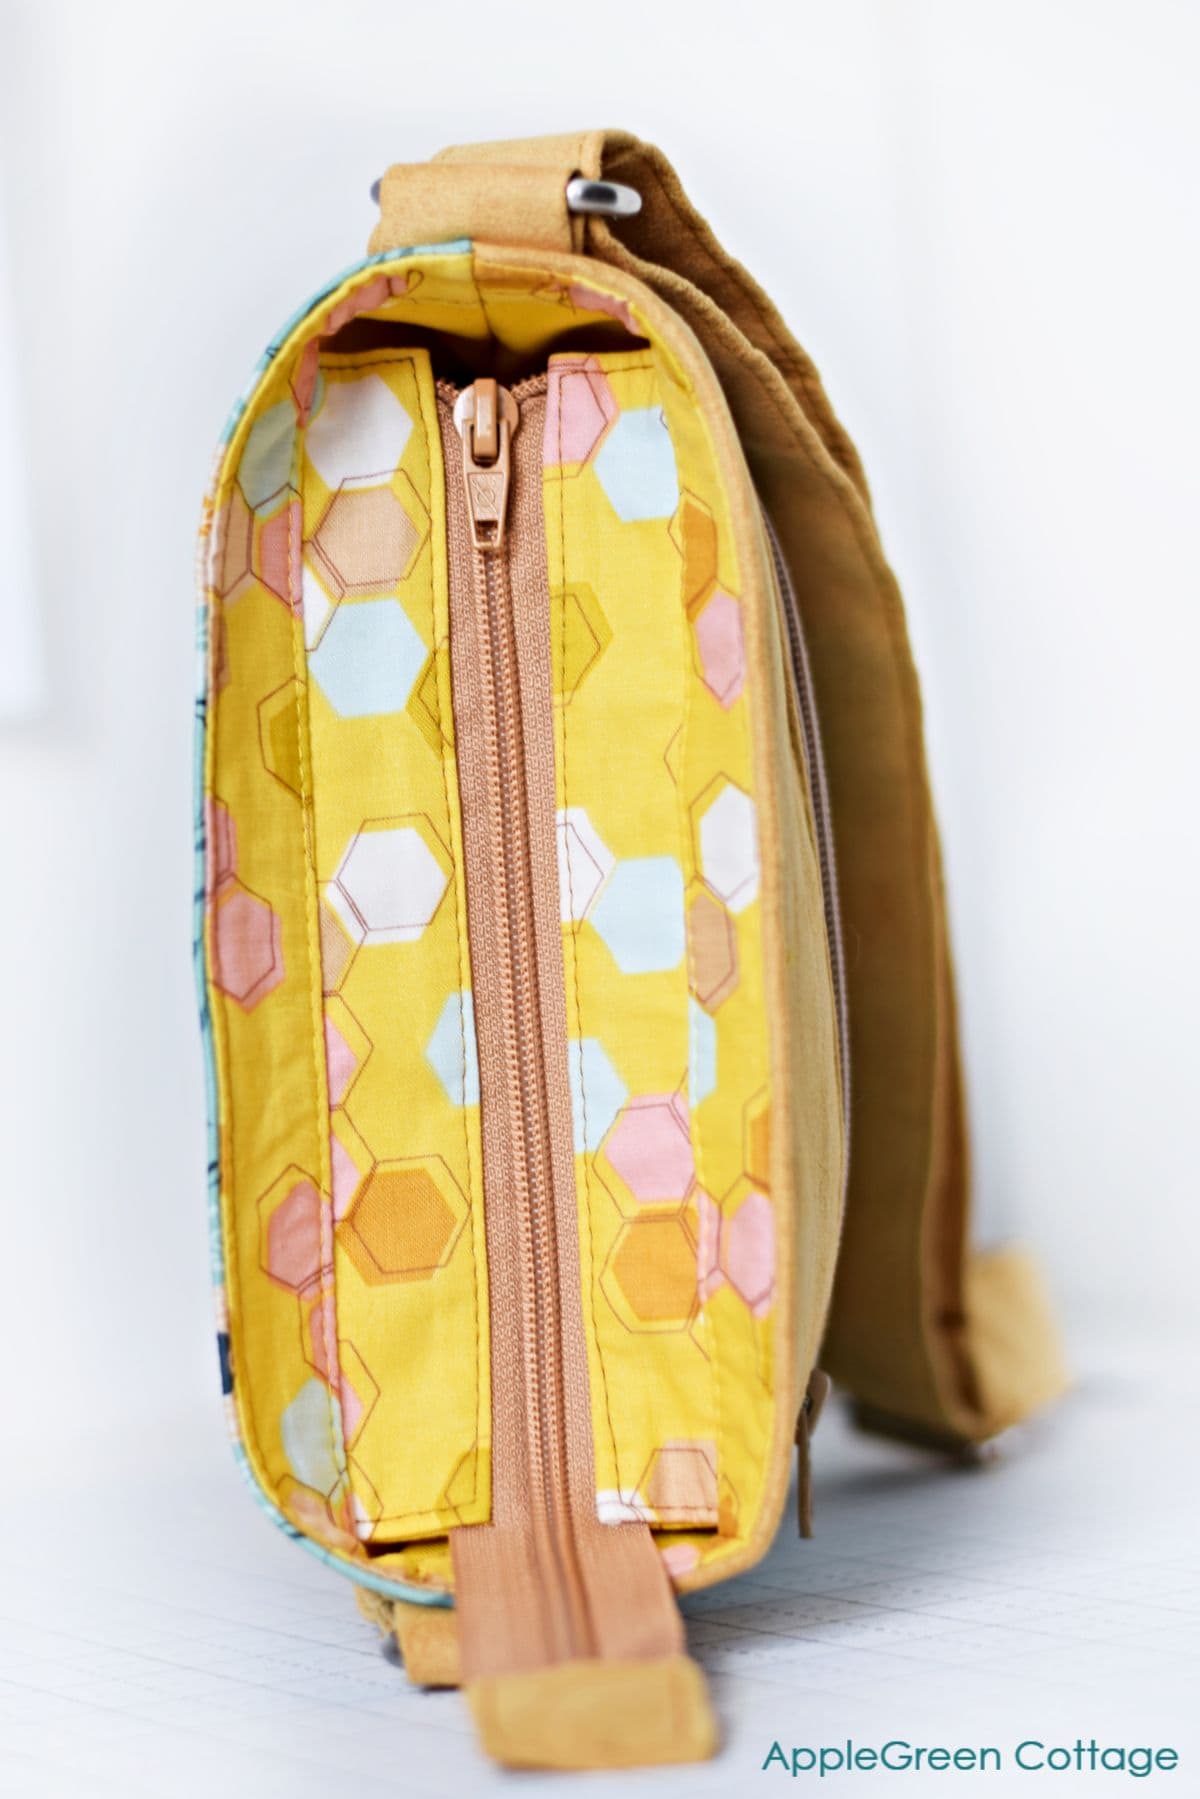
Sewing a recessed zipper is so much easier than it looks! It can instantly turn a regular market tote into a fully functional, stylish bag you'll want to carry everywhere with you. Like my Teya bag pattern. It's so much better with a top closure that will keep things secure yet still allow the bag to open wide. I've been sewing all recessed zippers the way I show you in this tutorial ever since I made my first Teya crossbody bag. And I still find it the best way to install an inset zipper.
The Teya bag has tons of pockets, and an adjustable strap so the bag can be worn as a shoulder bag or as a crossbody bag. And it has a recessed top zipper closure, just like the one shown here.
I've been using this technique since I made my first tote with a recessed zipper.
Recessed zipper tutorial
There are two things you need to consider before you start - super important!
Let me first help you decide on what size of the finished recessed zipper panel you need, and what length of the zipper you need for that. These are two separate things to consider. Read on to get your own dimensions for the bag you're making.
Or - if you don't like math, get the Teya crossbody bag pattern - I've done all the math and measuring for you!
What size of the recessed zipper panel to sew?
When you sew a recessed zipper panel you need to know what is the desired finished width and length of the recessed zipper panel. This is how to figure it out:
- Finished panel width: the finished depth of the bag you are making, plus a seam allowance for sewing the panel into the bag.
- Finished panel length: the fabric panel (not the zipper!) should be just a bit shorter than the finished bag you're making the recessed zipper panel for. An inch shorter should be good.
If you are making the Teya bag, your finished recessed zipper panel needs to be 7 inches long and 2" wide - or just a bit wider (those extra millimeters are good to have just a tiny bit of leeway! )
Note: the finished zipper with the zipper tab should be longer than the aforementioned zipper panel, at least by a few inches, to fully utilize the bag's ability to open wide. Can you tell that the recessed zipper is soo handy!
What zipper length is required for sewing a recessed zipper panel
First, you'll need to determine the required length of the top zipper. You will want to use the formula of 'finished bag width' plus a few inches for the zipper tail to open wide. Mine was 11". Always add an inch if using zippers by the yard, so I would cut my zipper tape 12" long - leave a bit more if you can.
Or, if using a finished zipper, you'd need to make sure that there are at least 11" between the top metal stopper and the bottom tab. (No need to add an inch here.)
Tutorial - How to sew a recessed zipper in a tote bag
There are three parts for how to sew a recessed zipper in a tote bag. I'll show you how to
- PREPARE - prepare the zipper, then
- CREATE the recessed zipper panel, i.e. how to attach the fabric pieces to the zipper, and finally,
- INSTALL - how to add the recessed zipper panel to the bag lining.
Step 1 - Prepare the Zipper
Finish the bottom end of the zipper by adding a zipper tab - see here how to add a zipper tab.
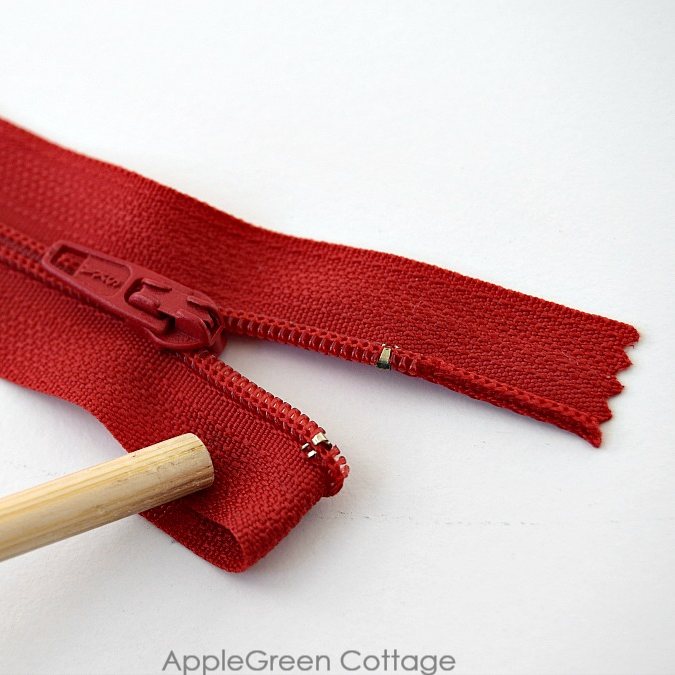
Then, finish the other, top end of the zipper tape by folding the ends of the zip tape out of the way and basting them. This is how:
Mark the length and fold the top bits:
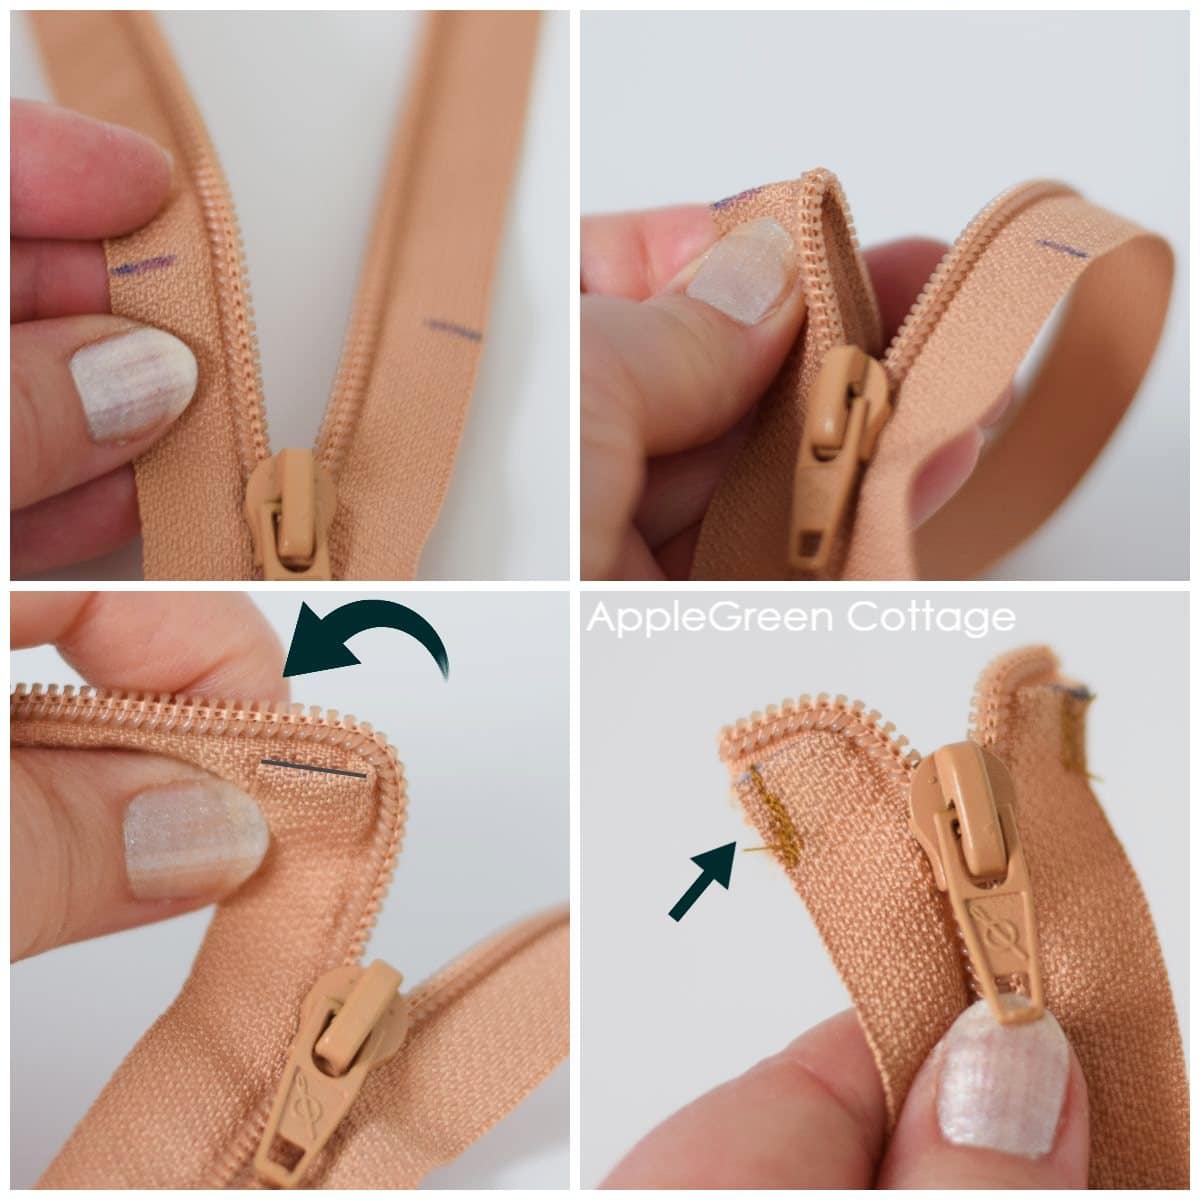
- You have already marked mark at the length required by your bag pattern, at the top zipper end. Mine was 11" for the Teya bag, photo before cutting. Open that end of the zipper tape.
- Pinch the zipper tape exactly on the marked line.
- ... and pull the tail down at 90 degrees.
- Pin in place and sew over the fold a few times back and forth to fix. Alternatively, glue in place so the fold is secure. Trim any excess zipper tape.
Repeat for the other side of the zipper tape, making sure the ends are even. Now your zipper is ready to install.
NOTE: If working with the finished zipper, just fold the top tails back, no special maneuvering is necessary. Easy peasy!
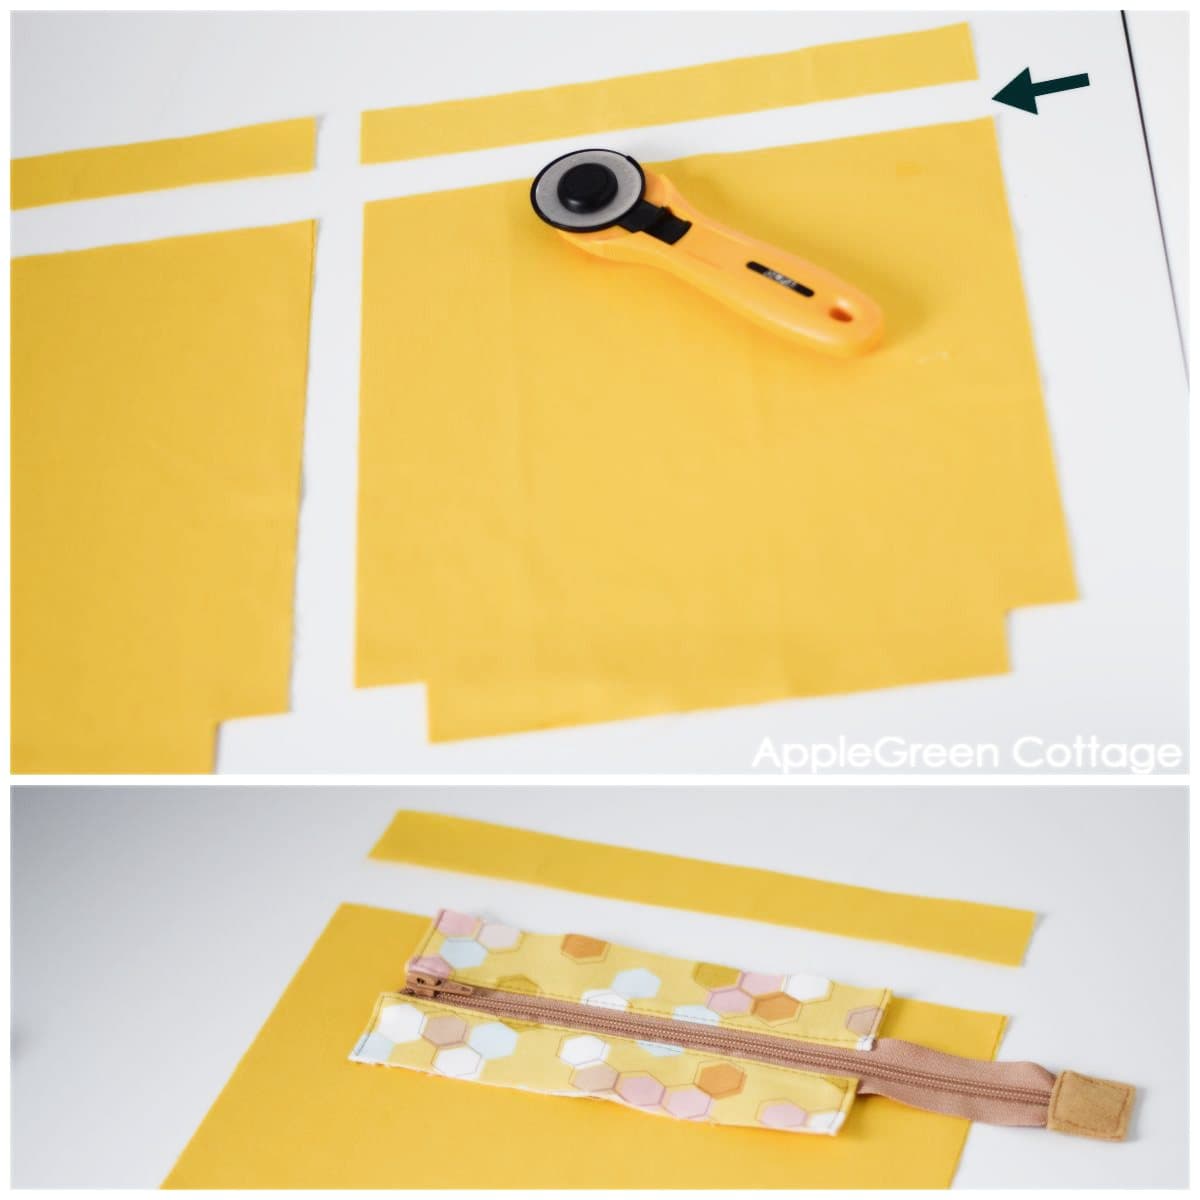
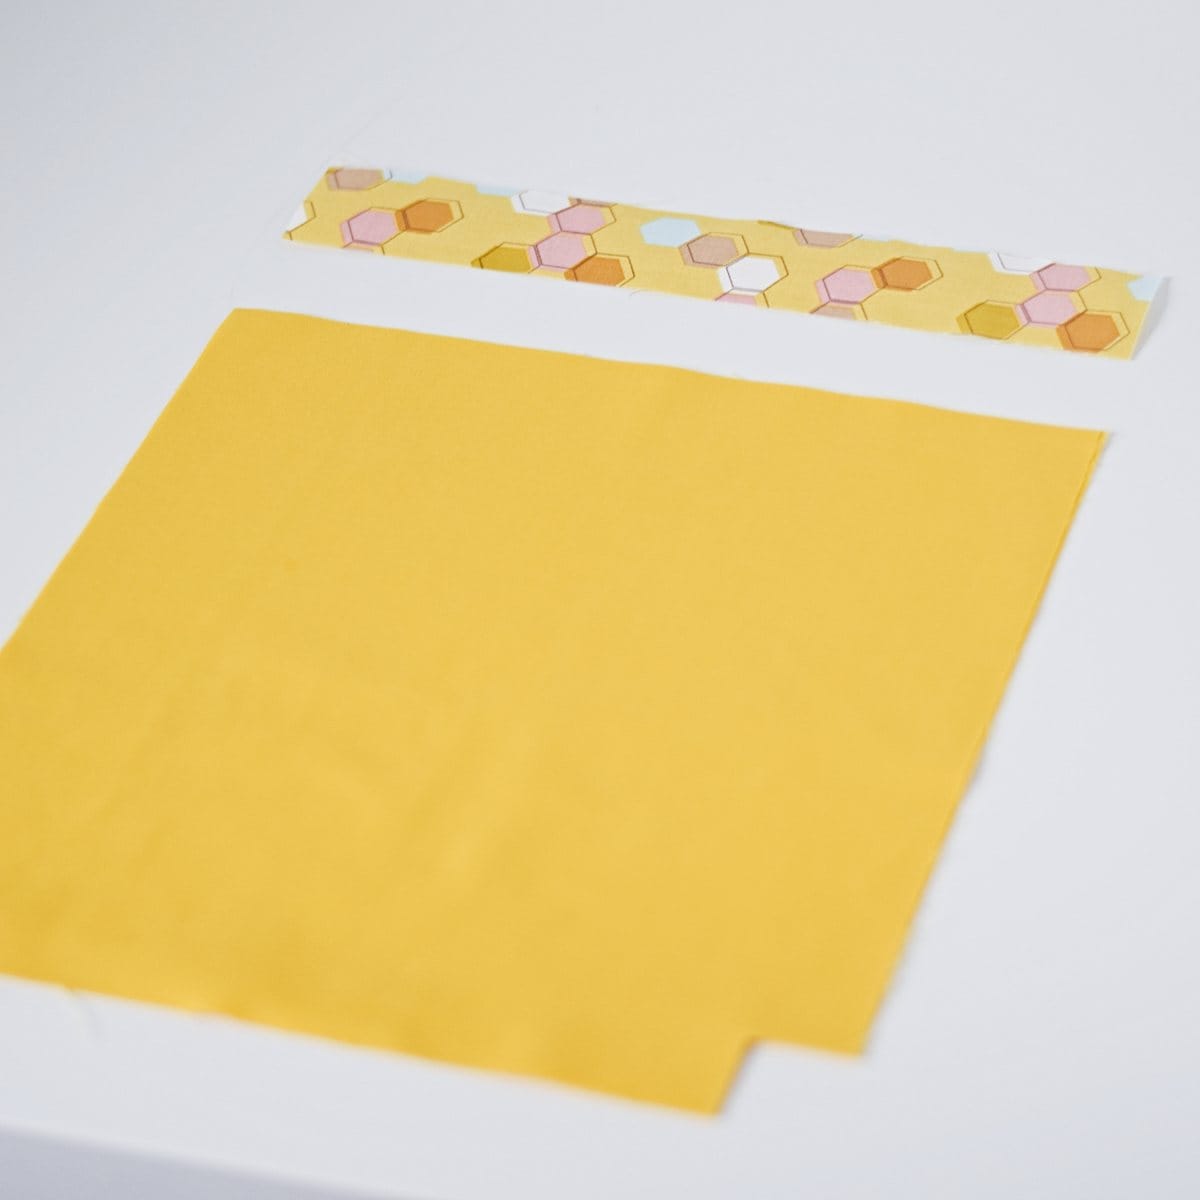
Step 2 - Prepare the Fabric Pieces
Here, we'll cut and interface 4 pieces for the zipper panel. Make sure to add the seam allowances to the measurements you figured out before, on EACH of the raw edges. I'll explain in a bit.
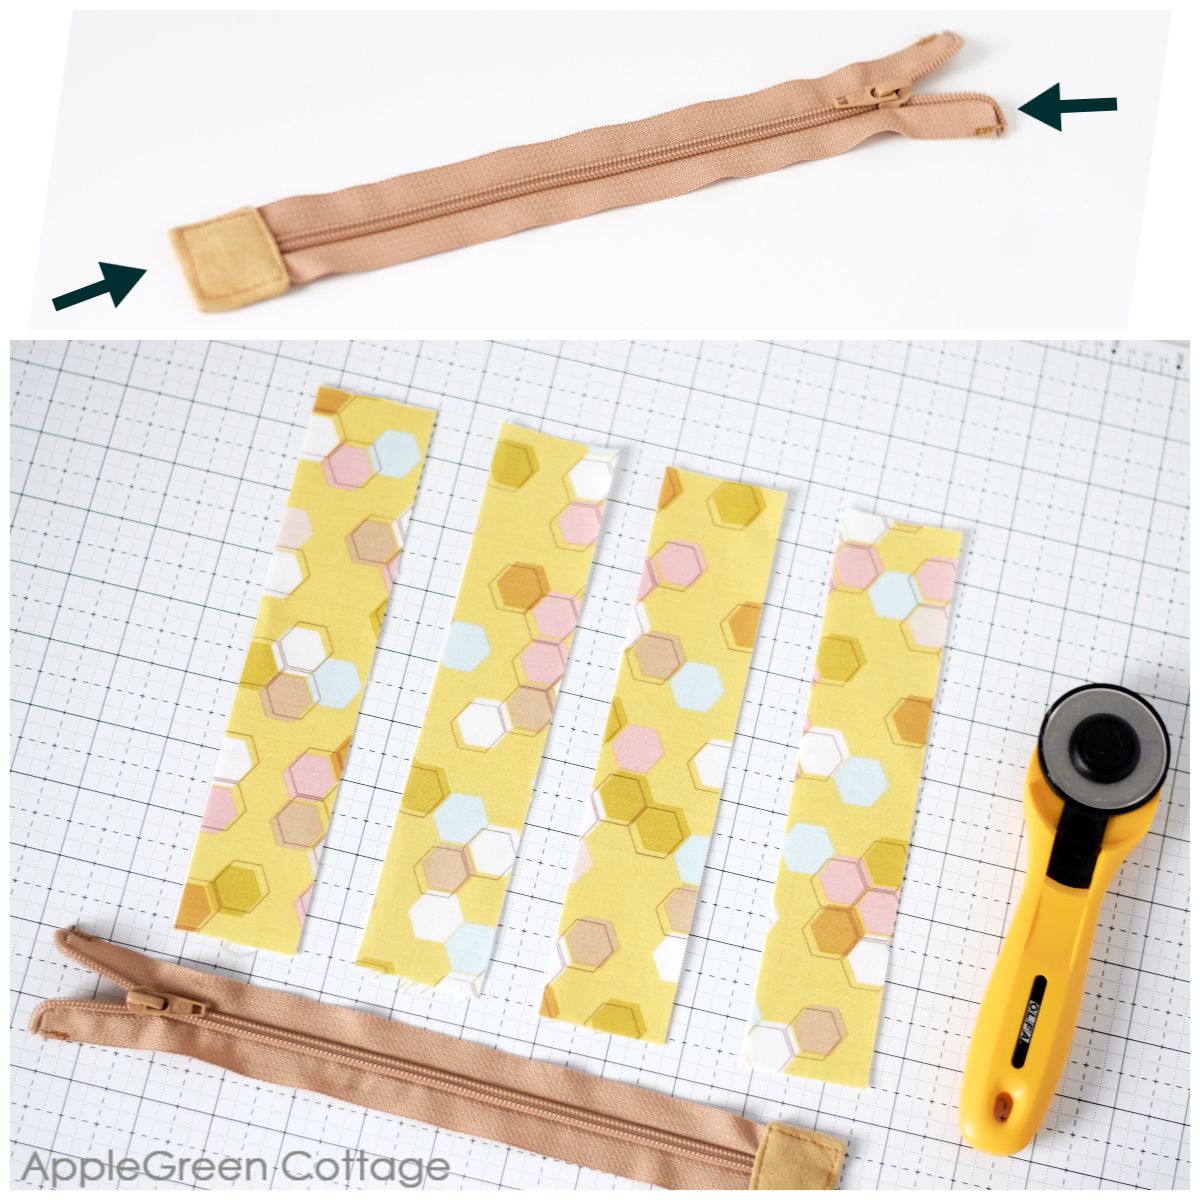
What size of pieces to cut:
LENGTH - cut the planned finished length of the inset zipper panel plus twice the seam allowance.
WIDTH - formula for the width of each piece of the inset zipper panel is this: (desired finished panel width minus ½" for zipper) divided by 2, then add twice the seam allowance.
Then cut 4 identical pieces, or 2 from Main Fabric and 2 from Lining Fabric, following the formula above.
For the Teya bag, I cut
| 8 ¼" x 1 ¾" | 21 cm x 4.5 cm | 4 pieces |
Optional: add lightweight interfacing to get your fabric closer to decor weight.
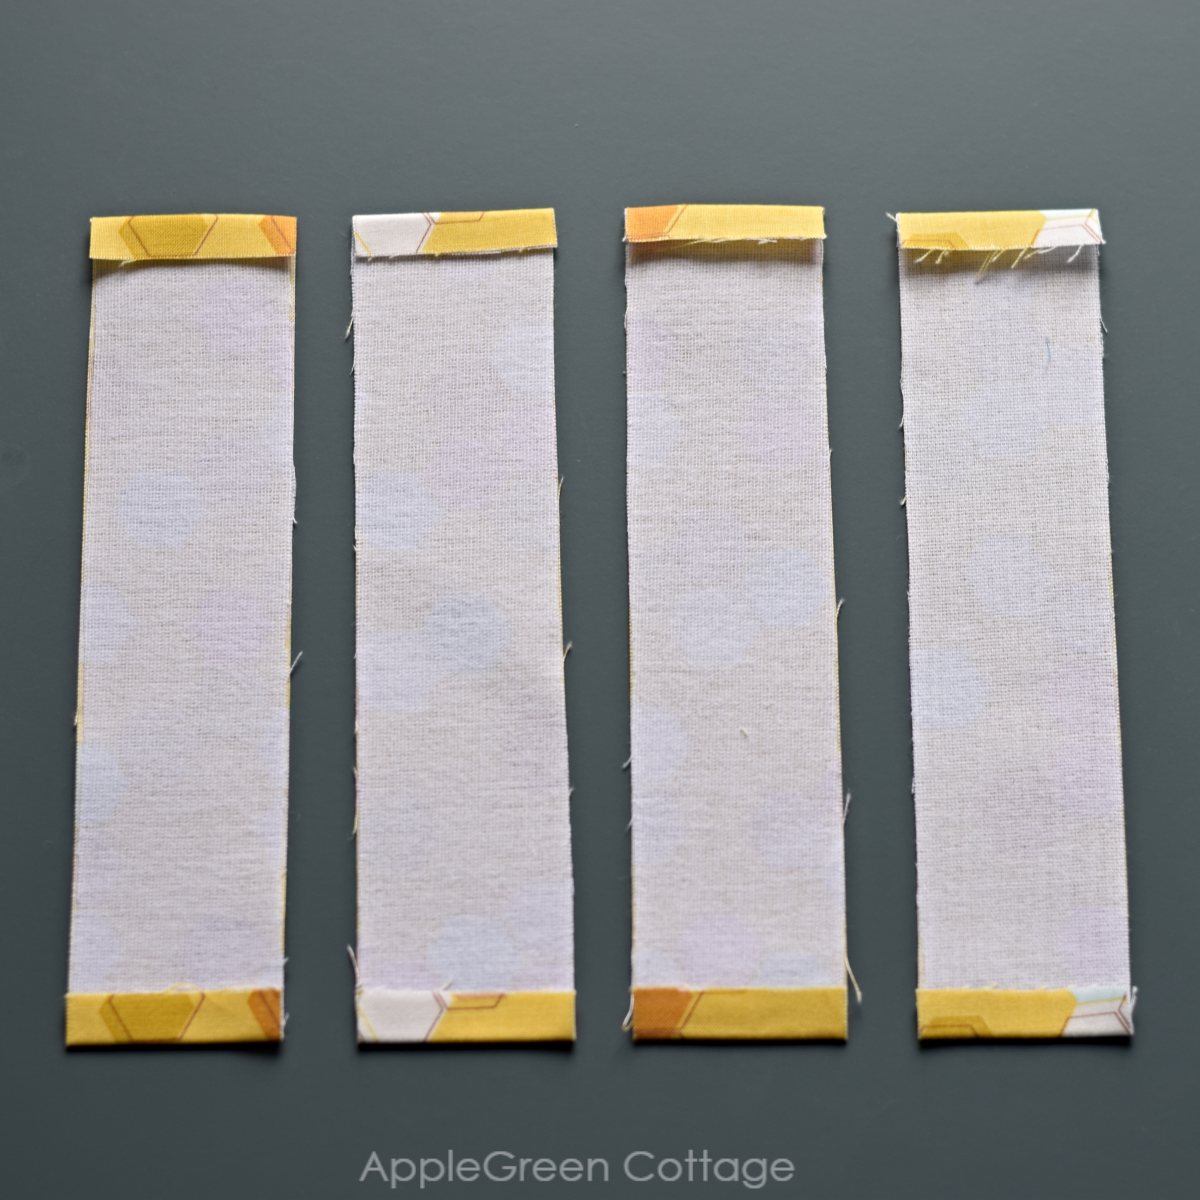
Fold the seam allowances on the short ends of the 4 pieces towards the wrong side. Press.
Step 3 - Stack Up the pieces
Stack up the pieces:
- Place one piece of fabric right-side-UP.
- Align the zipper right side UP along one long edge.
- Place the second piece of fabric right side DOWN on top of the zipper.
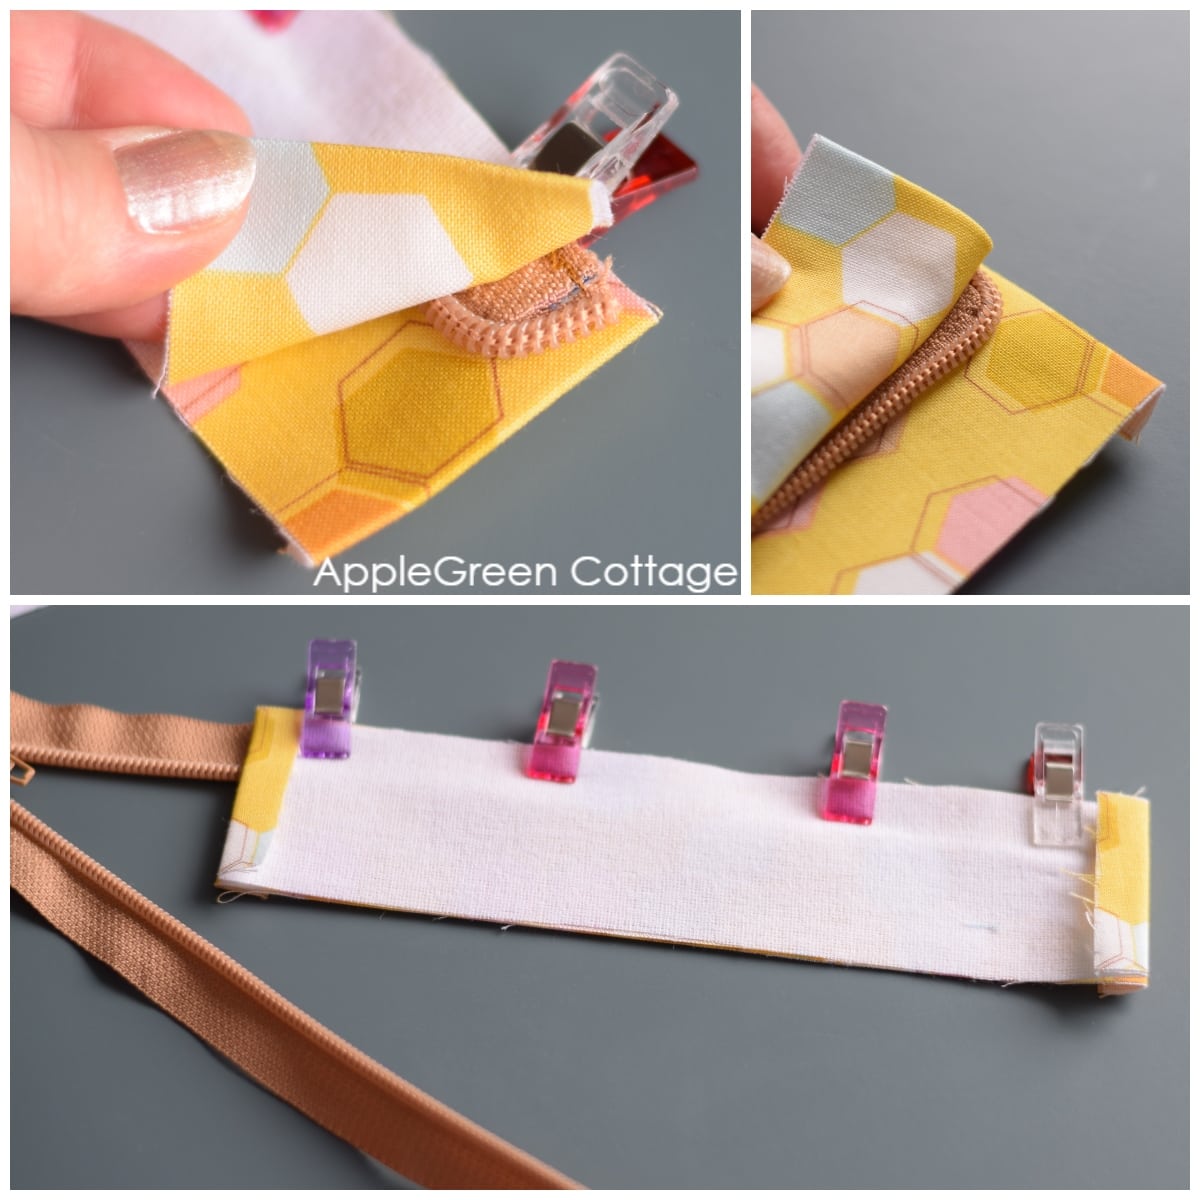
The zipper will be sandwiched between the two layers of fabric. Make sure to line up the edges of all three pieces.
IMPORTANT: All the folded short fabric edges need to be lined up. Here's a closeup from a different bag:
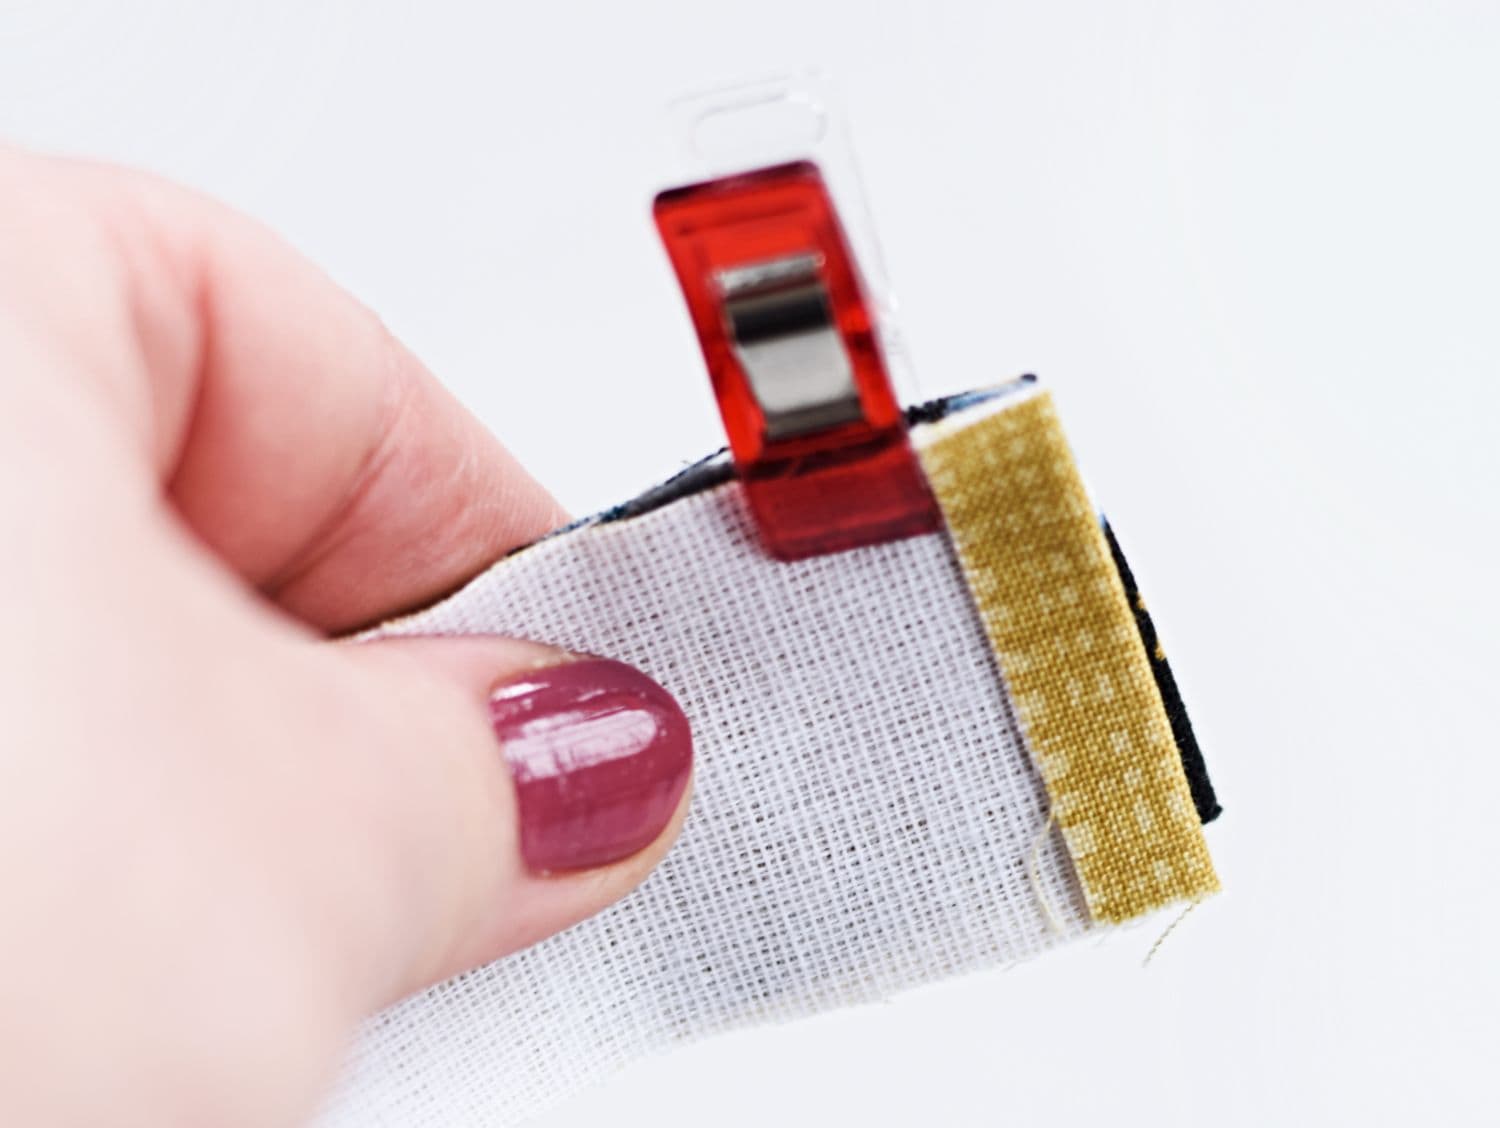
TO ENSURE AN EXACT ALIGNMENT, I also did this on the open side of the zipper:
I folded the seam allowance of the bottom fabric up and over the end on the open side of the zipper and pinned to hold them in place (see the image below) - this gives it a nicer finish:
CLOSEUP:
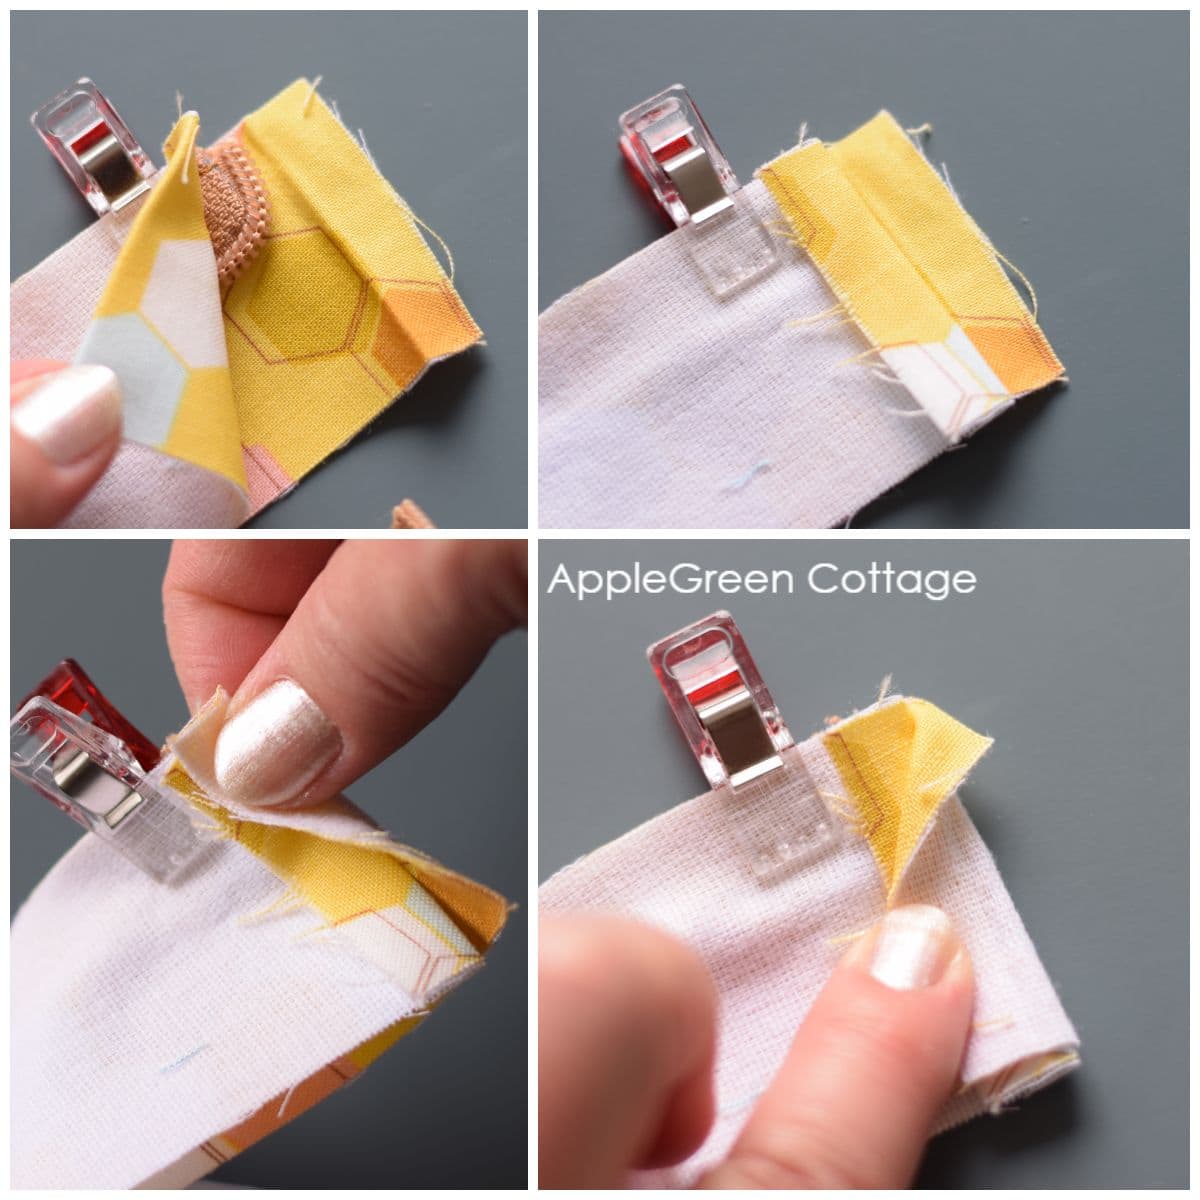
Step 4 - Sew on one side of the zipper
Pin the rest of the fabric, keeping the edges even. Sew using a straight stitch. Backstitch to secure the seam.
Turn the piece right side out and press.
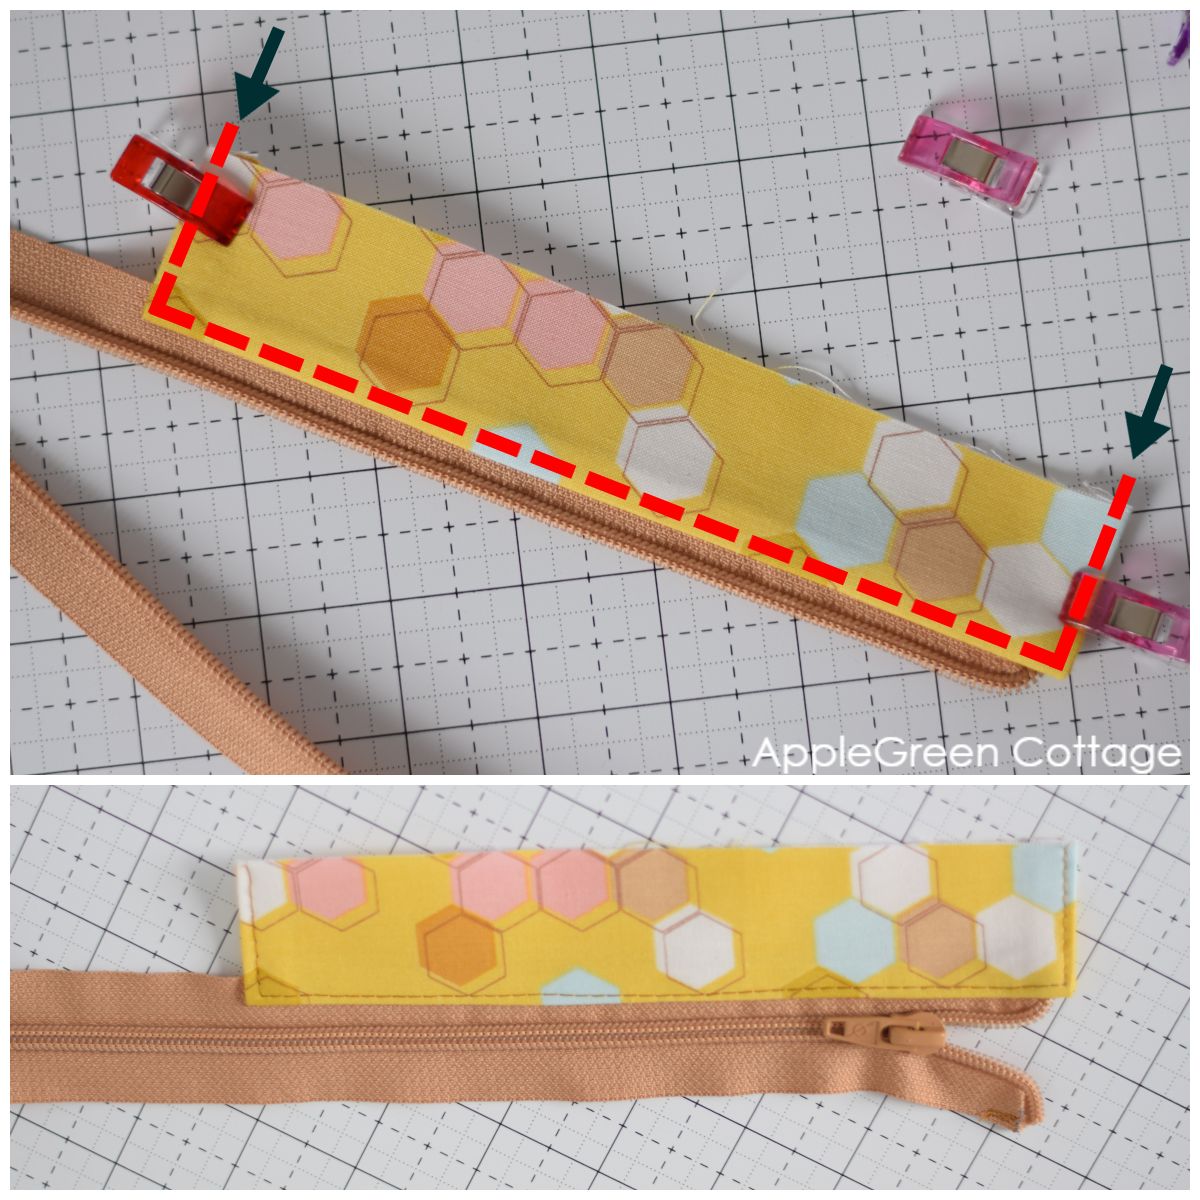
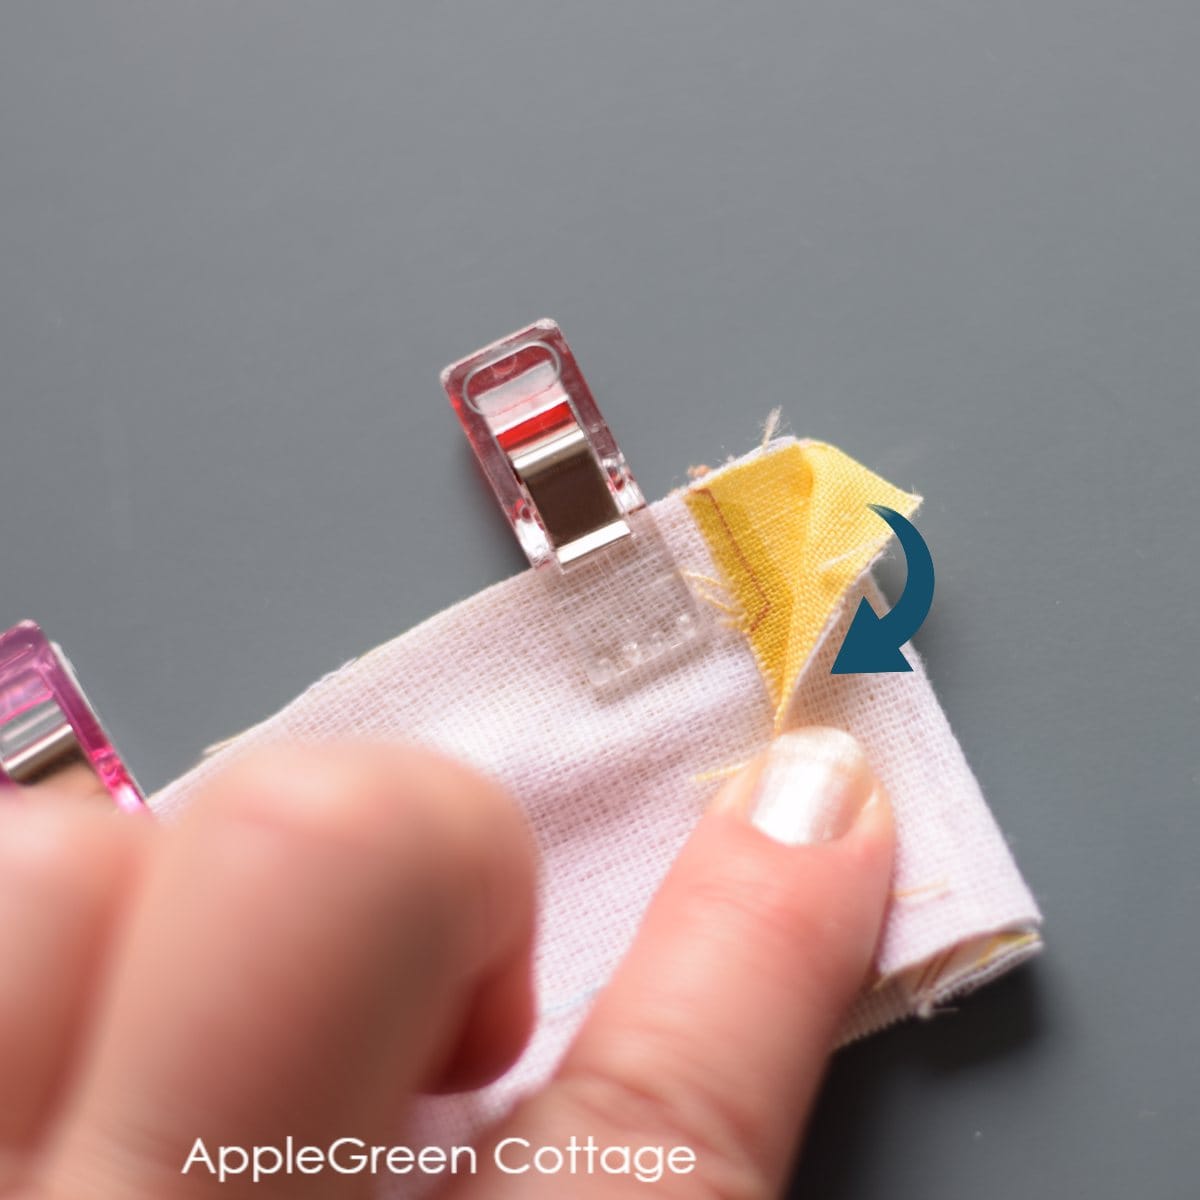
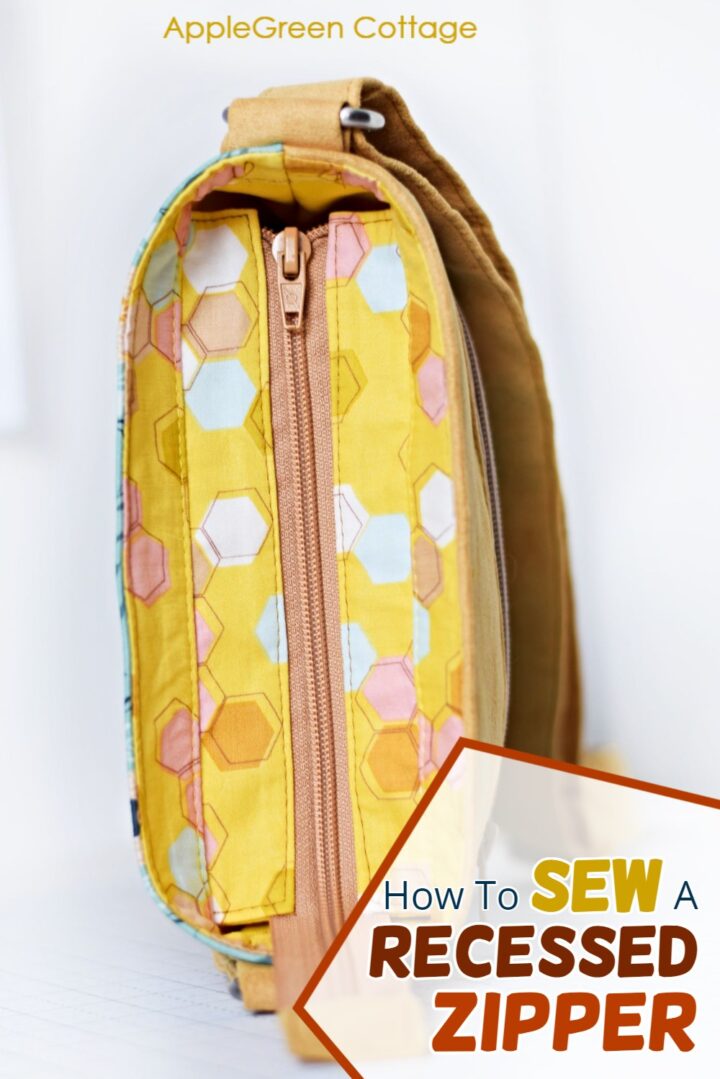
Edgestitch around the 3 finished sides of the panel:
- Sew along one short side
- Pivot and sew along the zipper
- Pivot again and sew the other short side
You can either baste stitch the long side with raw edges or leave it unstitched, as it will be tucked into the lining.
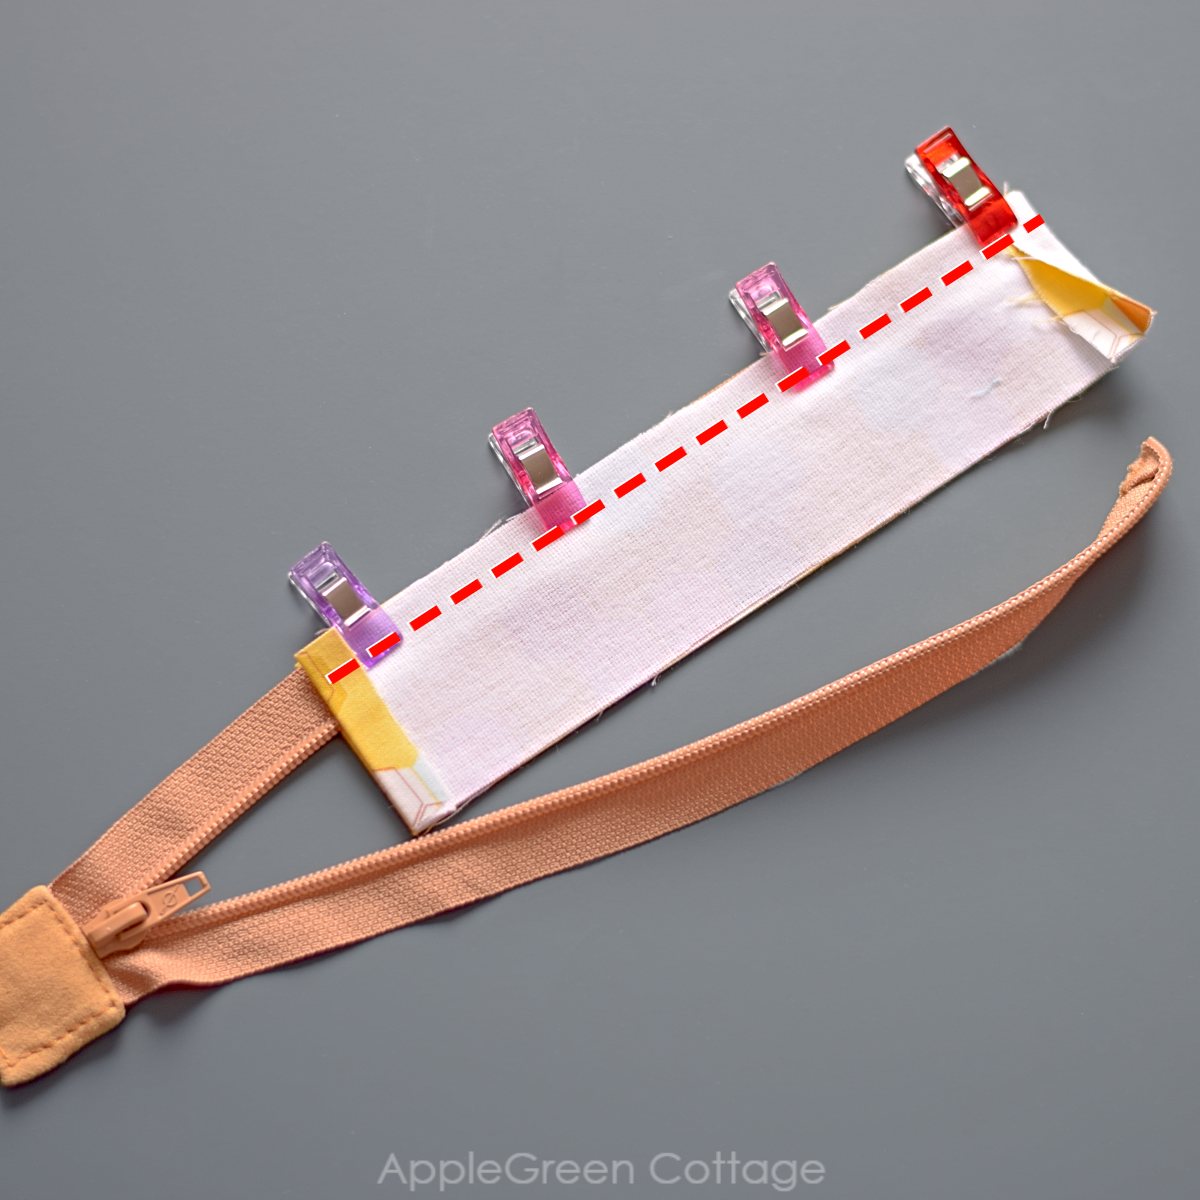
Step 5 - Finish the other side of the recessed zipper panel

Repeat for the other side of the zipper to complete the recessed zipper panel, as shown. Now you have a semi-finished recessed zipper panel, ready to insert into your bag lining. Yaay!
Step 6 - Sew the Recessed Zipper Panel into the Bag Lining
Please NOTE that every bag pattern will have a different size of bag lining pieces. The ones used in this tutorial are just an example, from the Teya bag pattern.
Take the bag lining and slash it at the top, cutting off just a small, 1-inch wide strip from the top of your lining. Do this on both lining pieces. You won't use the thin strips.
Now we'll add a new top strip, heightened by 'twice the seam allowance', to account for the lost height when sewing the inset zipper panel into the lining. Makes sense?
For my Teya bag, I selected different fabrics for the top section. These pieces are already listed in the pattern, you don't need to cut anything special. See the next photo:
Finally, the time to install the recessed zipper panel into lining: sandwich the recessed zipper panel between the upper and lower LINING PANELS:
- Place the lower part of the lining with the right side up.
- Then, the zipper panel with the right side UP centered along the top edge.
- Finally, place the top part of the lining with the right side DOWN, facing the zipper.
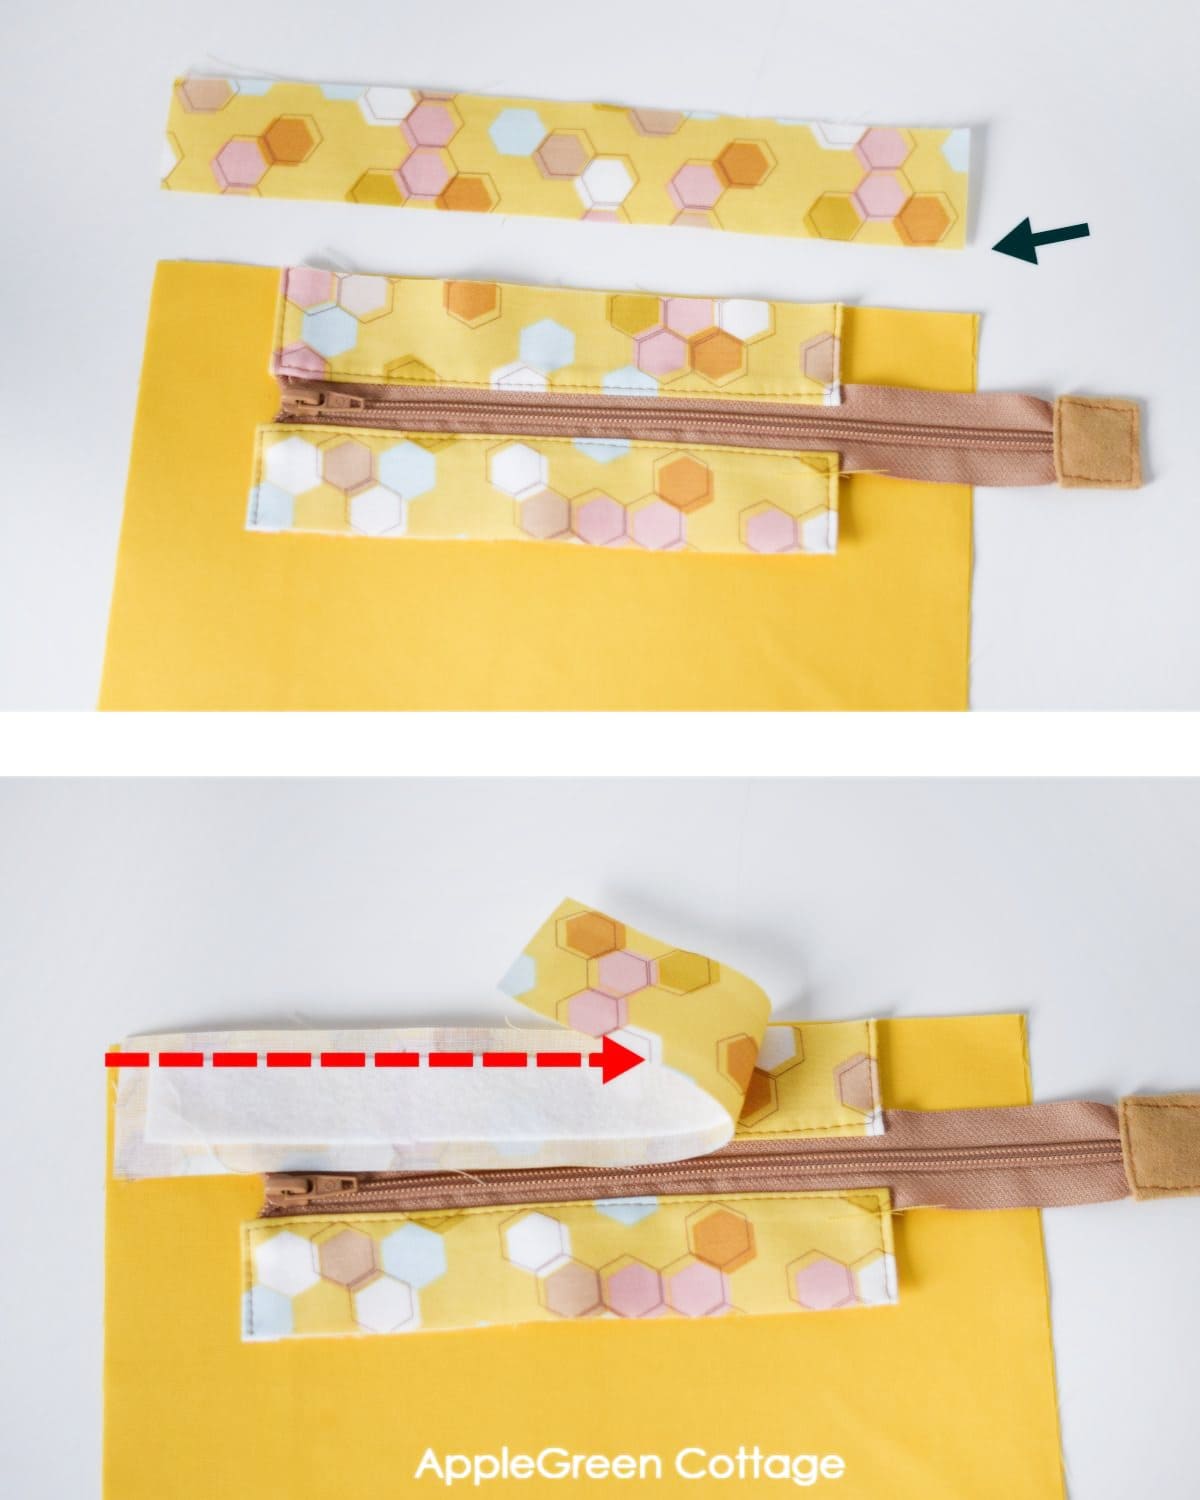
The pieces should be aligned along the top edge. Using a seam allowance of ⅜" (1cm), sew the layers together with a simple straight stitch.
NOTE: Stitch all the way through, not just over the recessed panel. Press the seam allowance towards the top and topstitch on the top portion of the lining - niice!
Repeat on the other side of the bag lining. When you finish, you'll see that both sides of the lining are now held together by the recessed zipper panel. You have the lining pieces assembled.

Step 7 - Proceed with sewing your bag
Proceed with sewing together the outer pieces, and then assemble the bag as you would without the installed inset zipper panel. This is my finished Teya crossbody bag pattern in my shop.
'I love simple designs like this that allow the fabrics to shine. There are some really practical design elements like the many pockets and overall sturdiness that make it a great everyday bag' - Mellissa @whistleandstitchstudio
TEYA Crossbody Bag pattern
Use the hashtag #applegreencottage, or tag me @applegreencottage when you post a photo of your totes and bags, I want to see them all! Also, let me know if this tutorial has taught you everything about how to sew a recessed zipper in a tote bag - or do you need more details. I'm happy to help you out!
WANT MORE FREE TUTORIALS AND PATTERNS?
Get email updates and never miss out on new patterns, printables, and tutorials:
Or …check out the TEYA crossbody bag pattern in our shop. One of my first bag patterns with pockets both on the inside and outside - and it works great as a gadget bag too!
TEYA PATTERN UPDATED!
PATTERN UPDATED.


Marie says
Hi Damjana,
Is the TEYA bag a good ‘first project’ do you think? I’ve made the market tote successfully and my daughter has asked me to make her one, so I will use this tutorial to add a zip. I’m itching to have a try at a cross-body bag though!
Damjana Jakos says
Marie hi, a great question! I made the Teya back then specifically with beginners in mind, so if you've made the AppleGreenCottage market tote you're good to go! For the recessed top zipper though, I also have a newer tutorial (in addition to the pattern instructions) with newer photos, here: https://www.applegreencottage.com/how-to-sew-a-recessed-zipper-in-a-tote-bag/ Can't wait to see your new Teya crossbody, tag me @applegreencottage if you post a photo somewhere online! <3
Φανή says
Γεια... Ευχαριστώ πολύ για το σεμινάριο ήταν ότι χρειαζόμουν για να τελειώσω την τσάντα μου. Η Καθοδήγηση σου βήμα βήμα αλλά και οι φωτογραφίες είναι πολύ σαφείς και με βοήθησαν για ένα υπέροχο αποτέλεσμα! Και πάλι ευχαριστώ και σου εύχομαι ότι καλύτερο!
Damjana says
you're welcome!
Jasmine says
Hi...thanks for the tutorial! I tried making this today and the zipper ended up terribly wavy...any idea what I did wrong and how to rectify it please?
Damjana says
Jasmine hi,
it's a pretty common issue for sewing with fabrics that are stretchy. Take a look at this zipper guide and scroll down to the tips and tricks, I've added a section on how to prevent wavy zippers.
Damjana
pat says
How do you make a recessed zipper without the gaps at the ends and the excess zipper on the end?
Damjana says
Pat hi,
that's an entirely different approach to sew it like you describe - I'll be happy to include it into some of my future sewing tutorials. Thank you for the idea!