
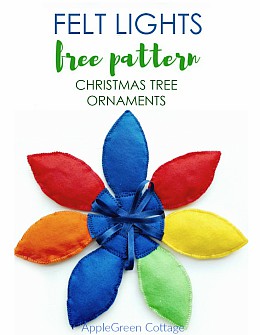
Let me show you how to make easy, unbreakable (and beautiful!) felt Christmas lights ornaments that don't run a risk of being crushed to splinters. Meet the Christmas lights ornament - perfect if you've got a small kid in the family!
You can hang these little Christmas light bulb decorations on your tree or string them across a wall to make a lovely felt Christmas lights garland.

This project is part of my free Homemade Holiday Pattern Bundle:
HUGE Holiday Sewing Pattern BUNDLE - FREE!

17+ sewing patterns to craft your own, cozy holidays!
These cute retro Christmas ornament bulbs will brighten up your Xmas decorations and are way prettier than tinsel! There are so many christmas ornaments to sew here at AppleGreen Cottage, and these are probably the first ones I posted about, years ago. I'm updating them to add a few extra photos and make the tutorial easier to read.
Diy Christmas Lights Ornaments
Here's why I'm still crazy about these cute felt light ornaments, even after years - and why you'll love them too:
- Easy to make. (Felt is even easier to sew than cotton fabrics!)
- Inexpensive (You'll need very little material!)
- A great felt scrap buster!
- Make a great and easy homemade gift!

Kids in your home too? You'll probably want to make your Christmas tree safe (and fun) for your toddler by skipping any fragile glass ornaments. We did the same, leaving our pretty "just-look-no-touch" glass decorations tucked away in the basement for now. If you're thinking along the same lines, this might be helpful for you too!
Or you want to make the cutest Christmas homemade gift for your friends - of any age.
Supplies
You'll need:
- felt in your favorite colors (Get this multi-color pack, not individual pieces, to save money!)
- 8 inches of satin ribbon of your choice per each ornament piece
- some soft toy stuffing material
- thread, pins, sewing machine or a needle
- Free template - download and print page 17 from my Homemade Christmas Patterns Bundle - updated in October 2024.
HUGE Holiday Sewing Pattern BUNDLE - FREE!
17+ sewing patterns to craft your own, cozy holidays!
What Interfacing to use for DIY felt ornaments?
I used proper soft and light stuffing polyester (best for baby toys, too!) for some of these Christmas tree decorations, and bits and pieces of fabric scraps for others. Both worked just fine.
FINISHED SIZE:
These Felt Light Christmas Tree Ornaments are approximately 2.5 inches wide and 4.5 inches long (ribbon not included), perfectly fitting into a toddler's hand. Not just for toddlers, though. These ornaments will make a great handmade present for grownups too.
Sewing steps
Step 1 - Print the Christmas lights template
Join our mailing list and get the Free Homemade Holiday patterns BUNDLE emailed to you:
Download to your device and print out page 17. Cut the paper template.
Step 2 - Cut the felt pieces

Cut out the three pieces from felt for each ornament: 2 leaf-like pieces, and one connecting piece.
The connecting piece should be in the same color as the ribbon, here: blue.
Step 3 - Connect the 2 main pieces

Put the leaf-like pieces together. Using a wide zigzag stitch, sew around the 2 pieces, stopping the sewing when you are approximately three-fourths (¾) around the piece.
Leave the piece on the sewing machine. I always leave the needle IN the material, i.e. in the lowest position to prevent sliding when working on it.
Step 4 - Add Poly-Fill

Now insert the toy stuffing material. Adjust the quantity to your liking, though I advise you leave some room for easier sewing. Using less, not more is just OK for this type of felt decorations:
Step 5 - Close the gap

Then close the opening. Secure the stitches: tie a knot and cut off the excess thread. This is how the finished main piece of the ornament will look like.
Step 6 - Attach the ribbon and the small piece

Now, you'll need to use the 8-inch long satin ribbon. Fold it in half. For a nice finish, you will use the third, small piece of felt in the same color as the ribbon to serve as a connecting piece, as you see in the image below.
NOTE on the RED markings (short lines) on the PDF pattern: When placing the connecting piece on the centerpiece, make sure the two red markings on the (yellow) centerpiece match the two red markers on the connecting felt piece.
Step 7 - Stitch everything together

Fold the felt endpiece in half, encasing the satin ribbon - you'll sew over it, connecting the ribbon with the main (yellow) ornament part; start sewing at the top (you'll catch the ribbon), then continue all the way around the small (blue) connecting piece.
Step 8 - Secure Stitches

Secure the stitches: tie a knot and cut off any excess sewing thread. Done!
Repeat the process as many times as you like. Each ornament will come together quicker, and soon you'll have a lovely collection of felt Christmas lights to decorate your tree with.

This idea might help you keep the tree as beautiful as you'd like it to be, while enabling the kids to play with the ornaments, rearranging them and moving them around the tree, allowing for a good portion of sensory and creative play activities for kids.
We've come to the end of our Christmas lights ornament tutorial, I hope you liked it. Try out this project - these DIY ornaments are easy to make, and they don't take a lot of time to complete.
Believe me, I spent 90% of the time taking photos of these cuties and only 10% actually sewing them!
Related Holiday Decorating Ideas
Looking for other projects like this? There are so many christmas projects here at AppleGreen Cottage! Try these:

Where can I get the free pattern?
Join our mailing list and get the template for free - and more, the entire (huge!) Homemade Holidays BUNDLE, with more than 18 templates to create your own cozy holiday decor:
And if you want to create even more, see all the Christmas sewing patterns here at AppleGreen Cottage. Create your own, cozy holiday home decor. Happy holiday season!


Heather Grow says
These are cute. Thank you for the sewing tip about keeping the project on the machine while you stuff. Genious!
Damjana at AppleGreen Cottage says
Heather, thank you for visiting. It's often the details that make a job easier, isn't it? 😉 Have a great weekend, Damjana
Army Wife Quilter says
these are cute I need to make them. thanks
Damjana at AppleGreen Cottage says
I'm glad you liked them 🙂
Alison B says
This is a great idea Damjana, one I will definitely need next Christmas which gives me lots of time to make them!
Damjana at AppleGreen Cottage says
Alison, I'm glad it's a useful idea for your family. Enjoy! Damjana