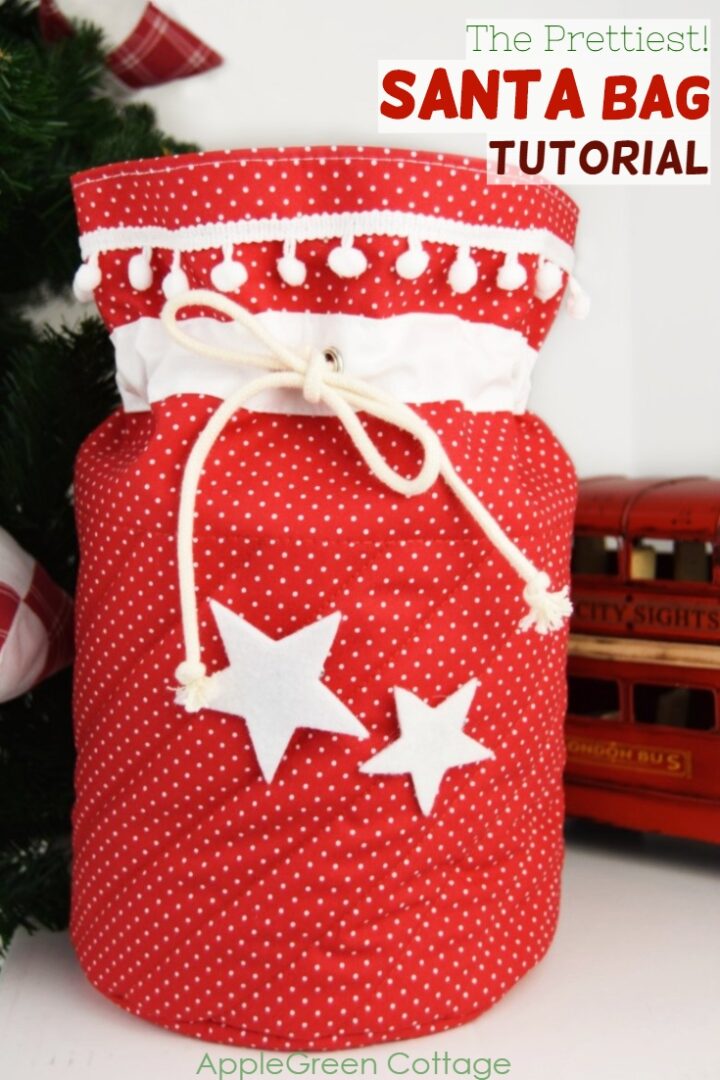
Diy Santa bag - See how to make a Santa bag and sew the cutest Santa sack you've ever seen!
This tutorial will show you how to make a Santa bag - a reusable, unique and cute diy Santa sack to put your Christmas gifts in. Scroll down for the diy Santa bag tutorial, all the cutting directions you need, as well as additional tips to help you make your Christmas entirely handmade, and personal.

This post contains affiliate links. Thanks for your support. If you are looking for more holiday projects, here are a few you'll love:
- 40+ Free Christmas Tree Skirts To Sew
- 35+ Best DIY Christmas Decorations - FREE
- 15+ Cutest Diy Christmas Gifts For Kids
- 15 Free Diy Christmas Gnome Tutorials
What is Santa Bag?
In case you didn't know, Santa sack, or Santa bag is the bag filled by Santa and the elves, and delivered by Santa and his reindeer on Christmas - right under your holiday tree. As far as any kid is concerned, this is BEST bag you can ever get!
So let's help Santa by sewing one, and leaving it up to Santa to fill it on Christmas night, shall we?
My Own Diy Santa Bag
This festive diy Santa bag is perfect for displaying by your tree. I've sewn it using my storage basket pattern from the shop (here) and thought I could do a tutorial for you, so you can sew your own Santa bags, too. So here I am, showing off this perfect red polka-dot bin that's going to make our Christmas tree even cuter!
As you'll see, the pattern gives you several additional options, but I've designed this tutorial in a way you do not necessarily need a pattern. The thing I love most about this Santa bag - and the pattern itself? It is soft but not slouchy, and of course - the pompom trim! And you can reuse it every season!

It's a lovely Christmas home decor idea: The Santa sack can double as Christmas stocking, that's why I added an optional hanging tab (a little longer than the one in the pattern), so you can use to hang the Santa bags on your mantle and enjoy your crafty projects all season long.
How To make a Santa bag
To get a few personalization ideas, scroll down to the 'Bonus Tips' towards the end of this blog post.

Make your own personalized gift bags - and go green! Reusable gift wrap is an impactful way to reduce waste - and placing your gifts in a handmade gift-wrap will make your holiday gifts pop!
And this bag has a little secret: SMART construction. No threading the cord through the casing after you're finished sewing!
Pattern from the shop is optional
The tutorial below gives you all the measurements and cutting directions, so you don't necessarily need the pattern from the shop.
However, the pattern in the shop
- gives you two more sizes to choose from, and
- includes printable pattern, so you can avoid measuring and seam tapering.
In this case, get the Round Basket Pattern here in my shop (link)
Of course, you can also just follow this tutorial. Enjoy!
Santa Bag Tutorial

First, for those of you who like video tutorials, I've made a video slide-show to get the feeling of what the sewing process will be like. (Spoiler alert: easy!)
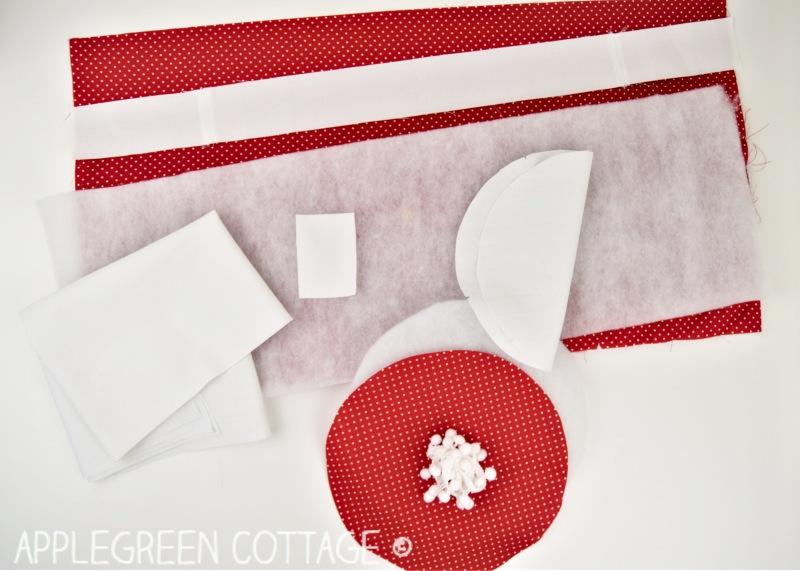
Supplies To Sew A Santa Bag
- 1 yard of fabric. (home décor weight fabric and/or quilting cotton)
- Batting - half yard
- mid-weight fusible interfacing - since I used quilting cotton for the outside, I added an additional layer of woven interfacing. I suggest you do the same if you want a stable bag.
- 2 pieces of cotton cord (recommended thickness 5/32"): 2 pieces 20"
- A tiny piece of fusible interfacing (1" by 2") to stabilize grommets
- 2 sets of grommets size 5/16" (size depends on cord thickness)
- Sewing machine, iron, scissors, pins, ruler, thread
- decoration: pompom trim (24 ½")
- either shop pattern in 3 sizes (available HERE) or use cutting instructions below
Cutting Instructions For Diy Santa Bag
Either use the Round Basket Pattern (available here in my shop - you get it in 3 sizes) or follow these Cutting Instructions to cut your pieces:
From main fabric and batting, cut:
- BODY OUTER - 24 ½" x 13" (width x height)
- BATTING PIECE FOR BODY OUTER - same width as Body Outer, but a third less height (here I only needed 8 inch height)
- OUTER BOTTOM CIRCLE - 8 ½" in diameter, cut one from main fabric and one from batting
From lining, cut:
- BODY LINING - 24 ½" x 12 ½" (width x height)
- LINING BOTTOM CIRCLE - cut it a bit smaller than outer circle to prevent bulk (I cut it 7 ¾" in diameter)
- HANGING TAB 3" x 2" or longer, if you want a larger tab for hanging
- DRAWSTRING CASING: I cut 24 ½" x 2"

NOTE - Seam Tapering And Quarter Marking
The pattern already includes these modifications, so you can SKIP this if you've got the Printable pattern from my pattern shop.
I'm adding the note here so you know what to do when cutting your own pieces using this tutorial:
Seam TAPERING
Lining can quickly become too big if you use the same pattern for both outer and lining piece, especially when using batting or other thick interfacing between the outer fabric and the lining. This is why the lining pieces should be slightly smaller in certain areas, and it makes a big difference in the finished item.
For the above reason, you'll need to taper the seams on lining to make it a bit narrower than the outer layer. It might take a little more time to do so, but you're safe: I'll show you how to do that in the tutorial below. See step 13 in the tutorial below.
Quarter Marking:
To mark the quarters on your pieces see step 14 of the tutorial below. (the pattern pieces already include markings)
Sewing Instructions:
Here's a step-by-step tutorial for how to make a Santa bag:
Step 1 - Baste Batting

1) You will need to baste batting onto the back side of 2 fabric pieces:
- the rectangular Body Outer (see how basting only covers the lower two-thirds of the piece?)
- and the Outer Bottom Circle.
Optional STEP - Quilting

2) Feel free to quilt the pieces. I used simple straight diagonal lines and they turned out just lovely! It will give the bag some texture.
Step 3 - Make Drawstring Casing

3) Prepare drawstring casing. That's the long strip of lining fabric you've just cut. Fold under the ⅜" seam allowance along both long edges of the fabric piece and press. Fold the strip in half and pinch to mark the middle of strip. Then open and use the marking to mark where the grommets should be installed. I also fused a tiny piece of interfacing onto that spot, to strengthen the fabric.

4) Install the grommets following the manufacturer's instructions on the packaging. They can be anything from ½" to 1" apart. (I plan to post tutorial for grommet and eyelet installation, so feel free to join my newsletter if you don't want to miss that one)

5) Now you'll place this drawstring casing on the main body piece:
- Place Body Outer piece right-side up – with the batting facing down, and located at the bottom edge.
- Then place the drawstring casing on it, also right-side up, I placed mine approx. 2 inch away from the top edge of the Body Outer piece. The drawstring case is NOT on batting.
- Now the SMART part! Guide your 2 cords through the grommet openings and baste one side of each cord to the side edge, covering it by the drawstring strip, like this:

6) To secure the ends of the cord, stitch back and forth a few times over the ends.
Step 4 - Attach Casing To santa bag

7) Topstitch the drawstring casing. Apart from catching the cords on each end, as shown in the previous photo, you must NOT catch the cord in any other spot.

8) Add decorative pompom trim at a distance of 1 inch from the top unfinished edge.
Step 5 - Make the hanging tab:

- Place your 3 by 2-inch piece wrong-side-up.
- Fold in half lengthwise. Press, then open again.
- Fold the upper edge to the center crease and do the same with the lower edge.
- Fold again along the original center and press.
- Then topstitch along the long edges.
The image above has different colors (I made a white tab but it's not much to see)

Sew The Diy Santa bag together
10) Place the pattern piece we've been working on (Body Outer) right side up on a flat surface, and cover it by the other rectangular piece (Body Lining) that measures 24 ½" x 12 ½" (see, it's half an inch shorter, while width is the same as Outer piece!)
The pieces need to be right sides together. Stitch along the top edge, using a ½ inch seam allowance.
11) Unfold and press the seam open. Now fold it once again, right sides together, but this time horizontally, like this:

The right side of outer fabric will fold onto itself, and lining will fold onto itself.

12) Now’s the time to add the hanging tab you made before:
- Fold the tab in half.
- Slide it between the layers into the top part of Body Outer piece. For me, the best place is just above the drawstring casing.
- The LOOP should face inwards.
- Pin in place to prevent moving.

13) Stitch along the side, leaving a gap for turning as indicated in the photo. Please read NOTE on seam tapering below if you are not using the pattern pieces
(Pattern pieces already include this modification:)
SEAM TAPERING:
You'll need to TAPER THE SEAM ALLOWANCES on BODY LINING towards the LINING BOTTOM. It means a gradual increase of the seam allowance from ½" in the spot where it meets the outer fabric, to 1 ¼" at the bottom of the lining.
In short, while the size of lining on points where it meets the outer fabric needs to be the same as outer, you'll want to taper the seam allowances (i.e. make the lining narrower) towards the bottom of the lining.
What you have now is a tube.
Attach the Bottom (Outer and lining)
14) Add quarter marks to proceed easier:
- on both ends of the tube, for ease of joining to their circular pieces: Divide each of the tube openings in even quarters and mark by cutting a notch into the seam allowance.
- Also, add quarter marks to both circular pieces: Fold the circular piece into a half and then a quarter to cut tiny notches/slits.

Now match the quarter marks. This will make your sewing easier.

15) Right-sides-together, pin the circular parts to the tube: lining circle on the lining end, and outer fabric circle (with batting already attached) to the end with the outer fabric.

16) Also, cut additional notches into the ‘tube’ part of the project, for ease. A series of snips will ease the pieces together.

17) Then stitch around the circles on each end of the tube, using a ½" seam allowance. Adjust the fabric position if needed to avoid puckers.
Once you're done, trim any excess on the seam allowance.
Finishing Your Diy Santa bag

18) Turn right-side-out through the hole in lining. Then stitch the opening closed.

19) Tuck the lining into the outer part, and topstitch along the top, using a ⅛" seam allowance for a neater finish. Done! Enjoy your handmade Christmas!
Bonus Tips
I cut a few stars from white felt and attached them on the bag (using cookie cutters as template, so easy!)
You can go a step further and personalize it by adding applique, a good idea would be adding the initial letter of the child's name. (See my simple tutorial on basic applique. It has a few tips that will help you if you are new to applique.)
If you want it, I have this free gift tag printable from one of my old blog posts. Print it out, write your child's name on it and attach it to the Santa bag.
This diy Santa bag doubles as cute holiday home decor. I've made so many I'm positive I have one in just every season's color, occasion, and style! These cute bags can also be used as a gift bag for many other occasions: birthdays, baby showers, you name it!
If you're not so much into baskets and sacks, but prefer totes as gift packaging, check out my other Christmas gift bag pattern, this one:

I cannot decide on which one I like more. So I've been making both. 🙂
Save It For Later:


And this was the base for the Santa bag. If you want an even easier and quicker way to make these Santa sacks, check out this Round Basket Pattern
WANT MORE FREE TUTORIALS AND GOODIES?
Get email updates and never miss out on new patterns, printables, and tutorials:
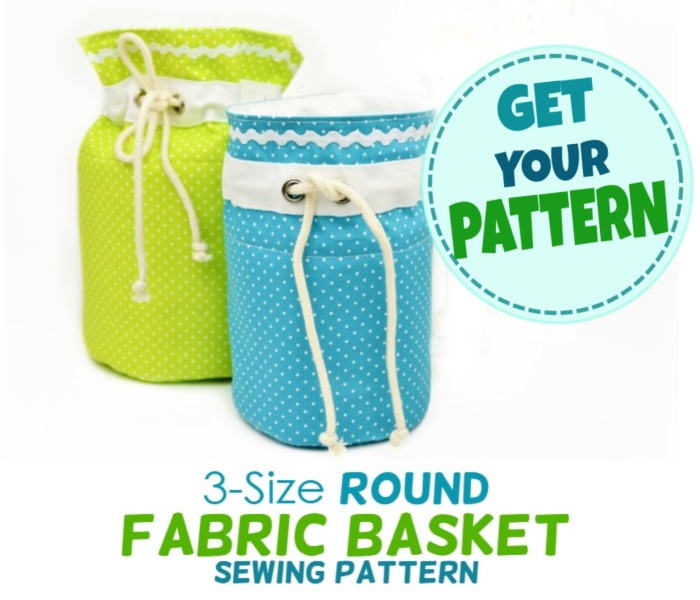
Or …check out this popular home storage pattern – the ROUND FABRIC BASKET - 3 sizes for all the rooms in your home!
This was the base for the Santa bag. If you want an even easier and quicker way to make these Santa sacks, check out this Round Basket Pattern


Christine
Your instructions are so readable & easy to follow. Thanks for the pattern. I have four grandchildren (6, 5, 4 & 3) that I can make this bag to carry their cars, tiny dolls, art supplies or I imagine the girls will use it as a purse.
barba707
Very cute pattern and as usual awesome instructions and illustrations! Thanks for sharing this!